Receiving Product
The purchasing module, specifically the receiving portion, is how all items will be brought in to inventory. There are two main methods of bringing product in, those items on a purchase order, and those items NOT on a purchase order. Regardless, for proper tracking of product, it is recommended that all product be introduced into the system.
OPTIONAL COUNTERPOINT SETTINGS
- In the PO receiving module, you have the option to run Automatic or Batch updates.
- Automatic updates will initiate the PO update routine every time you accept a PO for update, this means each PO is updated every time you finish receiving it
- Batch updates allow you to receive many purchase orders, and run a PO update once, updating any queued receiving’s since the last update.
PO RECEIVING WITH THE RF GUN (RECOMMENDED)
As long as barcodes are on all of the product, the recommended method of receiving product into inventory is via the RF gun. Even if there are no barcodes in the COUNTERPOINT system, the RF gun will allow you to add a barcode to an item when receiving
Getting Started:
- Log in to the RF gun.
- Select Option 3 from the RF menu.
- Once in the PO receiving menu, the program will list all of the outstanding Purchase orders on the system and will allow you to select one to be received.
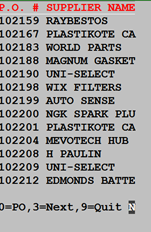
- To select a P.O. simply select one of the three options, 0=PO, 3=NEXT and 9= QUIT.
- When you use option 0 you will be prompted to enter the PO number. The P.O. number to be received does not have to be displayed on the screen to enter the P.O. number.
- CTLR followed by R will take you back to the main menu.
Scanning Items In
- The first question to be answered is if you wish to use “Autoscan” Y or N.. The use of “Autoscan” prompts you to scan each item and it defaults the received quantity to 1 unit for each scan and then goes back to the barcode field for the next scan. Alternatively if “Autoscan” is turned off N you will be prompted for a quantity each time you scan an item. You will have to accept each entry with CTRL followed by A.
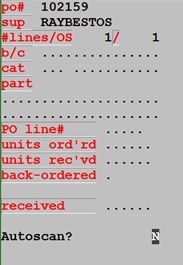
If you are using the “Autoscan” mode you can correct the quantity after the item is scanned by pressing Tab or CTRL I. After entering the new quantity press CTRL A at “Any change” to accept the entry
- You will then be placed in the barcode field. From here you can begin scanning items from the order
Pressing CTRL C at the barcode will place you in the part number field, in case an item’s barcode does not scan. Once you enter the part, the cursor will move to the Received field, where you can enter the quantity received.
- Once you have entered the quantity received and pressed CTRL A, the program will ask if you want to add a barcode for the item. Pressing Y will return you to the barcode field where you can enter in a new barcode for the item
- Once you are done scanning all items, Pressing CTRL A at the barcode will start the completion process where you will be asked if the editing is complete where the options are Y or N. If the editing is complete the next option is to print the edit list Y or N. If the edit list is printed. The next option is to flag the P.O. for update. When Y is used the PO will be flagged for update at your work station.
- You may continue scanning more PO’s or go to your workstation and perform the update process. Purchasing > 6. Purchase Order Receipt processing > 4. Purchase Order Update.
PO RECEIVING VIA THE MENU
When receiving large orders, or for orders where minimal changes are needed, it would be more expedient to receive the product via the COUNTERPOINT PO menu options.
Getting Started
- Log in to COUNTERPOINT with your regular “menu-based” login
- Navigate to Purchasing > 6. Purchase Order Receipts
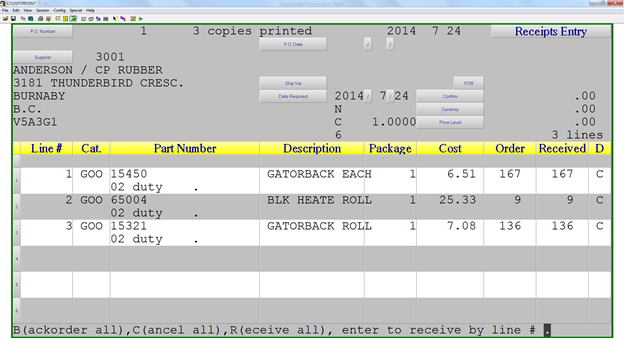
PO Receipts Input
The PO Receipts Input is an onscreen program that allows you to quickly accept large orders that have minimal changes or discrepancies. The program allows bulk receipts and the ability to add products to an order at the time of receiving.
- Enter the PO Receipts Input menu option
- Enter the Purchase Order number that you wish to receive
- Your first option is to make a bulk decision on what to do with all numbers on the PO
- B(ackorder All) – Will set the status of each item on the PO to Backordered.
- C(ancel All) – Will set the status of each item on the PO to Cancelled.
- R(eceive All) – Will set the status of each item on the PO to Received.
- enter to receive by line # - Will leave all items untouched and allow you to receive line by line.
- Once you have made an initial decision, you will be allowed to pick lines to alter, or begin updating the received quantity.
- Pressing Shift/F6 from this point will allow you to add a new item to the PO
- On each line, the D column defines the disposition of the item.
- C – Indicates that the item is Completed, and will update when you trigger the PO to update.
- K – Indicates to Keep the item on the PO and do NOT update it when you trigger the PO to update
- Once all lines have been properly received, Press CTRL/A until the OK to update prompt appears.
- A Y will initiate an update of the PO
- An N will NOT update the PO, and keep the PO open, allowing you to make changes later.
RUSH RECEIVING VIA THE MENU
Rush receiving is meant to handle the receipt of items NOT on a purchase order. This can range from drop ship, to special order items. The use of rush receiving allows you to quickly add items to inventory without the creation of a purchase order.
Getting Started
- Log in to COUNTERPOINT with your regular “menu-based” login
- Navigate to Purchasing > 6. Purchase Order Receipts > 5. Rush Receiving

Receiving Product
- The rush receiving program requires a PIN be entered, if you are unsure what your PIN is, contact AMS.
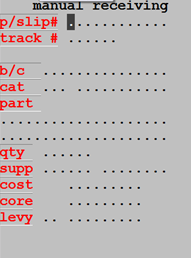
- You begin by entering a packing slip or invoice number that came with the product. Anything can be entered here.
- Next you will enter the Category, Part Number and quantity received. The Vendor field is optional
- For pricing, you can enter a Jobber price (with a discount to get your cost), or enter your cost. Then enter a core and/or levy if necessary.
- NOTE: If the supplier for this item (or the supplier you entered) is set to update the cost to inventory, and the item is a stocked item, then the cost of the item will be updated when finalizing the receipt
- If the item is non-stocked, you will be presented with a listing of any sales that may have been made on this item and an option to add the item to inventory.
- When electing to add the item, you will be brought to the product maintenance screen and any pertinent info from the receiving screen will be brought over.
- NOTE: If the item has recently been sold, and this is a receiving to cover that sale, be cautious about adding the item. If the item is on a completed invoice, the system has no way of knowing that this receiving is in regards to that invoice, and adding it to inventory will falsely up your quantity on hand.
RUSH RECEIVING VIA THE RF GUN
Getting Started:
- Log in to the RF gun.
- Select Option 10 from the RF menu.
- The RF rush receiving routine requires a PIN before starting the program. This is the same as used for physical adjustments, etc. If you cannot remember your code please call AMS support.
- The receiving scan begins by asking whether you wish to use Autoscan or Not. Selecting “Y” for Autoscan indicates that you will scan each item individually. Selecting “N” for Autoscan indicates that you will scan an item and manually enter in a quantity.
- After you choose Y or N the cursor will move to the Bar Code field.
Receiving Product
- Scanning product from the barcode field will receive the item on to the rush receipt transaction.
- All defaults for an item will be accepted, and you should not need to do anything else on any of the items
- Once all items are scanned CTRL/A will accept the receiving, and you will be presented with an option to print your journal.