Pricing Guide
Overview
This document outlines the files and processes involved in updating and applying pricing to items and/or customers in the COUNTERPOINT ERP system. We will discuss the very basic fundamentals of pricing (stocked vs. non-stocked) down to some very specific utilities that can add significant dollars to your bottom line. This document will also define the various places where parameters need to be set up, the behind-the-scenes updating of prices and some common issues that can occur in the pricing module.
Supporting Files/Information
BILLING PARAMETERS
- Within your billing parameters is where a number of things are set up that cover how your system handles pricing.
- To access the billing parameters, you want to take menu path System Utilities > 3. System Setup > 4. Sales Desk > 2. Parts Billing Parameters. From here, there are a few options:
- Price Levels - Screen 1 – Fields 14/15/16: When AMS receives a price file, we will only load Cost, Core and up to 3 other price levels (Jobber/Dealer/List). Fields 14-16 define where these prices would be assigned in your system.
- Alternate List – Screen 3 – Field 52. This allows you to use a price other than price level 1 to show as list in the invoicing program.
- Allow price reductions – Screen 4 – Field 39: Setting this to an “N” will stop the price update routines from allowing price reductions. DO NOT RECOMMEND SETTING THIS OPTION!!!
- Remove zero priced items
- Update price multiplier codes – Screen 4 – Field 14 (Auto Update Discount Levels): When set to Y, AMS price updates will also update stocking items to have the same Price Multiplier code as what the system finds. If the system does not see a match, it will update space to the items.
- Allow non-stocked items to autoselect a category – Screen 1 – Field 17 (Use Part Index): When set to Y, this will cause all items in an AMS price file to no longer need a category forced in when selling the item in the invoice screen. Please note: This will NOT add the item to inventory. Only create the convenience of not having to force a category code.
CATEGORY FILE
- Category maintenance can be accessed via menu path Inventory > 1. Data Maintenance > 1. Master Files > 1. Category Master
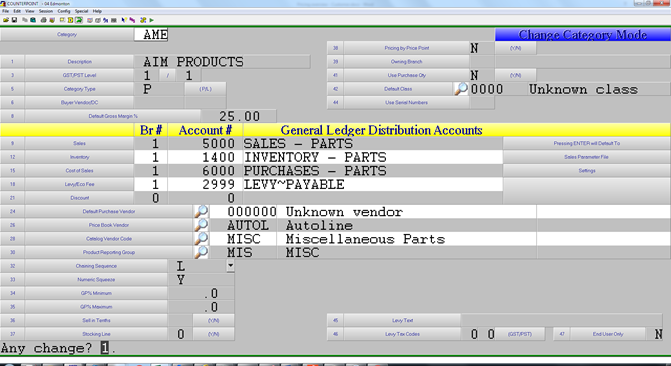
- In order for pricing to properly update, a category MUST have a pricebook vendor, and that pricebook vendor MUST be the same as what we provide in the header of the price input file.
- An incorrect or wrong pricebook vendor will result in no prices updating.
- Notify AMS if you notice any duplicate codes
- Always ensure the proper buying group code (UNI/AS/BBW prefixes)
- Additionally, you must ensure that the correct catalogue vendor code is assigned to the category in order for proper pricing to show online on either the autoecat or nexpart catalogues. Please Note Fields 20 & 22 for the vendor codes
- Field 32 also enables Price Point pricing, which will be covered later.
Pricing the Item
PRICE PARAMETERS
- Many price files will only contain 1 or 2 prices, so when a price update runs, we utilize ‘pricing parameters’ to determine what the rest of the price levels should be. These parameters are split into two types: Stocking Parameters and Non-Stocking Parameters
- Price parameters allow you to set the rest of the 1-6 price levels in COUNTERPOINT based on percentage increases or decreases from a base price given to you via price file update.
- Note the concept of percentage increases. Many assume 1X or 2X pricing where, in our world that would be +100% or +200%.
- Pricing parameters are the lowest and most general level of price definition within COUNTERPOINT. Before we can set up discounts, contracts, specials, etc. Pricing parameters MUST be set up. This defines what prices are assigned to an item.
- When AMS sends out pricing files, we assign each file a price parameter code. Sometimes these codes are pre-defined by the price file provider, sometimes there are requests to break files out into various different groupings for your use.
- When it comes to pricing parameters though, there are a few things to note:
- There are two types of pricing parameters, Stocked and Non-Stocked. This allows you to mark-up product that you have to bring in differently than that which is on your shelf.
- There is a ‘Default’ price parameter that we always look for in case of no price parameter existing. This is a blank or space price parameter code.
- Non-Stocked parameters are always provided in the files AMS sends out. These codes MUST exist, or the system will attempt to use the blank/default price parameter.
- Stocking price parameters are assigned at your discretion. We may send a file defining a price parameter level of “X”, but if your stocking item declares the pricing parameter code for that item is “Y”, the system will assign “Y” pricing to the item
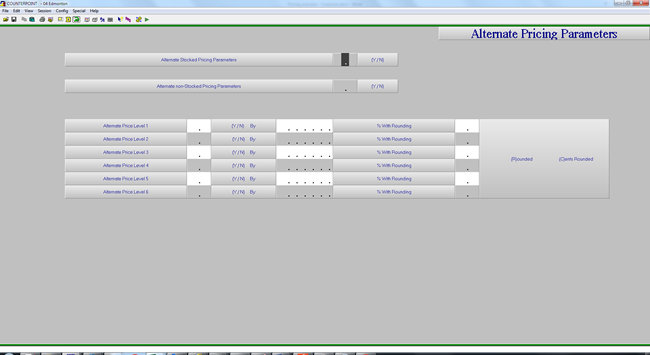
- While there are two files that are maintained, there is one main maintenance screen accessible in the COUNTERPOINT menu via Inventory > 4. Pricing > 1. Data Maintenance > 1.Price Multipliers
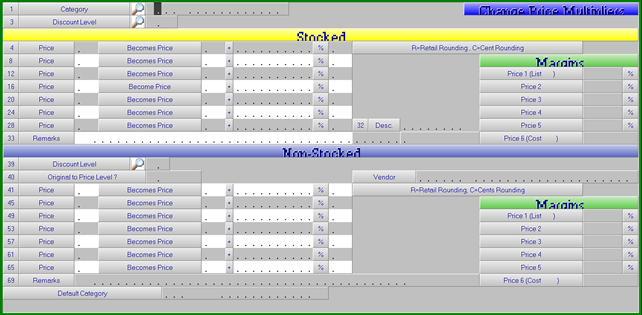
- However, you can also maintain JUST the non-stocked parameters via another program.
- Inventory > 4. Pricing > 1. Data Maintenance > 2. Non-Stocked Multipliers
- You can see in the image above, there are two sections: The top section is the stocking parameters and the lower is the non-stocking parameters.
- When setting up a price parameter, we always try to advise that you to set up a ‘blank’ or ‘space’ price level. This price level acts as a backup, or default parameter when the automated routines update price files.
- You then want to set your base price that you will work your parameters up/down from
- In the first line, ‘Becomes’ MUST be provided by us. For example, if you put Price 1 Becomes Price 6 in the first line, but all AMS delivers is List (Price 1), then the parameters will never work.
- Another thing to note is that, in some cases, your screen layout may be off and your cursor will look to be stuck in the yellow heading. If you notice this, please call AMS and have us rectify the issue. This can cause issues of you getting kicked out of the invoicing screen when billing a non-stocked number
- The field after the % sign is where you define ‘rounding’. This can either be (R) for Retail, or (C) to round up to the next penny. There is more info on Retail Rounding below
- You do not NEED to set up all of the prices, just the prices that you use in counterpoint.
- In the bottom section, the customer will usually just copy the parameters set in the top section, and they are even prompted to do so. However, they can manipulate it if they desire.
- If it is a very complicated category, where there are more non-stocked parameters than stocked, you may need to utilize the ‘Non-Stocked Parameter’ program.
- At the bottom of the pricing parameter screen, the default category MUST be properly set.
- An improper category here will result in bogus prices showing on the web, where the web is trying to price an item based on the parameters from the wrong category.
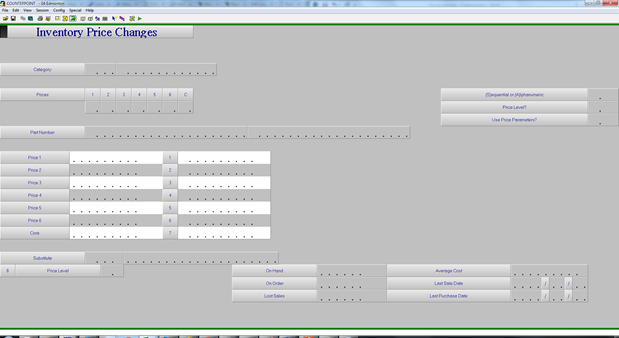
- Any parameters that are set up here must be additionally set up on the items in your inventory file as well via the Product Maintenance screen, available via menu path Inventory > 1. Data Maintenance > 1. Master Files > 1. Product Master. The screen looks like this:
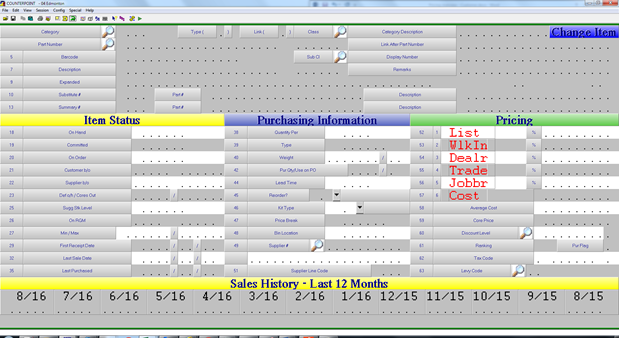
- The ‘Discount Level’ field is where you would place your pricing parameter code.
- Additionally, if you enter an asterisk (*) in the discount level field, all price updates will be blocked. This locks all current pricing (except cost)
RETAIL ROUNDING
- When setting up pricing parameters, you have the option to assign ‘Retail Rounding’. Retail rounding is the concept of rounding up to pre-set cent values, ie. .49/.99.
- To set up retail rounding, you want to take menu path Inventory > 4. Pricing > 1. Data Maintenance > 5. Retail Rounding Parameters
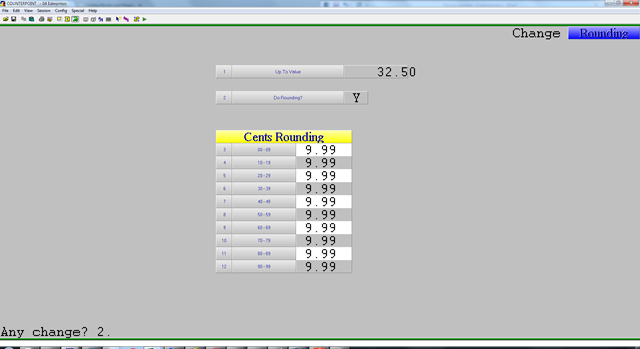
- Retail rounding parameters are ‘stacked’, you define constantly rising ‘up to values’.
- You then define what items will be rounded to, based on their original price.
- In this example, all items up to 32.50 (and also above the price of the last parameter) will be rounded to the next $9.99. So, an item that is 30.15 will become 39.99. 35.89? 39.99.
Pricing Updates
UPDATE INQUIRIES
- To check when a price update happened, or what a price changed from, you can look at the price update inquiry found in Inventory > 4. Pricing > 2. Inquiries > 2. Price Changes Inquiry
- Select the source (S)tocked or (P)Line, a category and a part number.
- You will be presented with all of the most recent price updates, the price parameters used and the price the item changed from.
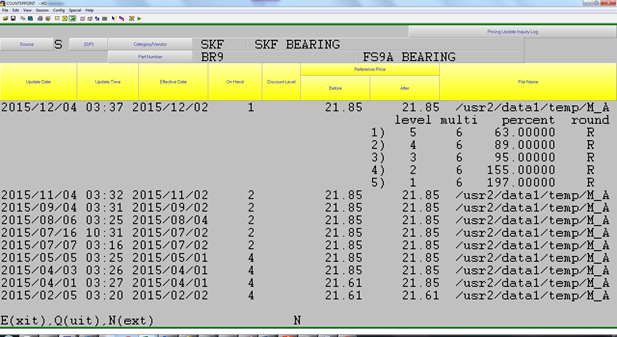
- To check a more summary version of when files updated, use Inventory > 4. Pricing > 2. Inquiries > 1. Price Update Log
AUTOMATIC UPDATES
- Each time AMS receives an update file, we are given an effective date for said pricing file. This file is sent out to customers with enough time to automatically update on the customer’s site on its effective date.
- All automatic price updates run at 3am on the effective date
- You can optionally also update pricing multiplier codes when running price updates by going to System Utilities > 3. System Setup > 4. Sales Desk > 2. Parts Billing Parameters., selecting Screen 4. Field 14 should read ‘Auto update Discount Levels’
- Setting this to “Y” will mean that, any AMS price update that is run will update all stocking items with the price multiplier level assigned to the file that is updating.
MANUAL UPDATES
- In cases where users decide against automatic updates, or when a user would like to re-update a file, the manual price update routine is available.
- To access the manual update routine, you would take menu path Inventory > 4. Pricing > 4. Update by Manufacturer
- This will present you with a screen listing all currently available updates on your system (Files are purged every 90 days).
- You can scroll through this list with the (N) key, or select a vendor with the (V) key. Once selecting a file, a small pre-processing routine runs to ensure validity of the file. As all files are checked before release, and emails sent to us in any cases where files ‘slip through’, there should be no issues and you only need to press F1 to pass through this screen
- Finally, you are presented with the price update screen:

- If the file has been updated, it will notify you. Simply pressing enter will pass by the message.
- The options of the manual update are, in order:
- Update stocking inventory - This allows you to choose whether to update your stocking items or not. Input is a Y/N option.
- Select Categories to Update - The categories listed here are the categories in your system with a matching vendor code in
ONLINE PRICE CHANGES
- If you have lines where AMS does not provide pricing, you have 3 options to update the prices manually.
- The online price change menu is found at Inventory > 4. Pricing > 5. Online Price Changes
- Within this menu, you have multiple options of how to manipulate your pricing
- By Category By Part: Scroll through the category part by part, changing the prices on each part individually
- By Category By %age. Utilizing percentages, similar to pricing parameters, change all or some of the parts within a category.
- All Categories – By %age. This option will update ALL parts in your inventory, utilizing percentage based changes much like the pricing parameters. THIS UPDATE IS NOT REVERSIBLE. ALWAYS BE SURE BEFORE RUNNING THIS OPTION!
By Category By Part
- Lets you select a category, the price levels you wish to manipulate, the sequence in which to scroll through the category, whether to update the price level (Y/N), and whether to use price parameters when updating prices.
- You then scroll through each item simply entering in the new price, if you select to use price parameters, all other prices are updated.
By Category By %age

- Looks much like the pricing parameter screen. Let you update pricing in a category by percentages.
- Select category, price multiplier level you wish to update (optionally), whether to update only blank prices, and whether to ignore any locked items.
- Prices are updated by price level. You select an increase/decrease for each price 1-6.
- Enter in the percentages you wish to update based on. These percentages are based on the pricing currently in the system.
Discounts For Point-Of-Sale
One thing to note in this section is that, discounts take president based on their specificity. So, the hierarchy for what discount will take effect (from highest precedent to lowest) is:
- Special (If Price is lower than calculated)
- Contract (If billing parameter is set. More in the contracts/specials section)
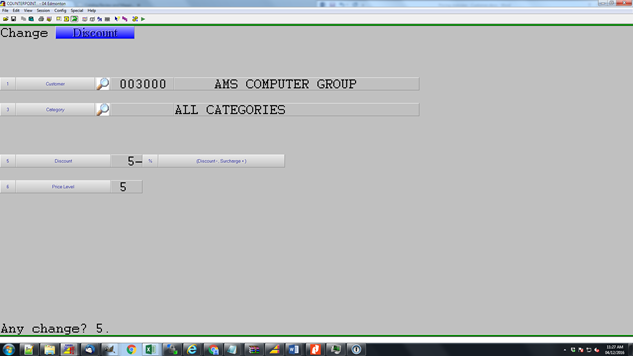
- Customer Discount By Category
- Industry Discount By Category
- Customer Discount (All Categories)
- Industry Discount (All Categories)
- List Price (Or alternate list price, if set in billing parameters as described in ‘Billing Parameters’ section)
Separate to all of those though, is Price Point Pricing, which is applied BEFORE any customer specific discounts or specials are applied.
INDUSTRY DISCOUNTS
- Customer discounts are discounts up/down from one of the 6 counterpoint prices that are applied to items based on a category and an industry group, which can be a grouping of many customers.
- To set up an industry discount, you take menu path: 4. Sales Desk > 8. Administration > 2. Customer Pricing > 2. Discount By Group
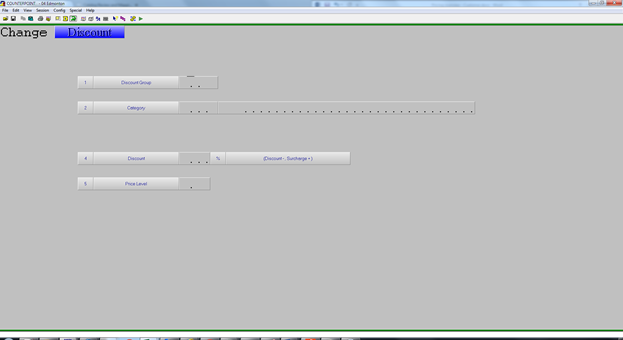
- You will need to create a group code, pick a category (or all categories), a discount or surcharge and then a price level (1-6) to base that discount/surcharge off of.
- Once the discount is set, all customers who apply to this new ‘Industry’ need to have this code assigned to them in the Customer master maintenance – Accounts Receivable > 1. Data Maintenance > 1. Customers
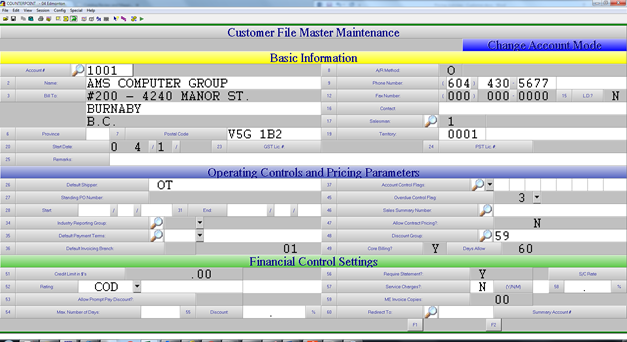
- Opt to change the customers you want, and add the new discount group code in to the ‘Discount Group’
CUSTOMER DISCOUNTS
- Customer discounts are discounts up/down from one of the 6 counterpoint prices that are applied to specific customers and categories, or a customer and all categories.
- To set up an industry discount, you take menu path: 4. Sales Desk > 8. Administration > 2. Customer Pricing > 2. Discount By Customer
- You will need to pick a customer to assign the discount to, pick a category (or all categories), a discount or surcharge and then a price level (1-6) to base that discount/surcharge off of.
CONTRACTS / SPECIALS
- Contracts & Specials are, essentially, the same thing. The difference only being who the pricing is assigned to. If the contract is assigned to a specific customer, or group of customers, it is deemed a ‘Contract’. If it is assigned to all customers, it is deemed a ‘Special’
- Contracts/Specials are accessed via the menu path Sales Desk > 8. Administration > 2. Customer Pricing > 3. Contract/Specials
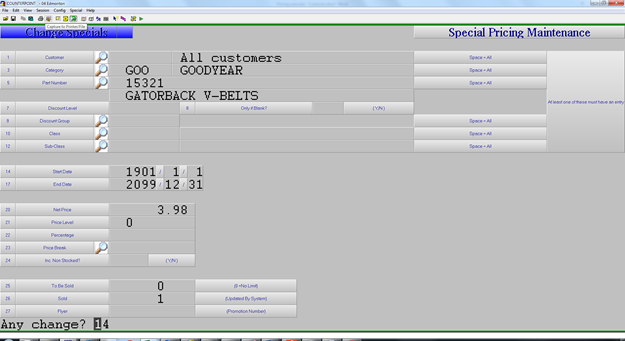
- Contracts / Specials can be set up for:
- Single customer or all customers
- Singe category or all categories
- Single part or all parts
- Single Discount Level (Price parameter level) or all price parameter levels
- Only blank? Works in conjunction with the Discount level field to determine if you meant “All Discount Levels” or just meant to apply it to blank or ‘space’ discount levels.
- Single Discount Group (Industry Type) or all discount groups
- Single Class or all classes
- Single Subclass or all subclasses
- From there you select a start and end date for the contract/special and how you would like it priced.
- When pricing, special pricing can be set up one of these ways:
- A single net price. For example, the part will be sold at $9.99
- A discount/surcharge on a price level. For example, the part will be sold at price 5 -10%
- Based on a quantity price break code (more on price breaks below)
- Finally, you can elect to apply the contract/special to stocked AND non-stocked items.
PRICE POINT (VELOCITY) PRICING
- Another option to adjust selling prices is to apply Price Point Pricing. Price Point Pricing allows you to adjust the multipliers for an item based on its selling price.
- You can access the price point pricing maintenance screen via the menu path Inventory > 4. Pricing > 1. Data Maintenance > 3. Price Point Multipliers
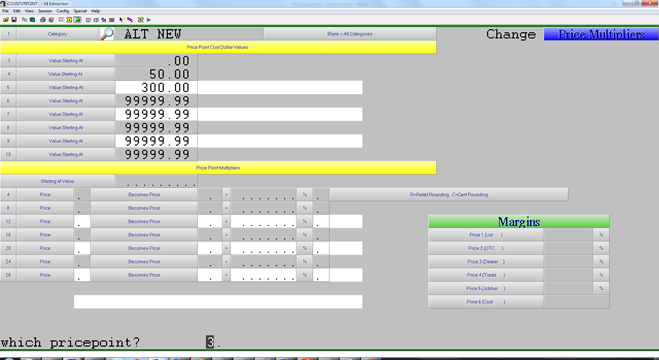
- PLEASE NOTE: Before you can add price multipliers for a category, you must access the category master maintenance and set the price point pricing flag to “Y”. This is covered in the ‘CATEGORY FILE’ section of this document.
- In this example, for all items in the ALT category, there is a multiplier that applies for all items starting at $0.00, a multiplier that applies for all items starting at $50.00 and a multiplier that applies for all items starting at $300.00.
- When starting out, you first define the start price for which you want the multipliers to apply.
- Then, in the bottom section of the screen, you fill in the multipliers you want to apply for the items falling in to that range.
- These multipliers are applied BEFORE any customer discounts are applied.
- Retail rounding can also be applied to these multipliers.
- Also, you do NOT need to fill in all price levels. If you only wish to adjust specific price levels, ie Price level 1 & 3, only fill in multipliers for price levels 1 & 3.
QUANTITY PRICE BREAKS
- Quantity price breaks allow you to apply discounts to items based on how many of an item are sold. For example, if a customer buys 4 of an item, they get 10% off. If they buy 10, they get 15% off.
- Once a price break is set up for selling, they are activated by creating a special for an item, and using the newly created price break as a means to price the item.
- The quantity price break maintenance is accessed via menu path Sales Desk > 8. Administration > 2. Customer Pricing >7. Quantity Price Breaks
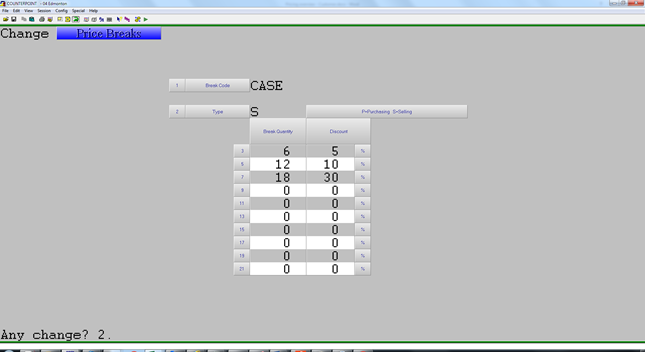
- When setting up a price break, the first thing you do is assign it a code.
- ‘S’ type breaks are for Selling, ‘P’ type breaks are meant for purchasing.
- From there, you pick the quantities and the discount the customer will get when buying that quantity.
- You would then create a special for the items you want to be on special in order for them to sell at that price. See the ‘Contracts/Specials’ section for more info.
- When a price break is set up, counter staff will be notified when selling applicable items with a message of “Next Break At ___”. This notifies them that the customer could get a discount if they buy X amount of the items.
- Also, on autoecat, customers will be notified of these price breaks with a message indicating “Buy X Save Y%”
Utilities
RESET MULTIPLIERS BY %
- Resetting the multipliers by a percentage allows you to update ALL price multipliers based on a percentage of what they currently are.
- This option is irreversible, so please ensure you are positive you want to do it.
- To access the reset multipliers by %age menu option, take menu path Inventory > 4. Pricing > 1. Data Maintenance > 4. Reset Multipliers By %
- The screen allows you to choose stocked, non-stocked or both types of multipliers.
- Then you simply put in the percentages you would like to go up or down from your current multipliers, for which ever price levels you wish to change. You do NOT need to put in all price levels.
UPDATE MULTIPLIERS
- This option lets you manually apply multipliers to a given category without running a price file.
- To access this option, take menu path Inventory > 4. Pricing > 1. Data Maintenance > 8. Update Multipliers

- To run the program, select a category (Or all categories, which is NOT recommended) and elect which prices you would like to run price multipliers on.
- The multipliers will run on CURRENT pricing in your inventory file.
DELETE PRICEBOOK VENDOR
- In some cases, you may want to remove old non-stocked pricing from your system. To do this, you can delete an old pricebook vendor
- Inventory > 4. Pricing > 1. Data Maintenance > 6. Delete Pricebook Vendor.
- The program only asks for a vendor code. This would be the pricebook vendor code found on your category.
Troubleshooting
COMMON PROBLEMS
- Prices Not Updating
- Check that the price book vendor on the category file is correct.
- Catalogue prices are wrong
- Check that the catalogue vendor on the category is correct.
- Unable to create price point pricing.
- Check that the price point pricing field is activated on the category record.
- Need to re-update a price file.
- Try the manual price update routine. Failing that, call AMS
- Want to map price multiplier codes to match a buying group.
- Update the ‘Auto update price levels’ option described in the ‘BILLING PARAMETERS’ section to a ‘Y’ (if it is not already)
- Manually run a the price update using the manual price update routine described in this document
- Update the ‘Auto update price levels’ option described in the ‘BILLING PARAMETERS’ section to a ‘N’ (if you don’t want this feature for ALL lines.)