Item maintenance can be accessed via menu path Inventory > 1. Data Maintenance > 1. Master Files > 1. Product Master
In Order, the field definitions on this screen are:
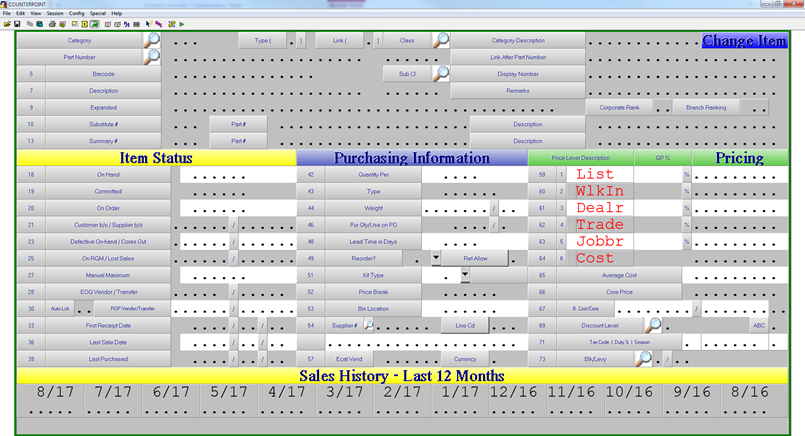
Category: Category under which this item is placed
Part Number: The item’s part number
Barcode: The main barcode associated with this part number. More on additional barcodes will come later.
Description: This is the base description for the item. This description shows on the invoice and any associated reports. One note regarding this field – Combinations of double quotes and commas within a field can cause a .csv extract to believe the field to contain a delimiter and, as such, cause incorrect parsing when imported into excel.
Expanded: This is an additional 40 characters used to describe the part, but is only ever shown on the invoice billing screen
Substitute #: This item will be shown as a substitute in the billing screen whenever the item is keyed into an invoice. Substitutes operate in a chain, in that the system will keep checking the substitute of substitutes until it reaches the end of the chain, or it loops.
Summary #: If present, all sales of the selected item will be posted to the substitute number. Good for instances of feet vs rolls, etc. Also used in scenarios of Feet vs. Rolls. In the Ft v Rolls scenario, this summary number can be used as a number to order from. For instance, if you have an item where you can break the pack to sell smaller units, like a roll (Part 123), you can set up a number broken pack item (Part 123FT), and have the broken pack item replenish itself from the summary number.
Type: This indicates whether the item is a (P)art, or (L)abour.
Link: This indicates what sequence the parts within this category are ordered.
Class: A high level part classification that can be used to classify your parts for specials creation
Sub-Class: A more granular part classification that can be used to classify your parts for specials creation
On Hand: The number of items the system thinks you have on hand.
Committed: Optionally, the number of items you have committed to stock transfers.
On Order: The number of items you currently have on order from a supplier.
Customer b/o: The number of items you currently have on back order invoices for customers
Supplier b/o: The number of items currently on back order from a supplier
Def o/h / Cores Out: The number of defective items you have on hand, and the number of outstanding cores still out.
On RGM / Lost Sales: Counts for both the amount of this item on an RGM, and the number of lost sales logged against this item
Manual Maximum: The Max level set to be optionally used when creating suggested orders that may contain this number.
EOQ Vendor / Transfer: The Estimated Order Quantity for both direct (Vendor) and DC based (Transfer) purchases, calculated based on a preset number of turns.
Auto Lock: Lock the order points on this item
ROP Vendor / Transfer: The ReOrder Points for this item, when calculating based on sales, safety stock and lead time, both from the supplier (Vendor) or a DC (Transfer). In cases where purchasing does not utilize the auto calculate / turns procedures, the ROP Vendor acts as your Min value.
First Receipt Date: The date of the first receipt of this item. Replaces date added, as some users will simply add all items as inventory items, so the date added becomes irrelevant.
Last Sale Date: Date of the last sale of this item.
Last Purchased: Last date that this item was put on order on a PO
Quantity Per: This is the quantity by which this item is priced. When selling an item, the selling price will be divided by this quantity to determine the unit selling price.
Type: This is a freeform text field, used in conjunction with the Pur Qty field to present the part in such a way that it reads properly on a printed PO. Examples are BOX (1 BOX of X), ROLL (1 ROLL of X), CASE (1 CASE of X), etc.
Weight: The weight of the item.
Pur Qty / Use on PO: Pur Qty is the quantity in which this item must be ordered. Any time an order is created, this item will be ordered in multiples of this number. The Use on PO field determines whether the actual order quantity sent to the supplier is divided by the Pur Qty. For example, if a supplier will only sell an item in boxes of 25, which they see as a single unit, but you see as 25 single items, you would set the Pur Qty to 25 and the Use on PO to Y. This would cause the system to order only 1 unit but, upon receipt, would put 25 into stock. Another scenario may be where a supplier requires you purchase an item in multiples of 6. You still need to order 6, but you must always order in multiples of 6. In this scenario, you would set the Pur Qty to 6 and the Use On PO to N. This will cause the item to only be ordered in multiples of 6.
Lead time in days: Parameter to be used when calculating ROP for this item when using the modified purchasing model.
Reorder: Reorder can be set to 1 of 4 things:
N: Do not reorder
Y: Reorder
S: Summary: Reorder this number (using the Pur Qty) from the Summary number (Field 13). This causes 1 unit of Field 13 to be taken out of inventory, and the number of units in Pur Qty to be added to this item.
K: Kit: Replenish one of this item and reduce inventory, optionally (see next field), on the items that make up this kit. See below for more info
Ret Allow: This field defaults to Y, but allows you to disallow returns on an item.
Kit Type: This field can have one of two options
M: Manufactured Kit – This is a kit that is deemed to be an inventoried item. This means that you would receive this item into stock, and at that time the components that make up the kit have their inventory depleted as determined by the kit. Components of an M type kit cannot be substituted. Also, as it is an inventoried item, sales of a M kit are attributed to the kit itself.
C: Counter Kit – This is a kit that does not have actual inventory, but is put together at the time of sale (ie. Oil Change Special Kit). Items can be substituted with this type of kit as well. At the time of sale of this item, the clerk can determine which components are making up this kit, and the sales of these items are attributed to their components.
Price Break: A sales quantity price break that is to be applied to this item. For example: Buy 6, save 15%. More on this is available in the pricing manual handout.
Bin Location: Bin in which this item is located if utilizing bins.
Supplier #: Internal supplier code for this number. This is used when creating orders by supplier number, and must be set if creating orders in that fashion.
Line Cd: The warehouse line code for the item. This is the code that will be submitted to the warehouse when sending order for this item. If it is blank, it will use the default which is set in the warehousing menu, under Jobber to A/S line code
Ecat Vend: Override the ecat vendor which this item should be associated with
Currency: The currency code associated with this number
Price Levels 1-6: The first level of pricing of an item is the base price levels 1-6 listed on the item itself. These are the prices that are calculated based off of the configured pricing parameters and the pricing provided by AMS, or manually entered.
Average Cost: The average cost of an item based on the number of units received and the cost at which they were received.
Core Price: The selling price of the core of this item.
Cost / Core: The base cost of the item prior to any upcharges put in via pricing parameters. Also, the core cost of the item.
Discount Level: The pricing parameter that is to be used when calculating prices of the item. More on this in the pricebook manual
ABC: Ranking of the item
Tax Code | Duty % | Season: The Tax level to be charged on the item (Tax codes are defined in the Billing parameters maintenance, but 1 is the default, 0 would charge no tax). Season code is used for seasonal purchasing and can be calculated.
Levy: Eco fee code associated with the item.
ADD/CHANGE/DELETE ITEM
In the product master is where you would add an item. The most important things to determine when adding an item. Initial item setup really only requires the part number be added, but it is always suggested that you determine the proper price discount, base price, qty per, purchase quantity and order points. This will allow you to, at a minimum, properly purchase and sell the item going forward.
Change & Delete options are also available. You must note whether an item in on hand, or on order before deleting it from the system.
BARCODES
While there is a base barcode on the item itself, many times the barcode may not be available at the time of adding the item to inventory. If this is the case, a default AMS generated barcode will be created and associated with the part. In these scenarios, additional barcodes can be tied to the part via the Inventory > 1. Data Maintenance > 1. Master Files > 5. Alt Barcode screen.
This screen will allow you to select a part number and then attach a new barcode to it. You may also select a quantity for the barcode to allow for box, case, pallet, etc barcodes that can be used when receiving or purchasing the part.