Multiple Bin Locations
Overview
There is now the option for setting up alternate bin locations for each item. Before proceeding, make sure that the flag to allow multiple bin locations (field # 45) has been set to [y] in System Utilities > System Setup > Sales Desk > parts billing parameters > Screen 2.
Another parameter change is required to have the bin location sold from selected on the invoice screen, Screen 5 > Select Bin Location in Invoice (field # 31) needs to be set to Y
Process
Bin Location Maintenance
This option is used to set up, view a specific location or view all locations for a specified product. Deleting an alternate bin location is also available from this menu. This option is found in the menu inventory > Data Mantenance > Master Files > Bin Location Maintenance.
Bin Location maintenance can also be performed when in the Product Master maintenance by selecting “B(ins)”.
The Bin Type “R”, Retail, is used to identify product in the retail space of the store. Nightly reporting is available to indicate which retail products currently have zero available and need to be replenished from other locations.
The retail bin location can only be the primary location if it is the only location for the product and POS transactions will update the on hand in the Retail location.
Receiving and Stock Transfers will update the quantity on hand in the primary location which is the location shown on screen in Product Maintenance and Inquiry.
Any product with multiple bin locations and the Retail location that has a negative on hand quantity will have the Retail location adjusted up to zero and the primary adjusted down by the same quantity nightly.
Stock Relocation Adjustment
inventory > Data Maintenance > Inventory Adjustments > Stock Relocation Adjustment
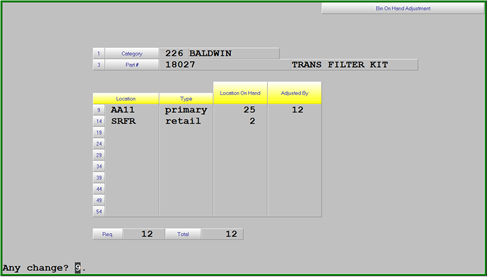
Use this option to adjust the on-hand quantities for each alternate bin location. Enter the category and part number. All of the locations will be displayed. At the any change prompt, press enter to get to the quantity to adjusted by field. Enter the quantity (followed by a minus sign) that is to be moved to other locations. Then distribute that amount to the alternatives. The total field at the bottom must be 0 in order to [f1] accept the entry. Pressing enter after the accept will allow you to continue with further adjustments and “N” will exit to the menu.
this would be the preferred method for adjusting bin location quantities.
Stock Relocation Report
This will report all Retail Locations that have and On Hand Quantity of 0 or less which is to be used to replenish these locations. This report will be run automatically each night.
On Dock Purchase Orders
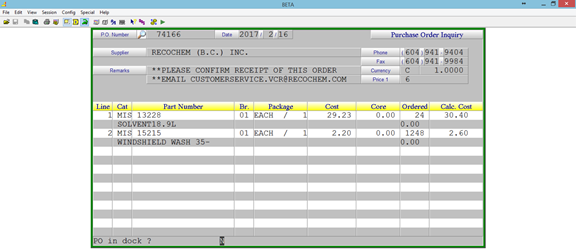
To flag a purchase order as On Dock use Purchasing > Purchase Order Receipts > On Dock Assignment. Enter the PO Number then confirm it is the correct PO, the first page of lines on the PO will be displayed and answer “Y” to create the Dock locations for this PO.
The Dock locations are automatically removed when the PO Receipts Update is completed for the PO.
P.O. Receipts Relocation Listing
Multiple bin location items are automatically received to the primary bin location as listed on the PRODUCT master maintenance screen. This report provides the information necessary for the user to relocate the quantity received to different locations.
This report is Purchasing > Purchase Order Receipts > P.O. Rec. Relocation Listing
P.O. Receipts Relocation Adjustment
Similar to the Stock relocation adjustment, the user is able to move the recently received quantity from the primary (default) location to multiple locations.
P.O. Receipts Relocation Update
The adjustments made in the above step will be updated.
Alternatively, the adjustments can be made using the Stock Relocation Adjustment described earlier in this document.
Inventory Adjustments
When entering Inventory Adjustments, inventory > Data Mantenance > Inventory Adjustments > Stock Adjustments, if a part is assigned to multiple bin locations you will need to enter the quantities adjusted by bin location when completing the adjustment
The default is to adjust the primary bin but you can change the quantities however the adjusted quantity for the bin locations must equal the total adjustment quantity.
This is the same procedures as used in the Stock Relocation Adjustment
Bin Location Lookup in Invoicing
Products with Multiple Bin Locations that have an on hand quantity will be identified on the invoice screen with a comment of “*MANY*” and products that have zero on hand but are included in an On Dock PO will have a comment of “*DOCK*”.
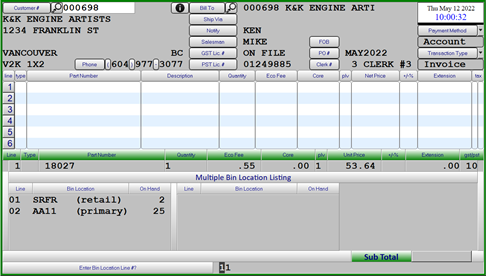
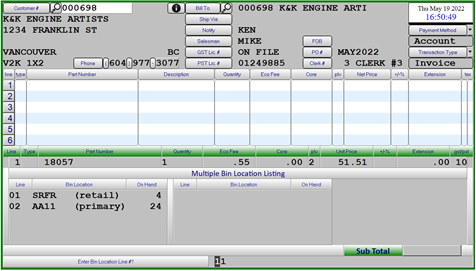
To check the available quantities for multiple bin locations within the invoicing screen press Shift F8 from the line Type field and you will be prompted for a line number to search. The bin location quantities for the selected part will be displayed in the Information Window. The sale of a product will always reduce the on hand quantity for the Retail bin location if one exists and if no retail location exists the Primary location will be adjusted.
All bin locations will be included on the printed invoice.
If the Select Bin Location in Invoice option is on and the part being sold is assigned to Multiple Bin Locations the locations with available inventory to fulfill the sale will be displayed on screen
Bin Location Selection in Invoicing - Optional
New feature when using Multiple Bin Locations and wanting to force the users to select the Bin Location that the product is going to be picked from in order to keep the on-hand quantities for each bin location accurate.
Billing Parameters
New option added to screen 5 of the Billing Parameters “Select Bin Loc. In Invoice” would need to be set to “Y
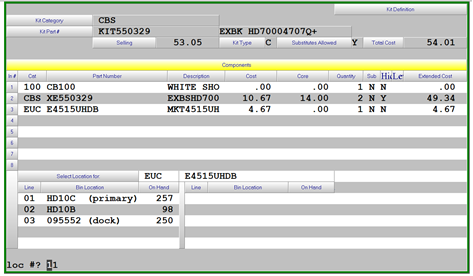
For Counter Kits where product is kept in multiple Bin Locations the parameter “18. Kit Detail Display” on screen 3 would also need to be set to Y
Invoicing
In the invoice screen the user will be prompted to select the bin location the product will be picked from after the quantity is entered. Bin locations are displayed in descending order based on quantity on hand. Dock locations are shown at the end of the list and cannot be selected, these are information only. A line number MUST be chosen.
Only the Bin Location chosen will be printed on the invoice and the overall inventory of the part will be reduced and the quantity available in the chosen Bin Location.
Exceptions where this screen will not be displayed
If a part is only assigned to a single bin location
If the quantity sold is greater than the quantity available is any single bin location
When selling a “C”ounter Kit the Kit components will be displayed on screen and if any of the components are located in multiple bin locations you will be prompted to select the Bin Location those parts will be pulled from. The components and the chosen Bin Locations will be printed on the invoice.
Invoice Print
The invoice print will only show the bin location selected for a part.
Exceptions
- No one bin location had enough quantity to fulfil the order and all locations will be printed.
- Invoices created from backorder fulfilment will show the primary bin location
- Web orders will show the primary bin location.
- Automatic Transfers will show the primary bin location
Inventory Update
The on-hand quantity will be updated for the selected bin location.
The on-hand quantity will be updated for the Primary bin location when:
- No one bin location had sufficient quantity on hand
- Invoices created for backorder fulfillment
- Web Orders
- Automatic Transfers

