Inventory Counts
OPTIONAL COUNTERPOINT SETTINGS
- While there are many settings available within the Inventory Count Parameter screen, the following are those which allow you to tailor your count.
- Count variance threshold: This setting allows you to define a variance at which to be notified when doing counts. For example, a threshold of 10 will mean that any time a count is out by more than 10, the gun will prompt you with a beep, indicating that the variance is out by more than 10. The purpose is to try to help avoid any incorrect scans or keying errors.
-
Update Type (A/V): This setting is specific to worksheet based updates and indicates what type of update you wish to run on the inventory.
- An [A] type indicates updating an “Actual” value meaning that, when the update is run, it will update the onhand with the value entered on the worksheet. For example, if you entered an onhand of 5, your current onhand will be updated to 5, regardless of sales.
- A [V] type indicates a “Variance” update meaning that, when the update is run, it will update the onhand based on the difference of what you counted to what the system thought you had at the time the worksheet was printed. For example, if the sheet said you had 4 but you counted 5, the count update routine will simply add 1 to your current onhand.
- Ignore Zero On-Hand on Count Sheets: This option allows you to ignore any items that the system sees having a zero on-hand value.
- Ignore Reorder Allowed: This option allows you to not print “N” reorder items on worksheets.
COUNTING WITH THE RF GUN (RECOMMENDED)
Counting with the RF gun is the recommended method of updating inventory counts. This method allows for consistent, real-time updating of inventory quantities without the hassle of printed count sheets and manual entry of quantities. This allows you to count lines in chunks, without worrying about messing up counts on update.
Getting Started:
- Log in to the RF gun.
- Select Option 9 from the RF menu.
- The RF count routine requires a PIN before starting the program. This is the same as used for physical adjustments, etc. If you cannot remember your code please call AMS support.
- The count scan begins by asking whether you wish to use Autoscan or Not. Selecting “Y” for Autoscan indicates that you will scan each item individually. Selecting “N” for Autoscan indicates that you will scan an item and manually enter in a quantity.
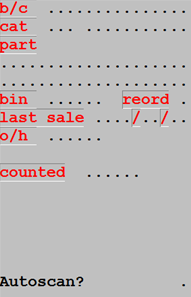
- After you choose Y or N the cursor will move to the Bar Code field.
Scanning Product
These are the options from the Bar Code field
- Start scanning product
If you are in AUTOSCAN mode pressing the ENTER key will perform the same as a second or subsequent scan.(Add 1 to the Qty)
- CTL/r to change the Autoscan setting. A second CTL/r will leave the program
- CTL/t to view the last item scanned by the User ID (RF0 through RF5)
- CTL/c to enter a part number that cannot be scanned
- TAB (CTL/i) to manually enter the QTY when in Autoscan mode.
Error Messages & Notices/Prompts
- Record in Use - (Another user scanning same Part Number)
- Over Variance
- Y=Update Inventory as Counted
- N=DO NOT Update
- C= DO NOT update the count, BUT, keep the count in storage, assuming you will find more of the item elsewhere.
- CAUTION: No is the Default if only Enter is pressed)
- Scan Failed – To continue Input Y and Press Enter.
- When you see a number of these for a line, contact AMS so that we may contact the supplier to obtain a barcode file to update your system.
- Recent Scans screen – A secondary screen may pop up for items that the system sees that you have already scanned. You have two options here:
- (R)epl – Replace the last scan with the current quantity, and start over.
- (A)dd – Add the current quantity scanned to the previous count
Variance Report;
The variance report allows you to view or print how any user is progressing
- select the report by taking the following menu path from any workstation
-
Inventory / 6. RF Count Reporting / 6. Update RF Count Detail / 1. Update RF Count Detail
- Enter your PIN
- Enter the Login ID you wish to report on. Pressing Enter will select ALL.
- Press Enter at the Update option to Not update the permanent count history data.
- Select the type of report you want; A=All items scanned OR V=Variances only.
- The Report will display on the screen.
-
Inventory / 6. RF Count Reporting / 6. Update RF Count Detail / 1. Update RF Count Detail
Update Count History
Updating the count history tells the system that you have completed counting all of the items you planned on counting at this time. Failure to update the count history will mean that, when you scan any of the items you have counted, you will be prompted with the “Recent Scans” screen popping up constantly.
- Select the same program as for Variance reporting
- Select ALL user ID’s by pressing Enter
- Input U and press Enter
- Select the type of report you want; A=All items scanned OR V=Variances only.
- Accept the options selected at the “Any change?” prompt.
COUNTING WITH WORKSHEETS
Getting Started
- Log in to COUNTERPOINT with your regular “menu-based” login
- Navigate to Inventory > 6. Physical Inventory
Creating Count Files
There are several different methods for creating Count Files.
Count File Create ‑ All Categories
This program creates a Single count file of the entire inventory in the system at the current time. It creates a work file that allows the user to create and print Count Sheets and adjust the On‑hand counts. It does noT adjust the On‑hand quantities in the Product Master File until the Update is run.
To Create a Count File for the entire inventory select [2] from the Physical Inventory Menu and the program will create the count file. Upon completion the screen will display:
records extracted = 999999
press ENTER to continue
When printing count sheets, an entry is added to the CARDEX, labelled “Physical Count Reset” this is NOT an adjustment of inventory, but a reporting of how many items were on hand at the time the sheet was printed.
Create and Print the Physical Count Worksheets
Once you have created the count file, select Physical Count Worksheets.
- CATEGORY?
Simply press [ENTER] if you have created the count files with Count File Create ‑ All Categories using menu option [2]. It is not necessary to enter a category here.
-OR-
If you are re‑printing a specific category that had been created with Multi‑Category Count File Create (menu option 4) type that category code and press [ENTER]. When complete, move to the next step of printing the count sheets.
Multi‑Category Count File/Worksheet
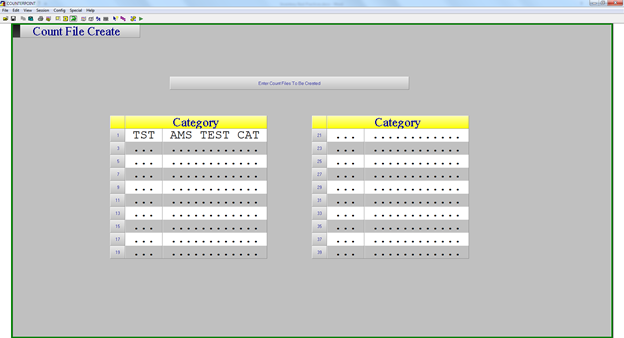
This program creates individual work files for each category designated. This program is designed for those users who do cyclical counts or are "just checking" particular lines. It automatically creates the Physical Count Work Sheet print file.
When printing count sheets, an entry is added to the CARDEX, labelled “Physical Count Reset” this is NOT an adjustment of inventory, but a reporting of how many items were on hand at the time the sheet was printed.
To create and print individual work files, select option 4 from the Physical Inventory Menu and the following screen will display:
-
CATEGORY
- Enter the category code you wish to count and press [ENTER]. Enter another category code if required. You may continue to enter up to 20 codes for each Product Line (category) to be counted.
- When all required categories have been entered [f1] to accept, and then [F1] again at the any change prompt.
- The program will create the temporary count files and then create and print worksheets for those specific categories selected.
- Upon completion of all categories entered, pressing [ENTER] will prompt the worksheets to print.
-
NOTE: Work file CAT.TMP already exists - Do you wish to EXIT from this program?
- If this message displays, type [N] and [ENTER]. This is an advisory message that there is a temporary count file created already.
Physical Count Input
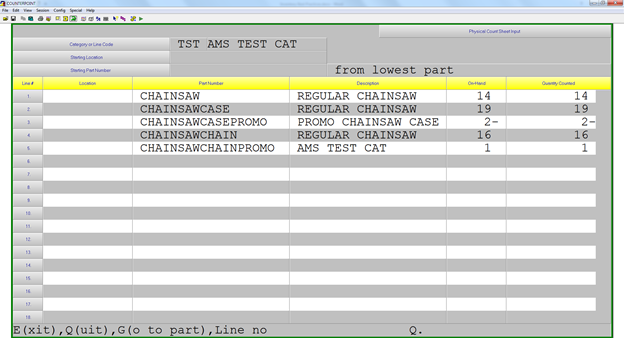
This program is used to enter the adjusted counts to inventory. It does not immediately adjust the Product Master file but allows the user to print an Edit List to check for input errors before Updating.
If the All Category Count file create menu option was used, reply [y] to the All categories work file question, otherwise answer [N].
- CATEGORY
- enter the specific category code or [enter] to start the input from the beginning of the count file
- STARTING LOCATION
- Enter the Bin Location for the first product on the count sheet, if there are no bin locations being used, press [ENTER], or to start the input with the first part number for the Count File, press [F7].
- STARTING PART NUMBER:
- Enter the starting part number or [Enter] to start at the beginning of the inventory or category. This will display the part entered and the next 17 numbers in sequence. Scroll through the inventory items making the necessary changes. Use the [E](xit)” to quit the count input process.
Any part numbers which are NOT in the Product File but have been noted on the Count Sheets should be entered to the Product Master File AFTER the Physical Count updates have been run.
Physical Count Edit List
This program creates and prints an Edit List to check for errors during Input before actually updating the new counts to the Product Master File.
- CATEGORY?
- Enter the category to be printed, or press [ENTER] only if the Count Files were created using Count File Create – All Categories.
- Variances only
- This option allows the edit list to show only those items where the quantity counted does not match the computer quantity.
NOTE: A Category cannot be accessed by more than one person at a time!
Physical Count Update
This program updates the entries made in the Physical Count Input program, either by Category or for the entire Inventory File depending on the method selected. The Physical Count Edit Lists should be printed and verified before the update is run. When the update is complete, it produces a Journal that shows the discrepancies between the System Count and the Actual Count.
The screen will list up to 126 of the available work files that are on the system. The default is [Y] to update. Make the necessary changes for which categories are NOT to be updated.
There must be NO BACKGROUND GROUPS running, no one using the Inventory Control system, no one in Invoicing, and ALL INPUT MUST BE COMPLETE before the update may be run. The Update will proceed and a Physical Count Journal will print upon successful completion.
Physical Count Reports – Print (Optional)
As many of the reports and worksheets created in the Physical Count Routines are deemed unnecessary, the user may select to print only those reports that are required.