Navigating the Product Listings
Overview
Once you have selected a vehicle, you are presented with the listing of parts that match your search criteria.

This screen is filled with a number of features to help you purchase products.
Breadcrumb Bar

- Navigate to a listing of previously selected and scanned (via the autoecat VinScan app) vehicles.
- One click access to change the current vehicle or product selection - Each of the Vehicle / Product description titles is a link back to that selection screen.
- Fluid Specifications (Subscription required). Clicking the
 icon will show you the specifications and capacities for a number of different fluids, tire specifications, and recommended service intervals for the vehicle selected. These include
 - OEM Listings. Another add-on module may present you with the
 icon. Clicking this will reveal OEM application listings in the listing page. These are true OE listings from the manufacturers.
 - Vehicle Options. Clicking the
 icon will pop up a vehicle option selection window. These are vehicle attributes found in the listings on screen that have a bearing on the product fitment. For example, you can filter down to only applications fitting a 4 wheel drive vehicle. These options only show if the vehicle attributes are listed and make a difference in fitment.


Product Header Options
Within the product header itself are a number of options related to that product type and the listings within it
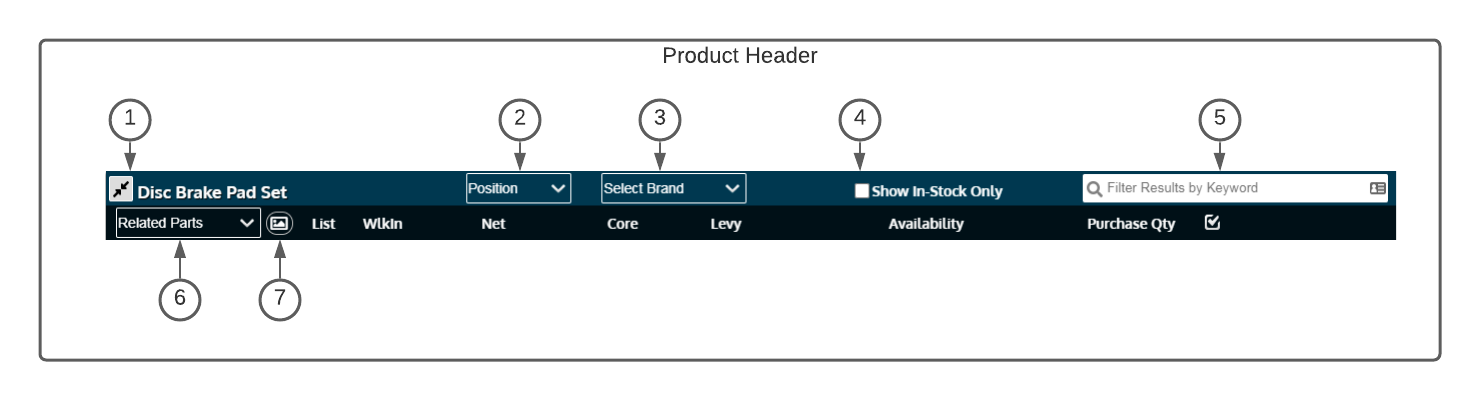
- If shown, clicking the
 icon will expand the part listings to include non-stocked items.
 - The Position dropdown will show when the product has multiple positions on the vehicle. Selecting any option in this dropdown will filter the selected product type to just those positions.
- When multiple brands are available, the brand dropdown will allow you to filter for a specific brand.
- Clicking the 'Show In-Stock Only' checkbox will hide any listings without stock
- Entering any text into the searchbox to the right will filter to only show listings matching that search criteria. This search is limited only to the product type whose header you are searching within
- The 'Related Parts' drop-down will show products that are related by job and/or proximity to the part you are listing
- The Icon next to the related parts will show you an interactive vector image of the product you are searching, plus other products in close proximity on the vehicle. This is a premium and licensed module.

The Product Listing
The product listing is the actual listing of a specific part. Within this listing on screen, there are a number of features you will find
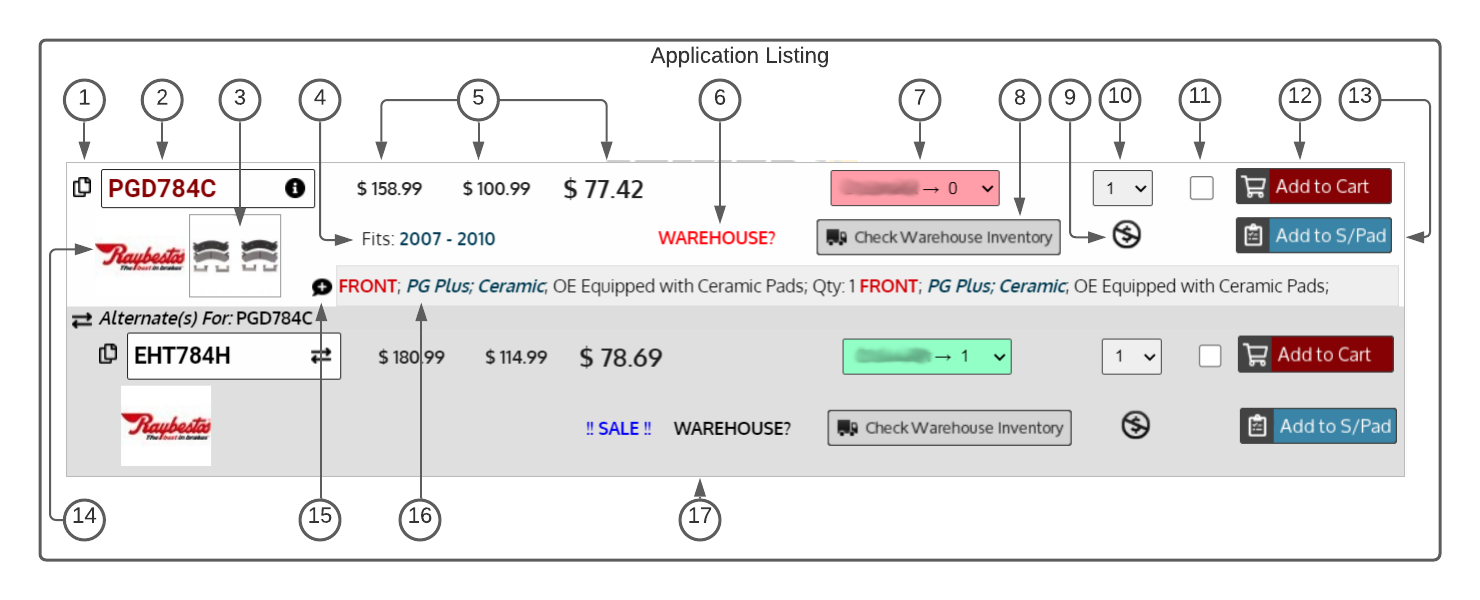
- Copy Part. Clicking the copy icon will copy this part number to your PC clipboard. You can then quickly paste the part into your shop system, invoice, etc.
- Part Number Info. Clicking on the box containing the part number will present you with the detailed part info screen. This screen contains info such as
- Buyers Guide
- Interchange Parts
- Marketing Information
- Detailed product description
- Specification Documents
- Installation Instructions
- Product Bulletins
- 360 degree images with zoom and rotate
- Part Image. Clicking on the product image will present you with a full resolution image of the product. Optionally, the product image may indicate if there is a 360 degree image available in the product info screen
- Year Fitment. This comment indicates what year range of this vehicle the part in question fits.
- Prices. The product listing will show your net price and two other configurable prices.
- Product Status. This description indicates the inventory status of the item, or if it is on sale.
- Availability. This dropdown box shows the onhand availability of the product at all branches for the sponsor being used. This drop-down is also colour-coded for easy readability
- Green - Available in servicing branch
- Yellow - Not available in servicing branch, but available in another branch
- Red - Not available in any of the branches
- Warehouse Lookup. Clicking this will pop up a window which will search all available warehouses for stock of this item
- Lost Sale. Clicking this icon will register a lost sale for this item
- Purchase Quantity. This will be the quantity added to the cart when clicking the add to cart button
- Will also add this quantity to the scratch pad if you click the Add to S/Pad button
- Add multiple items to cart. This checkbox is used along with the
 button in the header. You can check this box next to multiple items and use the
 in the header to add them all to the cart at once
 - Add to cart button. Add selected item to the shopping cart
- Add to S/Pad button. Add the selected item to your scratchpad
- Vendor Logo. This indicates what brand the product is. Clicking the logo will take you to that vendor's catalogue.
- Add comment. This allows you to add custom comments to an application and/or part. Comments optionally can be made public to all users
- Substitute listing. Items flagged as substitutes in a sponsor's system will show with a darker grey background. These parts can be substituted for the original