# PBXact
Documentation of the use of AMS Unified Communications product, PBXact
# Call History Functions
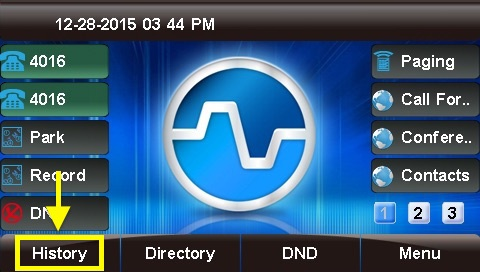
**History** section allows you to view missed, received, and dialed calls, as well as add the number to your contacts list, blacklist the number, or call the number.
## Viewing Calls
1. Press the **History** soft key.
2. "All Calls" will be shown by default.
1. **= Missed**
2. **= Received**
3. **= Dialed**
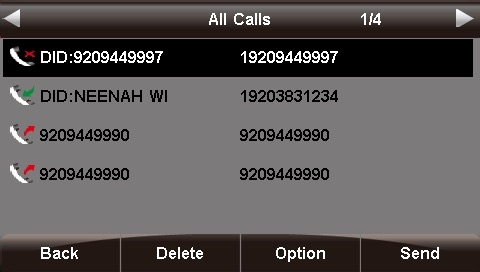
3. You can use the **<** and **>** (left and right arrow) buttons to filter by call type: **All Calls**, **Missed Calls**, **Received Calls**, and **Dialed Calls**. The current filter option is shown at the top of the screen.
## Deleting Calls Individually
1. Use the **Λ** or **V** (up and down arrow) buttons to select a call from the list.
2. Press the **Delete** soft key to remove the call from the call history.
## Options
1. Use the **Λ** or **V** (up and down arrow) buttons to select a call from the list.
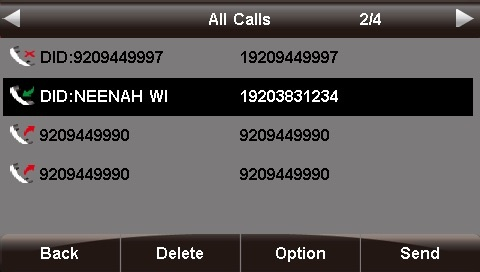
2. Press the **Option** soft key.
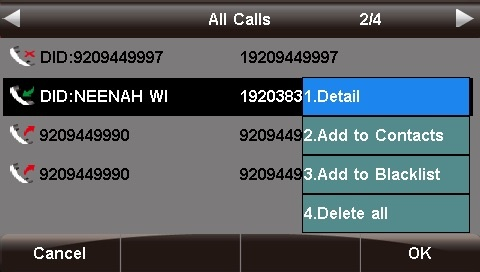
3. Use the **Λ** or **V** (up and down arrow) buttons to highlight an option, then press the **OK** soft key or the **√** (checkmark) button to select the option.
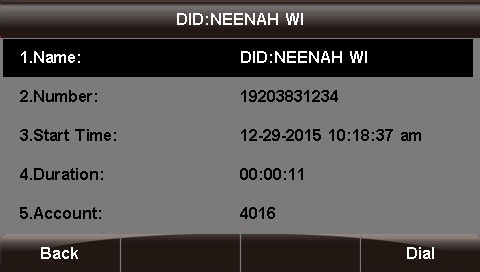
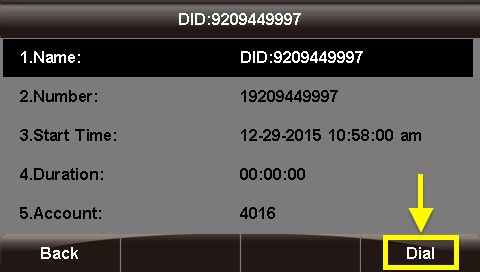
### Detail
This screen provides details of the call such as **Name**, Number, Start Time, Duration, and Account.
Press the **Back** soft key to go back to the previous screen, or the **Dial** soft key to call the number shown. (You are not required to highlight the number first.)
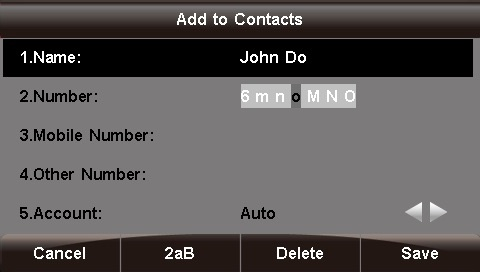
### Add to Contacts
You can save contact information such as Name, **Number**, **Mobile Number**, **Other Number**, **Account**, **Ring Tone**, **Group**, and **Photo**.
1. Use the **<** **>** **Λ** **V** (arrow) buttons to navigate and the phone keypad to enter text and numbers. To cycle between the numbers/letters/symbols available for each key, press the key multiple times or use the **<** and **>** (left and right arrow) buttons. *Tip: The "space" option is found under the "0" (zero) key. You can use the **2ab** soft key to cycle among 2ab, 123, abc, and ABC, which are various input options limiting which characters can be entered.*
2. Press the **Save** soft key when done.
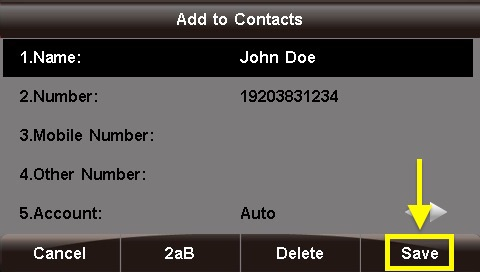
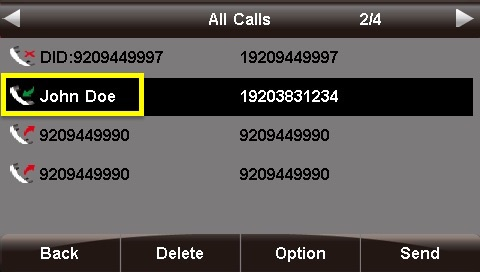
Now, any call history for this caller, as well as new inbound calls from this caller, will display the name you entered.
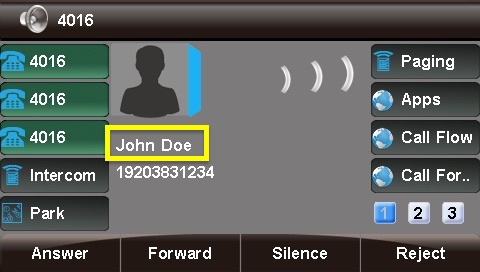
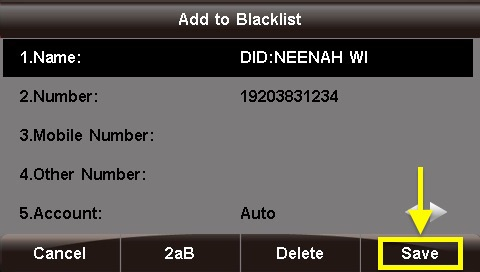
### Add to Blacklist
This option adds the caller to the blacklist, preventing you from receiving further calls from this caller ID.
To add the number to the blacklist, press the **Save** soft key.
### Delete All
This option deletes all of the calls associated with list that you are currently viewing (**All Calls**, **Missed Calls**, **Received Calls**, or **Dialed** Calls, as shown at the top of the screen).
*For example, if you are viewing the **Missed Calls** page, all of the missed calls would be deleted from the call history, and they will no longer show up here or on the **All Calls** page. However, the other calls (received and dialed) will still appear in the call history.*
## Dialing a Number
### From the List
1. Use the **Λ** or **V** (up and down arrow) buttons to select a call from the list.
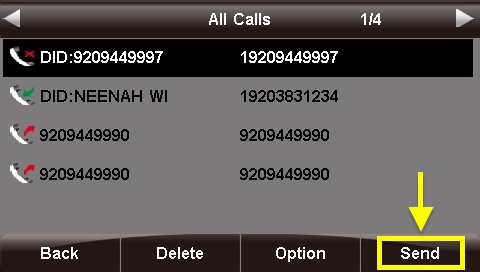
2. Press the **Send** soft key or press the **√** (checkmark) button. An outbound call will be placed immediately.
### From the Call Detail Screen
Press the **Dial** soft key or the **√** (checkmark) button. An outbound call will be placed immediately.
# Factory Reset Sangoma Desk Phone
You can reset the phone to factory default settings by using buttons directly on the phone, or by accessing the phone's admin GUI via a local web browser.
### Directly From the Phone
Using this method, you will require an admin password. Please contact AMS to obtain this password before proceeding
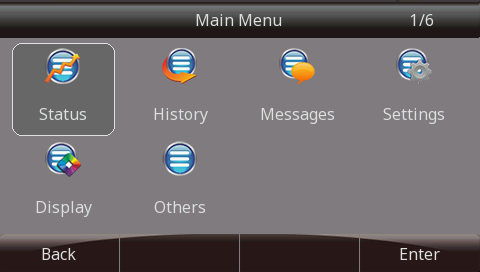
1. Press the **Menu** button.
[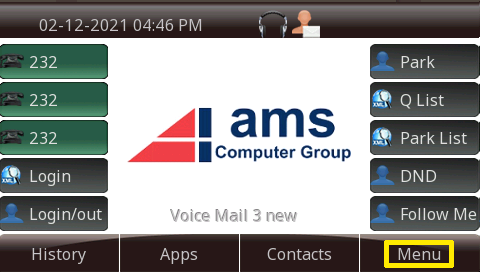](https://docs.amscomp.com/uploads/images/gallery/2021-02/image-1613177917745.png)
2. Highlight the option **Setting** and press the **Enter** button.
[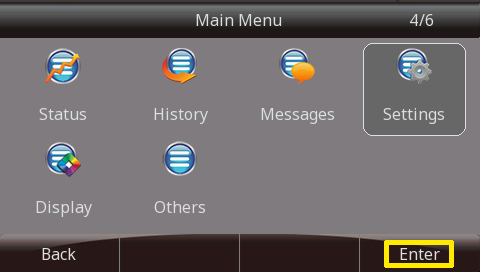](https://docs.amscomp.com/uploads/images/gallery/2021-02/image-1613177956454.png)
3. Highlight the option **Advanced Setting** and press the **Enter** button.
[](https://docs.amscomp.com/uploads/images/gallery/2021-02/image-1613177989976.png)
4. You will then be prompted to enter the password for this device. By default, the password is **admin**. Enter the password using the phone keypad, and press the **Enter** button.
For numeric passwords, it is recommended to press the character selection key (highlighted in red below) to ensure a numeric only keypad is selected.
[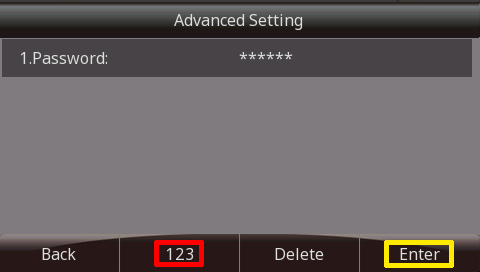](https://docs.amscomp.com/uploads/images/gallery/2021-02/image-1613178064868.png)
5. Highlight the option **Phone Setting** and press the **Enter** button.
[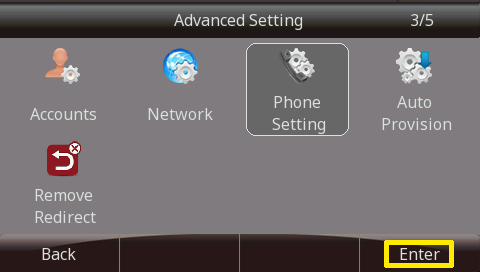](https://docs.amscomp.com/uploads/images/gallery/2021-02/image-1613178090516.png)
6. Then select the option **Factory Reset** and press the **Enter** button.
[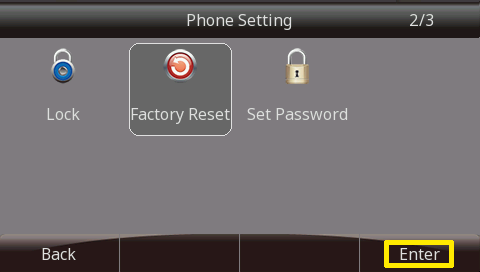](https://docs.amscomp.com/uploads/images/gallery/2021-02/image-1613178110516.png)
7. A warning message will then appear asking you if you're sure you want to reset to factory default settings. Press **OK** to proceed or **Cancel** to abort.
[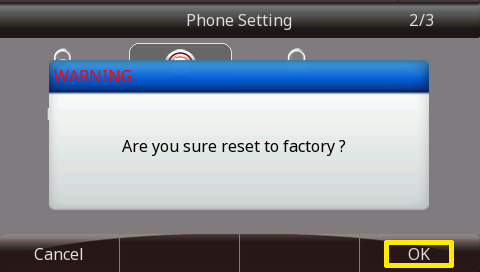](https://docs.amscomp.com/uploads/images/gallery/2021-02/image-1613178126591.png)
### Factory Reset without Password
Option #1
1. Press the **Menu** button.
[](https://docs.amscomp.com/uploads/images/gallery/2021-02/image-1613177917745.png)
[](https://docs.amscomp.com/uploads/images/gallery/2021-02/image-1613178147565.png)
2. Press the "**\***" key 3 times and then press and hold the "**X**" key for 10 seconds.

3. Phone will now preform a factory reset.

Option #2
1. When the phone is powering on, during the Initializing step, press the "**\#**" key 3 times and then press and hold the "**\***" key for 10 seconds.

2. Phone will now perform a factory reset.
# Follow Me
## Overview
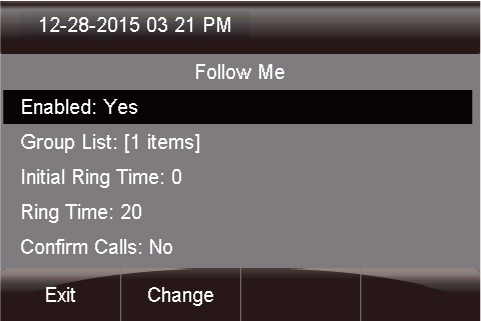
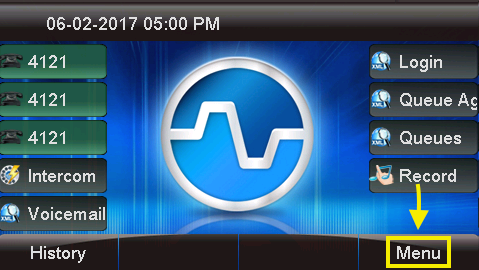
- Press the **Follow Me** button.
[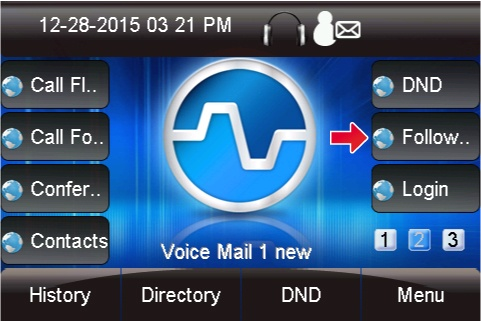](https://docs.amscomp.com/uploads/images/gallery/2020-10/image-1602097068892.png)
- - **Enabled:** Yes or No
- **Group List:** The list of numbers that will be called as part of your Follow Me
- **Initial Ring Time:** How long to ring your extension directly before calling the list of numbers in your Follow Me phone numbers list
- **Ring Time:** How long to ring the numbers in your Follow Me phone numbers list
- **Confirm Calls:** If you are going to be dialing external numbers and want to make sure a voicemail or answering machine does not answer the call, enable this option
Here, you can manage the following Follow Me settings:
[](https://docs.amscomp.com/uploads/images/gallery/2020-10/image-1602097101820.png)
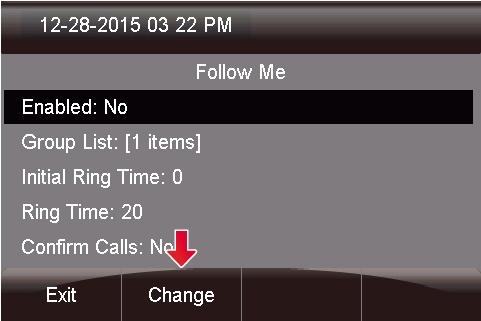
## Enabled
- You can select the **Enabled** option and press the **Change** button to toggle between Yes or No. If set to **No**, inbound calls to your extension will NOT be sent to your Follow Me.
[](https://docs.amscomp.com/uploads/images/gallery/2020-10/image-1602097111616.png)
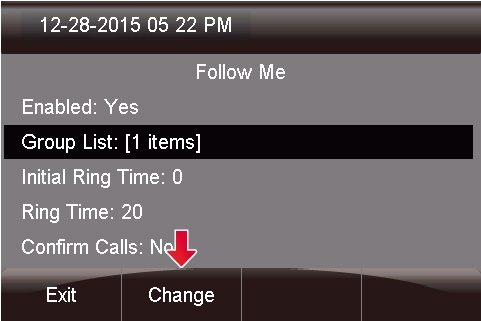
## Adding Phone Numbers to a Follow Me List
- You can edit and add any numbers you want to be dialed when activating your Follow Me. Select the **Group List** option and press the **Change** button to edit this option.
[](https://docs.amscomp.com/uploads/images/gallery/2020-10/image-1602097118815.png)
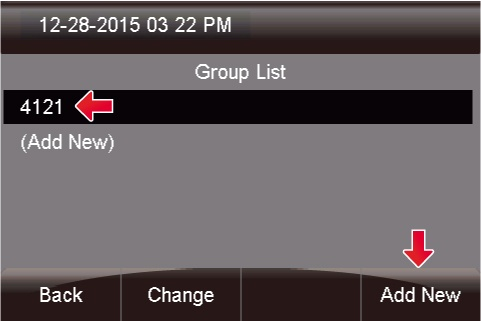
- You can scroll through the group list and see all the numbers that will be called as part of your Follow Me. You can then add a new number by pressing the **Add New** button.
[](https://docs.amscomp.com/uploads/images/gallery/2020-10/image-1602097127002.png)
- You'll be prompted with a text box to enter the number. Enter the number the same way you would dial it from your phone and press the **Done** button when done.
[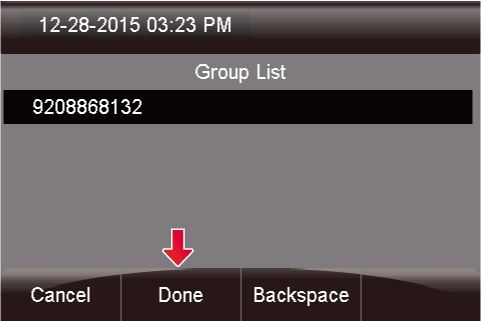](https://docs.amscomp.com/uploads/images/gallery/2020-10/image-1602097133139.png)
- You should now see the number you just added to your Group List. Press the **Back** button to return to the previous screen.
[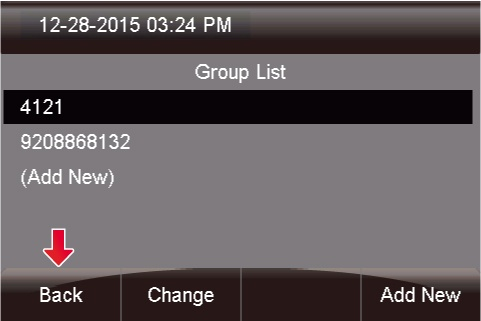](https://docs.amscomp.com/uploads/images/gallery/2020-10/image-1602097139134.png)
## Initial Ring Time
- Highlight the I**nitial Ring Time** option and press the **Change** button.
[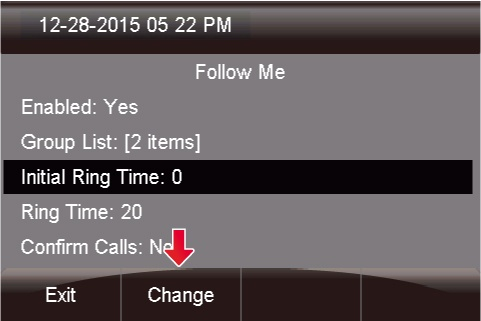](https://docs.amscomp.com/uploads/images/gallery/2020-10/image-1602097146683.png)
- Here you can choose how long you want the PBX to call your normal extension (up to 60 seconds) before it calls the phone numbers in your Group List. **Set this to 0 if you do NOT want the system to call your desk phone first**. Remember, you can include your own extension in your Group List of numbers to be dialed. Enter a value between 1 and 60 seconds.
[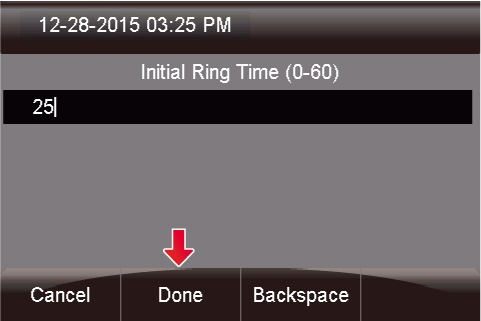](https://docs.amscomp.com/uploads/images/gallery/2020-10/image-1602097154290.png)
- Once the time is entered, press the **Done** button.
## Ring Time
- Highlight the **Ring Time** option and press the **Change** button.
[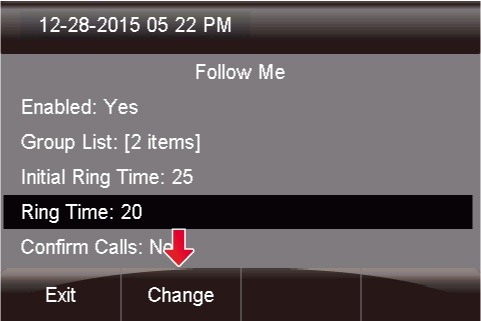](https://docs.amscomp.com/uploads/images/gallery/2020-10/image-1602097162615.png)
- Here you can choose how long you want the PBX to call all of your phone numbers that you have listed in your Group List (up to 60 seconds). It is suggested to have this value set to 30 or higher
[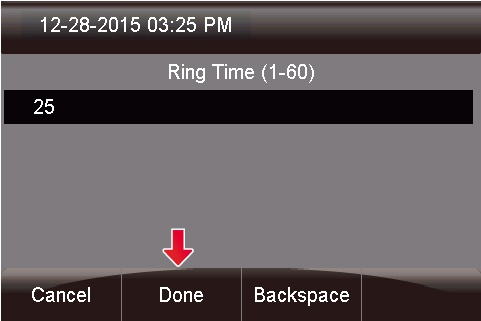](https://docs.amscomp.com/uploads/images/gallery/2020-10/image-1602097167130.png)
- Once the time is entered, press the **Done** button.
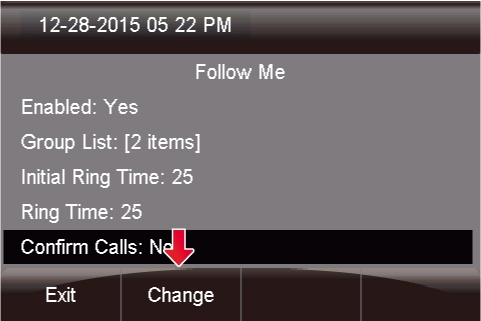
## Managing Confirm Calls
- Below **Confirm Calls** is not enabled. Highlight this option and press the **Change** button to enable it.
[](https://docs.amscomp.com/uploads/images/gallery/2020-10/image-1602097172329.png)
- When "Confirm Calls" is enabled, the system will prompt any external numbers that are dialed from your Follow Me with an option to press 1 to accept the call. This will prevent your cell phone's voicemail from answering the call.
[](https://docs.amscomp.com/uploads/images/gallery/2020-10/image-1602097178866.png)
# Helpful Videos
#### Setting up Follow Me:
[https://www.youtube.com/watch?v=o9\_QiXnipMw](https://www.youtube.com/watch?v=o9_QiXnipMw)
# Pairing Bluetooth Headset
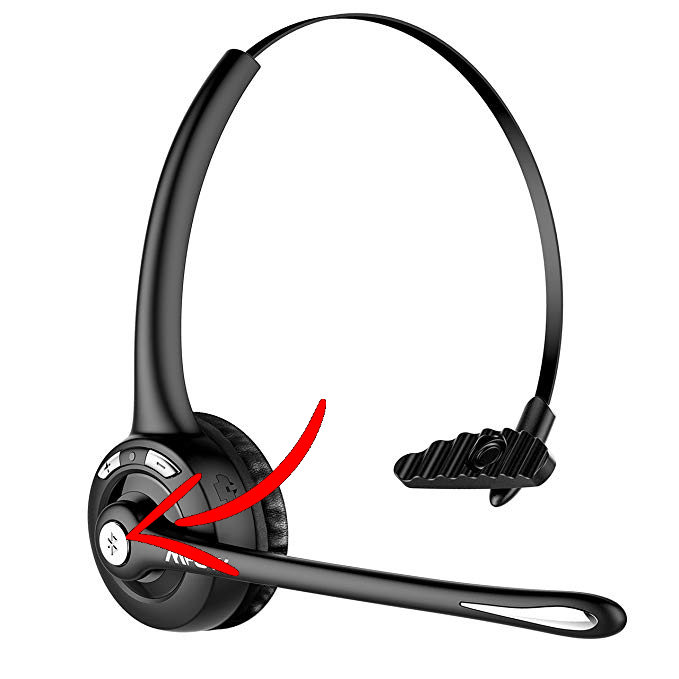
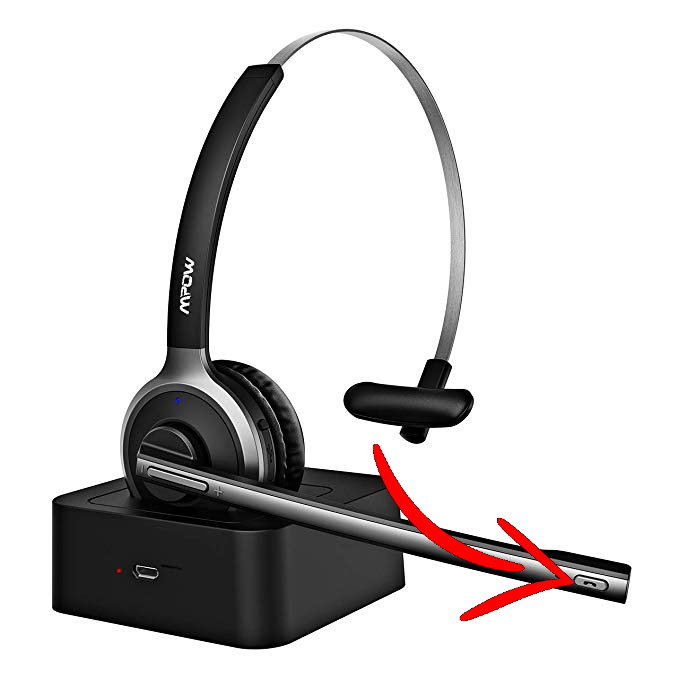
This document outlines the process, specifically, for pairing a Sangoma phone with one of the standard supplied MPOW headsets.
##### On The Sangoma Phone
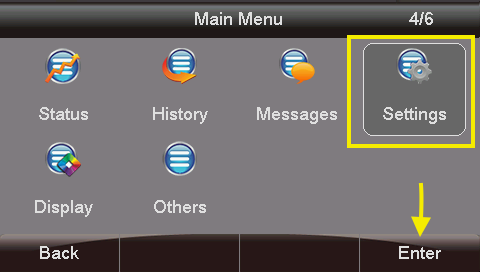
1. Press the Menu button on the bottom right of the main display screen
2. Use the arrow navigation panel to navigate to the **Settings** option, and press Enter (or the check mark button in the center of the navigation arrow keys)
3. Select ****Basic Settings**** and press **Enter**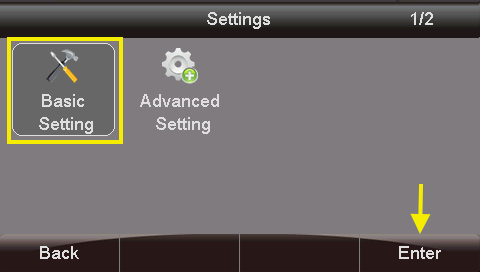
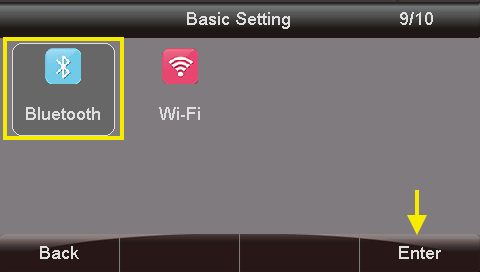
4. Navigate down to the **Bluetooth** menu option and press **Enter**
5. On this screen, if the phone says that bluetooth is on, follow the next sub-steps, otherwise skip to step 6
1. Press the **Switch** option to turn bluetooth on
2. Press the **Save** button to ensure that bluetooth is on
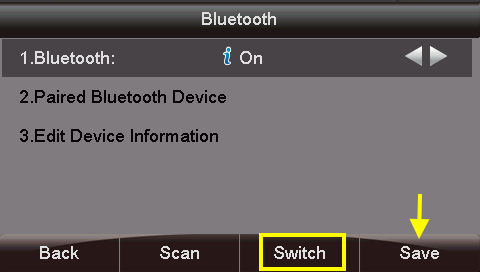
3. Press the **Back** button to return to the menu screen and action the save
4. Select the **Bluetooth** menu option
6. On your headset, press and hold the bluetooth activation button until the indicator light begins to flash blue/red
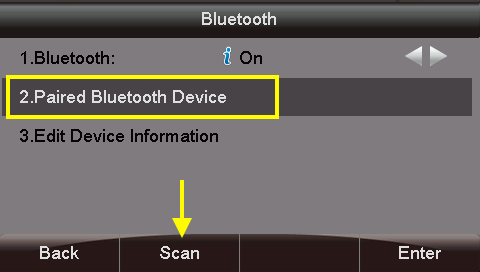
7. Select option #2 ****Paired Bluetooth Device**** and press the **Scan** button on the bottom of the phone screen
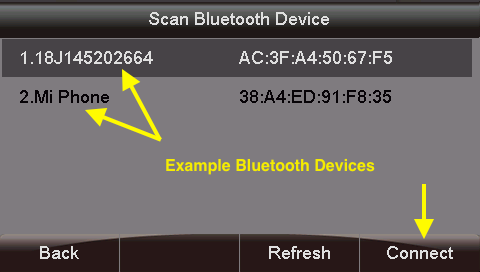
8. The phone will look for any bluetooth devices looking to pair. An MPOW device should show up.
9. Press the **Connect** button on the bottom right of the phone
10. When you return to the main screen, the phone should now indicate that there is a bluetooth device connected
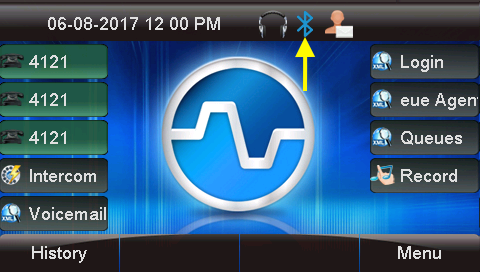
You also need to ensure that you have activated headset mode on your phone. This is done by pressing the [](https://docs.amscomp.com/uploads/images/gallery/2019-02-Feb/image-1551136659599.png) button on the phone
# Sangoma S705 Feature Sheet
[](https://docs.amscomp.com/uploads/images/gallery/2021-10/image-1635278882275.png)
# Setting Up Polycom Conference Phone
#### Overview
Polycom phones do not, by default, automatically provision with your AMS provided PBXact system. Due to the limited functionality of the phones, it is suggested to manually set the device up. You can do this by going through the following steps:
#### Get the IP address of the device
Once the phone is plugged in, it should obtain an IP address. In order to register the unit, we will need to know the IP address. To find out the IP address, from the phone:
- Press the **Menu** Key and select **Status** =>
#### Log on to the unit
Once you have the IP of the unit, you will need to open a browser and browse to the unit via the IP address
The default admin username is **Polycom**, the default password is **456**
[](https://docs.amscomp.com/uploads/images/gallery/2021-03/image-1616799433584.png)
Once you have logged on to the device, you will be presented with the main menu screen
[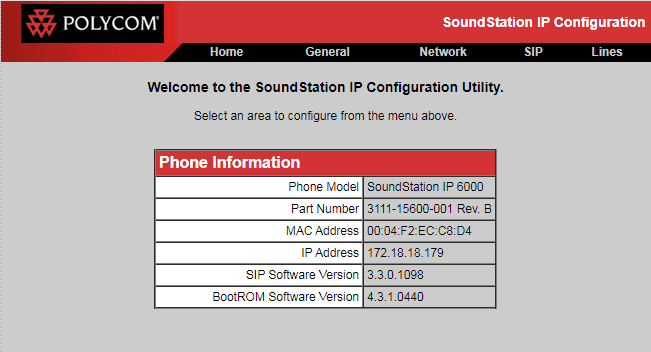](https://docs.amscomp.com/uploads/images/gallery/2021-03/image-1616799261584.png)
#### Registering the device on the PBX
AMS will need to provide you with the proper URL and user credentials to complete these steps.
##### Register the SIP server
- To access the SIP server settings for the device, click the **SIP** heading
- Next, you can scroll to the **Server 1** section
[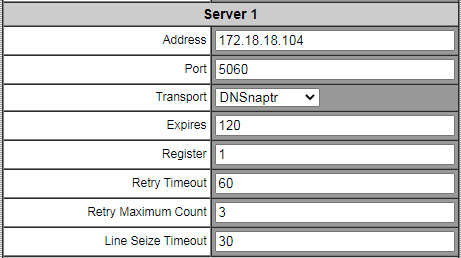](https://docs.amscomp.com/uploads/images/gallery/2021-03/image-1616799754520.png)
- The fields in **Server 1** can be filled in as follows:
- **Address**: The PBX address as provided by AMS
- **Port**: The server SIP port as provided by ams
- **Transport**: DNSnaptr
- **Expires**: 120
- **Register**: 1
- **Retry Timeout:** 60
- **Retry Maximum Count:** 3
- **Line Seize Timeout**: 30
- The rest of the fields can be left at their default values
- Click the submit button at the bottom of the page
[](https://docs.amscomp.com/uploads/images/gallery/2021-03/image-1616800216939.png)
##### Registering the Extension
- To access the SIP extension settings for the device, click the **Lines** heading
- The **Line 1** settings will be where you enter in the server IP, port and user settings
[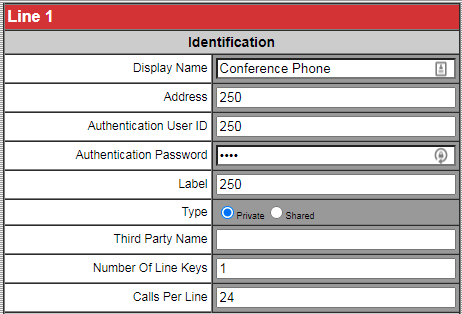](https://docs.amscomp.com/uploads/images/gallery/2021-03/image-1616799576568.png)
- The fields in **Line 1** can be filled in as follows:
- **Display Name**: Any name to identify the unit
- **Address**: The extension number as provided by AMS
- **Authentication User ID**: The username as provided by AMS
- **Authentication Password**: The Password as provided by AMS
- **Label**: The extension number as provided by AMS
- **Type:** Private
- **Third Party Name:** blank
- **Number Of Line Keys**: 1
- **Calls Per Line**: 24
- Next, you can scroll to the **Server 1** section
[](https://docs.amscomp.com/uploads/images/gallery/2021-03/image-1616799754520.png)
- The fields in **Server 1** can be filled in as follows:
- **Address**: The PBX address as provided by AMS
- **Port**: The server SIP port as provided by ams
- **Transport**: DNSnaptr
- **Expires**: 120
- **Register**: 1
- **Retry Timeout:** 60
- **Retry Maximum Count:** 3
- **Line Seize Timeout**: 30
- The rest of the fields on this page can be left at their default values
- Scroll to the bottom of the page and click the **Submit** button
[](https://docs.amscomp.com/uploads/images/gallery/2021-03/image-1616799915899.png)
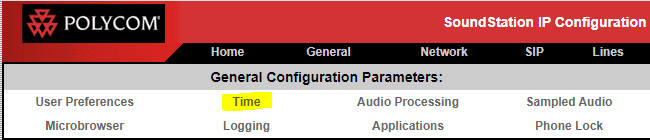
##### Setting the proper time
- Click the **General** heading
- Click the **Time** heading
[](https://docs.amscomp.com/uploads/images/gallery/2021-03/image-1616800074599.png)
- Adjust the time settings accordingly
[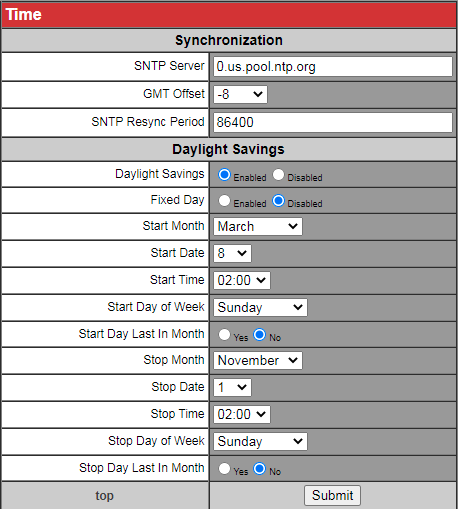](https://docs.amscomp.com/uploads/images/gallery/2021-03/image-1616800106214.png)
- Fields that need to be set are:
- SNTP server: Set to the time server provided by AMS
- **GMT Offset**: Set to your appropriate timezone offset.
- All other fields can be left at their default values
- CLick the **Submit** button at the bottom of the page.
[](https://docs.amscomp.com/uploads/images/gallery/2021-03/image-1616800190328.png)
# Standard Phone Setup / Call Flow
### Common S705 Phone Buttons
- **Line (Extension Number) –** This is a dedicated line for the phone. All calls will come to this line first.
- **Line (Extension Number) –** This is a dedicated line for the phone. This second line can be used if placing someone on dedicated hold using the first line
- **Blank**
- **Orderdesk –** A button to log you in to answer customer calls. If the button is red, you are signed in
- **Voicemail –** Pushing this button will pick up any messages in the general voicemail box. If it is red, there is mail
- **Park 1-5 –** ‘Parking spots’ where calls can be placed on hold to be picked up on another device in the building.
- **History –** Shows the call history on the phone. Use the navigation buttons to select and dial.
- **Intercom –** Intercom Page ALL phones in your branch
- **Menu –** Access to the phone’s user menu
### The EXP100 “Sidecar”
The buttons on the sidecar are valid destinations to park and/or transfer calls with one push. Common destinations added to the sidecar are:
- All Phones In your store
- 5 Parking spots to put customers on hold
- Frequently called cell phones
- Extensions in other branches
Calls can be sent to any of these destinations by pressing the button while on a call.
### When you get a call
- **Answering the call -** When the phone is ringing, picking up the handset, pressing the microphone button or pressing the button on your Bluetooth headset will all answer the call.
- **Transferring a call –** When on the phone with a customer, you can transfer the call by pressing the destination you wish to send them to. For office, or the other branches, it is recommended to use the ‘queue’ buttons on the phone to transfer calls to other branches, and sidecar extension buttons when transferring to a specific person. If there is no 1 push destination button available, you may also press the ‘transfer’ button that is displayed while on a call and dial the extension you wish to send the call to.
- **Putting a call on hold –** When on a call with a customer and the phone is off-hook, a ‘Hold’ button will show along the bottom of the phone screen. Pressing this button will place the caller on a private hold on your phone. The line button will blink green, indicating they are on hold. Pressing a second line button will allow you to make a second call. Pressing the blinking line button again will retrieve the call.
- **Parking a call –** For calls that aren’t to be transferred but need to be picked up on another phone, you can park them in one of the various parking spots on the sidecar. When on the phone with a caller, you can park them in a specific spot by pressing the parking spot button on the sidecar. The light will turn red to indicate they are parked. To retrieve the call, simply press the red lit parking spot button
### Other features
- **Navigation** – There are 4 arrow buttons around a checkmark button. These will navigate through the various screens on the phone itself.
- **Intercom** – When the phone is on the hook, an intercom button shows along the bottom of the screen, pressing this and picking up the handset will page all of the phones that are not busy.
- **Your voicemail** – The envelope button on phone itself will access your own private voicemail. If you have a voicemail, this button will flash green, the light on the top of the phone will light up red and there will be a voicemail notice on the phone screen itself.
# System Recordings
Assigning recordings to different scenarios (After Hours, Busy Queue, etc.) is done by your AMS PBX Admin. Once assignment is done, feature code recording can be done for ongoing update.
You can record system based messages on your phone via a feature code. These codes are assigned by your AMS PBX Admin and can be provided to you.
#### Using the feature code.
When keying in the feature code, you will initially hear the current recording, followed by 4 options:
1\. To listen to the recording again
2\. To accept a recording
\*. To record a new recording
3\. To change prompt language
#### Recording a new message
Once you press \*, you will hear a beep. Press # once you are done recording. You will then be given the same 4 options as before. Pressing 2 will keep the recording, and pressing \* will bring you back to the recording option.
Until you accept a recording, no changes will take effect.
# Voicemail User Guide
## Viewing Voicemails
- This icon at the top of your phone screen will show you that you have a voicemail(s).
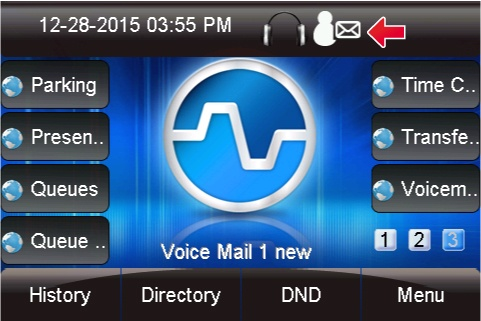
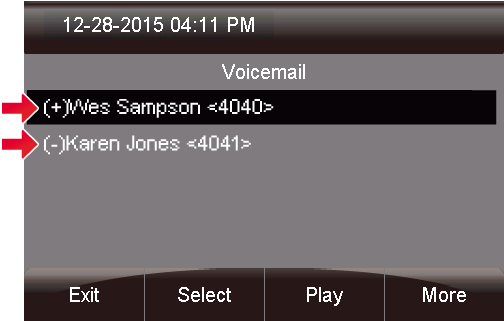
- Press the **Voicemail** button.

- - A **(+)** in front of the message indicates the message is new.
- A **(-)** in front of the message indicates the message is old.
From here you can quickly see who left you voicemails and choose which messages to listen to first.
## Listening to Voicemails
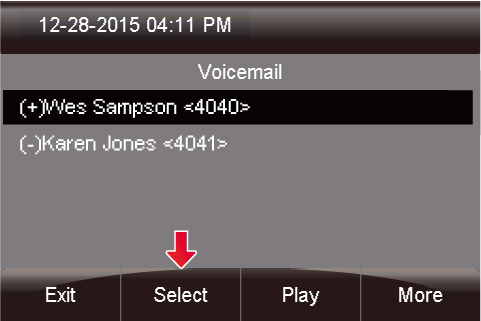
- You can press **Select** to find out more information about the voicemail message that was left.
- - Name and number of who left the message.
- Length of voicemail message.
- Date the message was left.
- Time of day the message was left.
The following will be displayed on this screen: 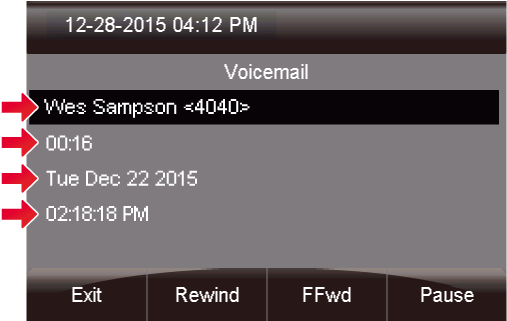
- If you pres the **More** button, additional options will appear.
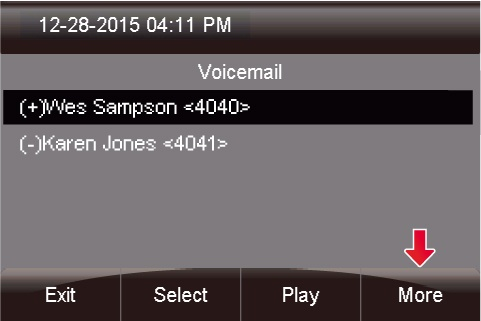
- You now see options to **Toggle** this voicemail from unread to read or vice versa, and an option to edit **Settings**.
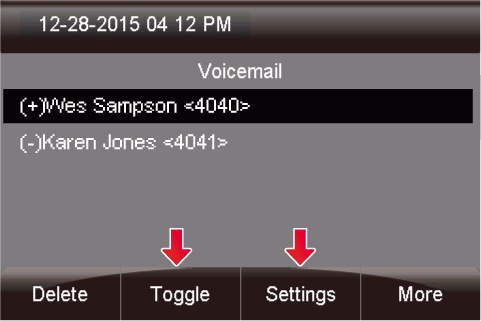
- Lastly, you can press the **Play** button to listen to your voicemail.
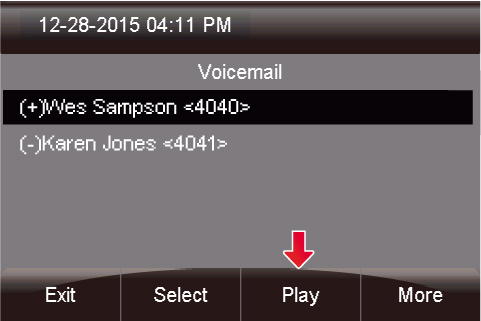
- The message will now play over your device.
## Voicemail Administration
To access all of the voicemail administration options, you can follow these steps.
If you wish to record any specific greetings, please pick up the handset before entering in to the voicemail menu
- Press the **Voicemail** button.

- Press the 'Settings' button
#### Change Voicemail Password
Once in settings, select the 'Change Password' Option
#### Change Voicemail name
To have a generic system greeting with only your name, you can change your system voicemail name by selecting 'Name' and then 'Change'
#### Change Custom Voicemail Greetings
The system allows for 3 different custom voicemail greetings:
- Unavailable - When you phone rings for the maximum number of rings without answering, this greeting will be played
- Busy - If you are sent a call, but are currently on the phone this greeting will be played
- Temporary - If set, this greeting will always be played
To change any of these greetings, once in the settings screen, select the greeting type and then select 'Change'. This will play a beep in your ear and you can begin recording. Once complete, select the save recording option on-screen. Follow the prompts if you wish to make changes.
# Zulu Softphone
Documents on the functionality and usage of the Zulu Softphone from Sangoma.
Original documentation is found at https://wiki.sangoma.com/display/ZU/Zulu+3
# Audio Device Behaviour
Audio devices preferences can be found by clicking on preferences under the user menu:
Inside Preferences, under the Audio tab you will find device settings:
Please make sure the device you want to use is connected. If it is connected and it is configured as your default device for input/output on your OS you shouldn't need to adjust any settings, just leave as default. But if you still want Zulu to always use that specific device for input/output you should definitely select it. Zulu will save the device id and try to use it, if it is not connected it will fall back to the Default device. Please note that Zulu will only list devices that are connected, even if you have previously selected a different device (It will still be saved and used if you connect it back).
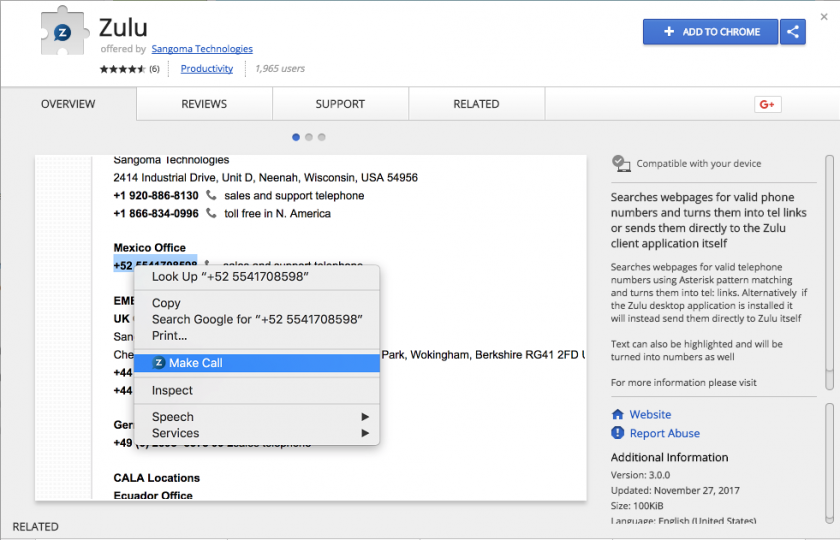
# Chrome Browser Plugin
1. Using Chrome navigate to the webstore: [https://chrome.google.com/webstore/detail/zulu/idfkkpineieigiennfifkhbbcbojeoae](https://chrome.google.com/webstore/detail/zulu/idfkkpineieigiennfifkhbbcbojeoae)[
](https://chrome.google.com/webstore/detail/zulu-click-to-call-for-ch/idfkkpineieigiennfifkhbbcbojeoae)
2. Click "Add To Chrome" in the top right hand corner
3. Click "Add extension" on the next screen
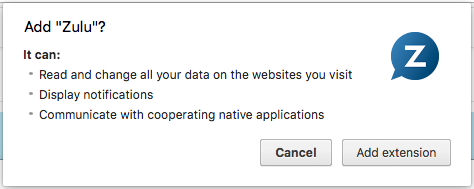
4. You will see a message after clicking "Add extension" that states the module has been installed

# Using the Zulu Desktop Client
# Installing the Desktop Client
## Download the desktop client
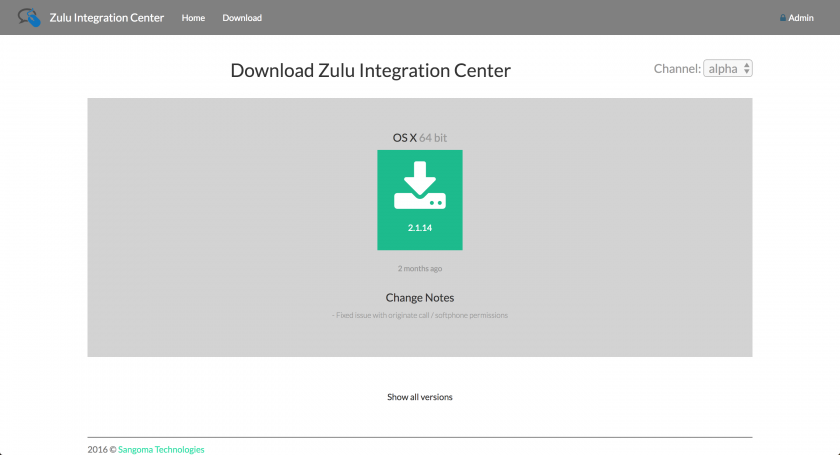
Navigate to [https://zulu-updater.sangoma.com/releases/stable](https://zulu-updater.sangoma.com/releases/stable) and download the current desktop application for your given platform.
## Install on Windows
Click the Zulu-3.x.x.exe file you downloaded.
Wait while we install the applications
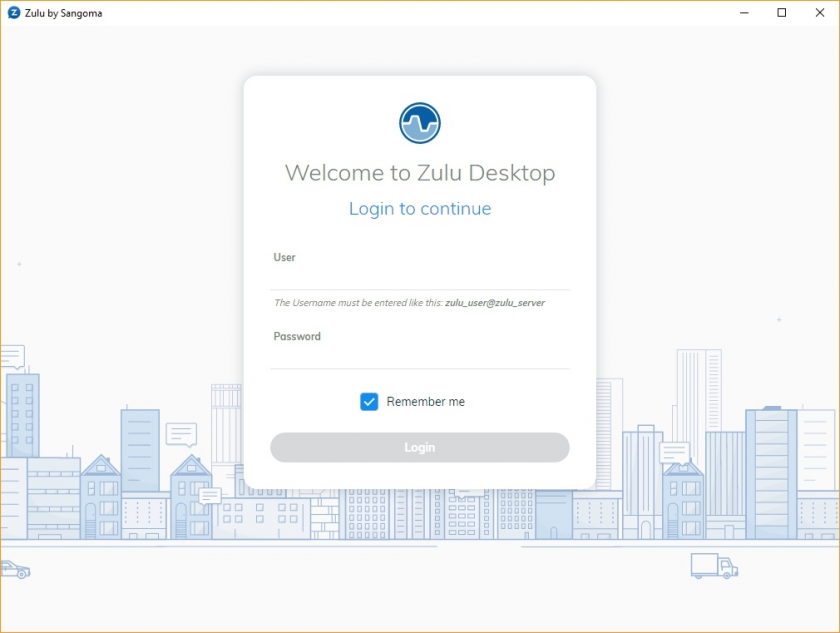
After installation it will prompt you to login.
## Install on MacOS
Double click on the Zulu-3.x.x.dmg file you downloaded
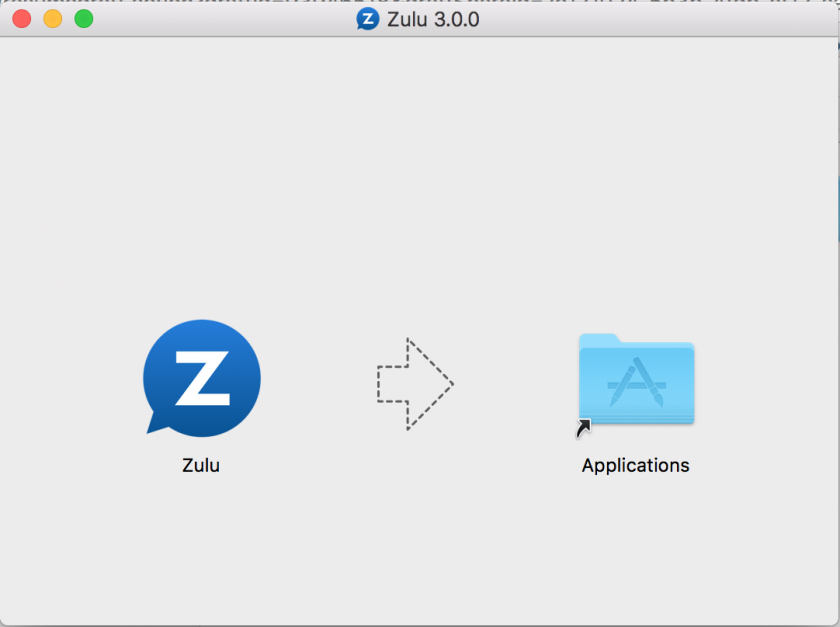
Drag Zulu into the Application Folder
Open Zulu by clicking on the Zulu icon in Launchpad
# Configuring the Desktop Client
Once the desktop client is installed on your device, it will prompt you to log in. You will then be presented with the login page.
[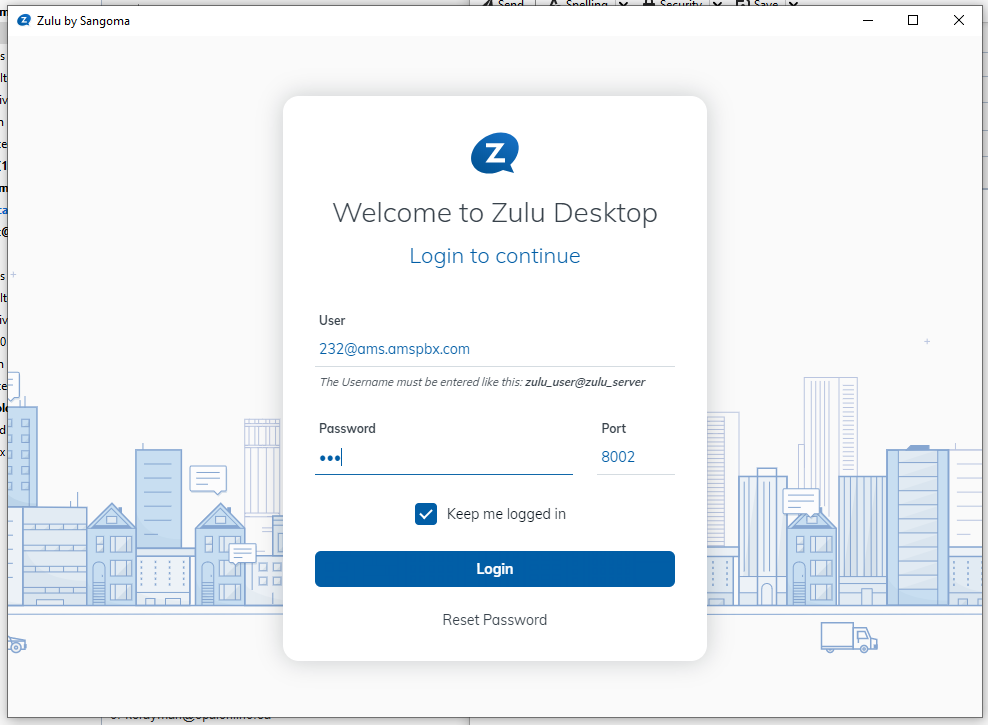](https://docs.amscomp.com/uploads/images/gallery/2022-12/image-1671044381416.png)
You will need to contact AMS for your User and Password info. The port will always be set to 8002.
# Streams
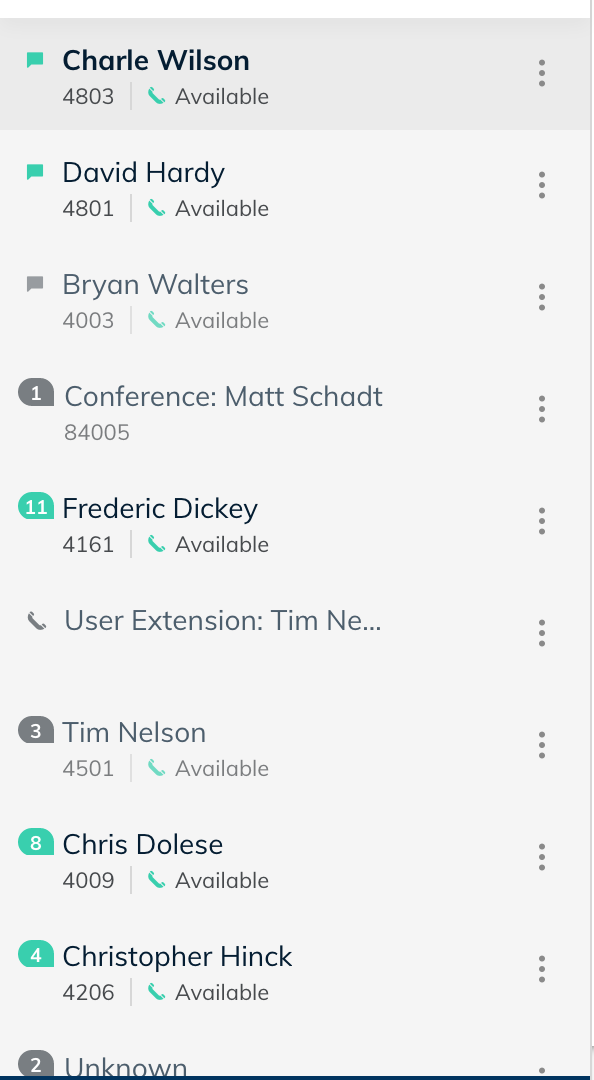
- Everything in Zulu 3 is done within a stream. You can see all your active streams on the left side of your Zulu Client.
- Clicking on a Stream will bring up the past history of that stream which includes
- Chats
- Sent, Received and Missed Calls
- If call recording for your extension is enabled on the PBX all call recordings that were done with this contact will be shown here.
- Any voicemails left by this contact for you.
- Shared Files
- SMS messages
- Send and Received Faxes
- From within the Stream you can send messages to the contact by typing a new message

- At the top of the Stream you have buttons for common things such as
- Call the Contact
- Fax the Contact
- SMS the Contact (Requires SIPStation trunking)
- Share your Screen with the Contact (Beta Currently as of 8-1-18)
- Send files to your Contact

# Zulu Chat
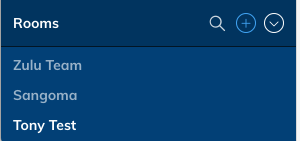
### Joining a Chat
- At the bottom of your Zulu Client is a list of all the Chat Rooms you are currently a member of
- You can click on the 
to search for rooms to join
- You will now be shown a list of Chat Rooms that you are allowed to join
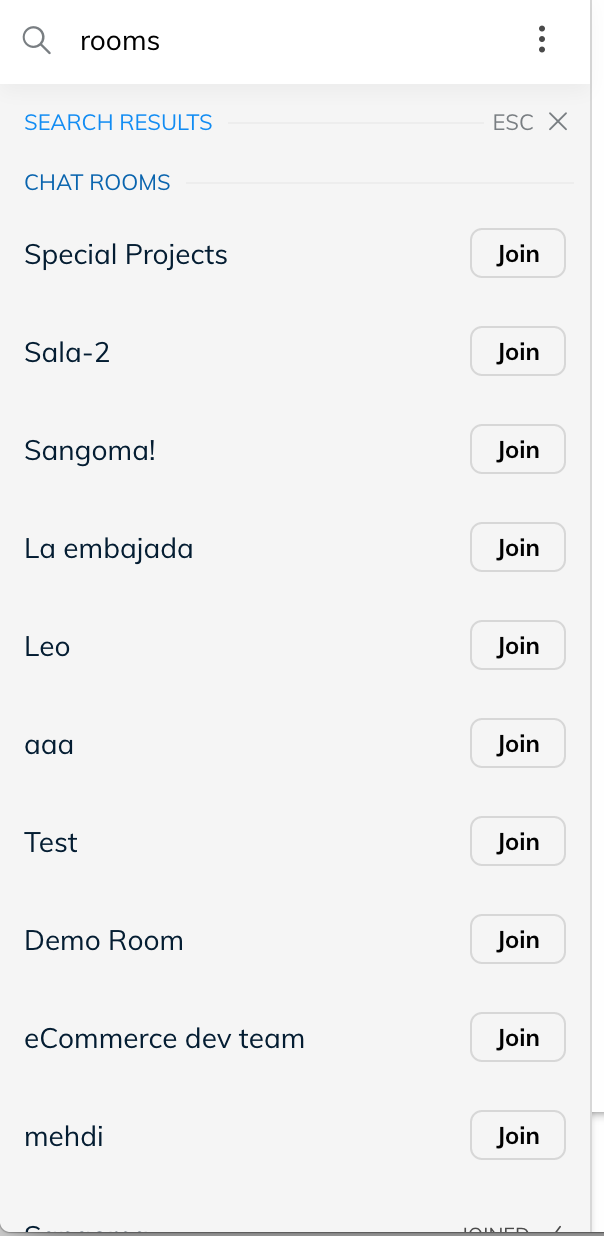
- Click the Join button to become a member of that room.
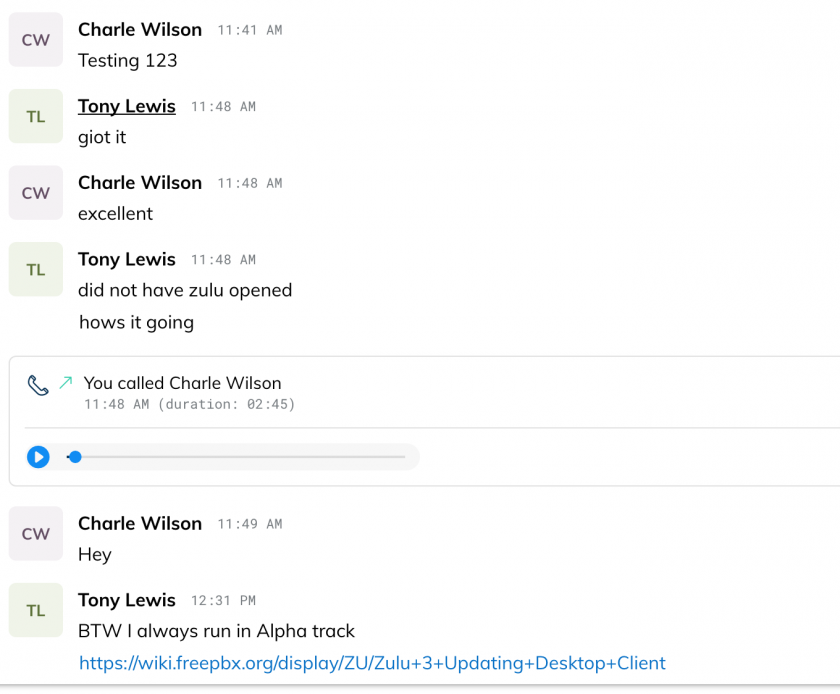
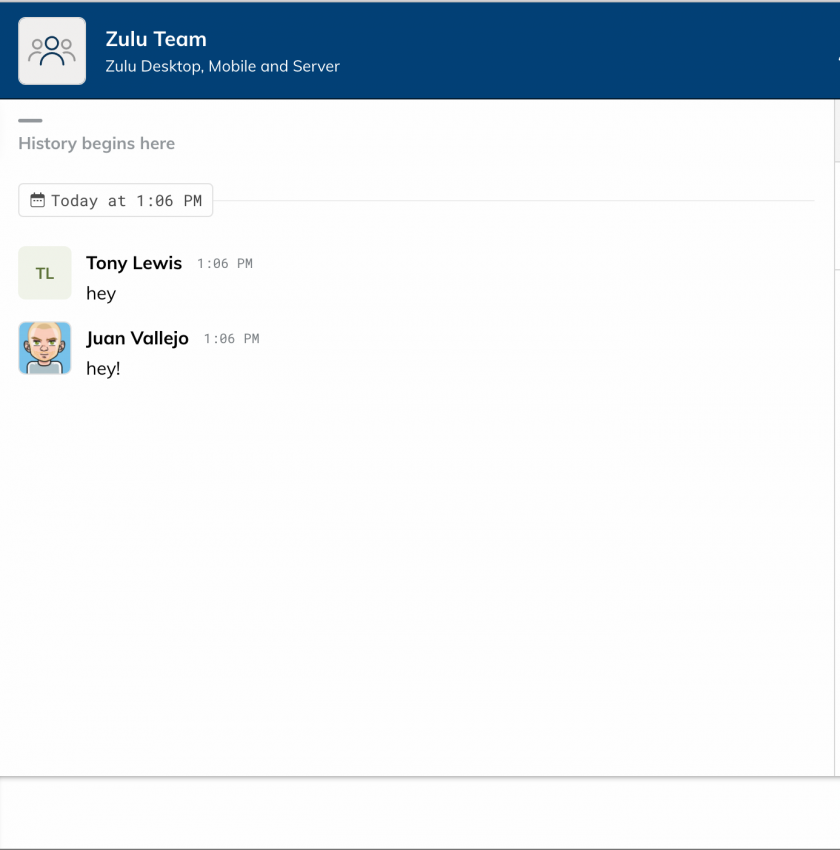
## Chatting with users inside a chat room
- Within a Chat Room that you are a member of you can chat with everyone inside the room and see a full history of the interactions of the room.
## Viewing Members
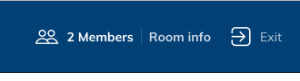
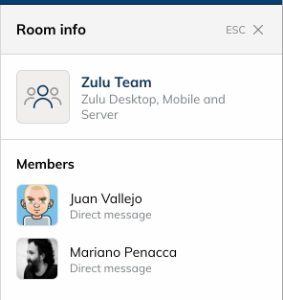
- To view all the member of the room who are currently logged in you can press the Room Info button on the top right of your Zulu Client when inside a Chat Room
- From here you will see a list on the left of all the members of the Chat Room who are currently logged in.
## Leaving a Chat Room
- From within the Chat Room you can click on the Exit button at the top right of your Zulu Client to leave the Chat Room

## Getting the Attention of a User (Notifications and Mentions)
- Zulu chat uses the concept of Mentions. A mention is away of getting the attention of a user within a chat room and that user receiving a notification of the chat room.
- Inside the chat room you would type in a message such as "@dhardy you around for a call" to send a notification to user dhardy.
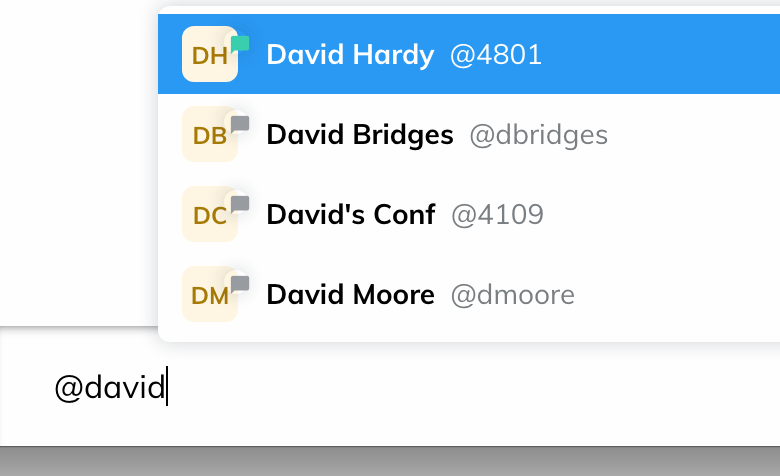

- The user will get a notification that they were mentioned inside the chat room and if they are not a member of the chat room it will notify them of the message and ask them to join the room at the same time.
### Creating a New Chat Room
- Inside Zulu you can chat with other contacts on your PBX and also create Chat Rooms that users can join and take part of group conversations.
- To create a Chat Room from your Zulu Client click on the Rooms 
sign Section at the bottom of your zulu client
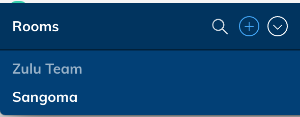
- Provide a Room Name and Description and press the Create Room button
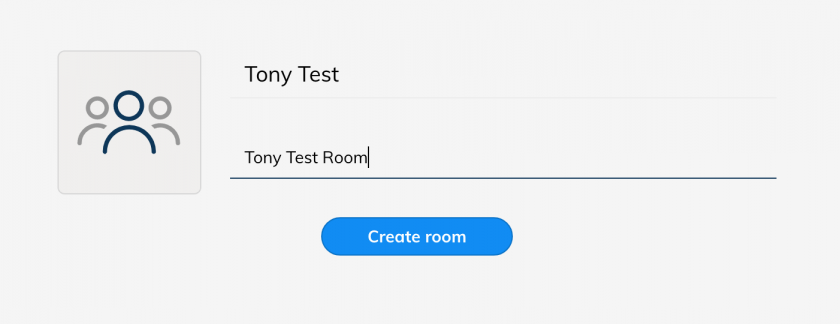
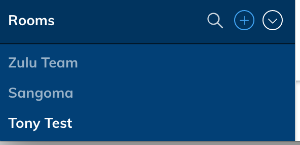
- You will now see the room has been added to the list of Rooms on your Zulu client and other users can now join the room.
- For more information on how to send a notification to users to join the room see this wiki
# Re-Pairing H20 Headset
### Overview
In some scenarios, the H20 headset will become unpaired from the base station. In this case, the headset will need to be re-paired with the base station. This document will walk you through these steps
### Symptoms
When the heasdset becomes unpaired with the base station, the battery charge indication light will flash green/yellow/red.
[](https://docs.amscomp.com/uploads/images/gallery/2021-11/image-1637788017491.png)
### Procedure
First, you will need to unplug the power from the back of the base station and take the headset out of the charging cradle.
Next, press and hold the '+' microphone adjustment button
[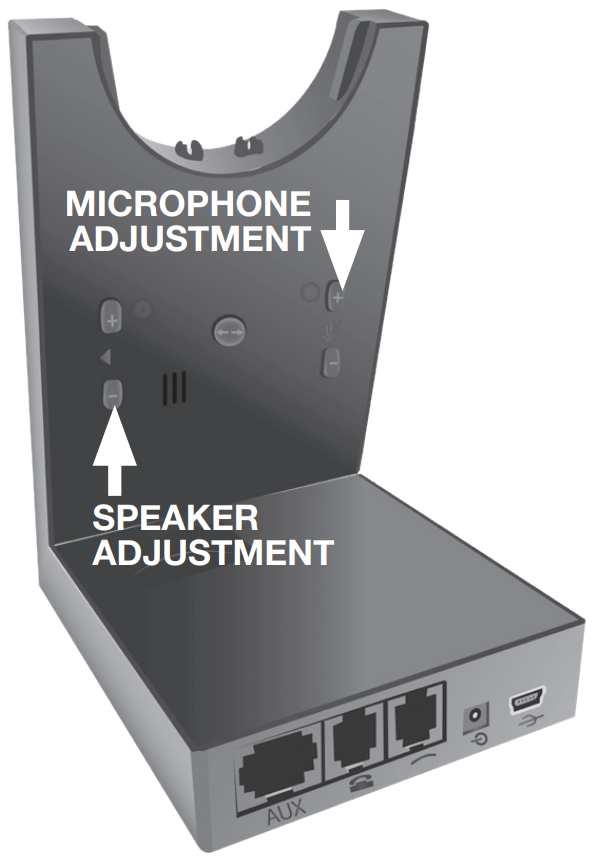](https://docs.amscomp.com/uploads/images/gallery/2021-11/image-1637788081928.png)
While holding the button, plug the power back into the base station. Continue to hold the button until the headset and battery light begin to flash (headset blue, battery red).
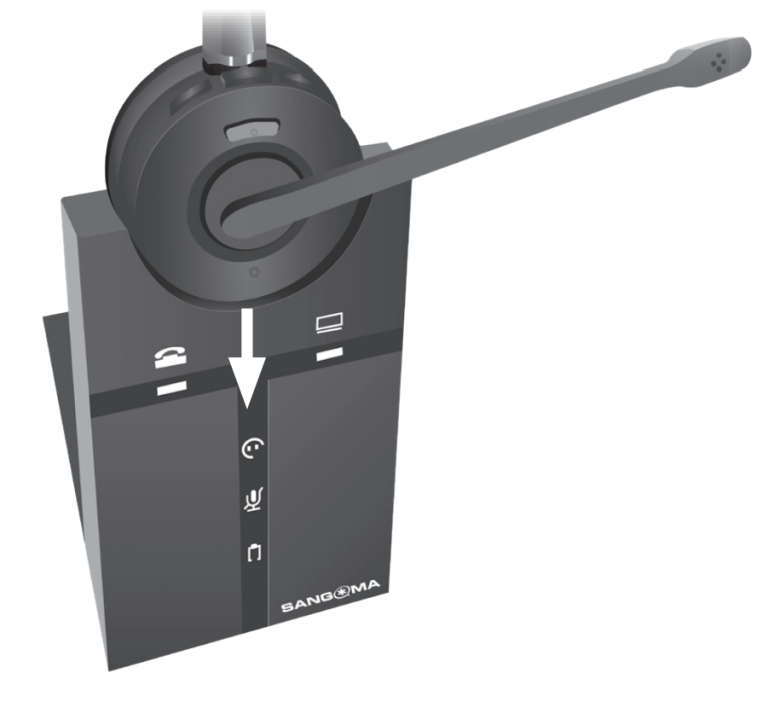
Once the lights on the base station are flashing, press and hold the mute button on the headset until the blue headset light begins to flash quickly
[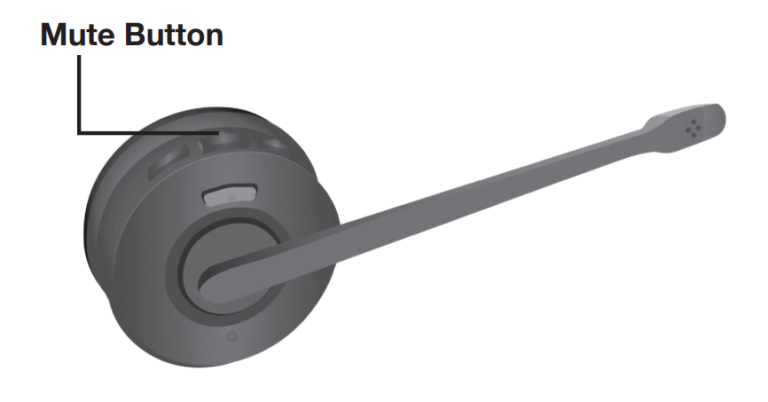](https://docs.amscomp.com/uploads/images/gallery/2021-11/image-1637788247921.png)
Once the devices are paired, the base station battery charge light will turn green, the headset indicator light will stop flashing and the light on the headset itself will begin to flash slowly. At this time, you can replace the headset onto the charging cradle.
# Setting Up Phones
This document is meant as a guide for assembling the Sangoma Desk Phones
#### S705 Desk Phone
##### Basic Assembly
The desk phones come in two pieces which need to be assembled. An S705 desk phone and an EXP100 expansion module. The expansion modules are not specifically paired, so any expansion module could go with any of the phones. The boxes contain all necessary mounting hardware and cables, and in a standard setup, we use the bottom slots for the stand.
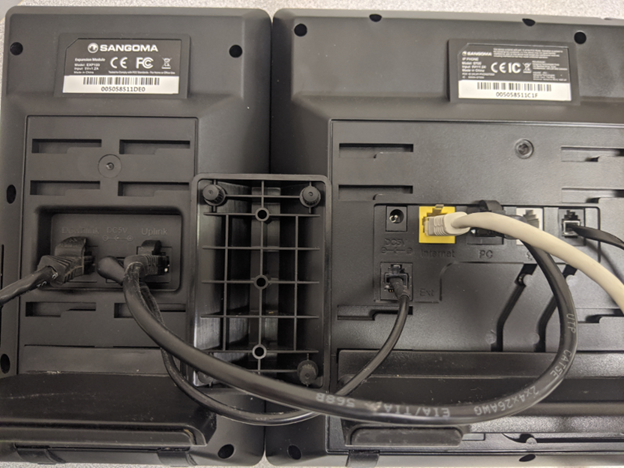
##### Cabling (Without headset)
The box containing the expansion module should have instructions on connecting the unit to the S705 but, if not, the below picture is an example of the wiring. The yellow jack is for the P.o.E. in. PC port then plugs in to the Uplink port on the sidecar. Power cable connects from the EXT port on the phone to the DC12V port in the sidecar.
[](https://docs.amscomp.com/uploads/images/gallery/2020-09/image-1599231457238.png)
##### Cabling (With headset).
The headset requires 2 pieces of equipment. The headset itself, and the EHS30 module that connects the device to the phone for headset functionality.
In this configuration, the sidecar also needs to be powered via one of the included power adapters. The connections for this configuration are to plug in the inbound P.o.E. Ethernet cable into the yellow ‘Internet’ port. The power adapter into the sidecar DC5V port, the short Ethernet cable from the PC port to the Uplink port, another Ethernet cable from the AUX port to the port on the EHS30, the second RJ45 (Ethernet) cable goes from the EHS30 to the Ext port on the desk phone. Finally, the RJ12 (Telephone) cable goes from the desk phone port on the headset (next to AUX) and into the grey headset port on the phone.
Below is a photo of a desk phone with headset setup.
[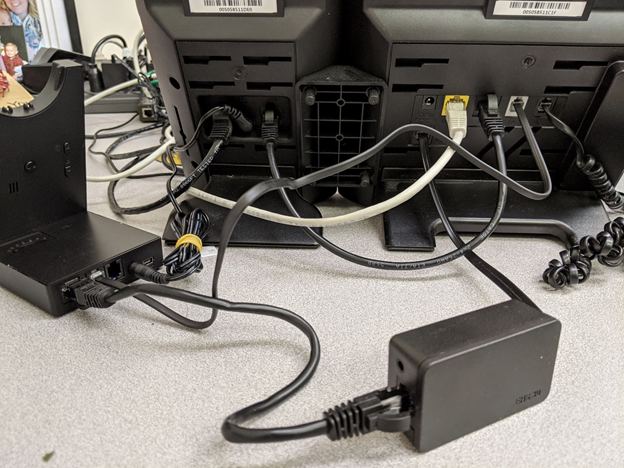](https://docs.amscomp.com/uploads/images/gallery/2020-09/image-1599231584903.png)
If you would like to test the functionality of the headset once connected, you can use the 'Echo Test' feature code of **\*43**.This can confirm in and out audio
# User Control Panel
# Using the UCP
#### Overview
The PBXact User Control Panel (ucp) is a dashboard that allows you to take advantage of mor eof the system functionality via your desktop browser.
This includes things like listening to voicemail, sending faxes and even modifying the buttons on your phone (although, this may be undone with global template changes).
Each user's UCP can be tailored to fit the needs of each person. The dashboard utilizes 'widgets' to allow a user to pick and choose which functions they wish to use.
#### Accessing the UCP
To access the UCP, your AMS support team will need to provide you with the URL and user credentials that you will need to use.
Once you have that information, you can browse to the provided URL and use the credentials to log in
[](https://docs.amscomp.com/uploads/images/gallery/2022-01/image-1642620299642.png)
Once you first log into the UCP, you will be provided with a 'walk-thru' to help explain some of the dashboard functionality
# Maintaining Dashboards
UCP 14 has been updated to include new functionality called dashboards. Dashboards are collections of widgets in different configurations.

Dashboards allow users to customize their User Control Panel experience
- [Adding a dashboard](https://wiki.freepbx.org/display/FPG/UCP+Dashboards#UCPDashboards-Addingadashboard)
- [Deleting a dashboard](https://wiki.freepbx.org/display/FPG/UCP+Dashboards#UCPDashboards-Deletingadashboard)
- [Renaming a dashboard](https://wiki.freepbx.org/display/FPG/UCP+Dashboards#UCPDashboards-Renamingadashboard)
- [Reordering a dashboard](https://wiki.freepbx.org/display/FPG/UCP+Dashboards#UCPDashboards-Reorderingadashboard)
- [Locking a dashboard](https://wiki.freepbx.org/display/FPG/UCP+Dashboards#UCPDashboards-Lockingadashboard)
## Adding a dashboard
To add a new dashboard look for the  symbol in the upper right hand side of UCP. Click this icon

Now give your dashboard a name and click "Create Dashboard"

Your new dashboard will be created. If you have not previously added any dashboards you will be placed into the dashboard you just created

To add widgets to this dashboard please see [UCP Widgets](https://wiki.freepbx.org/display/FPG/UCP+Widgets)
## Deleting a dashboard
To delete a dashboard click the (X) symbol in the dashboard tab

A confirmation prompt will ask you to confirm

If you are actively viewing the dashboard you have just deleted you will be warned appropriately

Simply Add a new dashboard to continue
## Renaming a dashboard
To rename a dashboard click the (Pencil) symbol in the dashboard tab

Change the name of the dashboard and click "Edit Dashboard"

The name will be updated in UCP

## Reordering a dashboard
Dashboard Tabs can also be reordered.

Simply click and drag any dashboard tab into a new position

After letting go of the mouse button the configuration order will be instantly saved

## Locking a dashboard
Locking a dashboard will lock the position and size of all widgets within.
To lock a dashboard click the (lock) icon in the Dashboard tab

When a dashboard has been locked it will look like this:

To unlock said dashboard just click the lock icon again:

# UCP Settings
User Settings can be found in the lower left hand corner of UCP. Look for a gear icon

Clicking this icon will bring up the user settings dialog
## Account Settings
Account Settings is the first tab. The options in here relate directly to your user.
Some of these options may not be visible to you depending on your configuration

- **Username:** The Username of your account. You can change it here if you wish (you will be forced to logout)
- **Password:** The new password of your account. You can change it here but will need to reenter your password in the confirm box
- **Confirm Password:** The confirm password input. Used to validate you did not mistype your password
- **Update Password:** Click this button to update your password based on new input from Password and Confirm Password
## User Details
User details is the second tab. This tab contains all of the details about the currently logged in user on the system

- **Display Name:** Alias/Name used in services such as Chat
- **Email:** Email address used for resetting the password
- **First Name:** The user's first name
- **Last Name:** The user's last name
- **Title:** The user's title
- **Company:** The user's company
- **Cell Phone:** The user's cell phone
- **Work Phone:** The user's work phone
- **Home Phone:** The user's home phone
- **Fax:** The user's fax
- **Avatar:** The user's avatar
- You can drag and drop an avatar here or click the "Use Gravatar" function which will use the email address provided above to lookup an avatar from the [Gravatar network](http://en.gravatar.com/)
## Interface Settings
The last tab is the Interface Settings tab.
This tab controls how the UCP should look and feel for this user

- **Language:** Select the language you'd like UCP to work in. Not all languages are fully translated. To help participate in translations see [Translating FreePBX](https://wiki.freepbx.org/display/FOP/Translating+FreePBX)

- **Use Browser Language:** Click this to automatically select your language based on your browser
- **Use PBX Language:** Click this to automatically select your language based on your PBX
- **Timezone:** Select the timezone you'd like UCP to work in.

- **Use Browser Timezone:** Click this to automatically select your timezone based on your browser
- **Use PBX Timezone:** Click this to automatically select your timezone based on your PBX
- **Allow Desktop Notifications:** Toggle desktop notifications. Various modules can take advantage of desktop notifications. This allows you to disable them globally

- **Restart Tour:** Restart the UCP tour when your close the user settings dialog

- **Date and Time Format:** Customize how Date & Time strings should look (For formatting options see: [http://momentjs.com/docs/#/displaying/format/](http://momentjs.com/docs/#/displaying/format/))
The default of "llll" is locale aware. Meaning the format will automatically change based on your language
Formatting is updated in real time

- **Date Format:** Customize how Date strings should look (For formatting options see: [http://momentjs.com/docs/#/displaying/format/](http://momentjs.com/docs/#/displaying/format/))
The default of "l" is locale aware. Meaning the format will automatically change based on your language
Formatting is updated in real time

- **Time Format:** Customize how Time strings should look (For formatting options see: [http://momentjs.com/docs/#/displaying/format/](http://momentjs.com/docs/#/displaying/format/))
The default of "LT" is locale aware. Meaning the format will automatically change based on your language
Formatting is updated in real time

# Sending Faxes
## Overview
Sending faxes from the UCP allows you to send a fax directly from your desktop. In order to do this, the image or document you wish to fax should be saved as a .pdf on your desktop
## Sending a Fax
### How To Send a Fax
Create one or more PDF or TIFF files on your computer. Multiple pages and/or multiple documents are acceptable and will be merged to create one fax (but not one fax document, each document uploaded with be one page or more)
To send a fax click the **Send Fax** button in the Fax widget:

Basic options include **Destination**, whether to use a **Coversheet**, and the **Document(s)**. (If you enable the coversheet, additional options will appear.)

### Destination
Enter the fax number of the recipient.
### Coversheet
This is **Off** by default. Click the switch to toggle the **on/off** setting.
If the switch is set to **On**, additional fields appear:

The information you enter will appear on the cover sheet.
- **Recipient Name:** The name of the person you are sending the fax to.
- **Message:** A short message to include in the cover sheet.
- **My Name:** The sender's name is pulled from User Management settings, but you can override it here.
- **My Telephone:** The sender's phone number is pulled from the User Management settings, but you can override it here.
- **My Email:** The sender's e-mail address is pulled from the User Management settings, but you can override it here.
### Document(s)
Documents must be in PDF or TIFF format.
A single fax can contain one or more documents. There are two ways to upload documents to be included in your fax:
- Click the **Upload Document** button to select a file from your computer,
- *OR* drag and drop files from your computer to the **Drag New Documents Here** area.
The uploaded file(s) will appear in a list:

- To view a file, click the button.
To remove a file from the list, click the  button.
### Send
When ready to send the fax, click the **Send** button.

Once send has been clicked the Fax interface will send you directly to the **Outgoing** folder.

When a fax has been sent successfully, it will be moved to the **Sent** folder. If it fails to send and all retry attempts have been exhausted, it will be moved to the **Failed** folder.
# Find Me / Follow Me
Find Me/Follow Me refers to two technologies that, in conjunction, enable incoming phone calls to be received at different locations, on different phones. “**Find Me**” refers to the ability to receive incoming calls at any location.

## Settings Window
In this section, you can change settings for the chosen Call Forwarding Extension.
Click the **Settings** button in the widget title bar to continue: 
- **Follow Me List:** List extensions to ring, one per line. You can include an extension on a remote system, or an external number by suffixing a number with a pound (#). ex: 2448089# would dial 2448089.
- **Announcement:** Message to be played to the caller before dialing this group.
- **Ring <Exten> First For:** This is the number of seconds to ring the primary extension prior to proceeding to the follow-me list. The extension can also be included in the follow-me list. A 0 setting will bypass this.
- **Ring Followme List For:** Time in seconds that the phones on the follow me list will ring. The number of rings will depend on region. Example: If a phone rings for 1 second then waits 2, each ring is 3 seconds.
- **Use Confirmation:** Enable this if you're calling external numbers that need confirmation - eg, a mobile phone may go to voicemail which will pick up the call. Enabling this requires the remote side push 1 on their phone before the call is put through. Example "Press 1 to accept.
# UCP Contacts
The Contacts widget allows you to see and create contacts that can be used in other widgets in UCP, Phone Apps and for speed dials.. The [User Management Module](http://wiki.freepbx.org/display/FPG/User+Management+Module) controls which contact groups a user will be able to see in this widget.

## Group Management
To add a new group called "My Contacts" click the "Add Group" link.

Name your group "My Contacts" then click "Save Changes"
The group will then appear to the left.

## Add Contacts
To add a new contact to a group click the "+ Add Contact" button. You will only be able to add contacts to groups you have permissions to do so.

In the next screen you will be able to define detailed information for the new contact

There are various details to a contact:

- **Display Name:**
- **First Name:**
- **Last Name:**
- **Title:**
- **Company:**
Contacts can also have custom avatar images or they can use gravatar:

Additionally contacts can have multiple numbers, xmpp, emails and website addresses added to them

- **Numbers:**
- **XMPP:**
- **Email:**
- **Website:**
## Delete Contacts
To delete an entire group click the "Delete Group" button

After which a confirmation box will pop up.

## View Contacts
To view any contact simply click the contact's row in the table.
You will then be presented with a view similar to this if you are able to edit/delete the contact

If you only have permission to view the contact you will be presented with this view:

# Chat Module
The User Control Panel (UCP) includes a built-in XMPP chat client that works in conjunction with the XMPP module. This allows users to send and receive instant messages (IMs) using a simple web browser interface.
## Prerequisites
- A user must be allowed to log into [UCP](http://wiki.freepbx.org/pages/viewpage.action?pageId=28180526) (set in the [User Management](http://wiki.freepbx.org/display/FPG/User+Management+Module) module)
- Chat must be enabled for the user (set in the [User Management](http://wiki.freepbx.org/display/FPG/User+Management+Module) module)
## Enable Chat
To enable chat for a user go to the User Management module and select the Chat tab. Then select "Yes" for Enabled and save. The option to add the Chat service will now appear in UCP

## Chat With a User
Chat can only be added as a Side Bar Widget. You can do this through the Add Widget interface

A list of users will appear from the left.

Click a user to bring up a chat window

From there you can type your message. Hit enter to send. You can also add emjois by pasting emojis or by clicking the emoji face in the chat window

Type your message to the recipient:

Use the return/enter key to send.

The message will be sent instantly to the receiving end
*This screenshot is of Adium*

When you receive a reply you will receive a browser notification if your browser is configured to accept notifications.

## Collapse or Hide the Chat Window
 / = Collapse / expand the chat window
 = Close the chat window. To re-open, click the chat icon in the side bar and select the user in the drop-down list.
# Device Management
The UCP for EPM module allows end users to customize phone buttons through the [User Control Panel (UCP)](http://wiki.freepbx.org/pages/viewpage.action?pageId=28180526) web interface. Users can change button layouts and program their phone with their favorite feature codes, speed dials, Busy Lamp Field (BLF) buttons, REST Apps, and more, without the need to contact an administrator each time a change is needed.
An administrator can control which users are allowed to edit button configurations, and which phones they can edit. The administrator can allow users to edit buttons for their own phones and/or for other users' phones.
A user's changes will override the original template created by the administrator, but the original template itself is not affected. Changes are only on a per-user basis (not global). A user can easily revert back to the original template at any time. The administrator can modify the phone template in End Point Manager.
Since UCP for EPM works in conjunction with End Point Manager, the commercial End Point Manager must also be licensed, installed, and active.

- [Changing Phone Buttons from UCP](https://wiki.freepbx.org/display/FPG/UCP+Device+Management#UCPDeviceManagement-ChangingPhoneButtonsfromUCP)
- [Restoring Phone Buttons to Default from UCP](https://wiki.freepbx.org/display/FPG/UCP+Device+Management#UCPDeviceManagement-RestoringPhoneButtonstoDefaultfromUCP)
# Changing Phone Buttons from UCP
1. Click the **Settings** button in the widget title bar to continue: 
2. The settings window will open with the current button settings. Available buttons and settings vary by phone.
*In this example, we are looking at part of the page for a Sangoma S500, which has both line keys and soft keys.*

3. Use the drop-down menus and fields to change settings as desired. These are the same settings you will find available in End Point Manager. For each button, you can select a button **type**, **label**, **value**, and **account** (not all options are available with all types of buttons).
4. After you have made the desired changes, scroll down to the bottom of the page and select one of the options in the drop down. Then click **Apply**.

1. **Save:** Saves the button configuration, but does not write out configuration nor does it restart the phone.
2. **Save and Rebuild Config(s):** Saves the button configuration and writes out configuration but does not restart the phone.
3. **Save, Rebuild Config(s) and Update Phones:** Saves the button configuration, writes out configuration and restarts the phone. The system will send a reboot command to the phone. The new button configuration should appear on the phone after the phone restarts.
4. **Reset to Template:**
# Restoring Phone Buttons to Default from UCP
1. Click the **Settings** button in the widget title bar to continue: 
2. Scroll to the bottom of the settings and select **Reset to Template** then click **Apply**.
