This update is currently only available for beta testers. To join the JDispatch beta, please follow the [steps to join](https://docs.amscomp.com/books/jdispatch/page/joining-jdispatch-beta "Joining JDispatch Beta")
- Updated security modules - Support for Android R - Updated signature module - Introduced the ability to take a picture of delivery vs. take signature - Bug Fixes # Dashboard V3.6.1 [2021/09/14] #### JDispatch Web Dashboard Release Notes for V3.6.1, released 2021/09/14 The following enhancements / bug fixes have been released for JDispatch ##### Enhancements for all users - General user interface improvements ##### Additional enhancements for premium users - Prep for next release of mobile app which will include ability to take photos of deliveries vs. signatures. ##### Bug Fixes - Corrected displaying of supplier / customer delivery statistics - Back-end security patches # Dashboard V3.6 [2021/07/02] #### JDispatch Web Dashboard Release Notes for V3.6, released 2021/07/02 The following enhancements / bug fixes have been released for JDispatch ##### Enhancements for all users - Improved Route Optimization - Inclusion of Pick-ups in route optimization - Addition of 'Rush' delivery indicator icon on delivery listing screen [](https://docs.amscomp.com/uploads/images/gallery/2021-07/image-1625252688812.png) ##### Additional enhancements for premium users - Additional information added to, and cleanup of delivery location window, accessed by clicking on the location button in delivery listing screen [](https://docs.amscomp.com/uploads/images/gallery/2021-07/image-1625252815812.png) [](https://docs.amscomp.com/uploads/images/gallery/2021-07/image-1625252856108.png) - Addition of 'Route Review' screen, accessed via the delivery location window [](https://docs.amscomp.com/uploads/images/gallery/2021-07/image-1625252962168.png) - Route review screen will show the optimized route suggested to the driver, along with the order of stops included - New KPI metrics added to JDispatch Dashboard - Rush Deliveries - Number of rush deliveries dispatched. Aimed to help identify if there are too many rush deliveries in a day. - Delivery Efficiency - Percentage of deliveries completed before the estimated delivery time calculated during route optimization - Delivery Window - Window (in minutes) that deliveries are completed when compared to estimated delivery time calculated during optimization ##### Bug Fixes - Corrected issues found in pickup summary reporting - Corrected issues in optimization when both a regular AND rush order for the same customer were assigned to a single run - Fixed a bug where the sort/filtering functions were not working in delivery pickup history reports - Fixed a bug where the sort/filtering functions were not working in the pickup summary screen. - Speed on location map for some users was reporting in Metres per second, not Kilometres per hour. This has been resolved. # JDispatch Mobile App V3.3 [2021/06/12] #### Release notes for the JDispatch Mobile Application released 2019/06/12 - Full overhaul of GPS module. - Introduced ability to check status of and reset GPS functions within settings page - Updates to route optimization to include pickups - Bug fixes # Dashboard V3.5 [2020/12/30] #### JDispatch Web Dashboard Release Notes for V3.5, released 2020/12/30 The following enhancements / bug fixes have been released for JDispatch - Additional status options (Received/Hold/Shipped) - Ability to modify status on delivery listing screen - Optional ability to automatically add orders as 'Received' when they are printed - Curbside pickup (For premium users) - SMS integration - Ability to notify dispatch staff of waiting customer via AMS PBX system - Integration with Counterpoint Cloud Platform QuickDial module - Icon updates - Back-end performance enhancements - Changes for consistency across look-ups - Fixed bug allowing duplicate suppliers to be added with same ID # Dashboard V3.4 [2020/04/29] JDispatch Web Dashboard Release Notes for V3.4, released 2020/04/29 - Introduction of 2 new status types 'Received' and 'In Pick' - Includes ability to adjust these statuses within the delivery listing page - Creation of new kiosk page to show all orders in process (Received / In Pick) and processed (In Transit / Delivered) - Updates to delivery listing page status updates - Bug fixes: - Error when trying to view signature in history listing - Delivered invoices continuing to flash as updated # Dashboard V3.3 [2019/12/23] #### JDispatch Web Dashboard Release Notes for V3.3, released 2019/12/23 This release of the JDispatch dashboard contains enhanced features for our Premium level users ##### New Features & Enhancements - **Real-time smooth scroll map for Premium users:** Premium users now have the ability to adjust the frequency at which their devices update position information on the JDispatch server. This allows the dashboard map to update device location real-time and navigate the device pins on the map without refresh. This also applies to the Kiosk maps. - **Introduction of driver alert reporting:** With the increased ping times from our mobile app, we can also enable Premium users to pull driver alert reports based on the Max speed and Max idle time set on your account. The new report is found under the 'Reports / Extracts' menu and can be generated for a date range, by driver or for all drivers. Both extended idle and overspeed errors are displayed in the report, which can be exported to excel by clicking the 'Export to Excel' button in the top right of the report panel. You can also view the location of extended idles alerts by clicking the icon in the 'Location' column. Parameters for the driver alert reporting are found under **Admin > Site Settings.** Default parameters are 15 minute idle time and overspeed of 125km. - **Navigation consolidation:** Similar navigation buttons have been grouped together in the navigation bar in an effort to tidy up the site navigation ##### Bug Fixes - Fixes to pick-up requests wherein only a portion of the parts are picked up. - Fixes to Kiosk navigation URL - Security Fixes - Fix where pick-up screen refresh only showed picked up listings. - Fixed mobile site navigation not showing. - Corrected the real-time update of delivery time showing on cancelled delivery invoices. # Dashboard V3.2 [2019/06/12] #### JDispatch Web Dashboard Release Notes for V3.2, released 2019/06/12 - Enhanced password and site security - Modification to non-admin user to hide total dollars delivered - Introduction of 'Dispatcher' login with unique permissions as well as the ability to assign drivers - Modifications to handle pick-up transactions to be signed for in store on a tablet - Introduction of 'alerts' section in top navigation bar to notify users of dashboard an/or mobile app updates - General Bug Fixes - Introduced a new setting wherein users can define how frequently the mobile app will search for location information. This setting is the **minimum** amount of time that will elapse before attempting to find a new location. - Style changes for the dashboard login page - Migration of the driver communication module to Google Firebase Cloud messaging # JDispatch Mobile App V3.2.23 [2019/06/12] #### Release notes for the JDispatch Mobile Application released 2019/06/12 - Updated security modules - Support for Android O/P/Q - Migration to Google Firebase Messaging for system to driver communication - Update to driver chat message display to not truncate message, and extend period of time from which messages will show. - Back-end updates to the GPS tracking module - Updated support for back-end integration - Big Fixes - Bug Fixes # JDispatch Web Dashboard How-To Guides for the JDispatch Web Dashboard # Dashboard The JDispatch dashboard page provides you with a quick view of some key metrics on your delivery performance. These metrics are live and updated every 10 seconds. ### KPI Cards [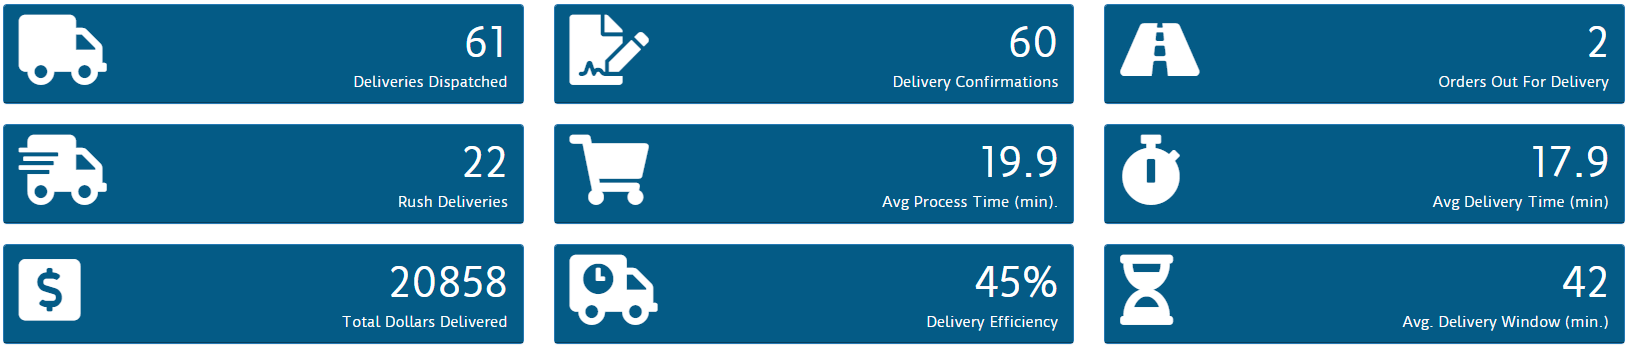](https://docs.amscomp.com/uploads/images/gallery/2021-08/image-1628548264433.png) Quick-glance KPI cards are shown at the top of the page. The KPIs listed are : - Deliveries Dispatched - Number of deliveries that have been dispatched with drivers today - Delivery Confirmations - The number of delivery confirmations completed by your drivers today - Orders Out For Delivery - The number of deliveries currently out with drivers - Rush Deliveries\* - The number of 'Rush' type deliveries dispatched today - Avg Process Time - The average amount of time between when the order is taken and when the order is dispatched. - Total Dollars Delivered - The total value of all deliveries confirmed today - Delivery Efficiency\* - The amount of deliveries that were confirmed within the optimized route ETA - Avg. Delivery Window\* - The average minutes between an optimized delivery ETA and when the invoice was delivered \*\* Denotes a premium user feature* ### Performance Graphs Below the KPI cards are some basic performance graphs [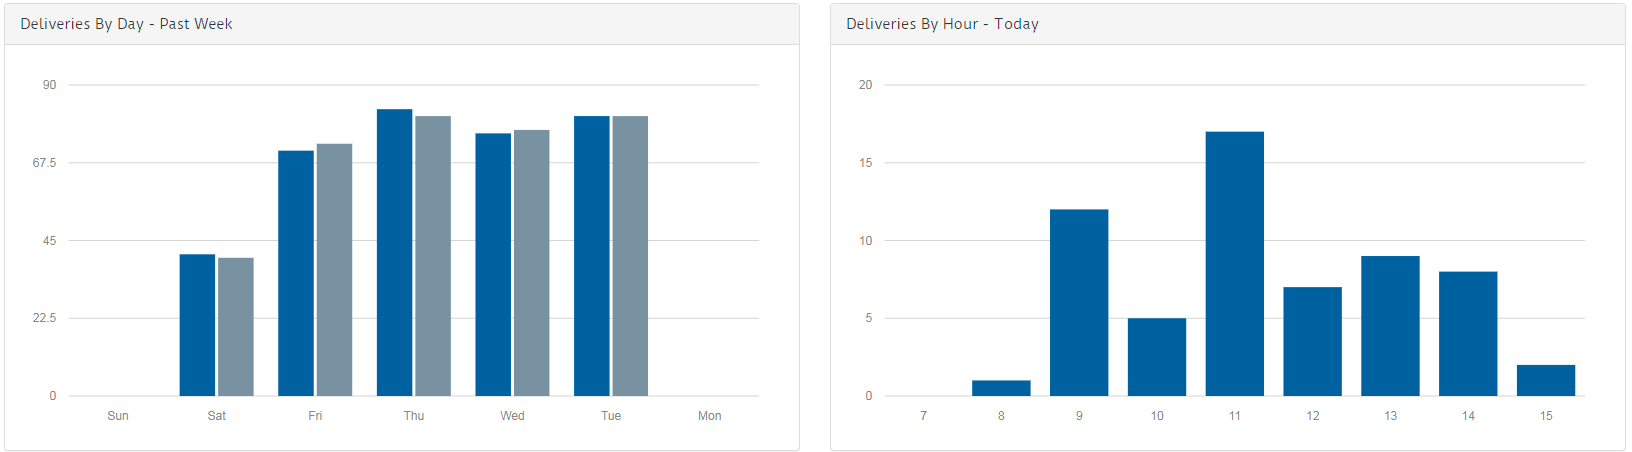](https://docs.amscomp.com/uploads/images/gallery/2021-08/image-1628548553573.png) - Deliveries by Day - Lists deliveries and confirmations by day, over the past week, working backwards from today left to right - Deliveries By Hour - Volume of deliveries, by hour, for today between 7am and current time. ### Performance Tables After the graphs are two tables highlighting delivery volumes by driver and customer [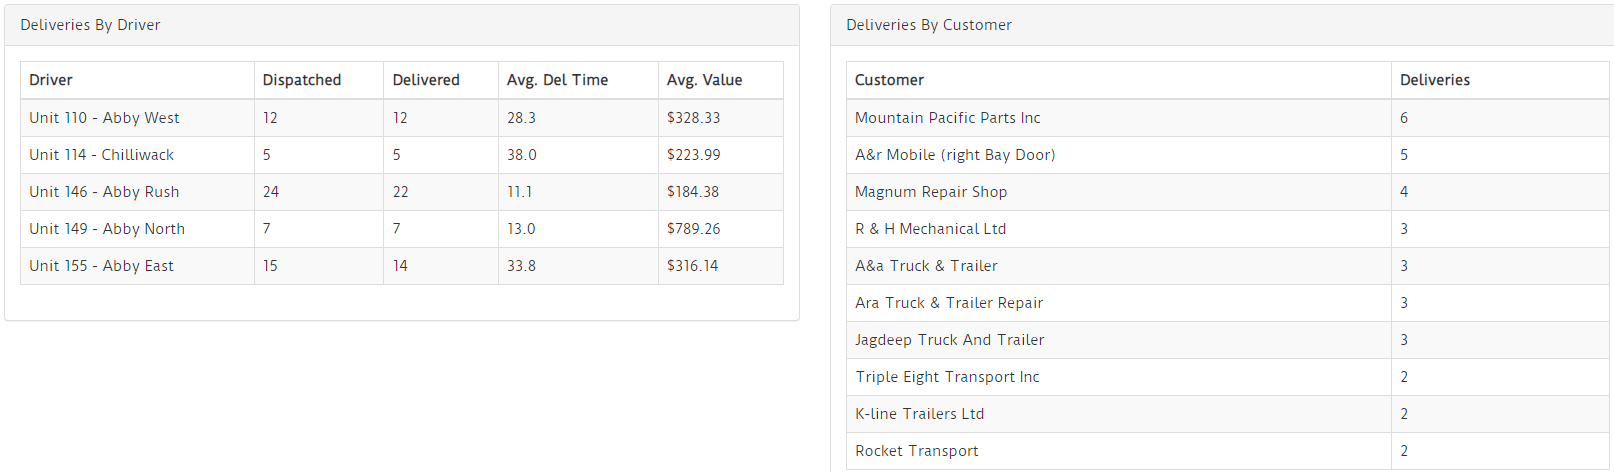](https://docs.amscomp.com/uploads/images/gallery/2021-08/image-1628548672119.png) # Deliveries ### Overview The deliveries tab in JDispatch lists all outstanding deliveries from previous days, as well as any deliveries dispatched or delivered today. [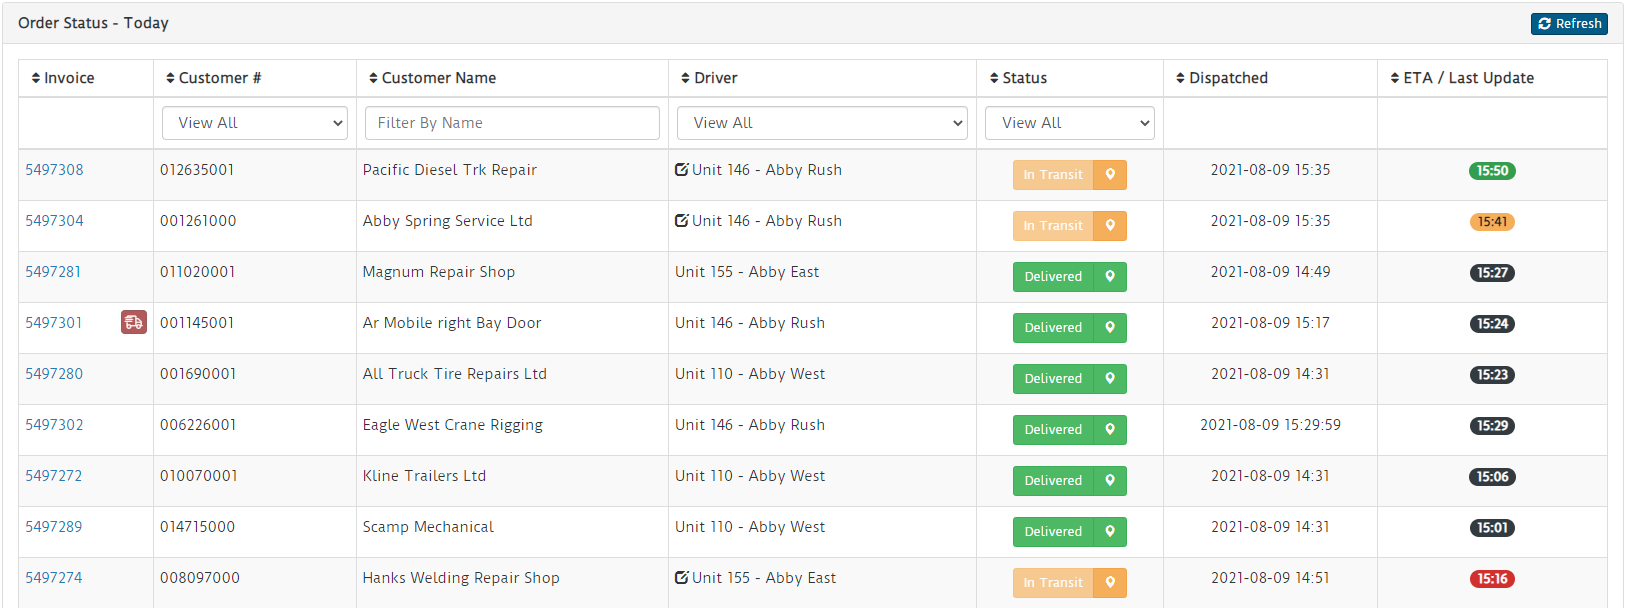](https://docs.amscomp.com/uploads/images/gallery/2021-08/image-1628548836526.png) ### Features #### Invoice PDF [](https://docs.amscomp.com/uploads/images/gallery/2021-08/image-1628549038533.png) Clicking on the invoice number will open a .pdf copy of the selected invoice #### Change Driver [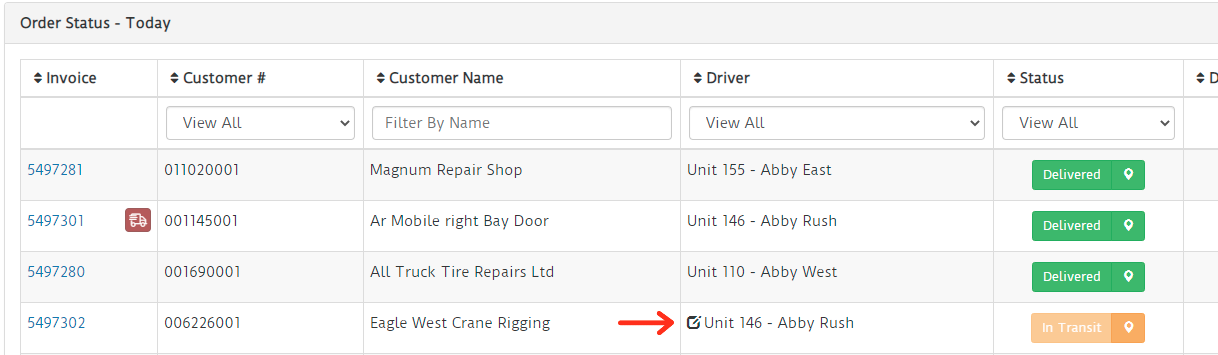](https://docs.amscomp.com/uploads/images/gallery/2021-08/image-1628549464352.png) Clicking the edit icon next to the driver name for any undelivered transaction will present you with a drop-down to change the driver assigned to the selected invoice. [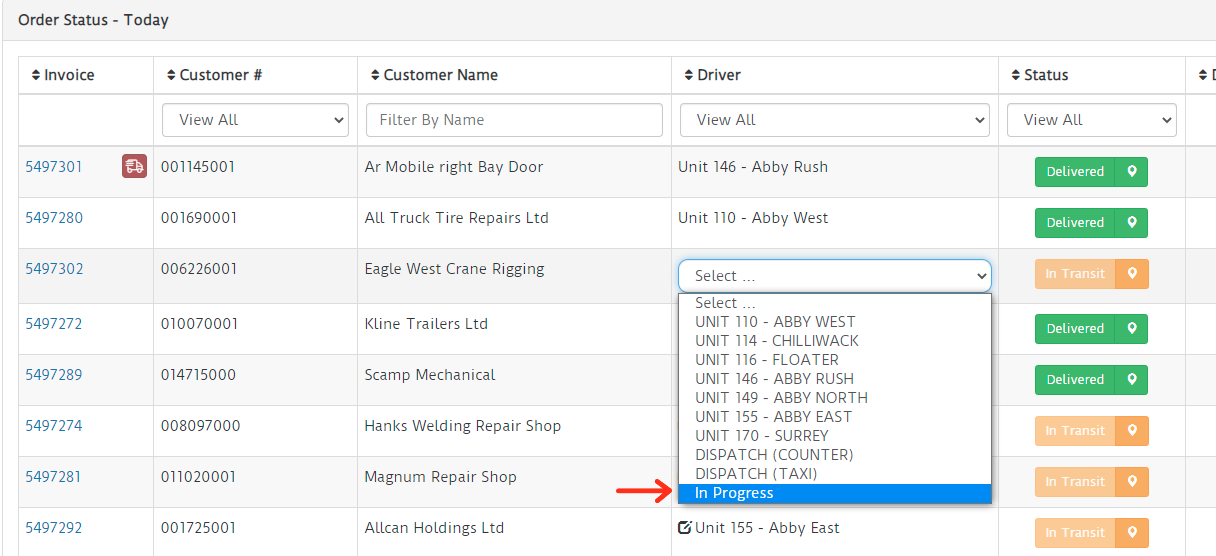](https://docs.amscomp.com/uploads/images/gallery/2021-08/image-1628549475371.png) Moving a delivery between drivers will add/remove that delivery from the device of the drivers involved and, for premium users, recalculate their routes #### Change Delivery Status [](https://docs.amscomp.com/uploads/images/gallery/2021-08/image-1628549656163.png) If you have opted in to see all 'In Progress' invoices, and your system is submitting in progress orders via the JDispatch API, you will have the ability to modify the status of a delivery. Clicking on the status button will present you with a listing of possible invoice statuses. [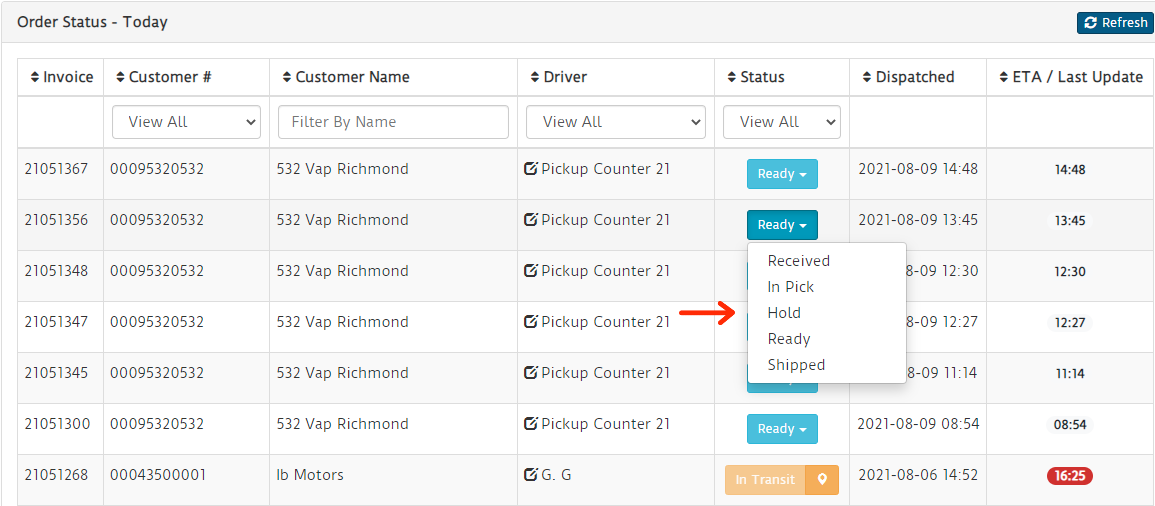](https://docs.amscomp.com/uploads/images/gallery/2021-08/image-1628550069835.png) - Received - Order has been received by the system, but no action has been taken yet - In Pick - Item is currently in pick. At this point, you could modify the driver to a user who may be picking the order and it will show in the shipping kiosk mode - Hold - The transaction is on hold. May be picked, but not yet ready for pickup. These items do not show on any devices - Ready - The transaction is ready to be dispatched. Ready can be used for pickup deliveries where you have a tablet or similar device at your pickup counter. Any ready transactions assigned to a pickup 'driver' will display on that device - Shipped - This is for non-delivery transactions and will close the transaction out. Once a transaction is marked as shipped, you can no longer modify the status.In Transit and Delivered are not options here as traditional deliveries should be processed via our API. Any dispatch documents posted for a 'in progress' transaction will modify that transaction's status automatically.
#### Signature Recall [](https://docs.amscomp.com/uploads/images/gallery/2021-08/image-1628550639628.png) For any delivered invoice, clicking on the status button will present you with a copy of the signature taken at time of confirmation. It will also display any name that was entered at time of confirmation. [](https://docs.amscomp.com/uploads/images/gallery/2021-08/image-1628550720326.png) #### Delivery LocationThis is a premium user feature
Both delivered and in transit transactions may have a small location icon button available. [](https://docs.amscomp.com/uploads/images/gallery/2021-08/image-1628550933916.png) Clicking on the location button will present you with an info window of the driver's current location for any transactions currently in transit, or the location where the invoice was confirmed for any transactions that have been delivered. [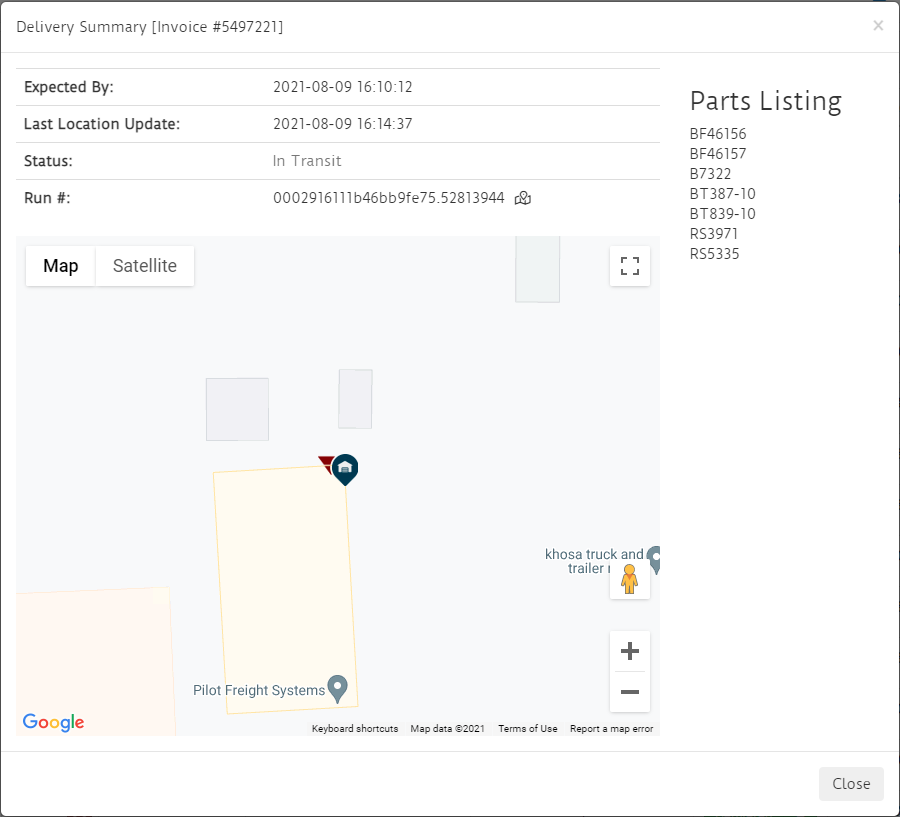](https://docs.amscomp.com/uploads/images/gallery/2021-08/image-1628551011449.png) ##### Delivery Run ReviewRun review will include markers for both deliveries and pickups on a selected run
You can optionally review the original optimized route by pressing the[](https://docs.amscomp.com/uploads/images/gallery/2021-08/image-1629411994804.png)icon [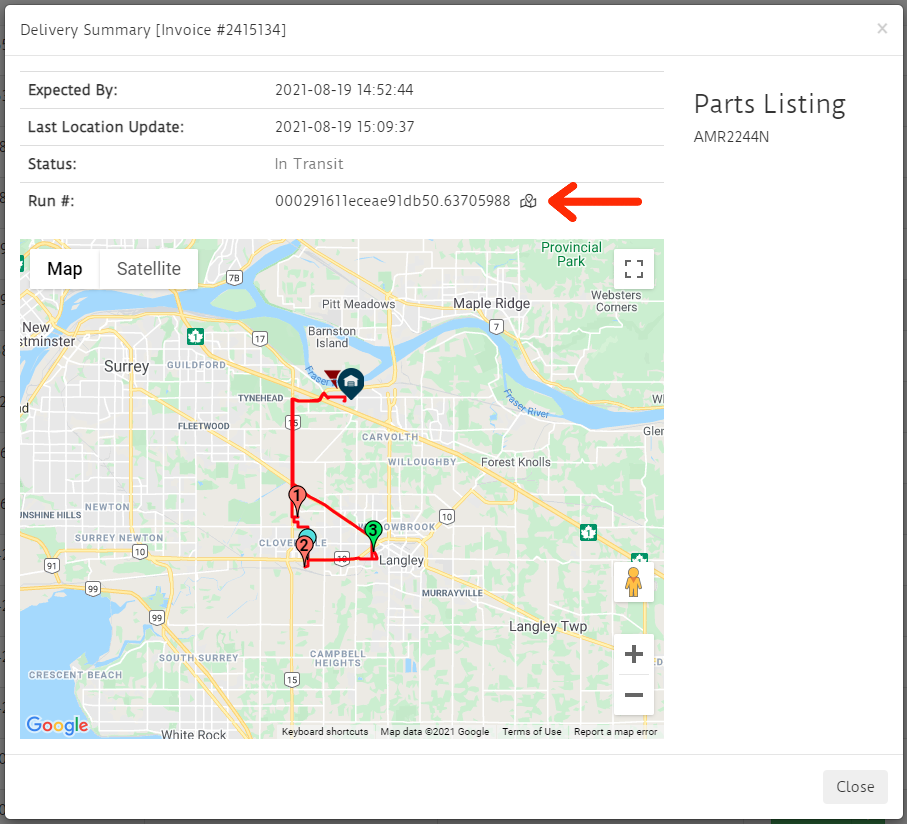](https://docs.amscomp.com/uploads/images/gallery/2021-08/image-1629411409789.png) This replaces the content of the delivery / driver location map and replaces it with the optimized route overlaid onto the map. Each stop is numbered based on it's optimized sequence, and the markers will change to green as the deliveries are completed. The blue location pin indicates where the driver currently is. #### Delivery ETAThis is a premium user feature
Premium users also have a color-coded ETA badge on all in transit deliveries. If a delivery could not calculate an ETA due to a poorly formed address, a simple 'Unavail' message will show [](https://docs.amscomp.com/uploads/images/gallery/2021-08/image-1628551117151.png) The ETA color coding has 4 color schemes: - Black - Invoice has been delivered. Time displayed here is the time the invoice was delivered - Green - On Time. The time shown is the ETA for this delivery, and the driver still appears to be on track to make the delivery - Yellow - Close. The time shown is the ETA for this delivery, but the current time is with a 10 minute window before or after the calculated ETA - Red - Late. The time shown is the originally calculated ETA, but it is now more than 10 minutes past the ETA. # Curbside PickupThis is a premium user feature and requires additional setup prior to going live. If you are interested in utilizing JDispatch curbside pickup, please call us at **1-800-663-1978**
#### Overview JDispatch curbside pickup allows your customers to notify your dispatch team of their arrival and provides information to your dispatcher through the JDispatch web dashboard to allow them to bring product out to the customer and, optionally, take a signature. #### Process For Customers ##### Wholesale Customers - Customer Texts: PICKUP - System Responds: *Hi, please enter your account number.* - Customer Texts their account number - System Responds with a list of any orders currently ready for pickup, and asks them to enter their stall number - Customer texts back with a stall number - System responds: *Thank You! We have notified our dispatcher and will be out to stall* **\[STALL NUMBER\]** *with your order(s) shortly. Please note that we may ask for ID to confirm pickup.* [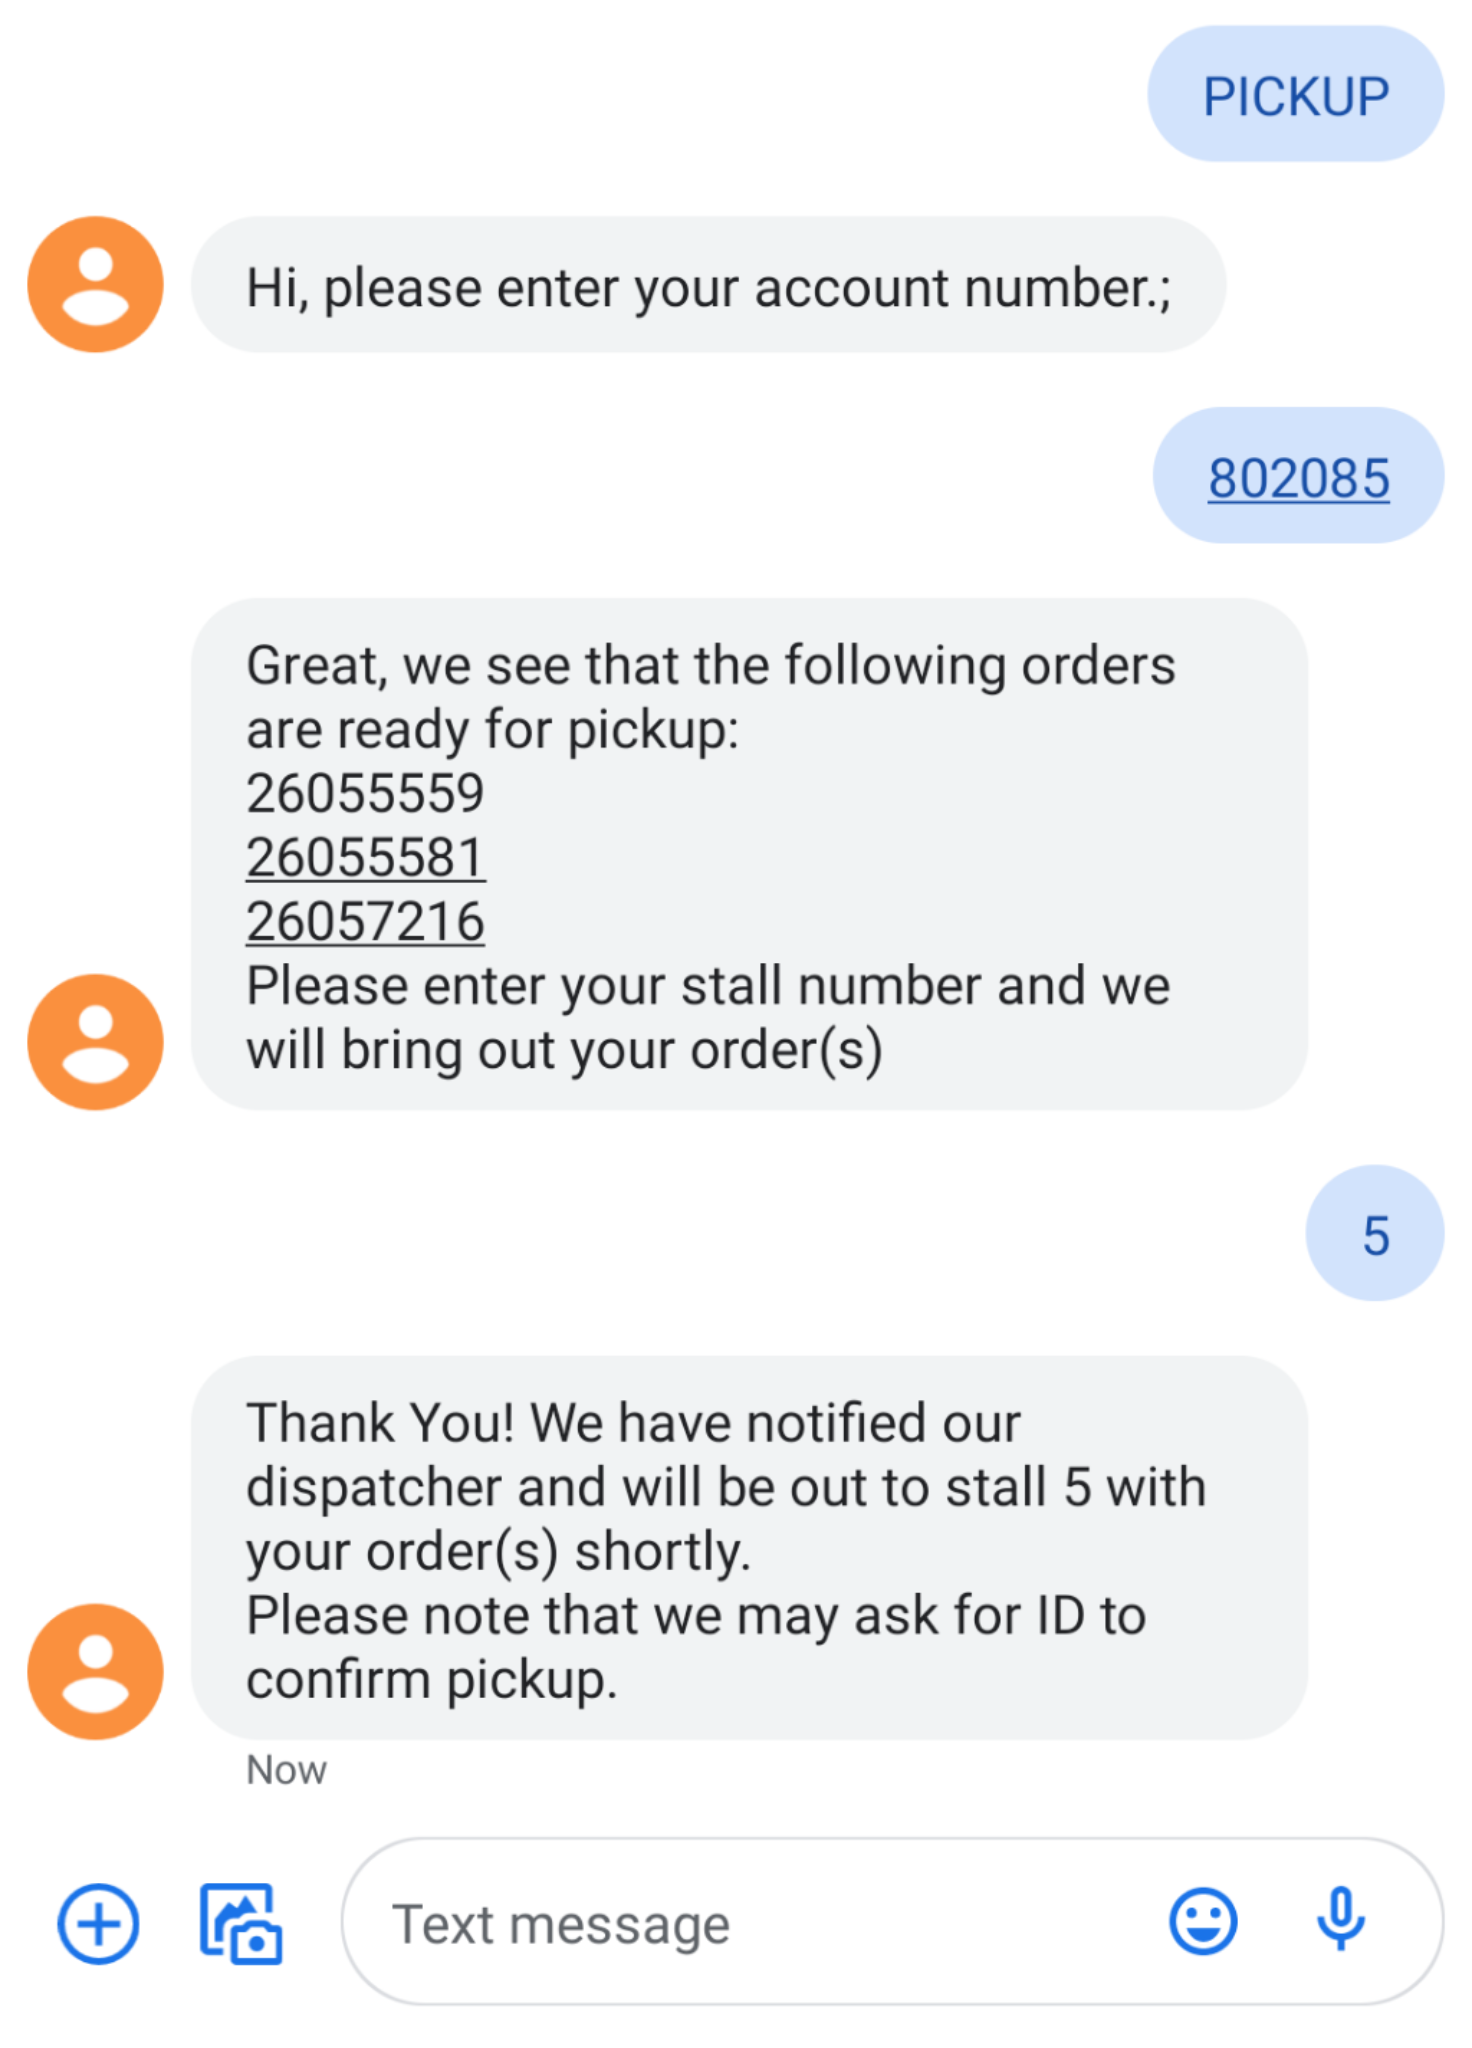](https://docs.amscomp.com/uploads/images/gallery/2021-08/image-1629478420079.png) - The system will then post all of that information into the 'Curbside Pickup' screen, assigned to a 'pickup' driver associated with your branch. The pickup driver is usually assigned to a tablet running off the branch WiFi. [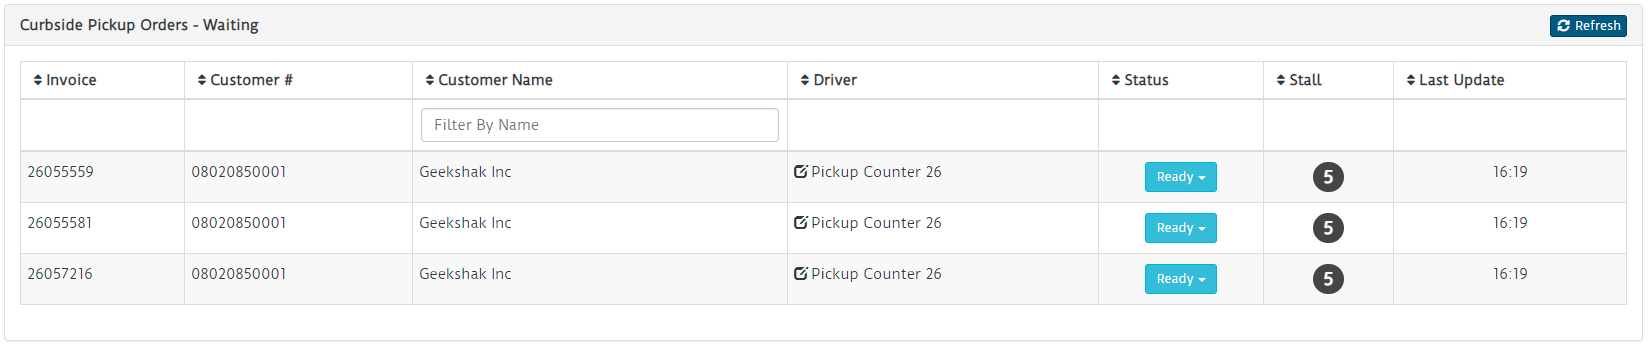](https://docs.amscomp.com/uploads/images/gallery/2021-08/image-1629478478710.png) - From there, users of our phone system would get a page in to their dispatch area over the phone to let the dispatcher know that someone was waiting curbside. Not sure if that will be possible with your phone system. Possibly. - Staff can then bring the invoices out, and take e-signature at the vehicle. ##### Retail Customers - Customer Texts: HERE - System Responds: *Hi, please enter your order number.* - Customer Texts their order number - *This can be provided via email using the autoecat retail 'pick up in store' feature* - System Responds with the status of the order and, if it is ready, will as what stall the customer is in - Customer texts back with a stall number - System responds: *Thank You! We have notified our dispatcher and will be out to stall* **\[STALL NUMBER\]** *with your order(s) shortly. Please note that we may ask for ID to confirm pickup.* [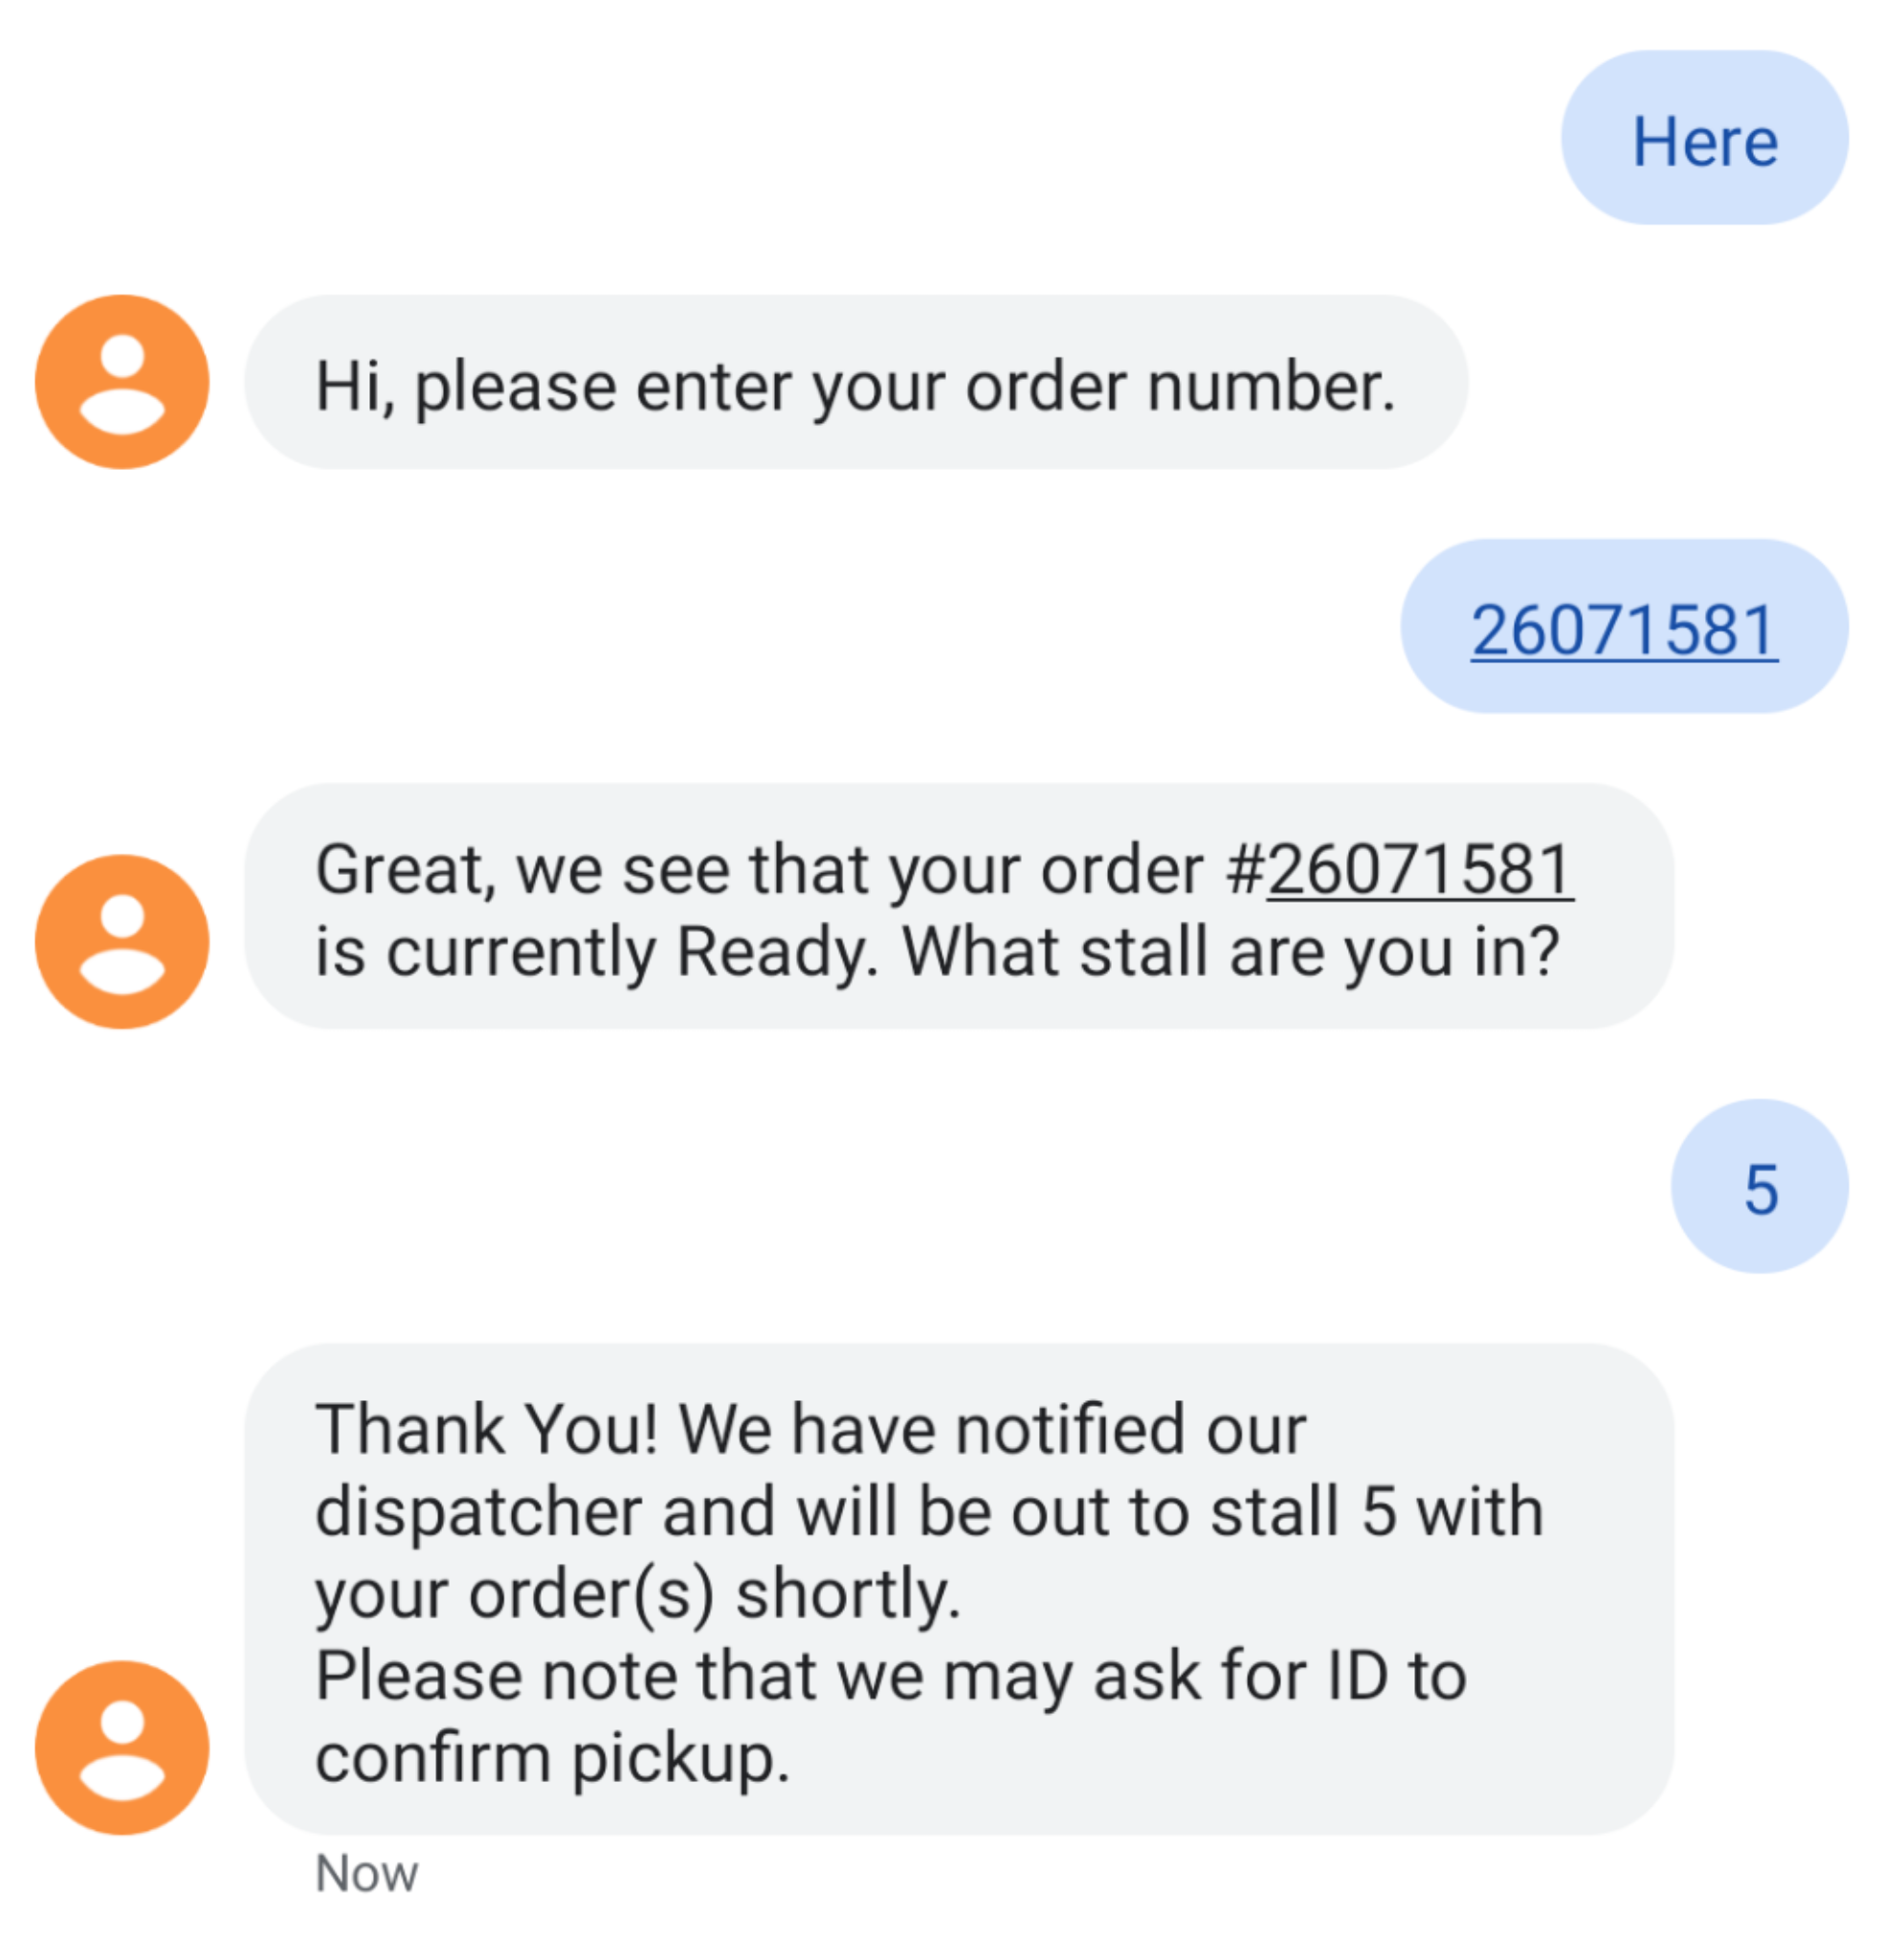](https://docs.amscomp.com/uploads/images/gallery/2021-08/image-1629479277776.png) - The system will then post all of that information into the 'Curbside Pickup' screen, assigned to a 'pickup' driver associated with your branch. The pickup driver is usually assigned to a tablet running off the branch WiFi. [](https://docs.amscomp.com/uploads/images/gallery/2021-08/image-1629478478710.png) - From there, users of our phone system would get a page in to their dispatch area over the phone to let the dispatcher know that someone was waiting curbside. Not sure if that will be possible with your phone system. Possibly. - Staff can then bring the invoices out, and take e-signature at the vehicle. # Pickups / Returns #### Overview This tab shows a listing of all outstanding pickups and allows you to create pickup requests. Pickups are used only within the jDispatch module at this time, and are a useful way to keep your staff informed of the status of warehouse pickups as well as keep tabs on core & warranty returns from customers. #### Creating A Pickup - To create a pickup request, click the **Create** button in the top right corner of the **Pickups / Returns - Today** panel. [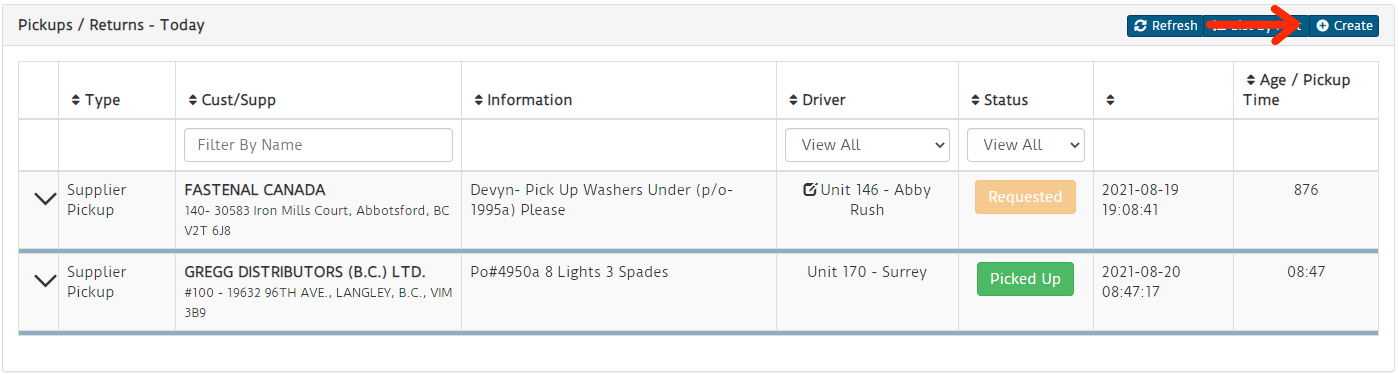](https://docs.amscomp.com/uploads/images/gallery/2021-08/image-1629479867309.png) - Once clicked, the **Add New Pickup Request** modal will show [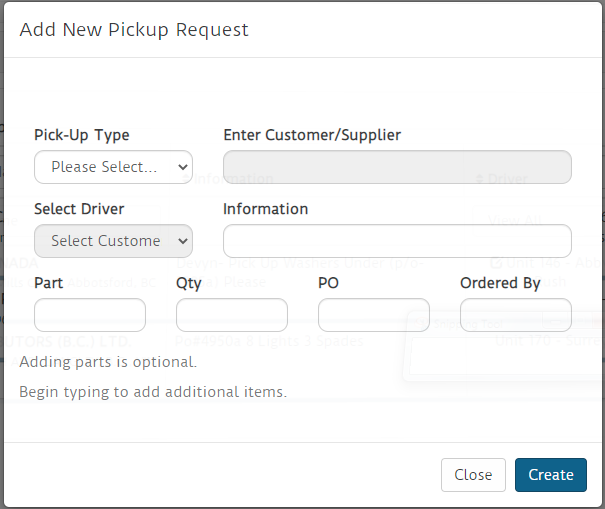](https://docs.amscomp.com/uploads/images/gallery/2021-08/image-1629479980876.png) - Start by selecting the type of pickup (Customer or Supplier/Warehouse), then select the customer or supplier they should be visiting. To pick a customer or supplier, begin typing in the name. A number of options should start to display. Once the one you wish to select is visible, just click on their name. - If it is a customer pickup and there are any drivers currently assigned a delivery to that customer, that driver will be automatically selected as the driver. You can change this. If there are no drivers currently scheduled to deliver products to this customer, please select a driver to assign the pickup to. - In the information field, type in any notes you want to be visible to the driver when they view the pickup request on their phone. - If there are specific parts to be picked up, you may enter them in the **Items to be picked up** As you type in the first field, another part field will appear. - Clicking the **Create** button at the bottom will finalize the pickup request and send it to the selected driver. It will also appear in the pickup listing table #### Adding items to a pickup request Once a pickup is created, you can add additional items to the pickup request via the pickup listing - Click the expand down button next to the pickup you want to add to - Enter in part information such as part number, qty, PO and who is requesting the item - Click the green plus symbol button to the right of the part entry row [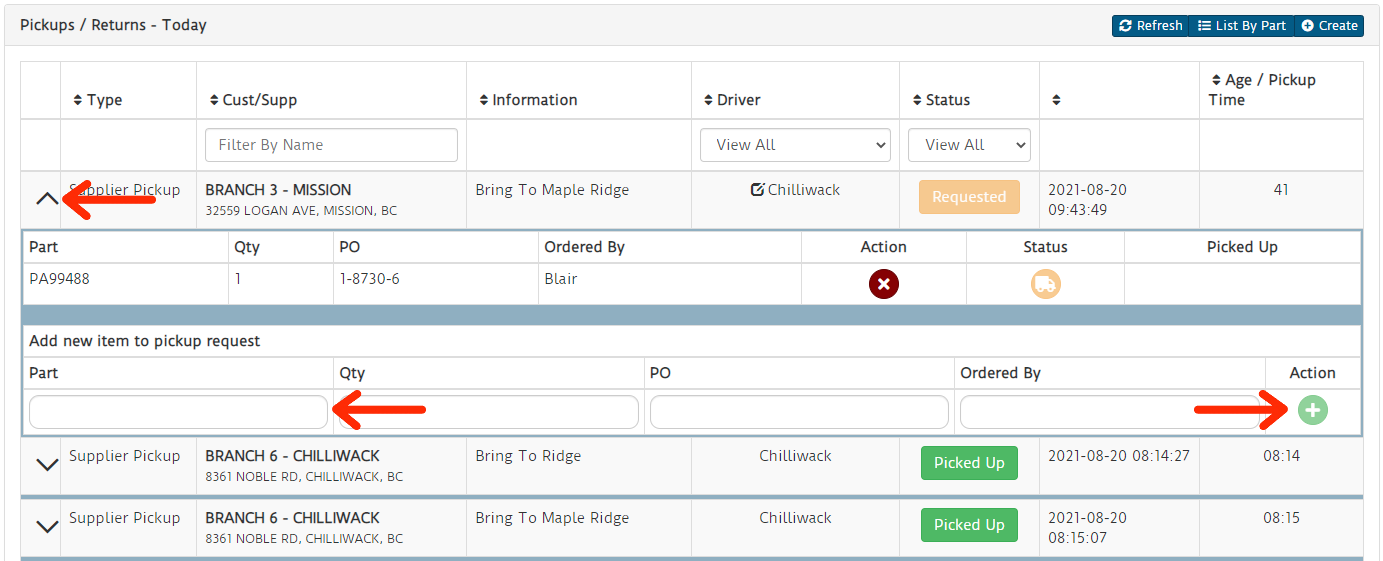](https://docs.amscomp.com/uploads/images/gallery/2021-08/image-1629480958223.png) #### Removing items from a pickup request Once a pickup is created, you can remove items from the pickup via the pickup listing - Click the expand down button next to the pickup you want to add to - Click the red X button next to the item you wish to remove [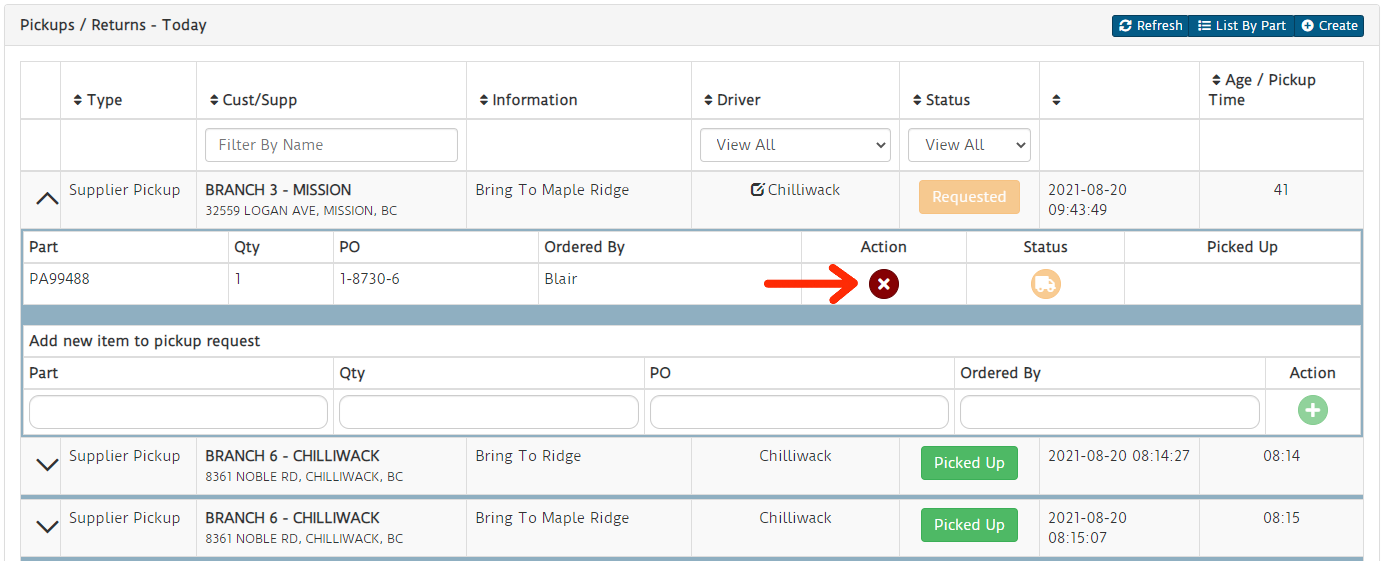](https://docs.amscomp.com/uploads/images/gallery/2021-08/image-1629481071983.png) #### Change driver assigned to pickup request Any pickup requests that have not been completely confirmed can have the assigned driver changed - Click the edit icon next to the driver's name on any delivery you wish to change [](https://docs.amscomp.com/uploads/images/gallery/2021-08/image-1629481207884.png) - This will present you with a drop-down of drivers to select. Once you select a driver, the pickup request will be transferred to that driver, and their device will receive a notification of the change #### View Pickups by Part number You can optionally change the view of pickup requests to view the requests by part number in case you have a part number specific question you need answered. - Click the **List By Part** button in the top right of the **Pickups / Returns - Today** panel [](https://docs.amscomp.com/uploads/images/gallery/2021-08/image-1629481339124.png) - This will change the pickup panel view to list the requests by part [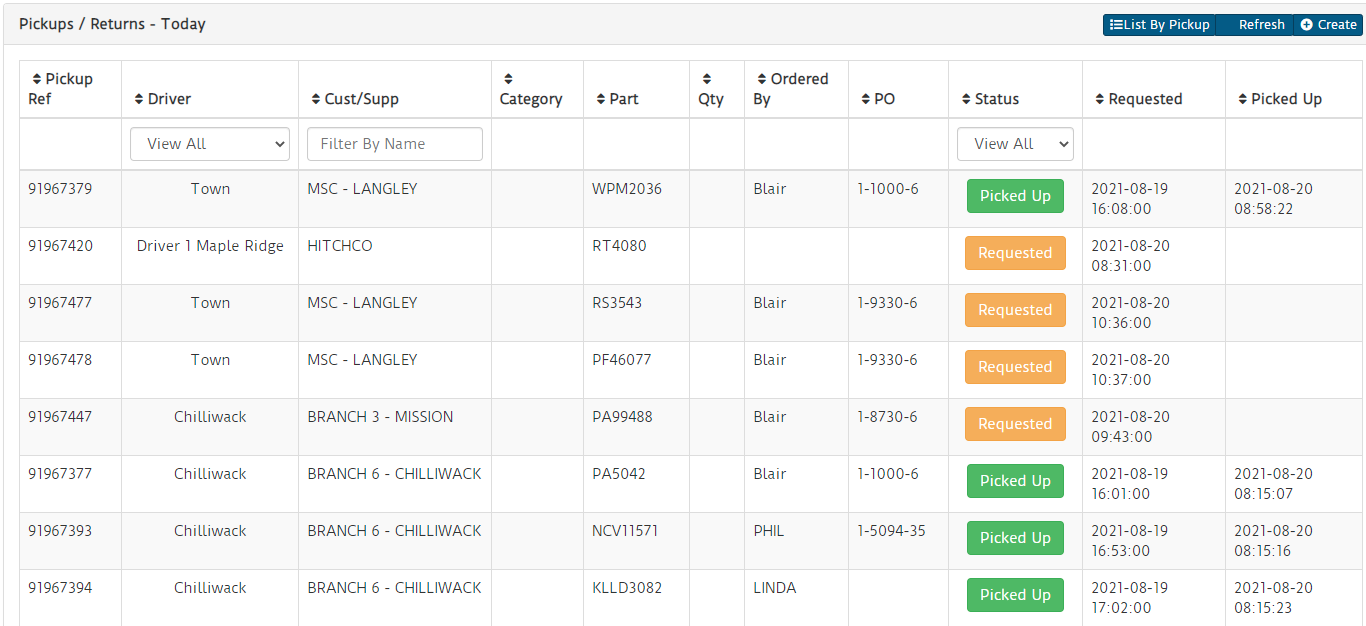](https://docs.amscomp.com/uploads/images/gallery/2021-08/image-1629481379285.png) # Driver Communication ### Overview The his tab shows a small conversation box for each driver that has signed in, or had any deliveries or pickups assigned to them today. ### FunctionsThe driver communication functions are one-way communication only.
Typing a message in the box labled *Type your message here* and clicking the **Send** button will send a message to the driver and notify them much like a text message. # Using The Web Dashboard # Basic Usage Notes - The jDispatch Dashboard acts as your portal to not only review and analyze your deliveries and delivery performance, but also communicate with your drivers, request part pickups and configure your jdispatch mobile application. - This document will review all tabs of the dashboard, starting at the top. # Logging In, Menus and Navigation - To log into your jDispatch dashboard, open an internet browser and go to [http://www.jdispatch.ca](http://www.jdispatch.ca). - Each branch will have their own login. - From there, your credentials are: - Login: \_\_\_\_\_\_\_\_\_\_\_/ Password: \_\_\_\_\_\_\_\_\_\_\_\_\_\_ - Once logged in, the jDispatch dashboard menus are all found on the left part of the screen. To log out, click the red log out button in the top right corner. # Dashboard - The main Dashboard tab is a quick snapshot of some key performance indicators. - First are the ‘live cards’. The blue boxes along the top. These are updated as confirmations are sent back to the system, so you may notice the values change while you are viewing the page. - Deliveries Dispatched: The is a count of how many deliveries have been dispatched today. - Delivery Confirmations: This is the total count of confirmed deliveries for today. - Out For Delivery: This is a count of how many deliveries are currently en route. - Avg Process Time: This is the average time between invoicing and dispatch for any invoices beneath the ‘Rush Limit’ threshold (see the settings section for more info). - Avg Delivery time: This is the average time between dispatch and delivery for any invoices beneath the ‘Rush Limit’ threshold (see the settings section for more info). - Total Dollars Delivered: This is the total (to the nearest dollar) of invoices that have been delivered. - Next we have the daily/weekly graphs. These are updated when the dashboard is launched and may need a page refresh to update. - Deliveries By Day: This graph shows, by day, the deliveries and confirmations done in the past week - Deliveries by Hour: This shows, by hour, the number of confirmed deliveries today. - Deliveries by Customer: This is a table of all customers who have been delivered to today, the number of dispatched and delivered invoices and the average delivery time by customer. - Deliveries by driver: This is the number of dispatched and delivered invoices by driver. # Corporate Live Stats - This tab shows all of the ‘live cards’ for each branch in your organization. For a little friendly competition, the best delivery and dispatch times as well as highest dollars delivered will show in green, while the rest show in red. # Deliveries - This tab shows a listing of all invoices that have been dispatched in the past 24 hours or had any action on them today. Each column can be sorted by clicking on the column heading. The customer, driver and status field can also be filtered by selecting a value from the drop down list in the heading, and the customer name can be filtered by typing into the text box in the heading. - Delivered invoices will show the time of delivery, while in transit invoices show the current age of the invoice from time of dispatch. - Clicking the green **Delivered** button will reveal the confirmation for that invoice. If it was signed for, a signature will be available. - Clicking on the invoice number will open a .pdf copy of the invoice. - The delivery listing will update every 20 seconds, so the content may change while you are viewing it. - In the top right of the delivery listing panel is a ‘refresh’ button to force the table to refresh. # Pickups - This tab shows a listing of all outstanding pickups and allows you to create pickup requests. Pickups are used only within the jDispatch module at this time, and are a useful way to keep your staff informed of the status of warehouse pickups as well as keep tabs on core & warranty returns from customers. - To create a pickup request, you want to click the **Expand** button on the right side of the **Create Pick-Up Request** - Start by selecting the type of pickup (Customer or Supplier/Warehouse), then select the customer or supplier they should be visiting. - If it is a customer pickup and there are any drivers currently assigned a delivery to that customer, that driver will be automatically selected as the driver. You can change this. If there are no drivers currently scheduled to deliver products to this customer, please select a driver to assign the pickup to. - In the information field, type in any notes you want to be visible to the driver when they view the pickup request on their phone. - If there are specific parts to be picked up, you may enter them in the **Items to be picked up** As you type in the first field, another part field will appear. - Clicking the **Create Pickup Request** button at the bottom will finalize the pickup request and send it to the selected driver. It will also appear in the pickup listing table. # Driver Communication - This tab shows a small conversation box for each driver that has signed in, or had any deliveries or pickups assigned to them today. - Typing a message in the box labled *Type your message here* and clicking the **Send** button will send a message to the driver and notify them much like a text message. # Driver Location - The driver location tab is a map that shows where each driver currently is. The initial view of the map should contain all drivers that are currently out for pickups or deliveries. - To the right of the map is a list of the drivers, by name. Clicking on any of these names will pan the map to that driver and open an info window for that driver. - The driver’s info window contains the following: - Their Name - Their current speed - Their last delivery, the invoice delivered, the time is was delivered and to whom it was delivered. - The invoices they still have on board to deliver. - A box to type a message and send it to them. # Data Extracts - The data extracts tab allows you to do an extract of detailed delivery information for a given time frame, for specific drivers or customers. - Select the date range, customer and/or driver. Only a date range is required. - Once the information is entered, click the **Extract** Once the extract is complete, a small box will appear below the **Extract** button with a .csv file name. Clicking on this link will download the csv file to your PC. - The csv file contains the following info: - Invoice, Status, Branch, Customer #, Customer Name, Order Date, Dispatch Date, Delivery Date, Time to deliver, driver ID, Driver Name, Invoice Total, Recipient # Delivery History - The delivery history tab allows you to do a quick search for deliveries, by day, without having to extract a file. - Select a start and end date and click the **Submit** - The **Delivery history Listing** panel will update with all deliveries for the date range provided. The table is sortable and filterable much like the delivery listing tab. - Clicking the invoice number will give you a .pdf copy of the invoice, and clicking the green **Delivered** button will show the confirmation info and signature if applicable. # Register Phones - This tab allows you to register phones and reassign devices. For more info on registering your phone for the first time, please refer to the jDispatch phone setup document. - To reassign a phone when drivers switch phones, simply find the unit number of the phone in question (Once a phone is registered, the unit number will always display in the app when opened). Drag the blue **Unit** button over to the box next to the drivers name who will have the device. When the green check appears, the device is assigned. # Site Settings Dashboard Settings - These settings have a direct affect on how the dashboard operates and displays - Rush Order Time Limit: Changing this value will adjust what the ‘Live Cards’ on the kpi dashboard use as a time limit. This is aimed to help weed out dispatched invoices that shouldn’t be measured, such as stock orders. - Timezone: This should be set for your current timezone and is used for display of times in the dashboard. - Language: This setting controls the language for both the dashboard and all associated mobile devices. Mobile App Settings - Allow Confirmation Without Signature: Checking this option will enable the **Confirm** only button in the app. Meaning that the driver will not be forced to obtain a signature - Activate GPS Tracking: This tells the mobile devices to submit their position to the jDispatch server. Disabling this will disable all map features. - Require Recipient Name: Checking this will require that the driver type a name in when getting a customer’s signature. User Profile - This panel is more for aesthetics and allows you to change your password. - Update Password: Key a new password in here, and repeat it in the **Confirm Password** box to update your user password. - Homepage: This is not currently used. - Logo: This is the logo that appears in the top left corner of the dashboard. - Direct Access Link: This link can be used as a shortcut to allow counterstaff to access basic features of jDispatch without having to log in. # Admin Function ### Overview The admin section provides a number of functions used in the configuration and setup of the web dashboard ### Corporate Live Stats This page shows key metrics of all branches belonging to the JDispatch Sponsor ### Customers / Suppliers This page allows you to search key metrics specific to certain customers and/or suppliers. You can also add new suppliers here. #### Viewing Customer Statistics [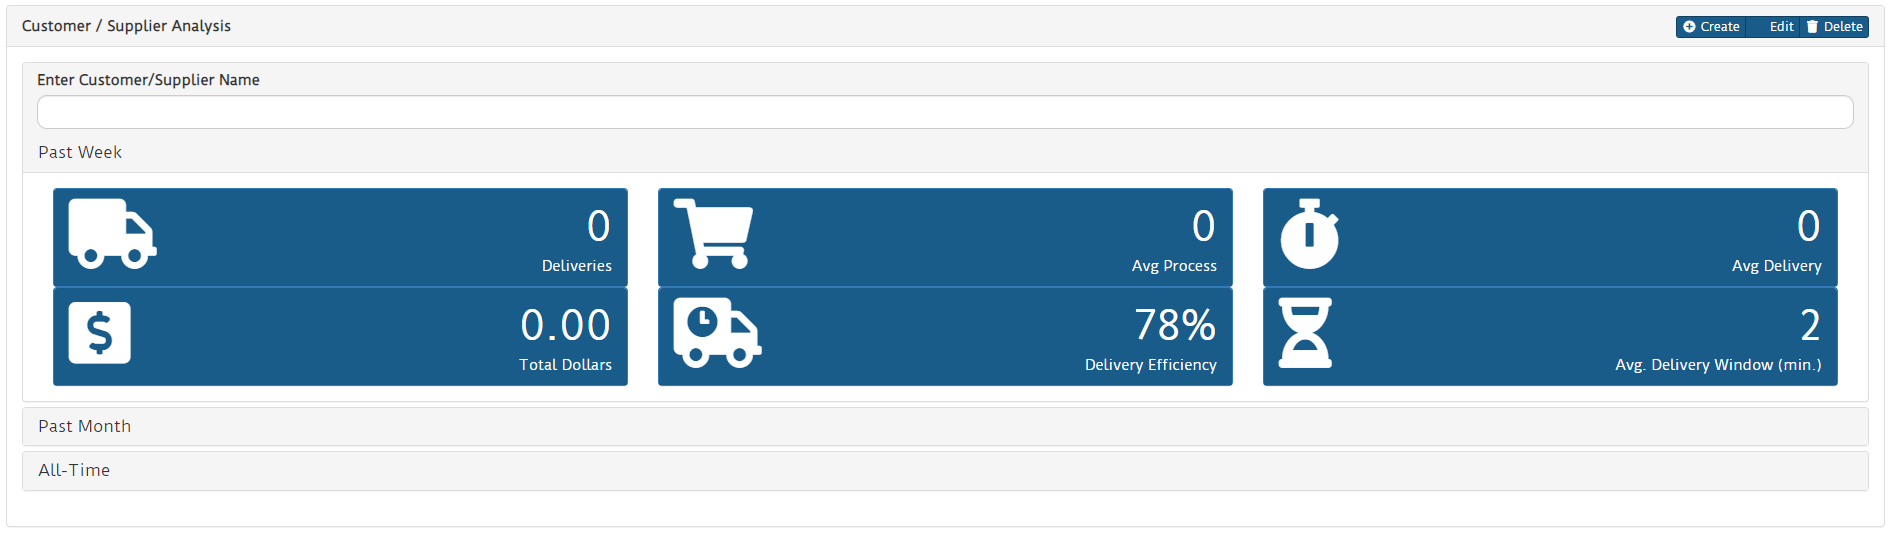](https://docs.amscomp.com/uploads/images/gallery/2021-09/image-1633028940923.png) To view a specific customer's info. Begin typing into the **Enter Customer/Supplier Name** field. Matching customers will display. Cick the desired customer and the cards below will update. #### Adding / Changing Suppliers From the main Customer / Supplier page, click the **Create** button to create a supplier or **Edit** button to edit an existing supplier [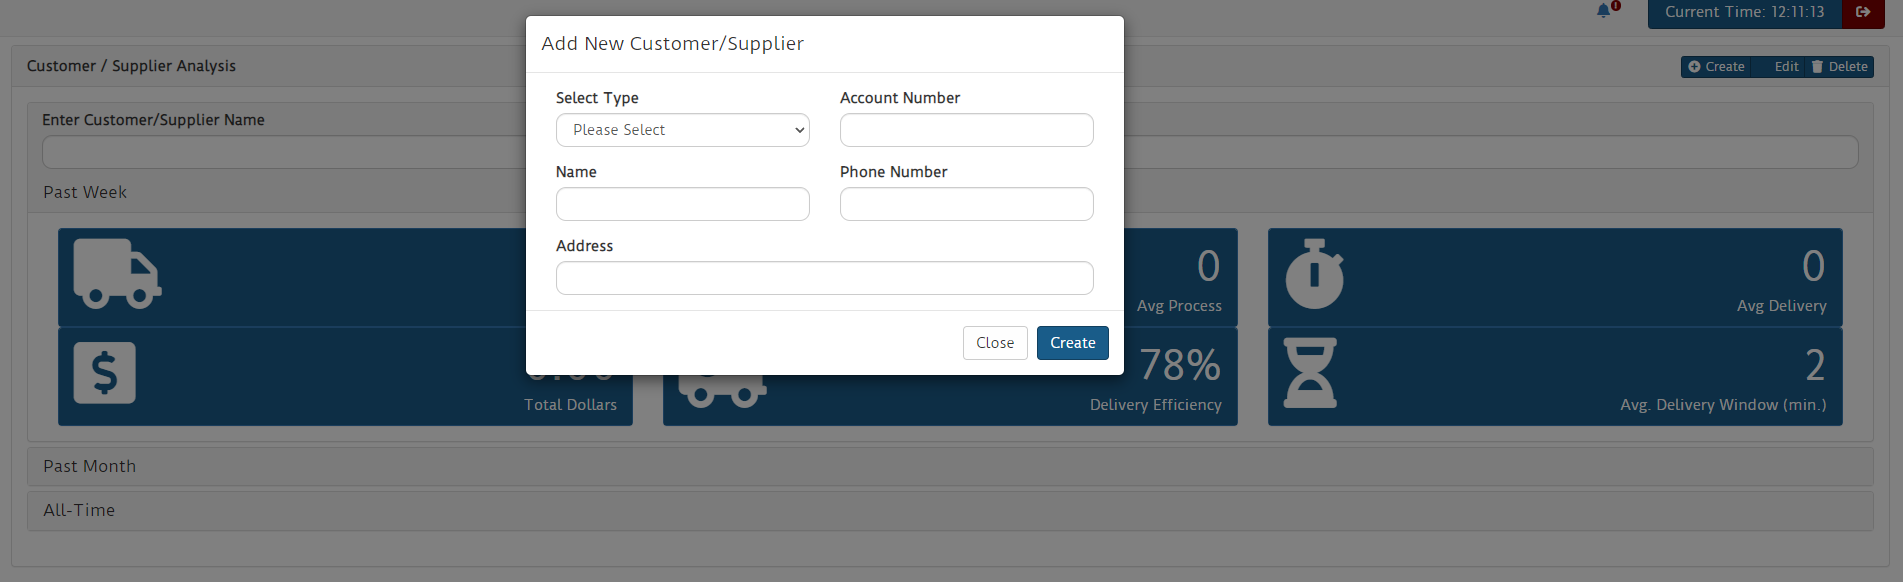](https://docs.amscomp.com/uploads/images/gallery/2021-09/image-1633029086994.png) In the modal that pops up, enter in the following: **Select Type -** Select either Supplier or Customer **Account Number -** Enter in a UNIQUE number for this customer and/or supplier you are adding **Name -** Enter a name to show in the system **Phone Number -** Enter a valid phone number. This can be used within the mobile app to call **Address** - Key in a valid address. This will be used to provide route directions and optimization ### Register Phones This tab allows you to register phones and reassign devices. For more info on registering your phone for the first time, please refer to the jDispatch phone setup document. To reassign a phone when drivers switch phones, simply find the unit number of the phone in question (Once a phone is registered, the unit number will always display in the app when opened). Drag the blue **Unit** button over to the box next to the drivers name who will have the device. When the green check appears, the device is assigned. ### Site Settings #### Dashboard Settings These settings have a direct affect on how the dashboard operates and displays [](https://docs.amscomp.com/uploads/images/gallery/2021-09/image-1633029686599.png) - Rush Order Time Limit: Changing this value will adjust what the ‘Live Cards’ on the kpi dashboard use as a time limit. This is aimed to help weed out dispatched invoices that shouldn’t be measured, such as stock orders. - Estimated Time per stop (min): This value is added on to each delivery when calculating ETA times - ETA Safety Padding (%): Each leg of a delivery is then multiplied with this percentage of padding built in when reporting ETA times - Timezone: This should be set for your current timezone and is used for display of times in the dashboard. - Language: This setting controls the language for both the dashboard and all associated mobile devices. - Show 'In Progress': Display invoices with statuses of Received, In Pick and Ready within the dashboard #### Mobile App Settings [](https://docs.amscomp.com/uploads/images/gallery/2021-09/image-1633029811174.png) - Confirm w/o Signature: Checking this option will enable the **Confirm** only button in the app. Meaning that the driver will not be forced to obtain a signature - Activate GPS Tracking: This tells the mobile devices to submit their position to the jDispatch server. Disabling this will disable all map features. - Require Recipient Name: Checking this will require that the driver type a name in when getting a customer’s signature. - Optimize Routes: This will automatically optimize the delivery and pickup route round trip from the branch - GPS Frequency: Frequency that the app will report it's time to the JDispatch server #### JDispatch Kiosk Settings These settings are specific to the JDispatch Kiosk. A small, purpose specific, device that can be plugged into a TV or large display to report status of deliveries to warehouse staff [](https://docs.amscomp.com/uploads/images/gallery/2021-09/image-1633029927452.png) - Show deliveries en route: Show current deliveries that are out - Show live update map: Show a large, live updating map of all drivers and their current locations - Show outstanding pickups: Include 'pick up' transactions in the kiosk listing of transactions #### Driver Warning / Stats These settings are used in conjunction with the driver alert reporting. [](https://docs.amscomp.com/uploads/images/gallery/2021-09/image-1633030089877.png) - Max Speed: Any speed reported to the JDispach server that is above this value will be listed in the driver alert reporting as an 'over speed' alert. - Driver Max Stop: Driver's reporting in the same location for a duration longer than this value will be reported in the driver warning listing. #### Curbside Pickup Settings These settings are used when activating the curbside pickup feature [](https://docs.amscomp.com/uploads/images/gallery/2021-09/image-1633030265963.png) - SMS Phone Number: The phone number that users will text into to interact with your JDIspacth curbside module. - Notification Page Number: An optional phone number that can have an automated message sent to when customers call in a pickup. #### User ProfileIf you deny any of these permissions, the driver's location may not be reported to the JDispatch server and the driver location map may not work correctly or at all.
JDispatch requires location services to always be active, so you may receive a number of messages about allowing permissions - Allowing JDispatch to access this device's location? This allows JDispatch to report the device location so that it can be reported in the JDispatch dashboard under the 'Driver Location' section [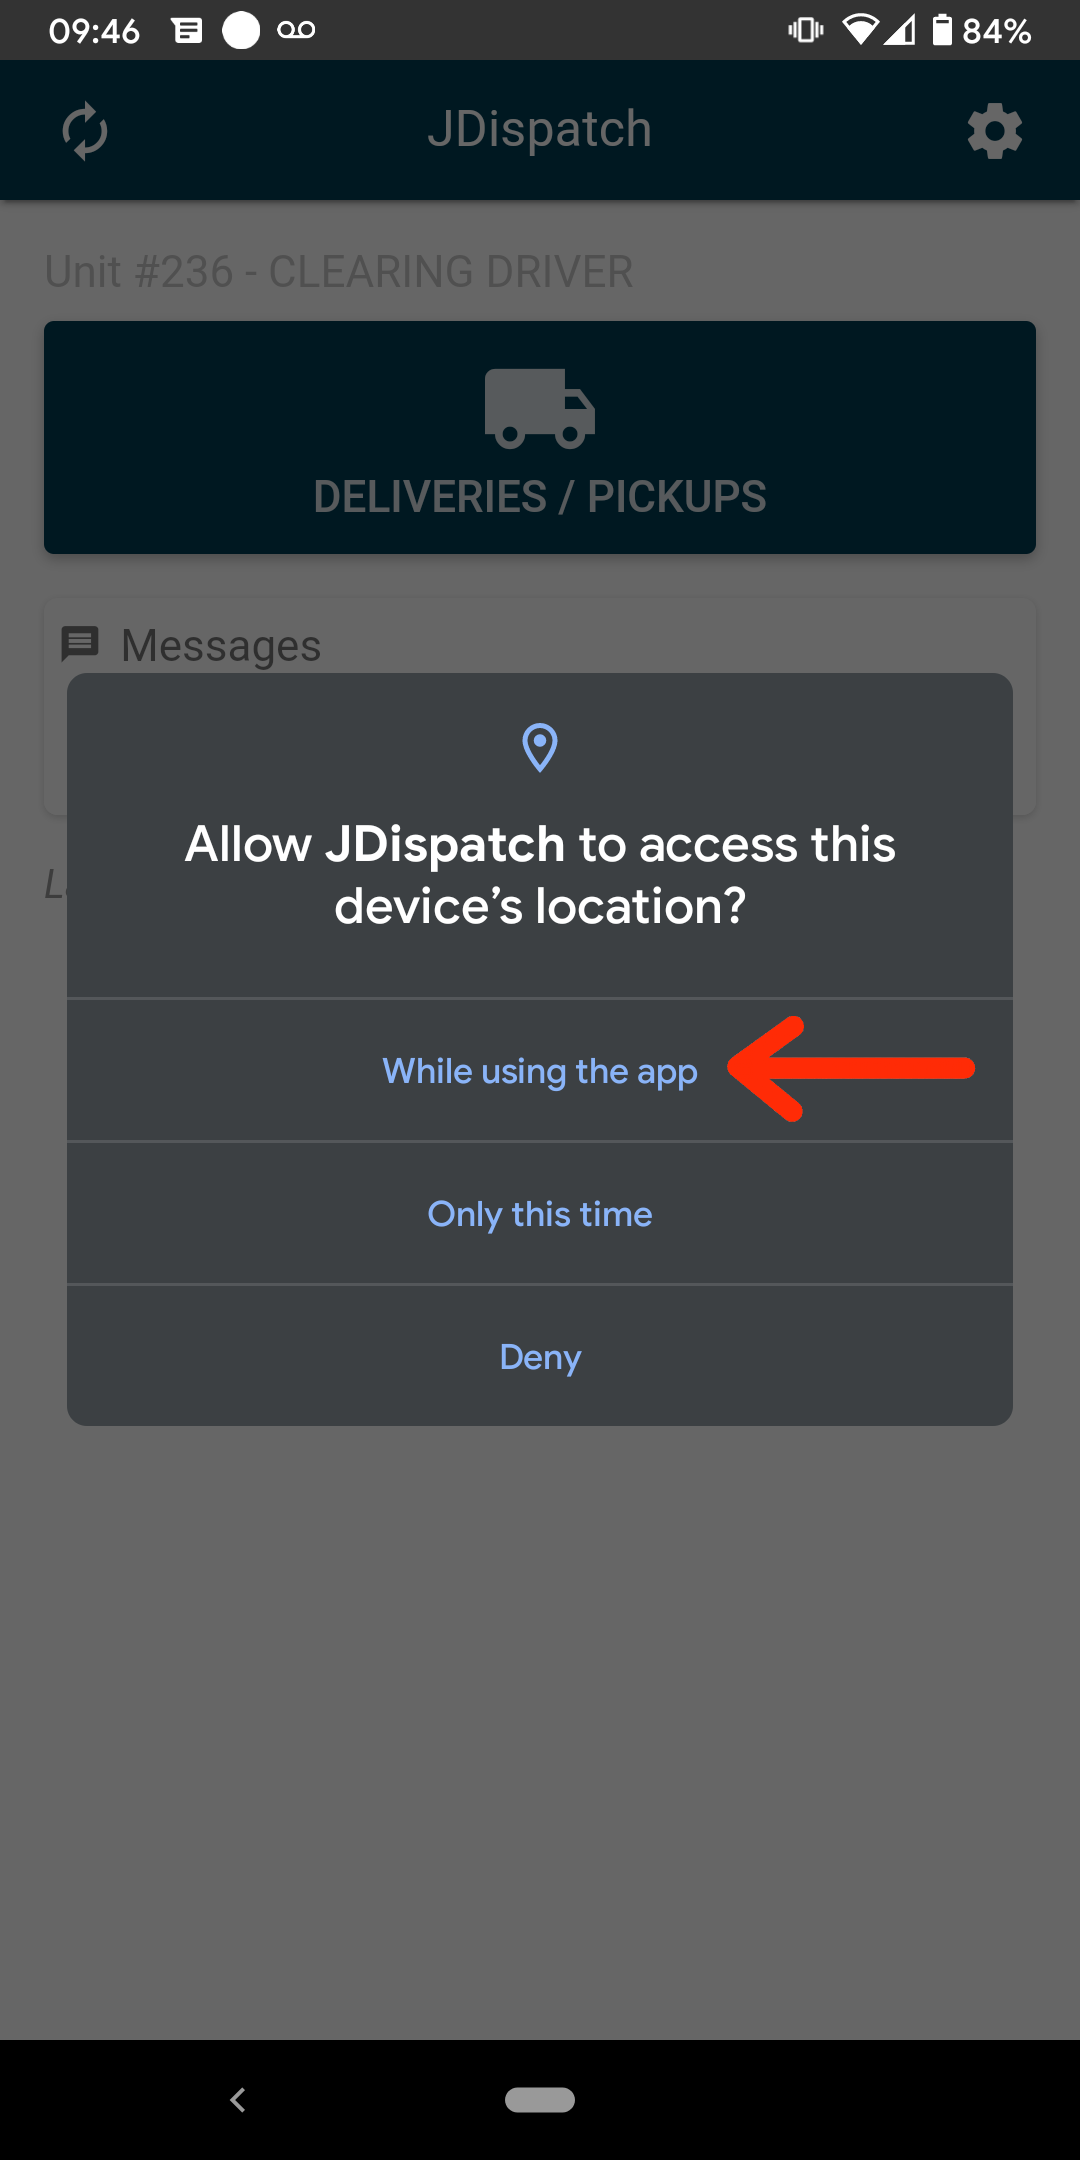](https://docs.amscomp.com/uploads/images/gallery/2021-08/image-1629997282852.png) - Allow JDispatch to access your physical activity? This allows JDispatch to register the speed that the device is travelling at so that it can properly move about in the driver location map. [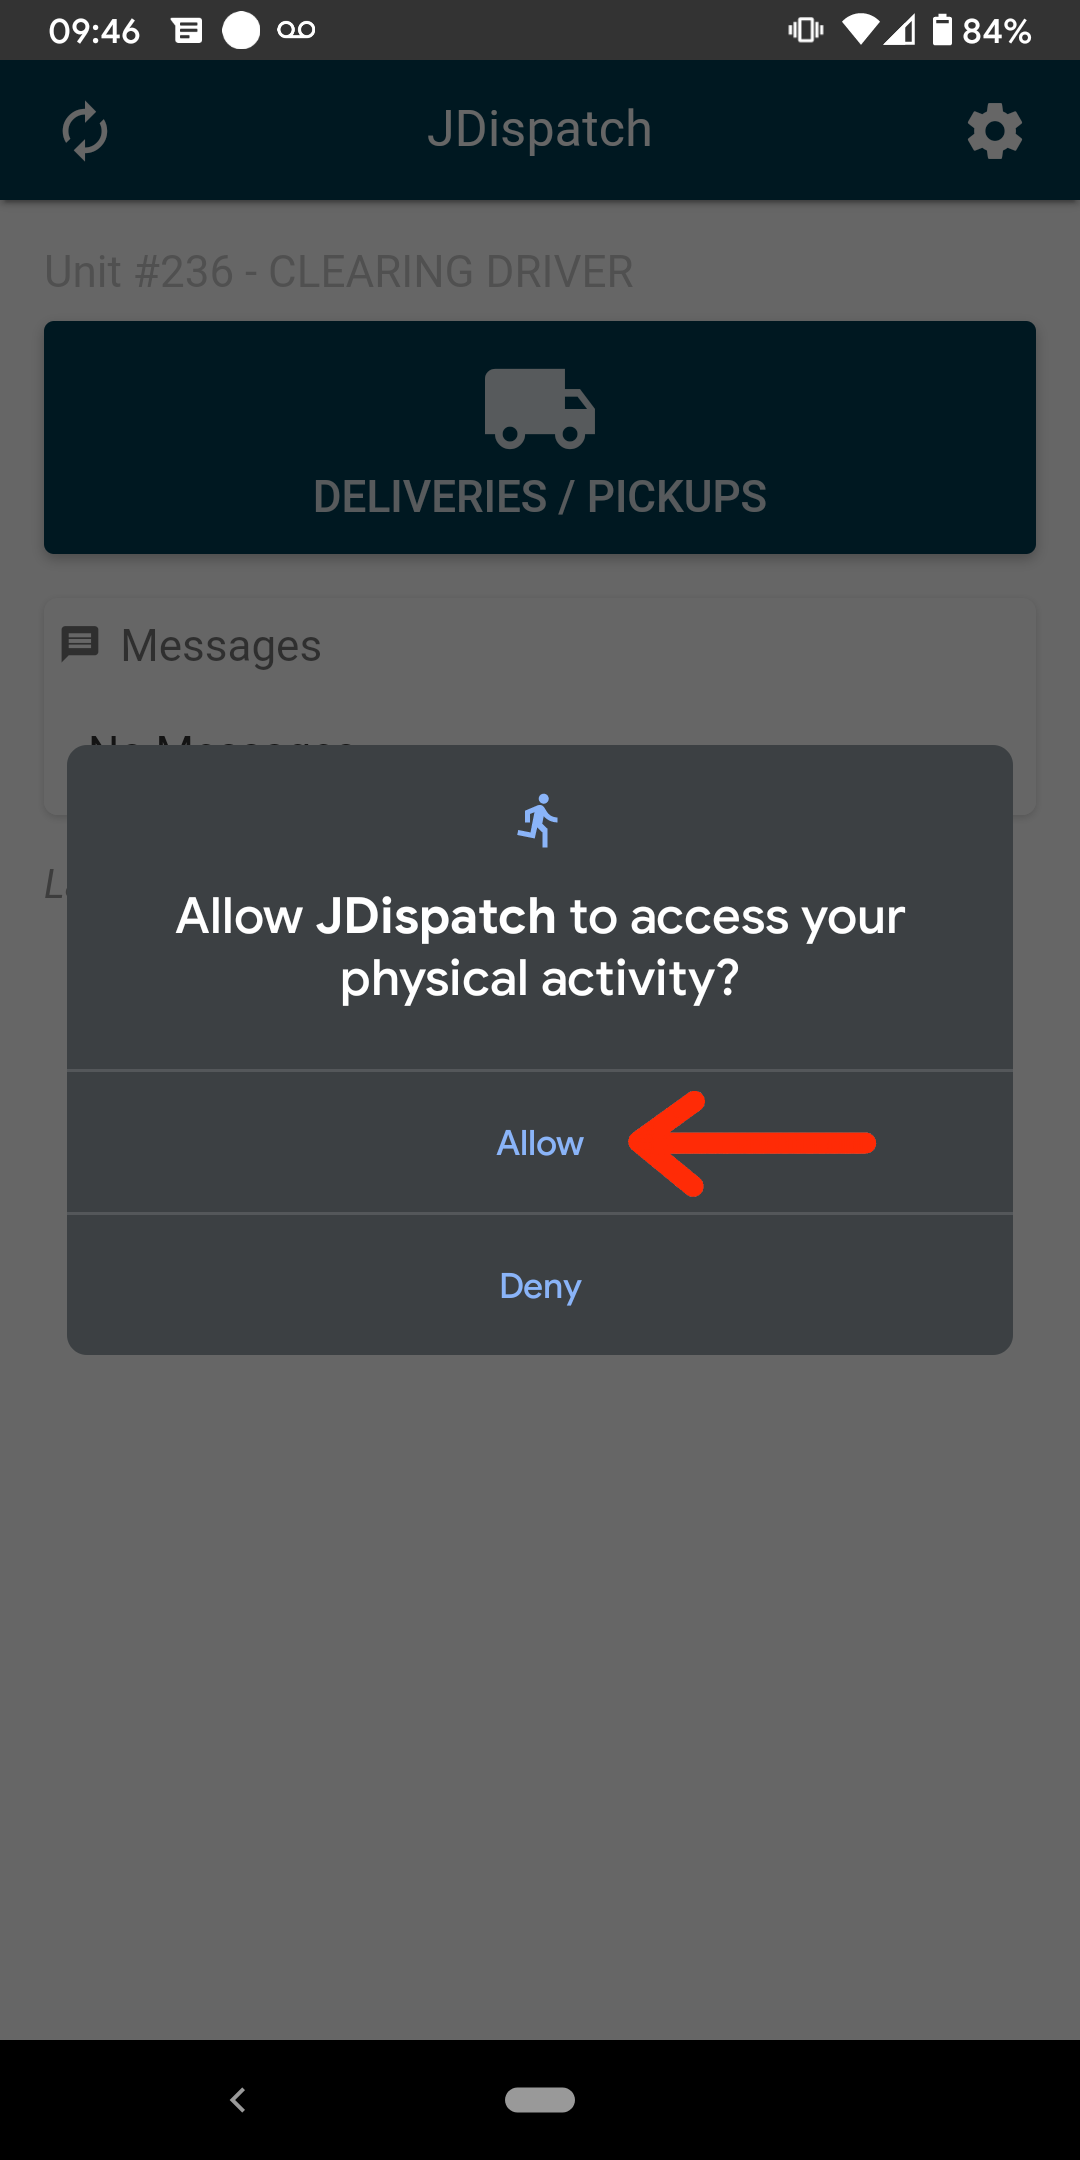](https://docs.amscomp.com/uploads/images/gallery/2021-08/image-1629997392997.png) - Change location access for JDispatch? This will take you to a screen where you can allow JDispatch to report the device location all the time [](https://docs.amscomp.com/uploads/images/gallery/2021-08/image-1629997452714.png) - Allow all the time. This ensures that the dashboard can know the location of the device even when JDispatch is not open. [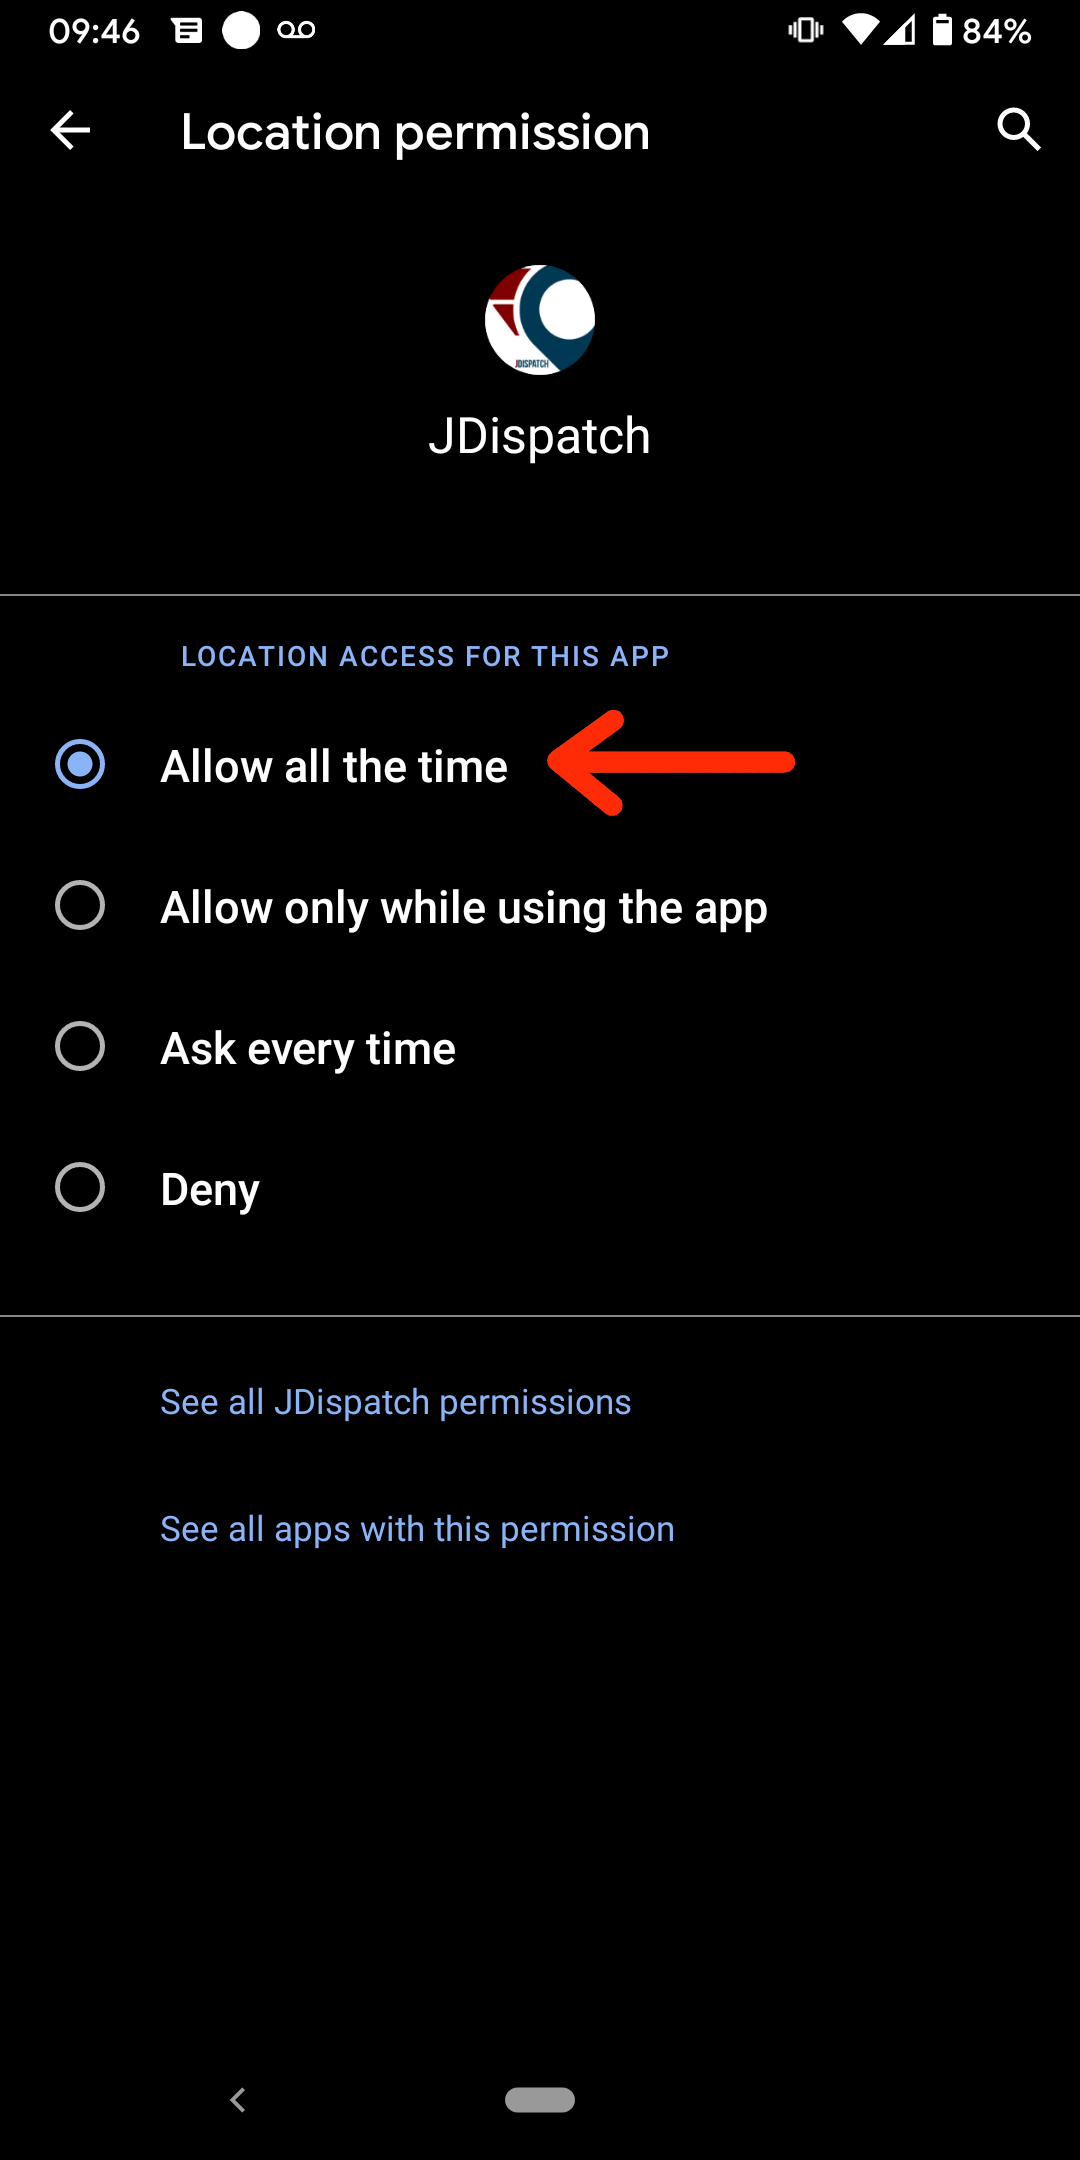](https://docs.amscomp.com/uploads/images/gallery/2021-08/image-1629997512251.png) ### Register The Device Once you have allowed all driver permissions, youshould have a message warning you that the phone is not registered. - Tap OK. [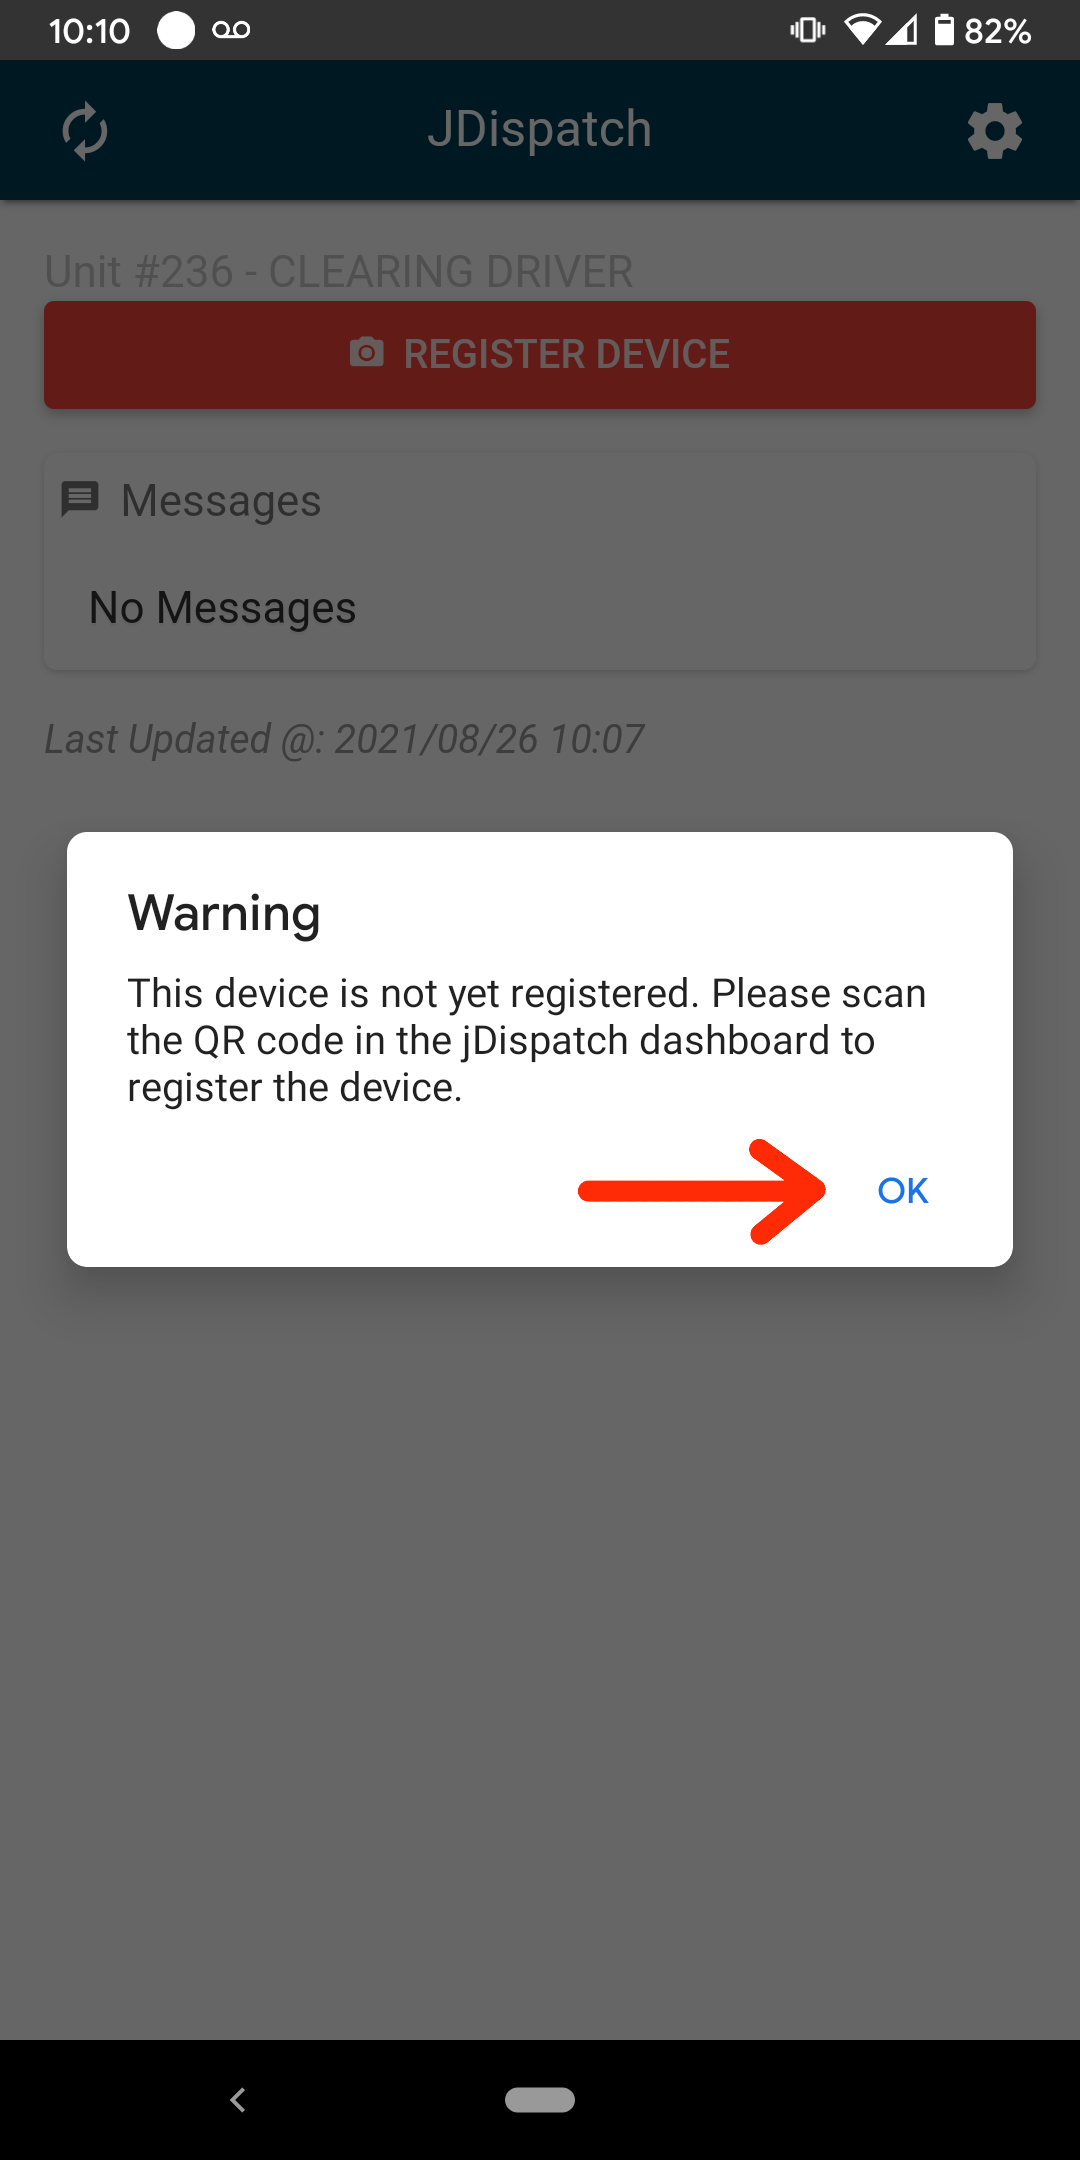](https://docs.amscomp.com/uploads/images/gallery/2021-08/image-1629999452634.png) - You should now see a red **Register Device** button. Tap this button. The first time you do this, the app may ask for additional permissions. You should allow JDispatch to take pictures while using the app. [](https://docs.amscomp.com/uploads/images/gallery/2021-08/image-1629999548416.png) - You will also be asked to allow the app to modify system settings. This enables the app to take pictures as well. Toggle the switch to allow this, and then tap the back arrow in the top left. [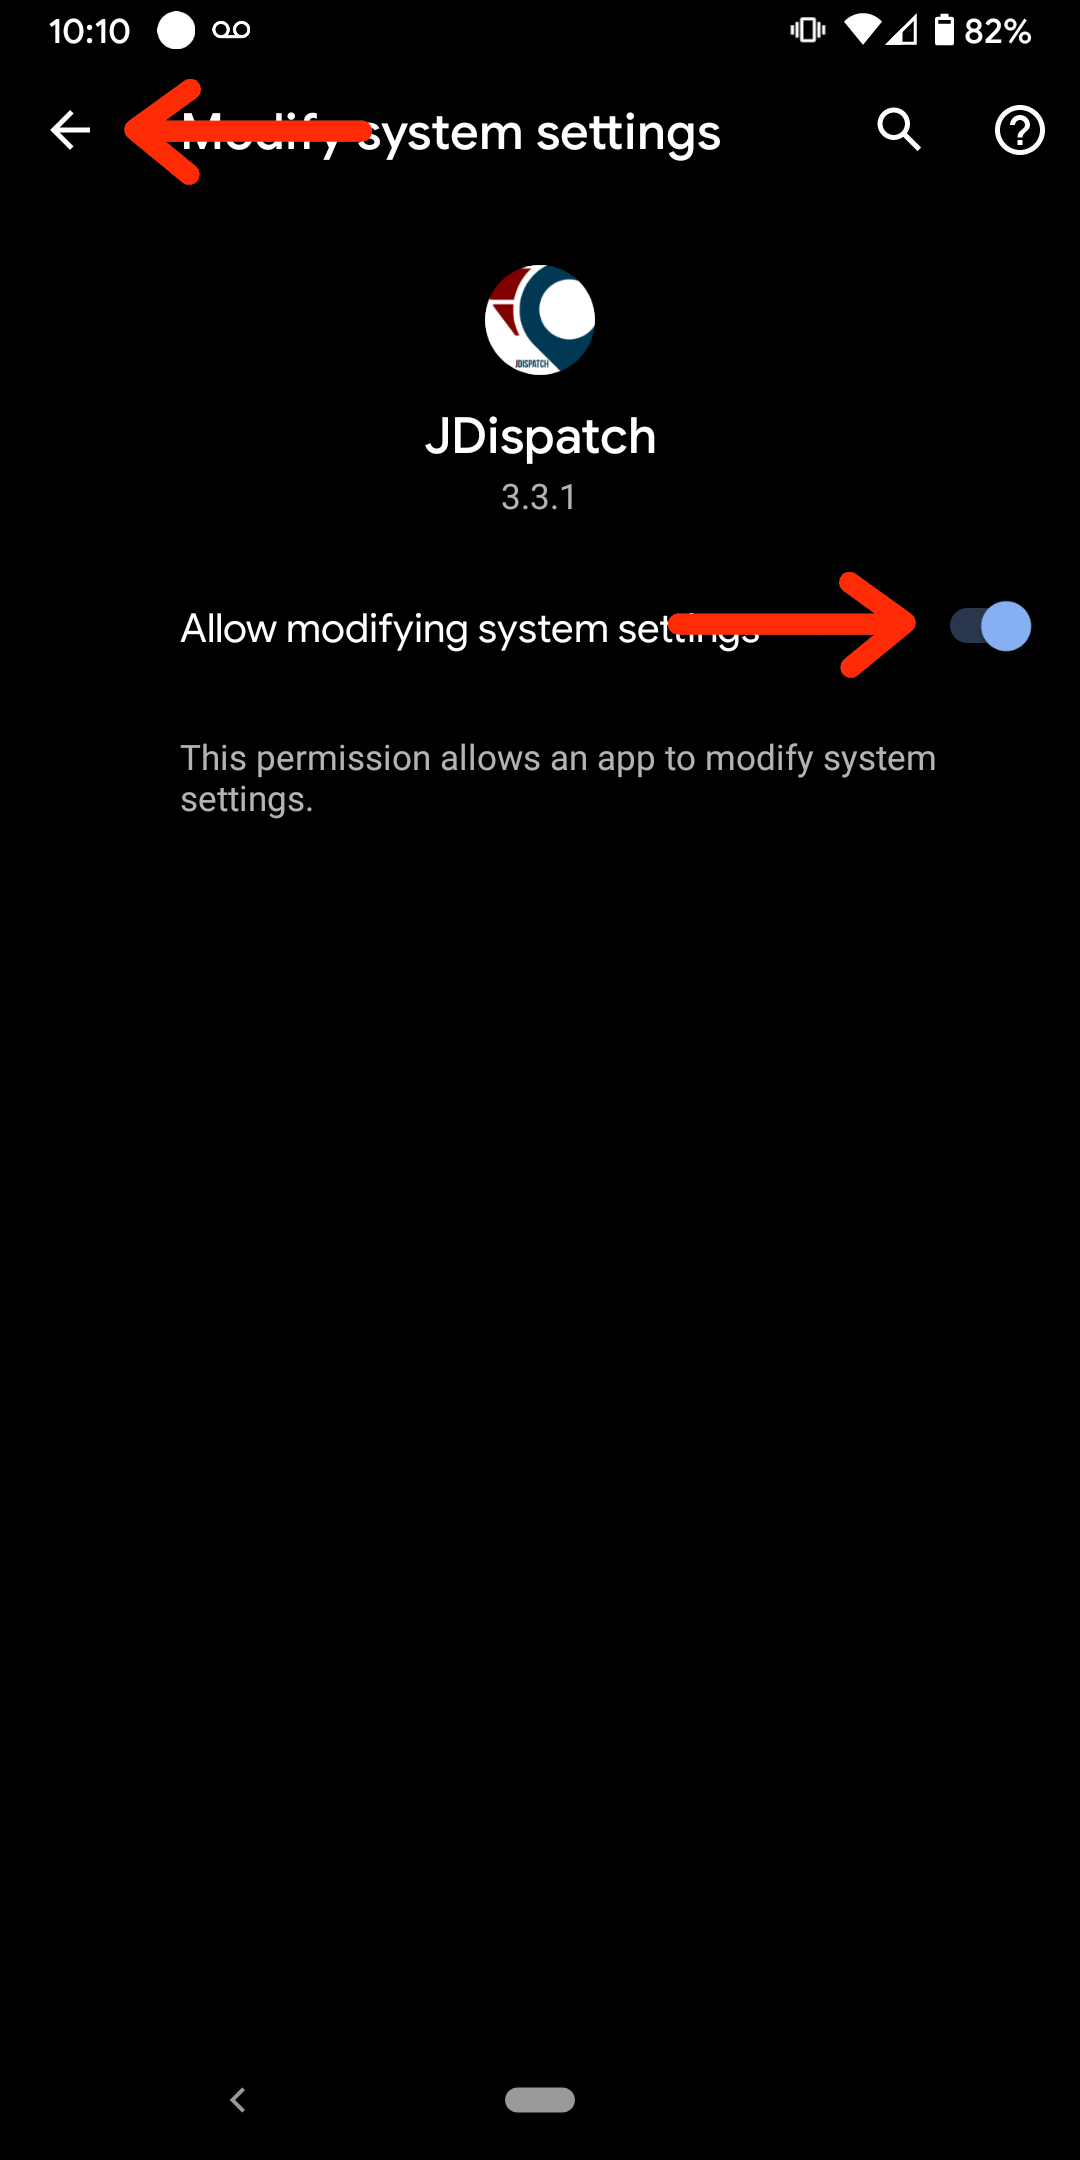](https://docs.amscomp.com/uploads/images/gallery/2021-08/image-1629999660041.png) - Tap the **Register Device** Your camera should initialize. - With the camera initialized, focus on the QR code on the screen you opened up the JDispatch dashboard. - You should be presented with a message saying that you successfully registered your phone, and the 'Register Phone' button should be replaced with a 'Refresh Info' button. - You will also notice a new entry in your jDispatch dashboard under **Registered Devices**. ### Assign a Driver to The Phone - In the jDispatch dashboard that was opened up previously, you should see a listing of all your drivers that you have set up in in your ERP under **Driver/Device Assignment**. - Click on the blue **Unit** button for the newly set up device and drag it over to the driver who will be using this device. Next to the driver’s name, a checkbox icon should appear. This means the assignment was successful. [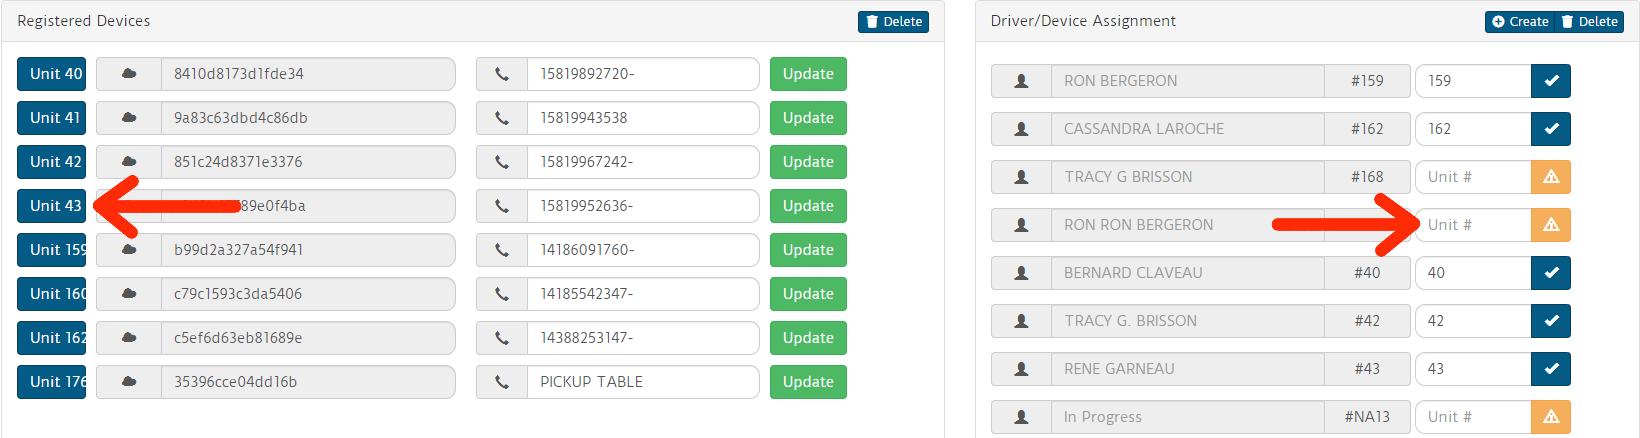](https://docs.amscomp.com/uploads/images/gallery/2021-08/image-1630000403561.png) - Now, back on the phone, tap the red **Refresh Info** button. You should see the driver’s name, and a unit number along the top. This confirms the proper assignment on the phone as well as the dashboard. # Updating Sonim Devices A number of Sonim XP7700 devices are registered with the JDispatch service. A number of these devices are currently running an older version of Android which will disable push notifications. An additional problem with these devices is that the built in Adnroid OS update no longer works. In order to update these devices to a more current version of Android to enable push notifications, you will need to follow these steps:In order to update, we will need to install an app outside the Play store which is direct from Sonim.
1. Download a barcode scanner app. This one is recommended: [https://play.google.com/store/apps/details?id=com.google.zxing.client.android&hl=en](https://play.google.com/store/apps/details?id=com.google.zxing.client.android&hl=en) 1. From your device's home screen, open the app tray 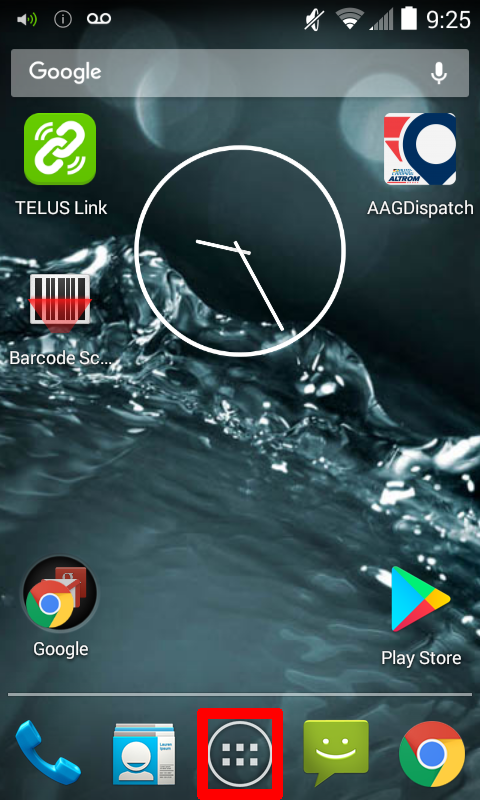 2. Open the Play store app 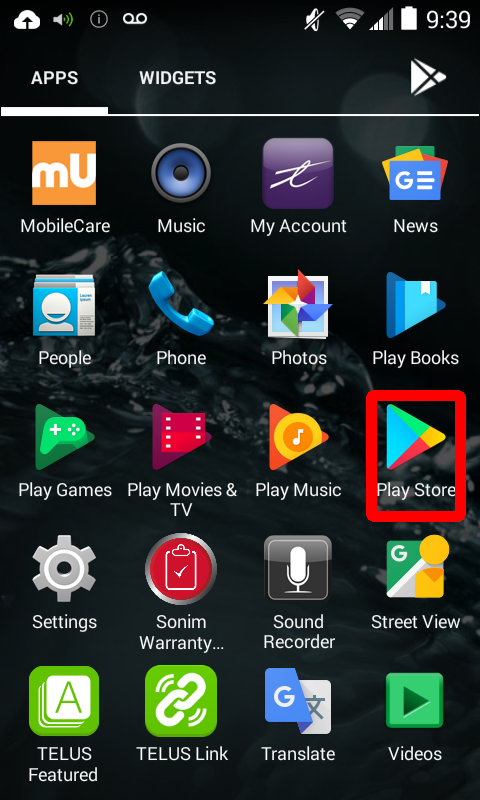 3. Search for 'Barcode Scanner' and select the app from **ZXing Team** 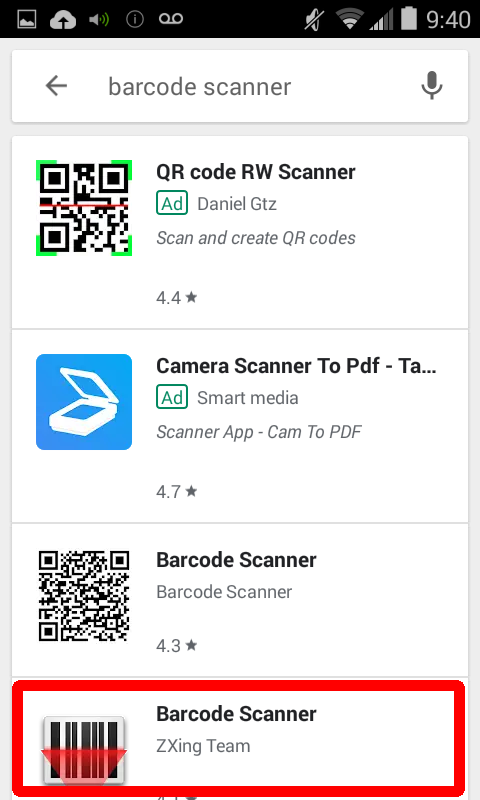 4. Once the app is open, Click ****Install**** 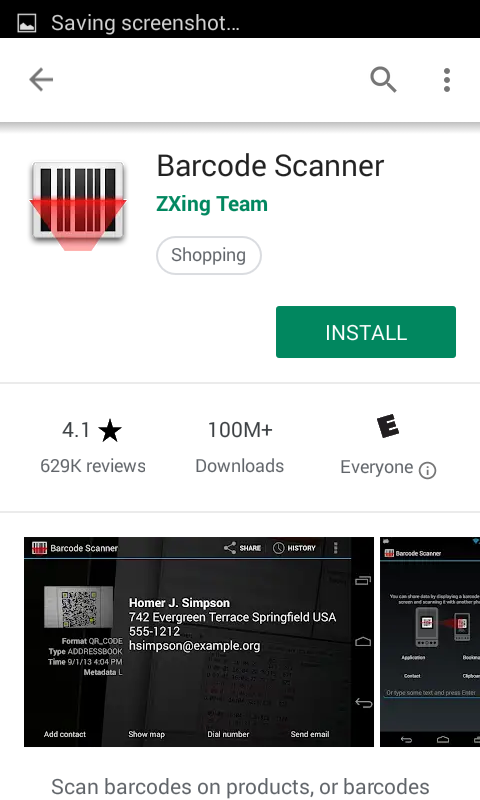 2. Enable unknown sources to install apps. 1. From the device's home screen, open your app tray  2. Open the **Settings** app 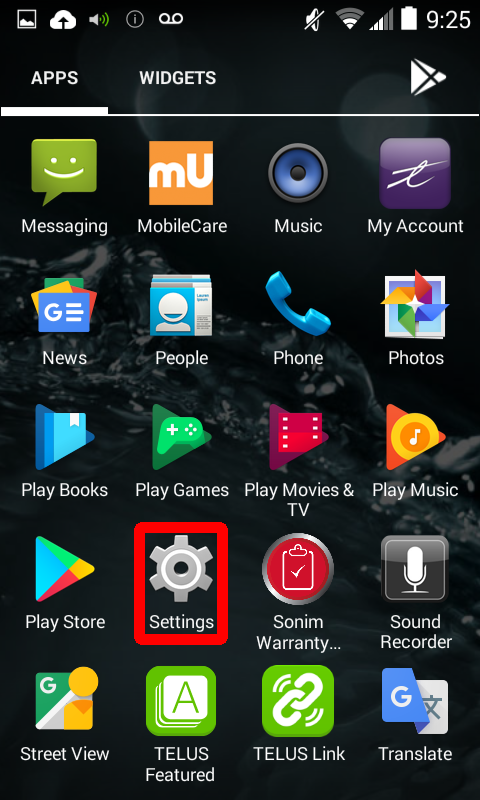 3. Navigate to ****Security**** 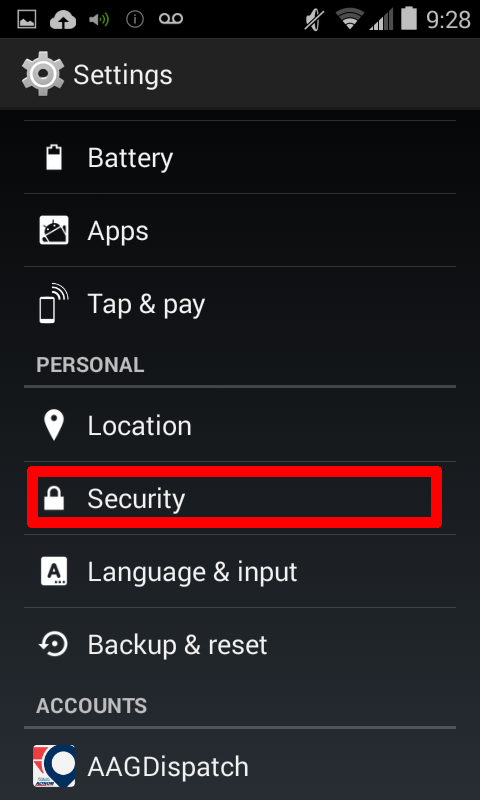 4. Select the **Unknown Sources** option 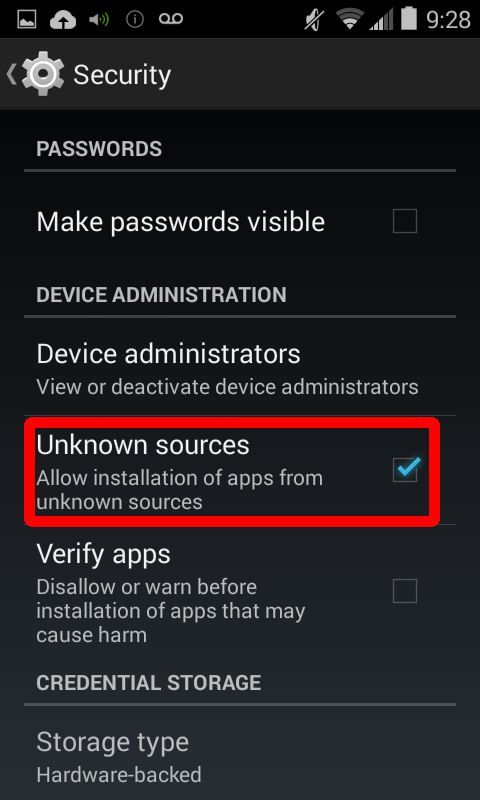 5. You will see a warning message on screen. This is expected, please tap **OK**. 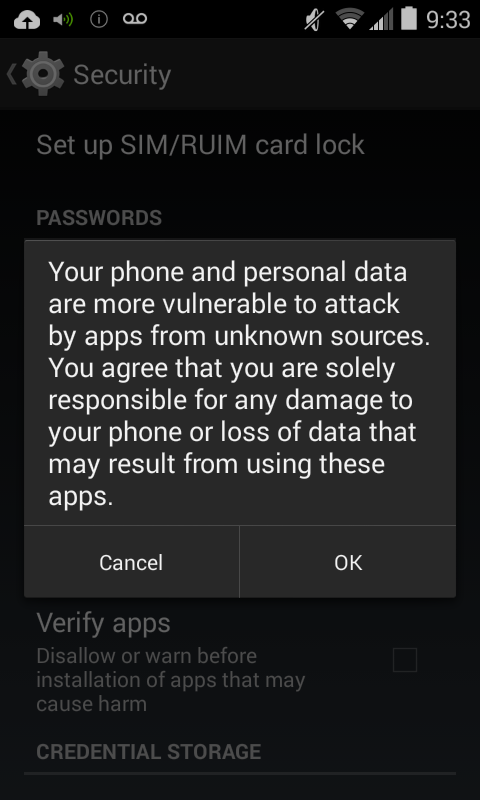 6. Return to the main home screen. 3. Now, you can install the Sonim updater app. 1. From your device's home screen, open the app tray  2. Open the newly installed barcode scanner app 3. Scan this barcode  4. Tap the link in the scanner window 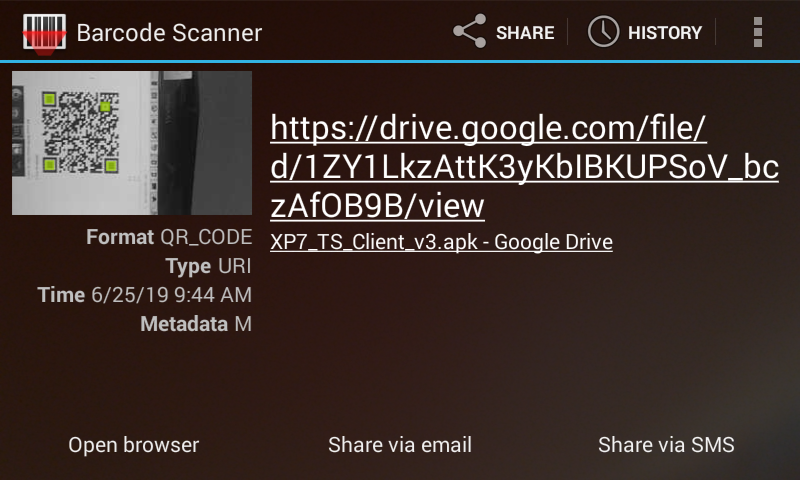 5. Select to open the link with chrome. Select 'Just Once' 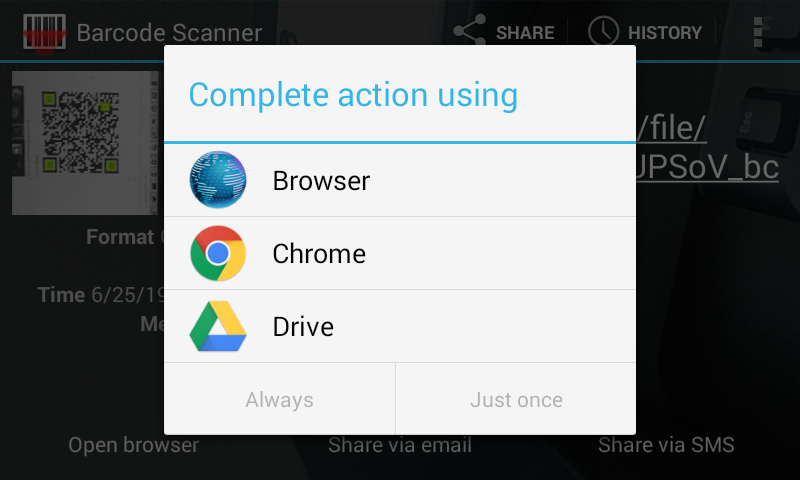 6. Tap the download button 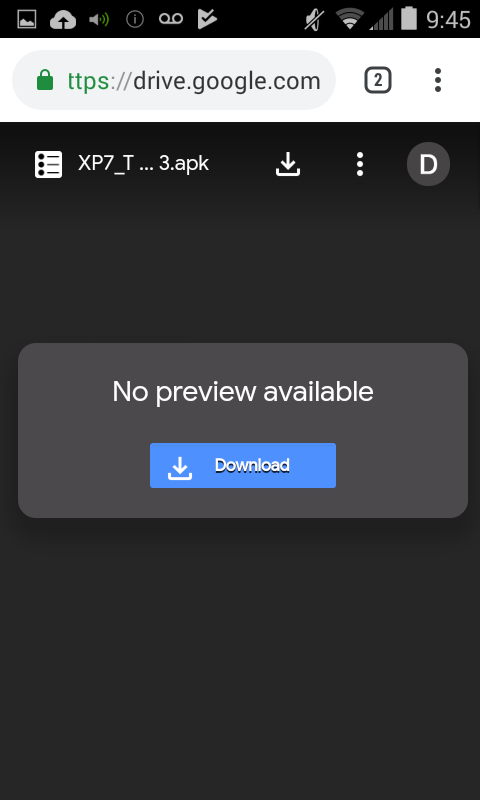 7. When asked which app to use, select Drive. Select 'Just Once'  8. Accept the permissions 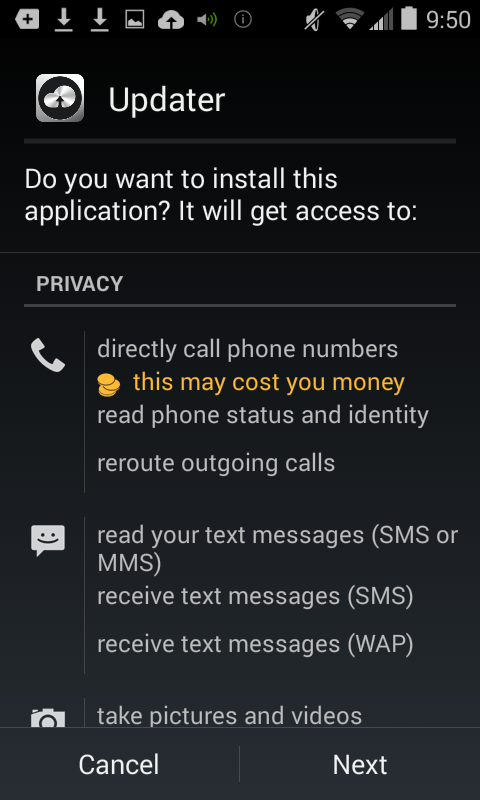 9. Once the app is installed, elect to open it 10. Tap ****Check Update**** 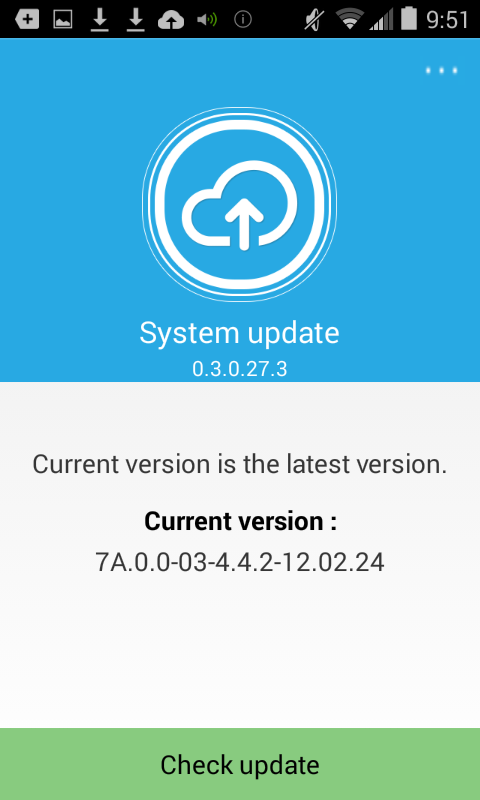 11. a 12. a 13. a # Updating The Mobile App In scenarios where a device is not set to auto-update the JDispatch app, the following steps will need to be followed: 1. From the device's home screen, list all of your apps: 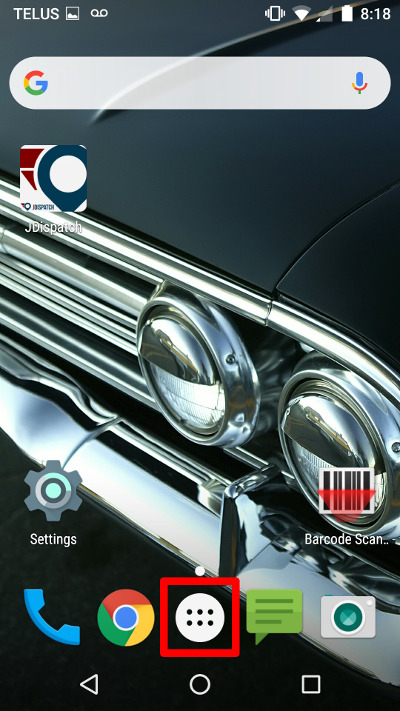 2. From the listing of apps, scroll down to the Play Store app. 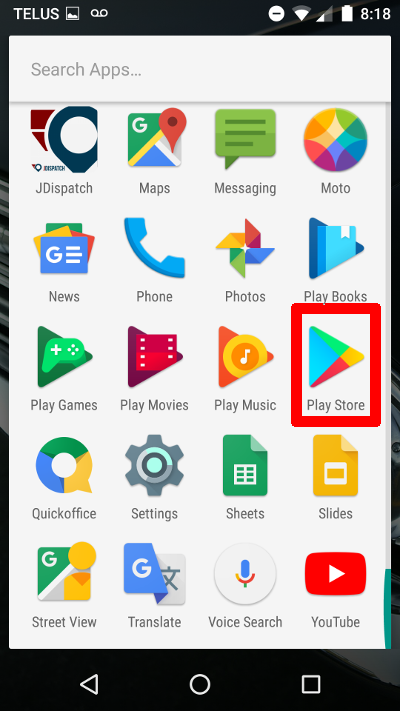 3. Within the Play store app, select the menu option in the top left 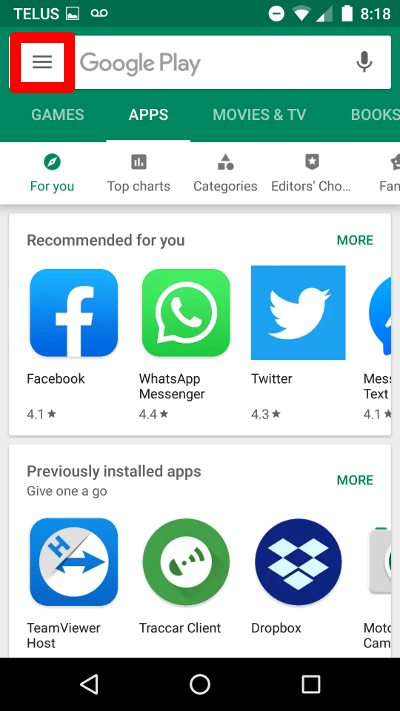 4. Select 'My Apps & Games' 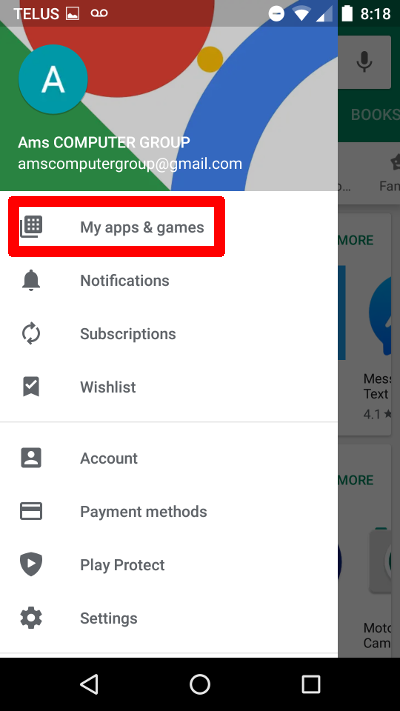 5. All of your apps should now list. Under the 'Updates' heading, you may find JDispatch 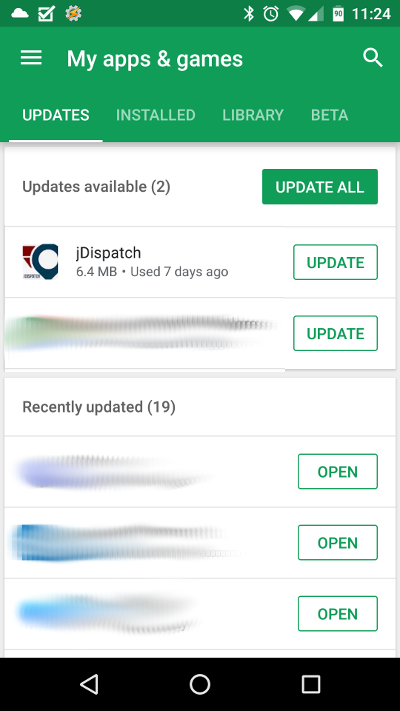 6. Click the 'Update All' button to update all apps, or the 'Update' button next to JDispatch to update just the JDispatch app. # How to Find Your Android Version Number and Security Patch Level This information is available in Android’s system-wide Settings screen. Whatever version of Android you’re using and whatever customizations your device’s version of Android has, you should be able to get to it in the same way. Open the “app drawer” — the entire list of apps installed on your phone. It’s almost always a button at the bottom of your home screen, in the center.  Scroll through the list of installed apps and look for an app named “Settings”. Tap the Settings icon to enter Android’s system-wide Settings app.  Scroll down on the Settings screen and look for an “About phone”, “About tablet”, or “System” option. You’ll usually find this at the very bottom of the main Settings screen, under System, but depending on your phone it could be different. If you do find a specific option for System, you can usually find the “About Phone” underneath that.  Couldn’t find it? Depending on your phone, here are some places that you can find the Android version: - Samsung Galaxy Phones: “About Phone” > “Software Information” - Stock Android: “System” -> “About Phone” or “About Tablet” On the resulting screen, look for “Android version” to find the version of Android installed on your device, like this:  It just displays the version number, not the code name — for example, it says “Android 6.0” instead of “Android 6.0 Marshmallow”. You’ll have to perform a web search or look up a list of Android codenames if you want to know the code name associated with the version. Here’s a current list: - Android 11 - Android 10 - Android 9 - Android 8.0 – 8.1: Oreo - Android 7.0: Nougat - Android 6.0: Marshmallow - Android 5.0 – 5.1.1: Lollipop - Android 4.4 – 4.4.4: Kit Kat - Android 4.1 – 4.3.1: Jelly Bean - Android 4.0 – 4.0.4: Ice Cream Sandwich - Android 3.0 – 3.2.6: Honeycomb - Android 2.3 – 2.3.7: Gingerbread - Android 2.2 – 2.2.3: Froyo - Android 2.0 – 2.1: Eclair - Android 1.6: Donut - Android 1.5: Cupcake Other fields here are also relevant. The “Model number” field tells you the name of your device, for example. # Confirming App PermissionsThese instructions are based on an Android P device. Your device screens may appear slightly different, but the menu options should still be available on your device.
#### Direct method when app is open 1. Open up the app on your device. You should have a badge in the top banner of your screen. 2. Swipe your screen down from the top to get your notifications and menu. You should see a "JDispatch is running" or "AAG Dispatch is running" message.\*\*\* Also confirm that the **Location** icon is enabled in this screen
3. Tap the "JDispatch is running" / "AAGDispatch is running" message 4. You will be presented with the app options 5. Tap the 'Permissions' option 6. Ensure that all of the permissions are 'Allowed all the time' #### When unavailable from top bar 1. Go into your device Settings by swiping down from the top of the screen 2. Go into the **Apps** section 3. Find the JDispatch app 4. Select the **Permissions** option 5. Ensure that **Location** permissions are 'Allowed all the time' # Joining JDispatch BetaJDispatch beta is an early release app. Please be aware that there may be minor bugs or changes that are undocumented. All bugs or problems should be reported to
Please note that it can take up to an hour for the beta signup process to be complete. Once you have been added to the beta program, you can update the JDispatch app.
# Developer Information # API Documentation V3.0 # 1 Changelog| Version | Date | Author | Update |
| 2.1.1 | 06/01/2016 | Jim Potter | \- API release |
| 3.0.0 | 12/28/2016 | Jim Potter | \- JSON document introduction \- Method consolidation & deprecation |
| 3.0.1 | 02/01/2017 | Jim Potter | \- Versioning table \- Correction to jdDriver xml sample |
| 3.0.2 | 03/02/2017 | Jim Potter | \- Updated Customer Field Length |
| 3.0.3 | 07/11/2017 | Jim Potter | \- Added deliveryResponse document to allow for resend of deliveryReceipt in case of error/timeout |
| **jDispatch Mobile Application** | **Connected** | **Batch Mode** |
| Signature capture | Yes | Yes |
| Part delivery confirmation | Yes | Yes |
| Background location services | Yes | |
| System to driver communication | Yes | |
| Part pickup confirmation | Yes | Yes |
| ‘One Off’ invoice scan and confirm | Yes | |
| Push notifications | Yes | |
| Driving directions | Yes | |
| Route Optimization | Yes | |
| **jDispatch Dashboard** | **Connected** | **Batch Mode** |
| Real-time delivery analysis | Yes | |
| Real-time corporate delivery metrics | Yes | |
| Signature recall | Yes | Yes |
| Delivery analysis extracts | Yes | Yes |
| Pickup dispatch | Yes | Yes |
| Driver communication | Yes | |
| Driver 'on map' location tracking | Yes | |
| Dashboard configuration | Yes | Yes |
| Quick phone registration | Yes | Yes |
| **Attribute** | **Required** | **Description** |
| **DocID** | Required | A GUID to make each document uniquely identifiable |
| **DocType** | Required | Defining the document type that is being sent |
| **Sender** | Required | A unique identifier assigned to the sender. |
| **Date** | Required | Time stamp of the document, to the millisecond per the ISO 8601 standard. YYYY-MM-DDThh:mm:ss |
| **apikey** | Required | API Key provided to you from AMS |
| **env** | Required | “TEST” or “PROD” |
| **Document** | **Description** |
| **deliveryDispatch** | Document to create a delivery |
| **deliveryReceipt** | Document sent on delivery confirmation |
| **deliveryResponse** | Document sent to confirm deliverReceipt |
| **jdCustomer** | Document to add a customer to the web |
| **jdDriver** | Document To add a driver to the web. |
| **deliveryDispatchResponse** | Response from deliveryDispatch document |
| **jdCustomerResponse** | Response from jdCustomer document |
| **jdDriverResponse** | Response from jdDriver document |
| **Status Code** | **Description** |
| 200 | OK |
| 400 | Bad request |
| 401 | Authentication failure |
| 403 | Improper Data Format |
| 404 | Invalid Document Type Passed |
| 405 | Invalid Document Structure |
| 412 | Condition Failed |
| 413 | Request Entity Too Large |
| 460 | dispatchReceipt failed – Resend requested |
| 465 | dispatchReceipt failed – Resend not required |
| 500 | Internal Server Error |
| 501 | Not Implemented |
| 503 | Service Unavailable |