JDispatch Mobile App
- Using The Mobile App
- Setting Up A Device
- Updating Sonim Devices
- Updating The Mobile App
- How to Find Your Android Version Number and Security Patch Level
- Confirming App Permissions
- Joining JDispatch Beta
Using The Mobile App
Basic Usage Notes
- Once you have registered your phone with the jDispatch server, you will be able to properly launch the jDispatch app. If you haven’t yet registered your device, please refer to the jDispatch phone setup document.
Deliveries and Delivery Confirmation
- Each time a delivery is assigned to your driver from the host system, you will be sent a notification to your phone. This notification will simply say New Deliveries, and will update the app with all of the recently assigned delivery information.
- To view all currently assigned deliveries, tap the List Deliveries You will be presented with a full summary listing of all current deliveries. Tapping on any of these lines will take you to the detail of the invoice(s) for the selected customer.
- If you do not see any deliveries, you may need to ensure that the final confirmation of dispatch was completed on the host system
- Once in the delivery detail screen, you will see a broken down listing, by invoice, of all invoices to be delivered.
- Tapping any of these invoices will reveal the basic totals for the invoice (sub-total, taxes, etc). You can also check the line item detail by tapping the green Part Detail
- From this screen, you can also get driving directions to the customer by tapping on the icon in the top right of the header bar. You can also phone the customer by tapping the icon next to the customer’s name.
- Based on your configuration, you have to options to confirm delivery of the invoice(s).
- First, you can tap the Confirm button at the bottom of your screen. This will simply confirm that the invoice was delivered, with no real proof of delivery. In the jDispatch dashboard, this is recorded as “Confirmed by driver”
- Second, you can collect a signature. Tap the Sign and Confirm button, and a new screen will be presented where the customer is able to sign with their finger or stylus, you are able to type in their name, and then submit confirmation to the host system. Upon confirmation, both the signature and recipients name are saved into the dashboard and available for future reference.
Pickups and Pickup Confirmations
- The basic idea behind pickups in jDispatch, currently, is that a pickup acts as a note identifying the fact that a part, or many parts need to be picked up from either a customer or supplier. These can be old cores or warranty products from a customer, or a number of special order items from the local warehouse. Pick ups act as an easy way for your staff to know what items are due to be coming in, and when they are on their way.
- Each time a pickup request is created in the jDispatch dashboard (Please see the jDispatch dashboard documentation for more on creating pickup requests), you will be sent a notification to your phone. This notification will simply say New Pickups, and will update the app with all of the recently assigned pickup information.
- To view all currently assigned deliveries, tap the Supplier Pickups You will be presented with a full summary listing of all current pickups. Tapping on any of these lines will take you to the detail of the pickup for that selected customer or supplier.
- If you do not see any pickup requests, you may need to ensure that the final confirmation of dispatch was completed on the host system
- In the pickup detail screen, you are given basic info about what customer/supplier the parts are to be picked up from as well as a text note as entered when the request was created. You may also see part number details, based on how the request was entered.
- To confirm that a pickup is complete, you simply tap the red Confirm button along the bottom, and the confirmation is reported back to the jDispatch dashboard as information to your dispatcher and/or counter staff.
Driver Communication
- The driver communication module provides a quick and easy way to relay any important messages to your drivers without having to phone them.
- When a message is sent from the jDispatch dashboard, you will be notified on your phone to the presence of a new message.
- This message will show on the jDispatch mobile app home screen along with the time it was sent. Currently, driver communication is only 1 way from the system to the driver to avoid any liabilities surrounding distracted driving laws.
Additional Notes / Configuration Options
- The following options can be controlled in the jDispatch dashboard. (For more information on the dashboard, please review the jDispatch dashboard documentation).
- The language of the mobile app. English, French and Spanish are available
- Requiring a signature on all deliveries
- Requiring a recipients name be typed in
- If you happen to lose cell service or do not have a data plan, jDispatch will automatically switch to batch mode. You must, however, ensure that you have data service within your building, and receive the dispatch notification in order to be able to view the invoices.
- Once you get data service back, the phone will automatically upload any offline confirmations to the system with the proper confirmation times
Setting Up A Device
Overview
This document outlines the setup of new phones for use with the jDispatch module.
Setting Up Drivers
The first thing that is required is to set up drivers in your integrated ERP. These steps will vary by system, so please confirm with your IT team how to set up drivers for use with JDispatch.
Activiating Your Device
If this is a new android phone, you will also need to complete the initial setup of the phone so that you may download the JDispatch app. These steps may vary, but generally you just need to turn on the phone and follow the initial prompts to set up date, time, language, etc. When you reach the point of entering in an email address, you will need to enter in a valid Gmail email address. If you do not have one, you can set one up at gmail.com. Once it is set up, this email can be used on any number of devices.
There may be one or two more prompts aftwerwards, but you should end up at the basic android home screen.
Install JDispatch
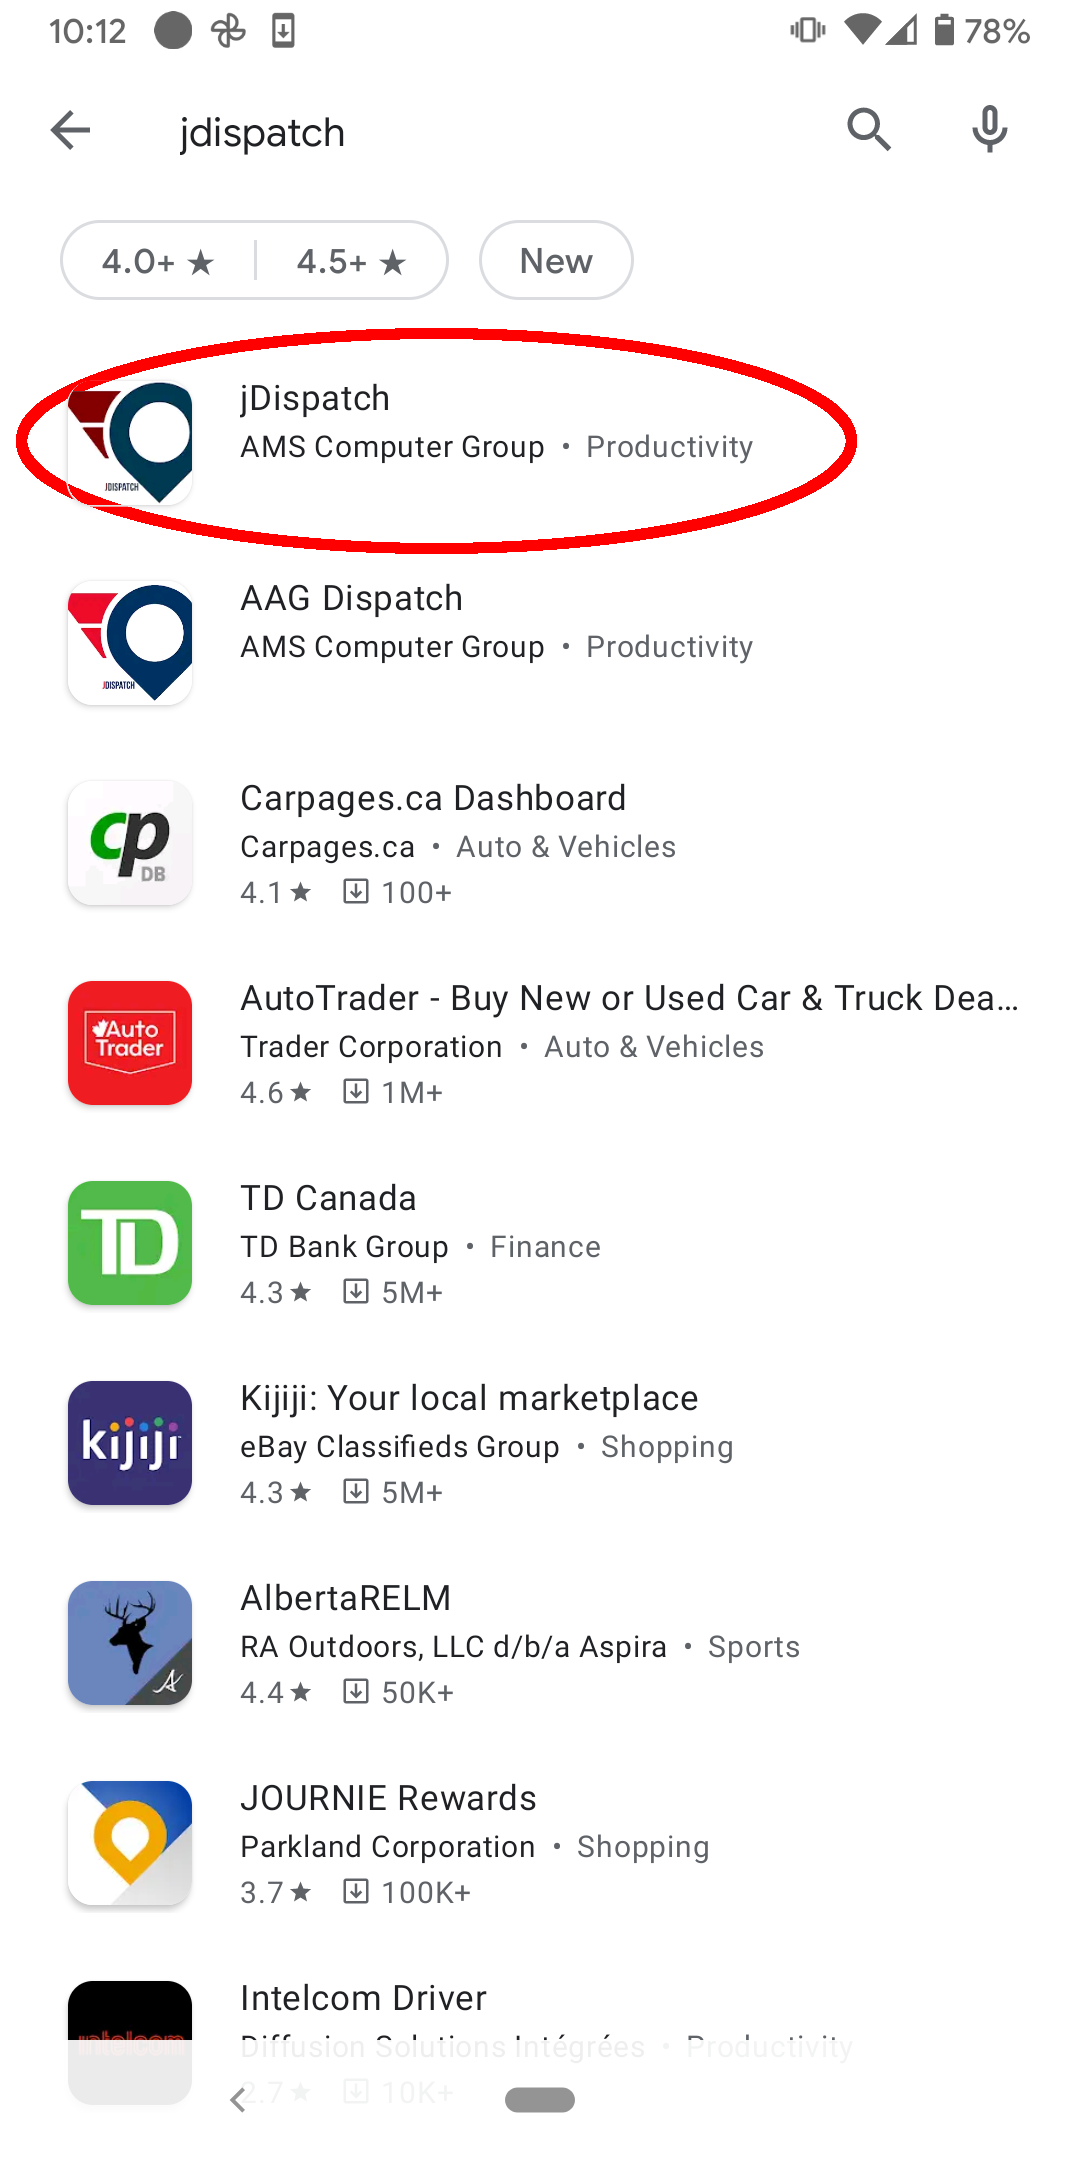
- Click on the android play store icon

- In the top search bar, type in jdispatch. You may get back a number of results. Please make sure that you install jdispatch from AMS

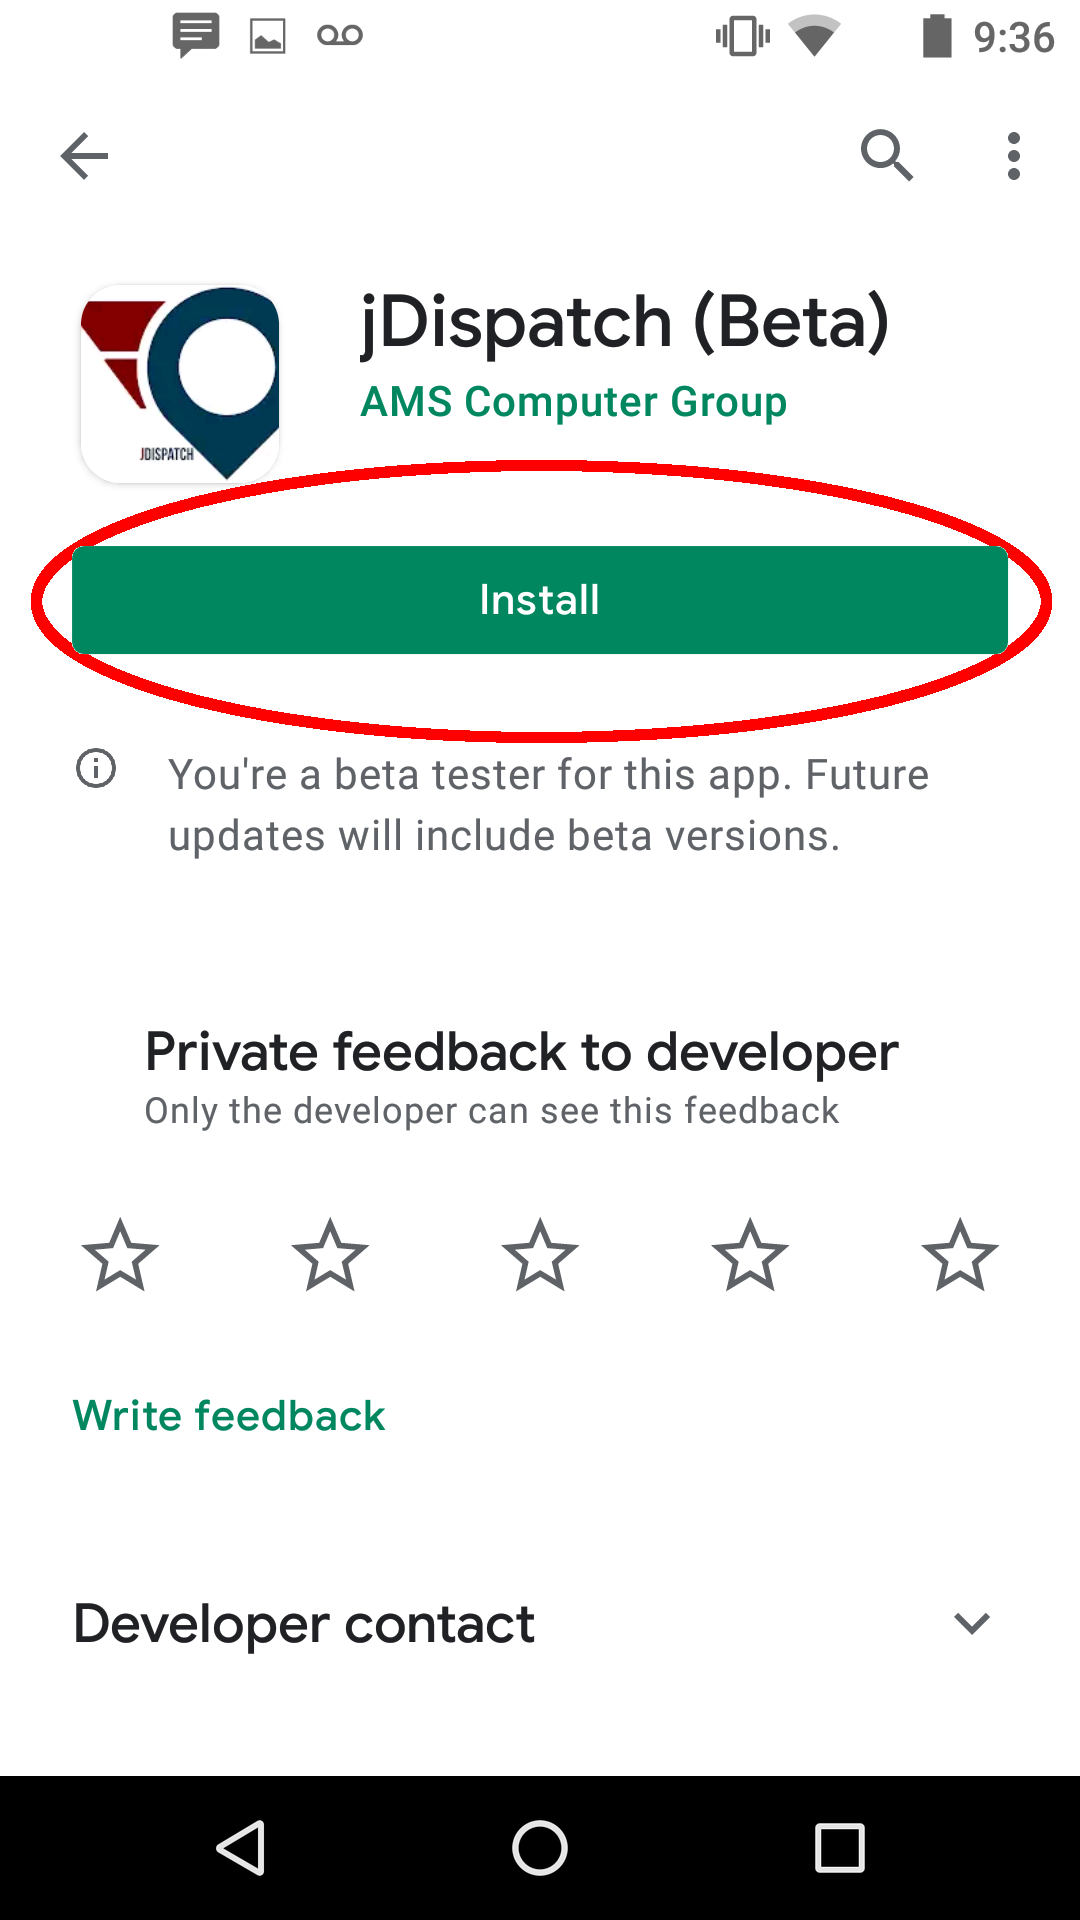
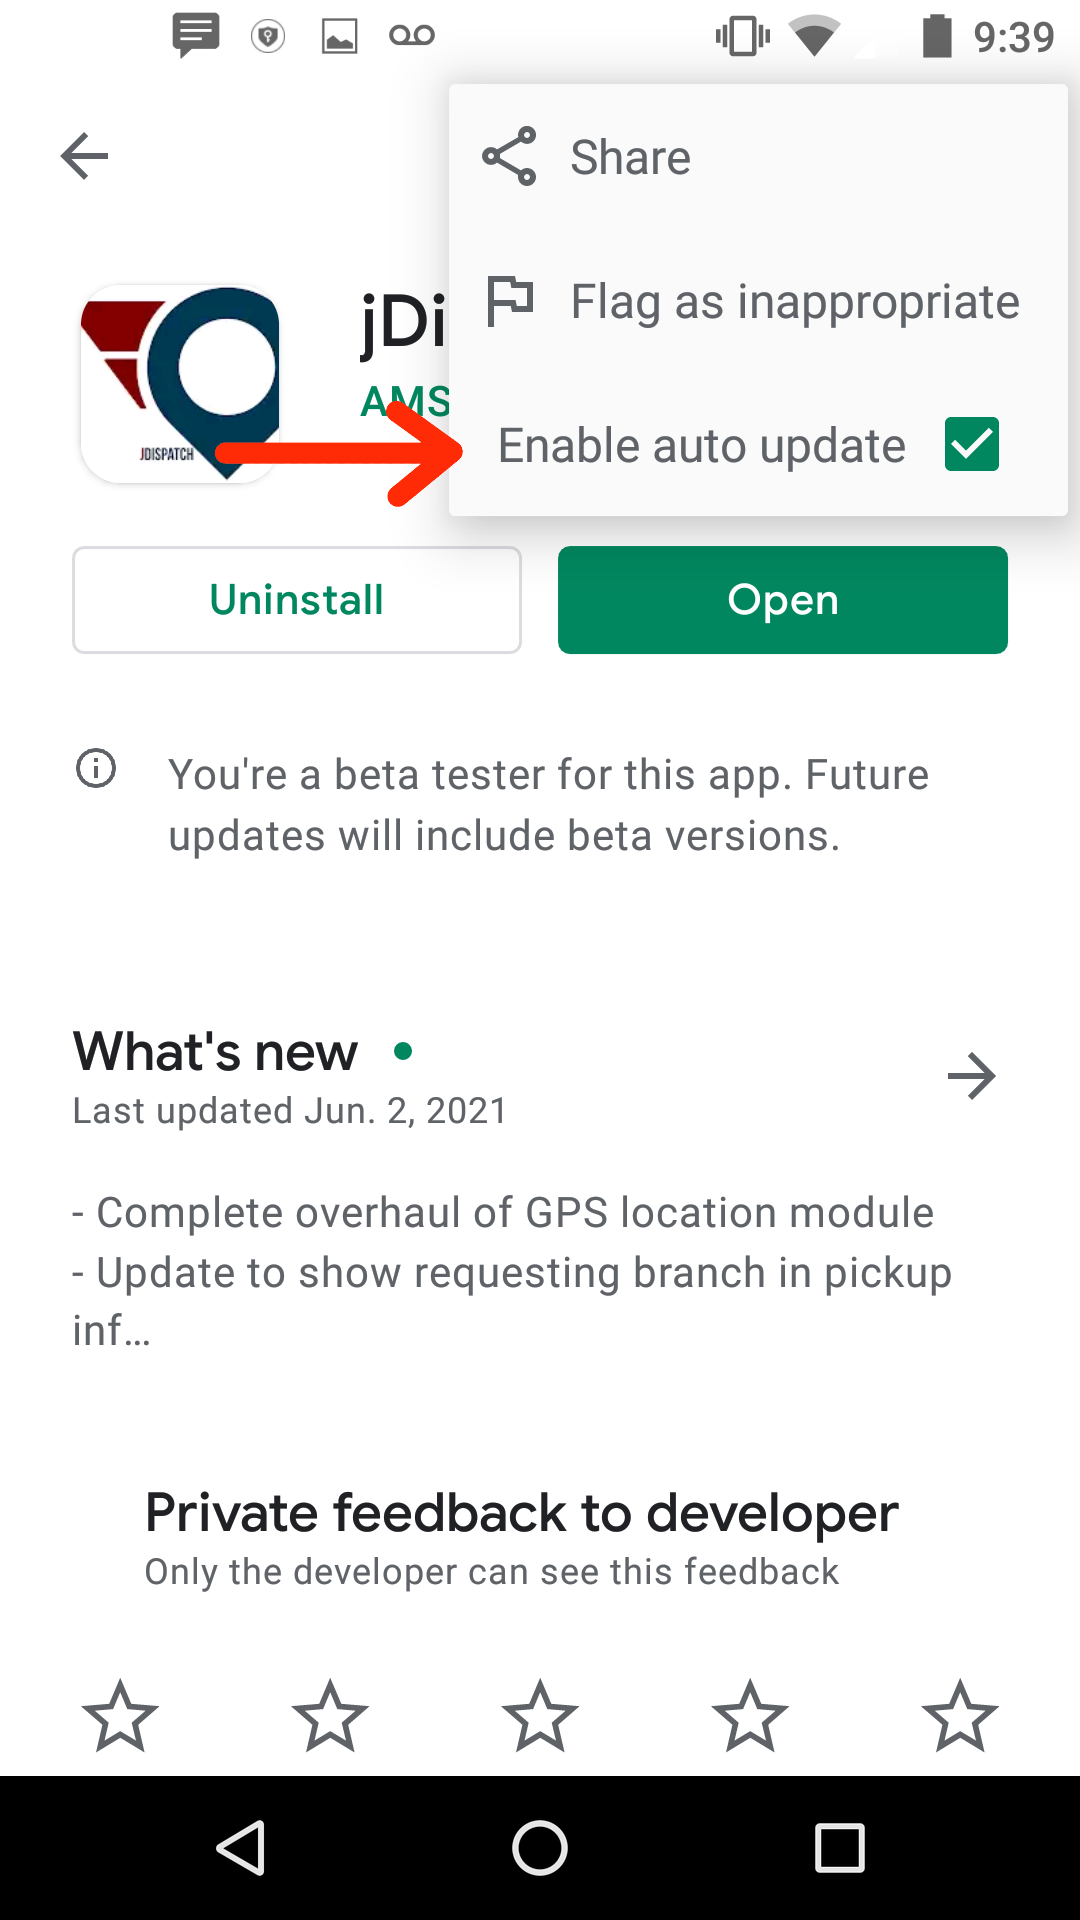
- Tap the listing, and tap the install button. If asked, accept permissions.

- Once the app is installed, tap the options button in the top right. Ensure that auto-update is checked.


Sign In To JDispatch Dashboard
- Open an internet browser and go to the following URL:
https://www.jdispatch.ca/dashboard.php
- Log in with the your jdispatch admin credentials
- Click the Register Phones button on the left menu bar.

- Once in the register devices screen, you should see a QR code underneath the device listing

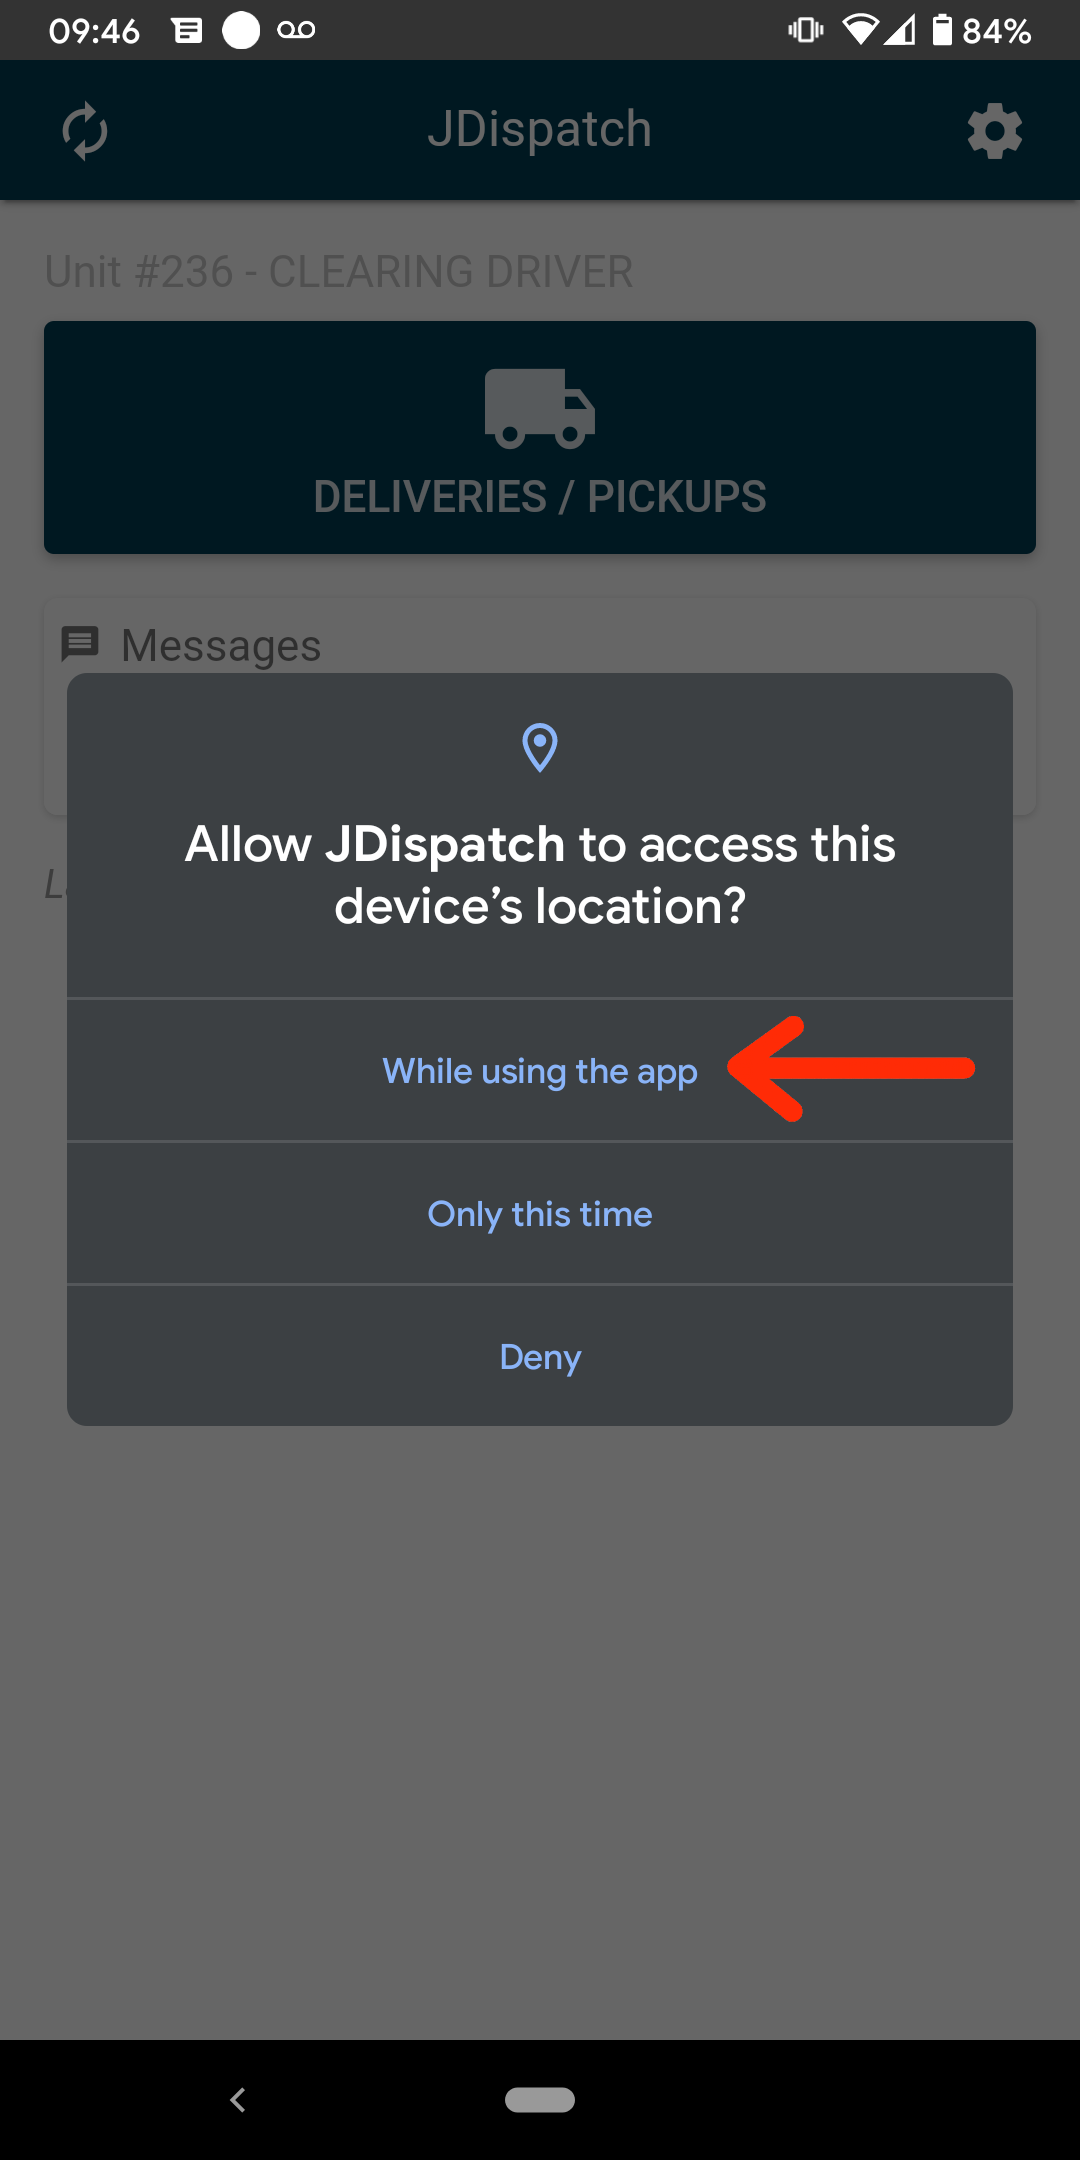
Open JDispatch and Allow Location Permissions
When you first open the app, it should ask a number of questions about permissions. These permissions must be allowed in order for JDispatch to properly report driver and delivery location
If you deny any of these permissions, the driver's location may not be reported to the JDispatch server and the driver location map may not work correctly or at all.
JDispatch requires location services to always be active, so you may receive a number of messages about allowing permissions
- Allowing JDispatch to access this device's location? This allows JDispatch to report the device location so that it can be reported in the JDispatch dashboard under the 'Driver Location' section

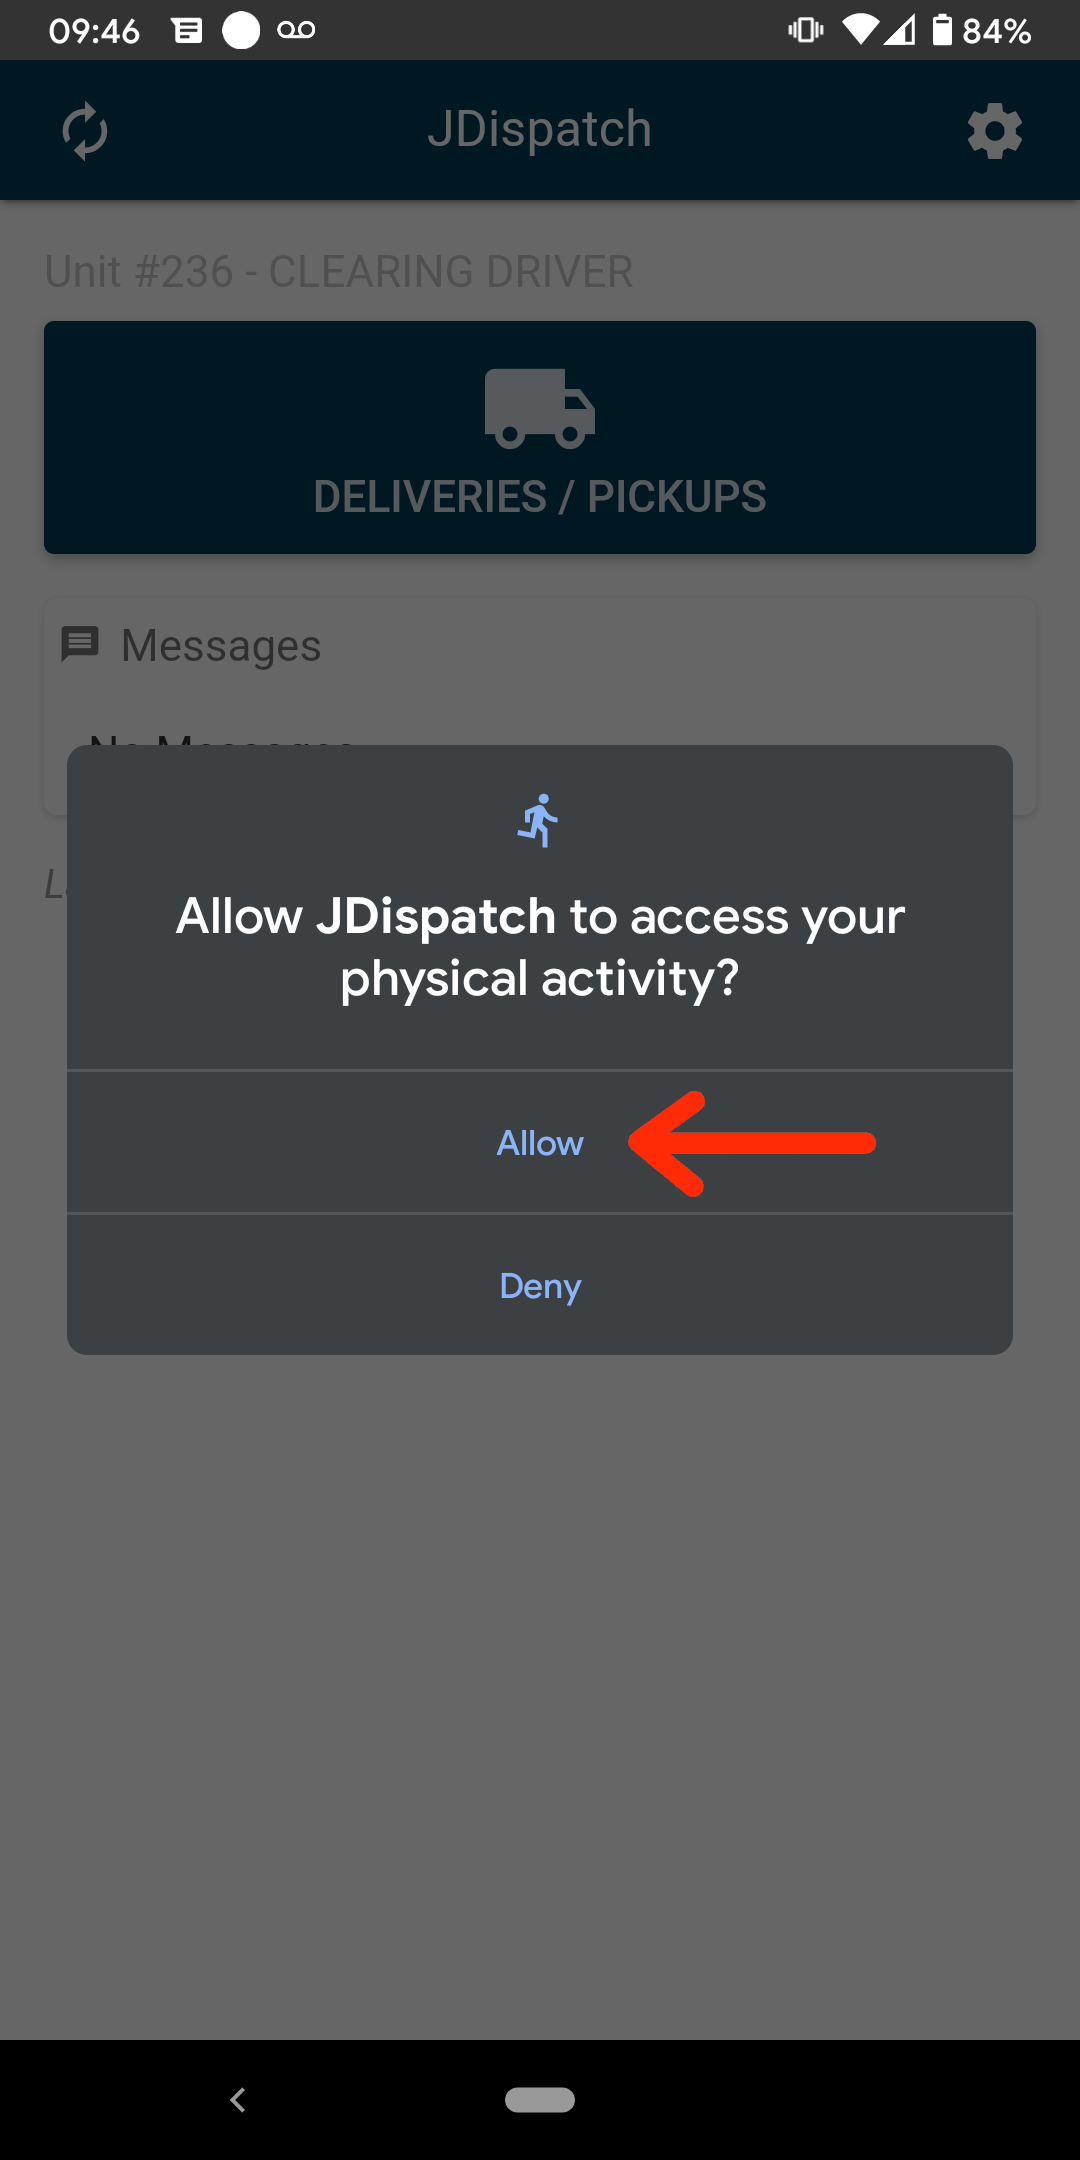
- Allow JDispatch to access your physical activity? This allows JDispatch to register the speed that the device is travelling at so that it can properly move about in the driver location map.

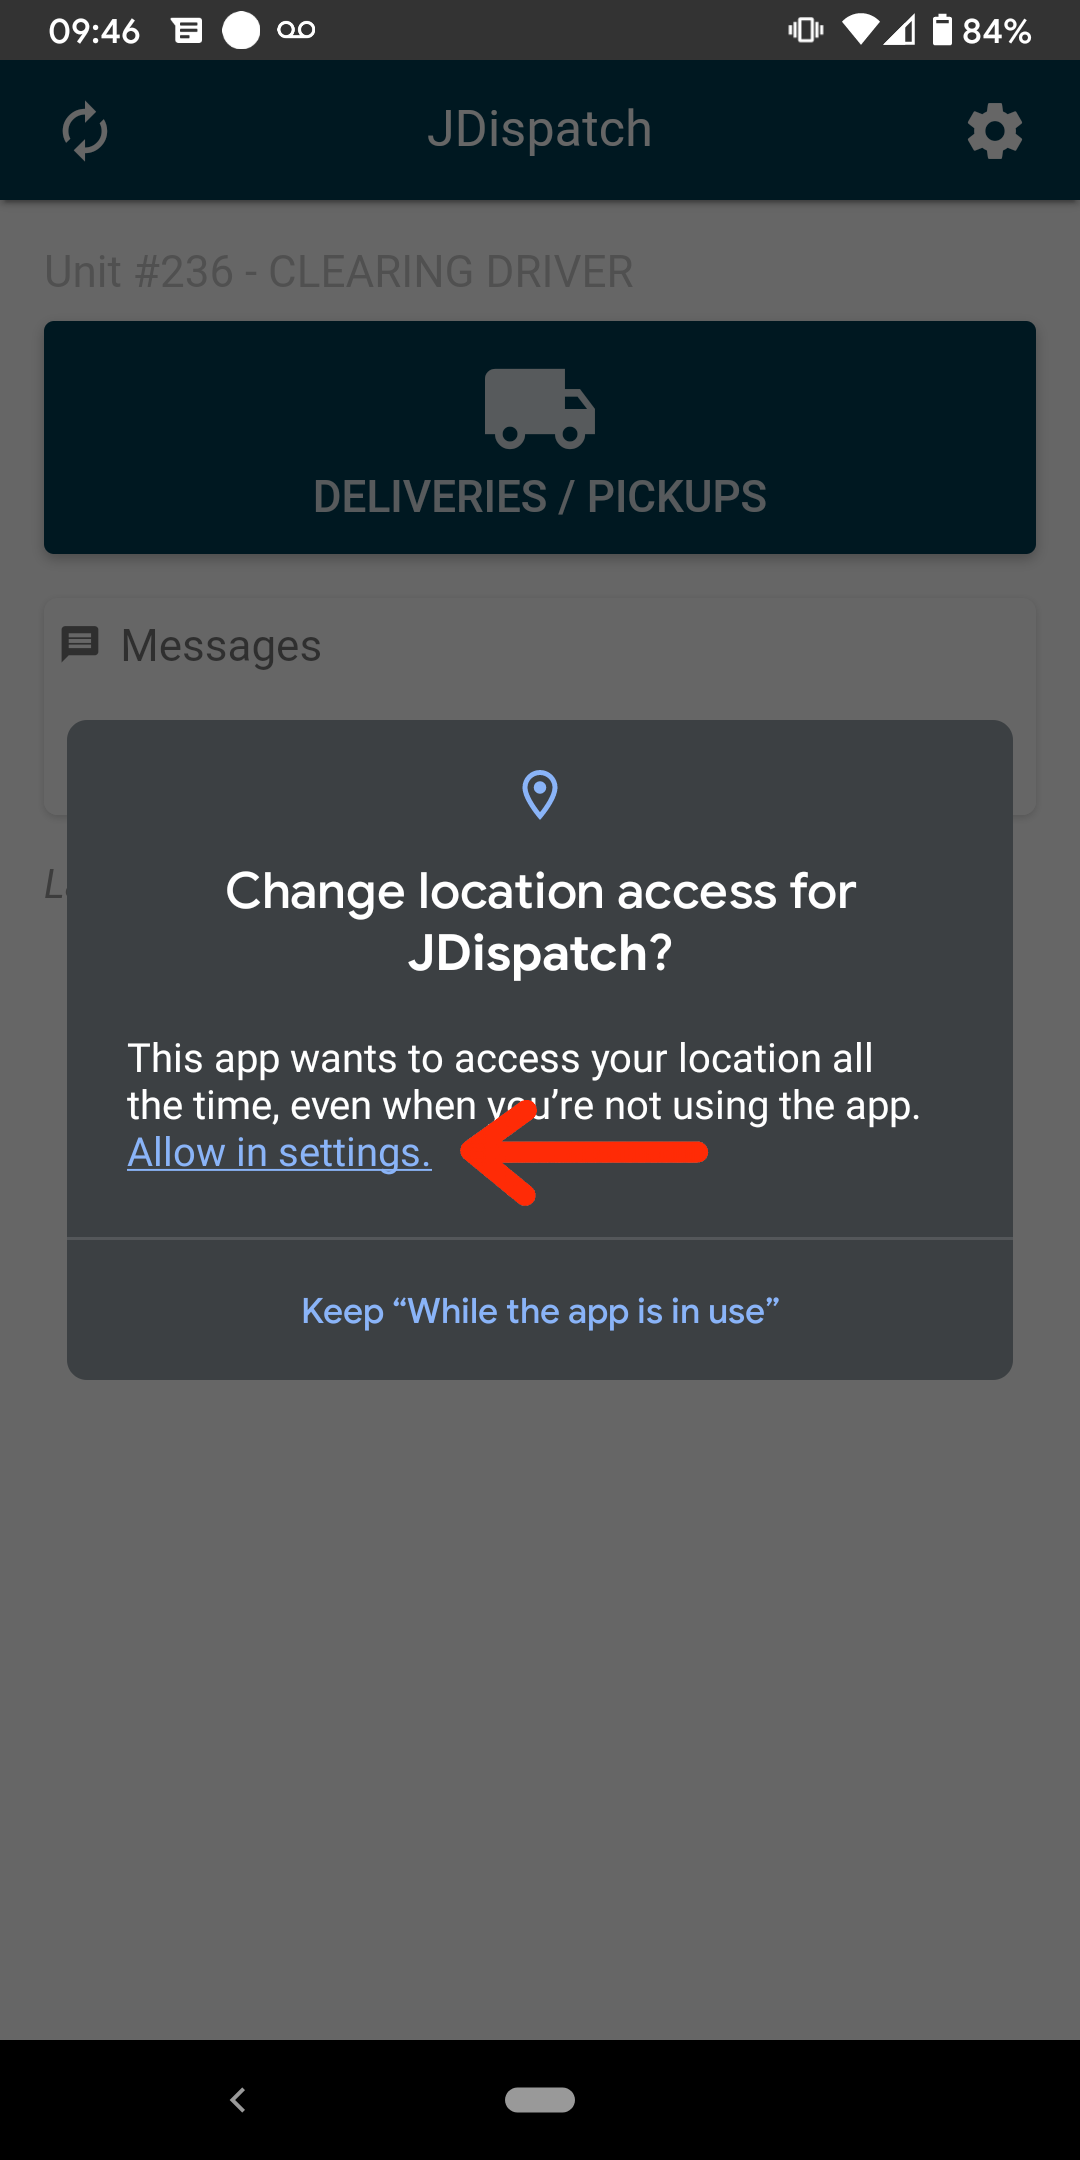
- Change location access for JDispatch? This will take you to a screen where you can allow JDispatch to report the device location all the time

- Allow all the time. This ensures that the dashboard can know the location of the device even when JDispatch is not open.


Register The Device
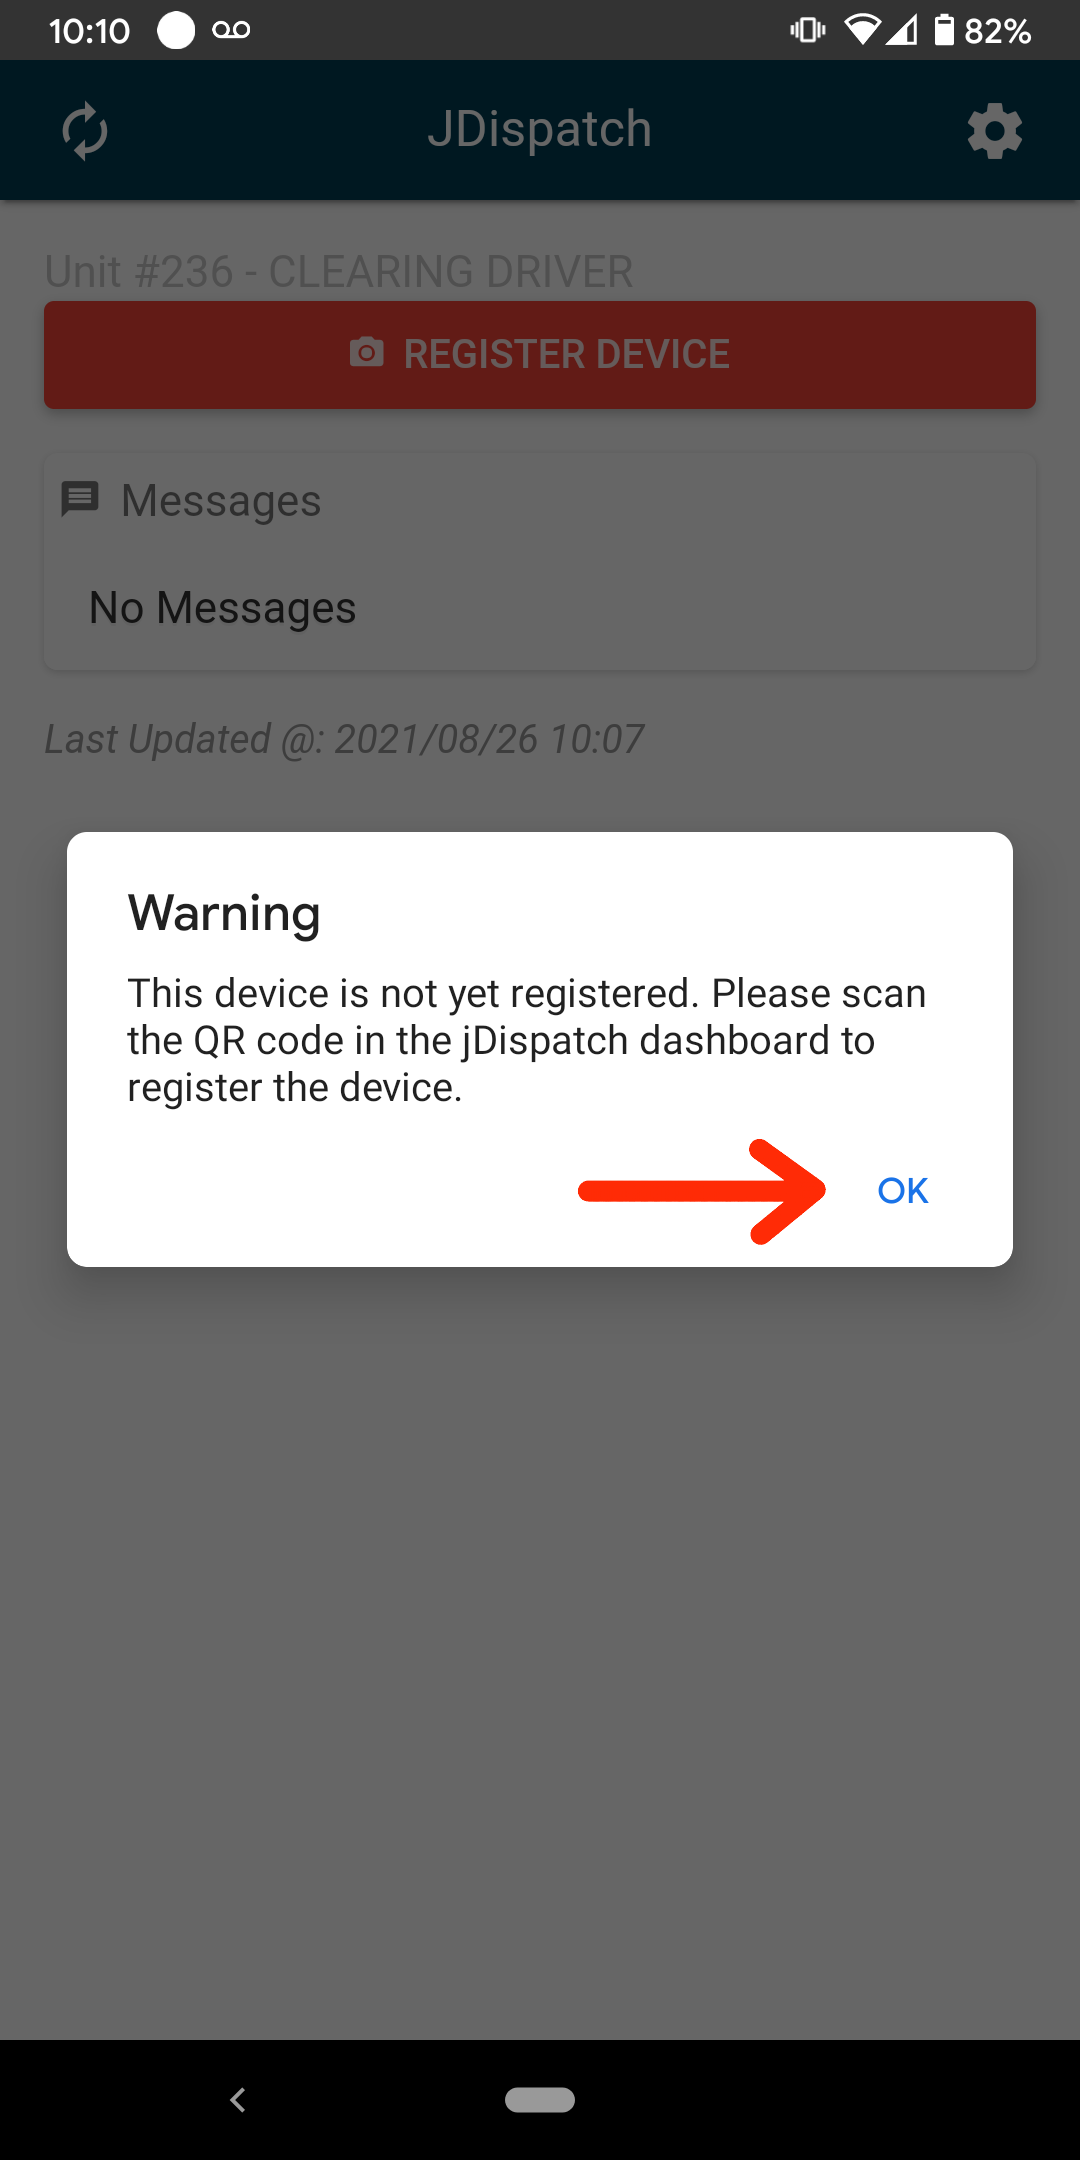
Once you have allowed all driver permissions, youshould have a message warning you that the phone is not registered.
- Tap OK.

-
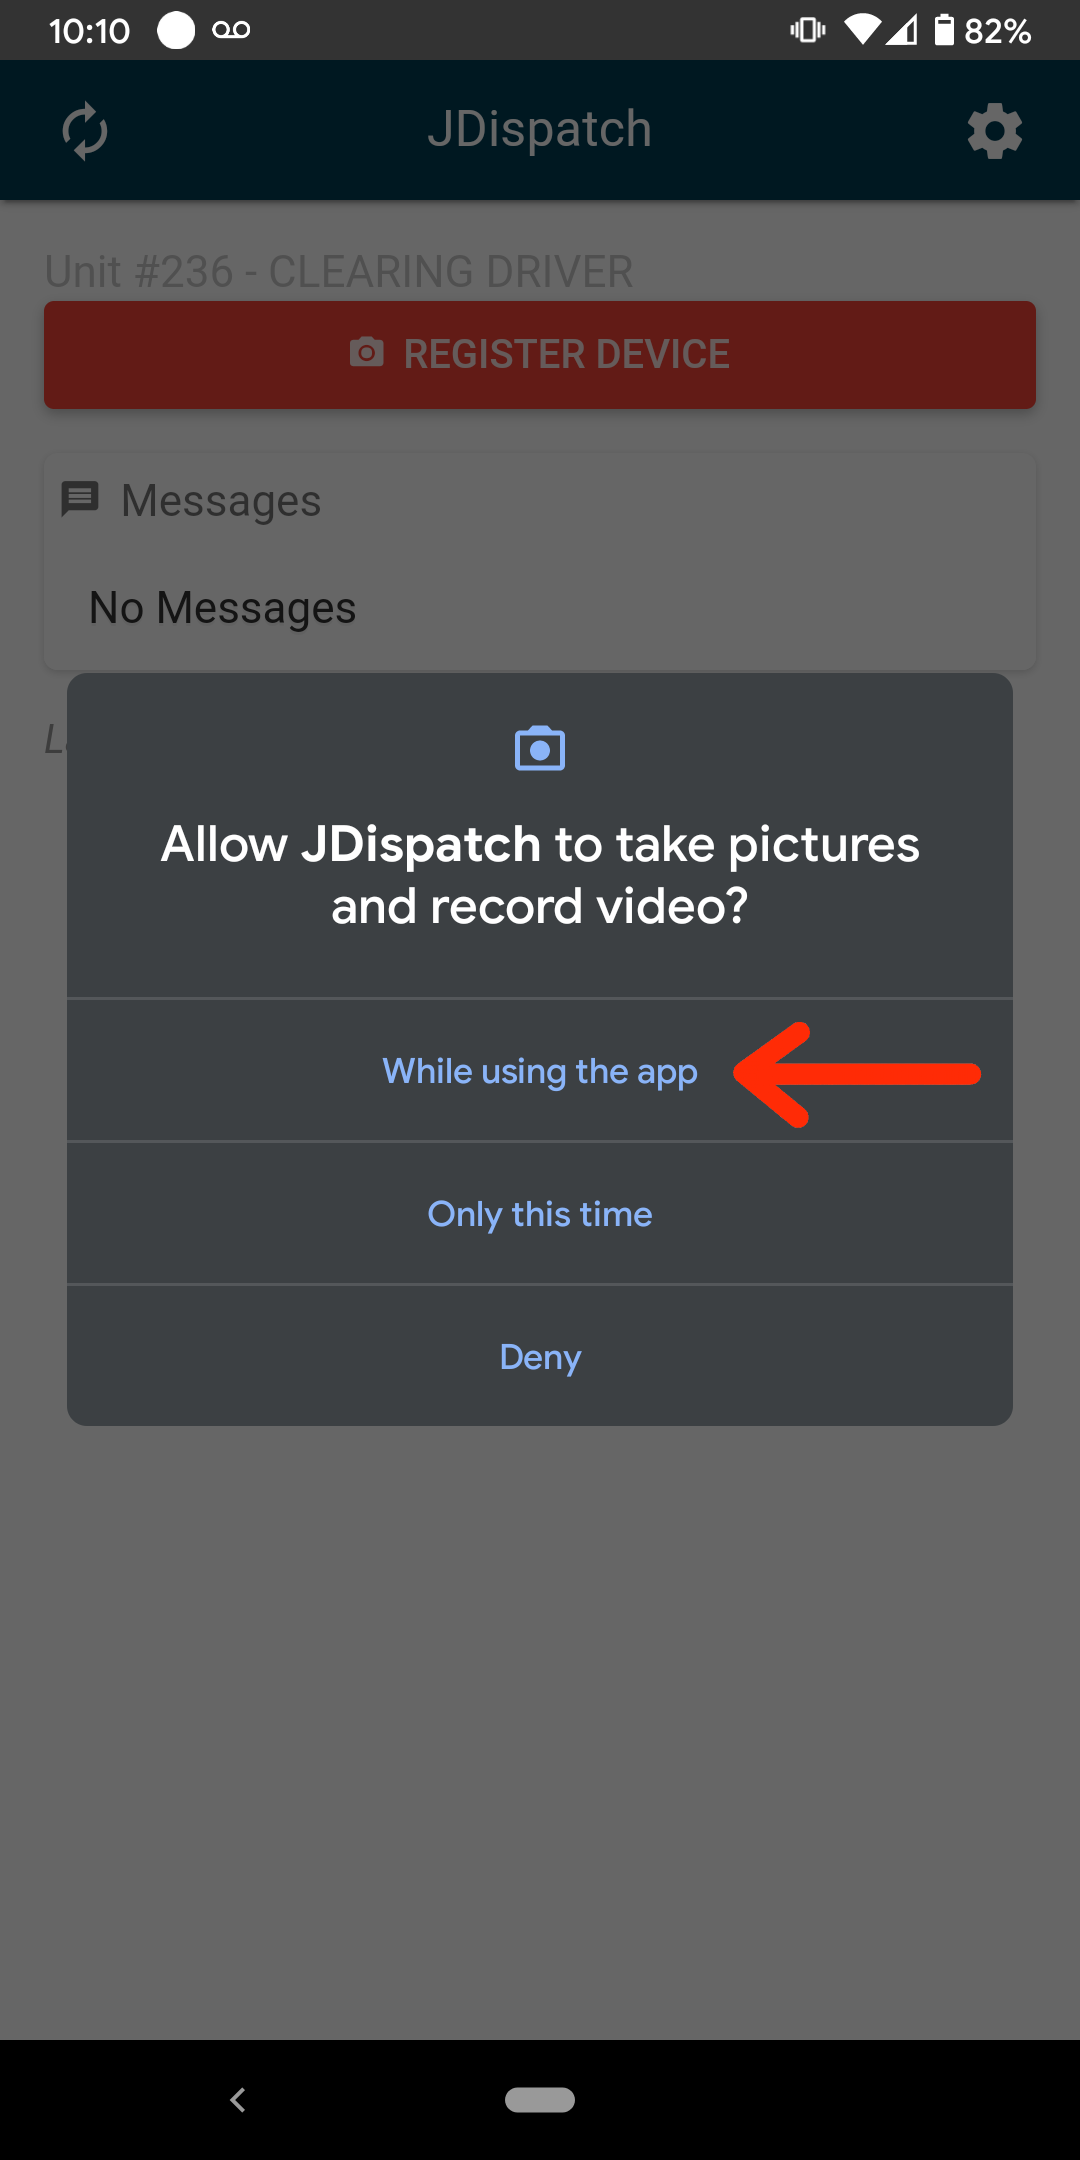
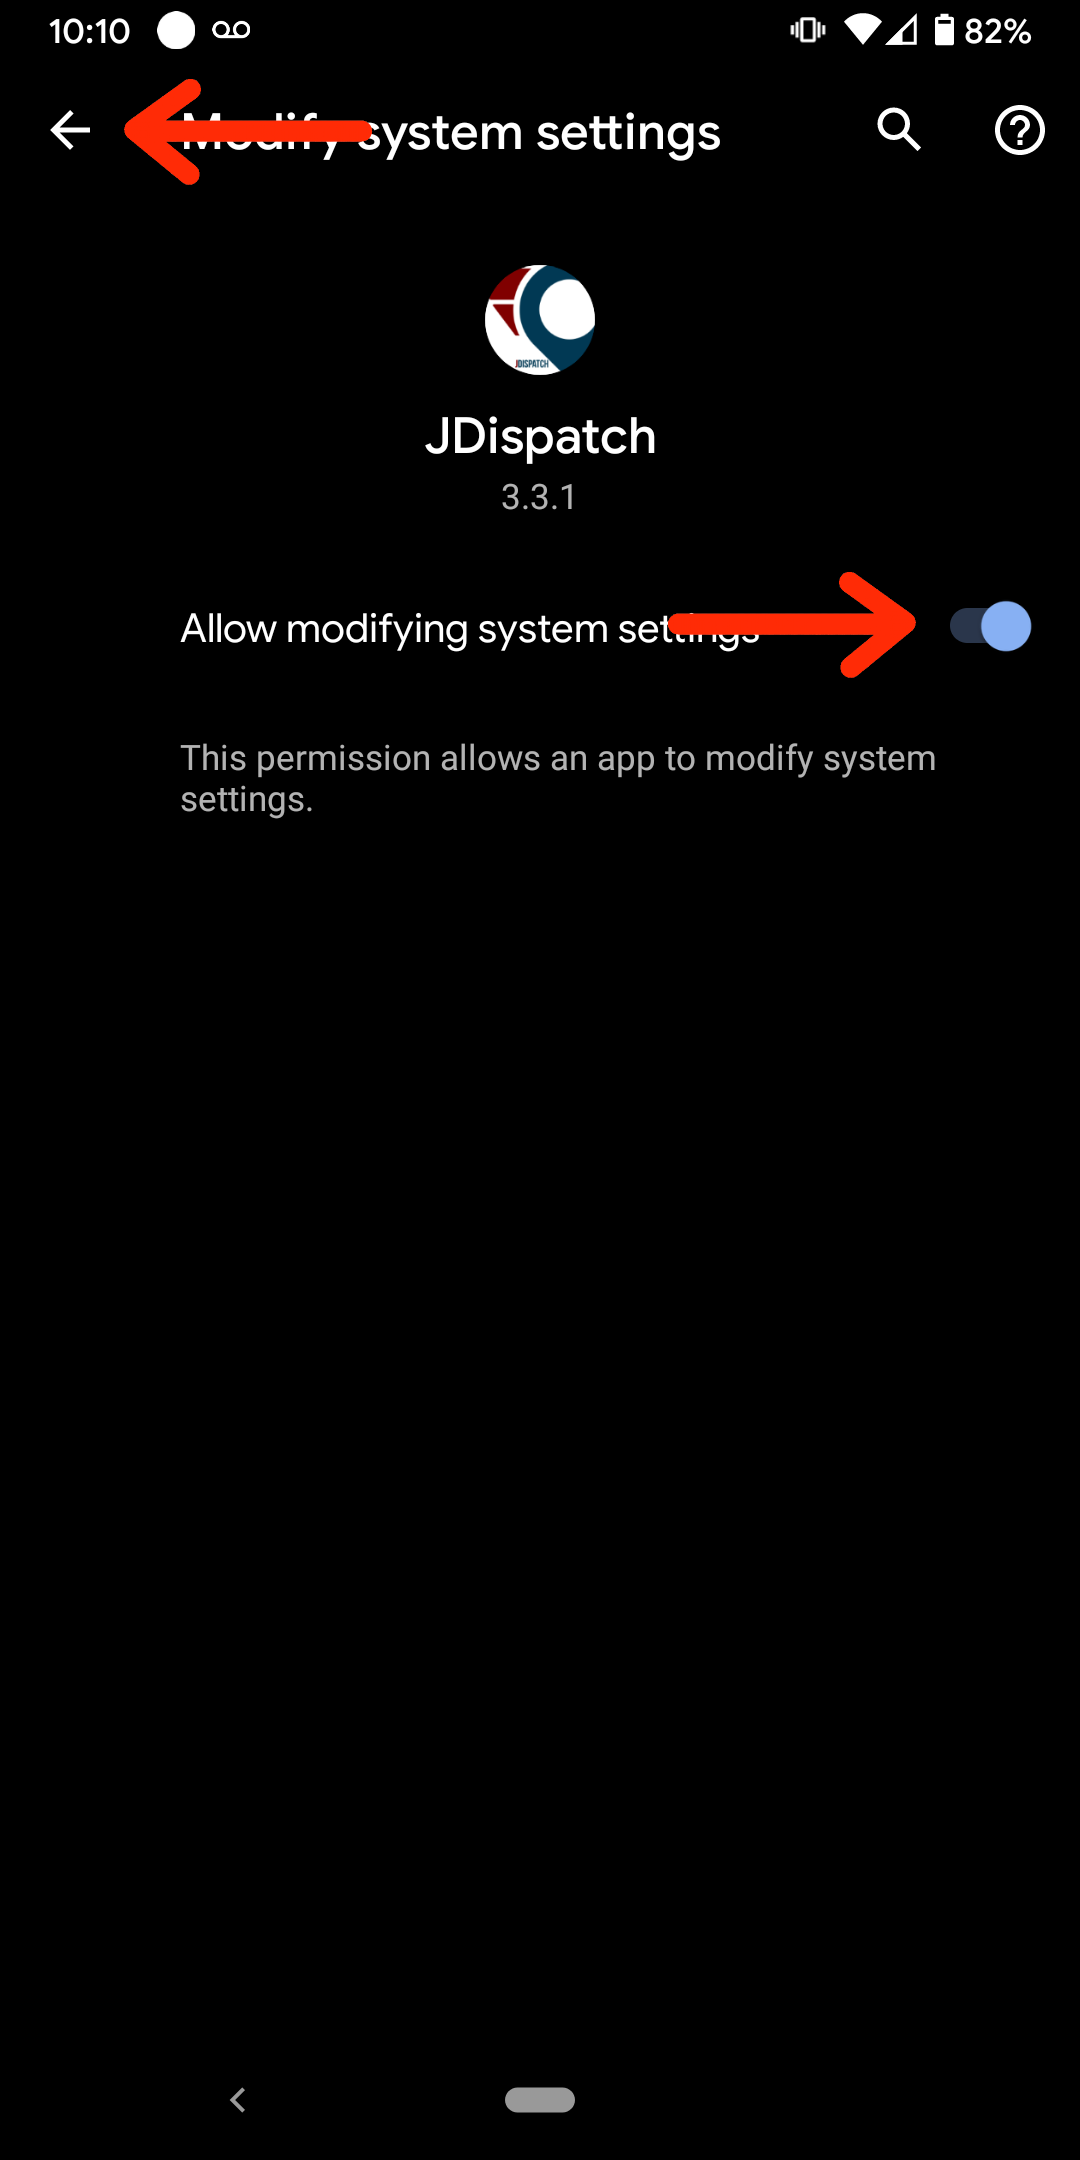
You should now see a red Register Device button. Tap this button. The first time you do this, the app may ask for additional permissions. You should allow JDispatch to take pictures while using the app.

- You will also be asked to allow the app to modify system settings. This enables the app to take pictures as well. Toggle the switch to allow this, and then tap the back arrow in the top left.

- Tap the Register Device Your camera should initialize.
- With the camera initialized, focus on the QR code on the screen you opened up the JDispatch dashboard.
- You should be presented with a message saying that you successfully registered your phone, and the 'Register Phone' button should be replaced with a 'Refresh Info' button.
- You will also notice a new entry in your jDispatch dashboard under Registered Devices.
Assign a Driver to The Phone
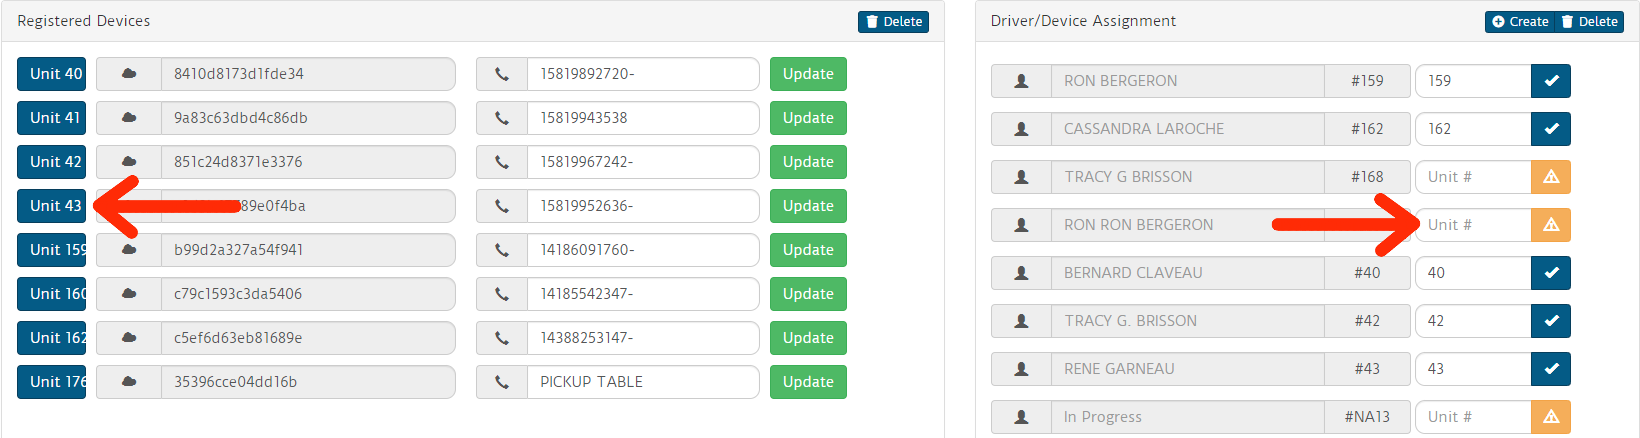
- In the jDispatch dashboard that was opened up previously, you should see a listing of all your drivers that you have set up in in your ERP under Driver/Device Assignment.
- Click on the blue Unit button for the newly set up device and drag it over to the driver who will be using this device. Next to the driver’s name, a checkbox icon should appear. This means the assignment was successful.

- Now, back on the phone, tap the red Refresh Info button. You should see the driver’s name, and a unit number along the top. This confirms the proper assignment on the phone as well as the dashboard.
Updating Sonim Devices
A number of Sonim XP7700 devices are registered with the JDispatch service. A number of these devices are currently running an older version of Android which will disable push notifications. An additional problem with these devices is that the built in Adnroid OS update no longer works.
In order to update these devices to a more current version of Android to enable push notifications, you will need to follow these steps:
In order to update, we will need to install an app outside the Play store which is direct from Sonim.
- Download a barcode scanner app. This one is recommended: https://play.google.com/store/apps/details?id=com.google.zxing.client.android&hl=en
- From your device's home screen, open the app tray

- Open the Play store app

- Search for 'Barcode Scanner' and select the app from ZXing Team

- Once the app is open, Click Install

- From your device's home screen, open the app tray
- Enable unknown sources to install apps.
- From the device's home screen, open your app tray
- Open the Settings app

- Navigate to Security

- Select the Unknown Sources option

- You will see a warning message on screen. This is expected, please tap OK.

- Return to the main home screen.
- From the device's home screen, open your app tray
- Now, you can install the Sonim updater app.
- From your device's home screen, open the app tray
- Open the newly installed barcode scanner app
- Scan this barcode

- Tap the link in the scanner window

- Select to open the link with chrome. Select 'Just Once'

- Tap the download button

- When asked which app to use, select Drive. Select 'Just Once'

- Accept the permissions

- Once the app is installed, elect to open it
- Tap Check Update

- a
- a
- a
- From your device's home screen, open the app tray
Updating The Mobile App
In scenarios where a device is not set to auto-update the JDispatch app, the following steps will need to be followed:
- From the device's home screen, list all of your apps:

- From the listing of apps, scroll down to the Play Store app.

- Within the Play store app, select the menu option in the top left

- Select 'My Apps & Games'

- All of your apps should now list. Under the 'Updates' heading, you may find JDispatch

- Click the 'Update All' button to update all apps, or the 'Update' button next to JDispatch to update just the JDispatch app.
How to Find Your Android Version Number and Security Patch Level
This information is available in Android’s system-wide Settings screen. Whatever version of Android you’re using and whatever customizations your device’s version of Android has, you should be able to get to it in the same way.
Open the “app drawer” — the entire list of apps installed on your phone. It’s almost always a button at the bottom of your home screen, in the center.

Scroll through the list of installed apps and look for an app named “Settings”. Tap the Settings icon to enter Android’s system-wide Settings app.

Scroll down on the Settings screen and look for an “About phone”, “About tablet”, or “System” option. You’ll usually find this at the very bottom of the main Settings screen, under System, but depending on your phone it could be different. If you do find a specific option for System, you can usually find the “About Phone” underneath that.

Couldn’t find it? Depending on your phone, here are some places that you can find the Android version:
- Samsung Galaxy Phones: “About Phone” > “Software Information”
- Stock Android: “System” -> “About Phone” or “About Tablet”
On the resulting screen, look for “Android version” to find the version of Android installed on your device, like this:

It just displays the version number, not the code name — for example, it says “Android 6.0” instead of “Android 6.0 Marshmallow”. You’ll have to perform a web search or look up a list of Android codenames if you want to know the code name associated with the version. Here’s a current list:
- Android 11
- Android 10
- Android 9
- Android 8.0 – 8.1: Oreo
- Android 7.0: Nougat
- Android 6.0: Marshmallow
- Android 5.0 – 5.1.1: Lollipop
- Android 4.4 – 4.4.4: Kit Kat
- Android 4.1 – 4.3.1: Jelly Bean
- Android 4.0 – 4.0.4: Ice Cream Sandwich
- Android 3.0 – 3.2.6: Honeycomb
- Android 2.3 – 2.3.7: Gingerbread
- Android 2.2 – 2.2.3: Froyo
- Android 2.0 – 2.1: Eclair
- Android 1.6: Donut
- Android 1.5: Cupcake
Other fields here are also relevant. The “Model number” field tells you the name of your device, for example.
Confirming App Permissions
These instructions are based on an Android P device. Your device screens may appear slightly different, but the menu options should still be available on your device.
Direct method when app is open
- Open up the app on your device. You should have a badge in the top banner of your screen.
- Swipe your screen down from the top to get your notifications and menu. You should see a "JDispatch is running" or "AAG Dispatch is running" message.
*** Also confirm that the Location icon is enabled in this screen
- Tap the "JDispatch is running" / "AAGDispatch is running" message
- You will be presented with the app options
- Tap the 'Permissions' option
- Ensure that all of the permissions are 'Allowed all the time'
When unavailable from top bar
- Go into your device Settings by swiping down from the top of the screen
- Go into the Apps section
- Find the JDispatch app
- Select the Permissions option
- Ensure that Location permissions are 'Allowed all the time'
Joining JDispatch Beta
JDispatch beta is an early release app. Please be aware that there may be minor bugs or changes that are undocumented. All bugs or problems should be reported to support@amscomp.com
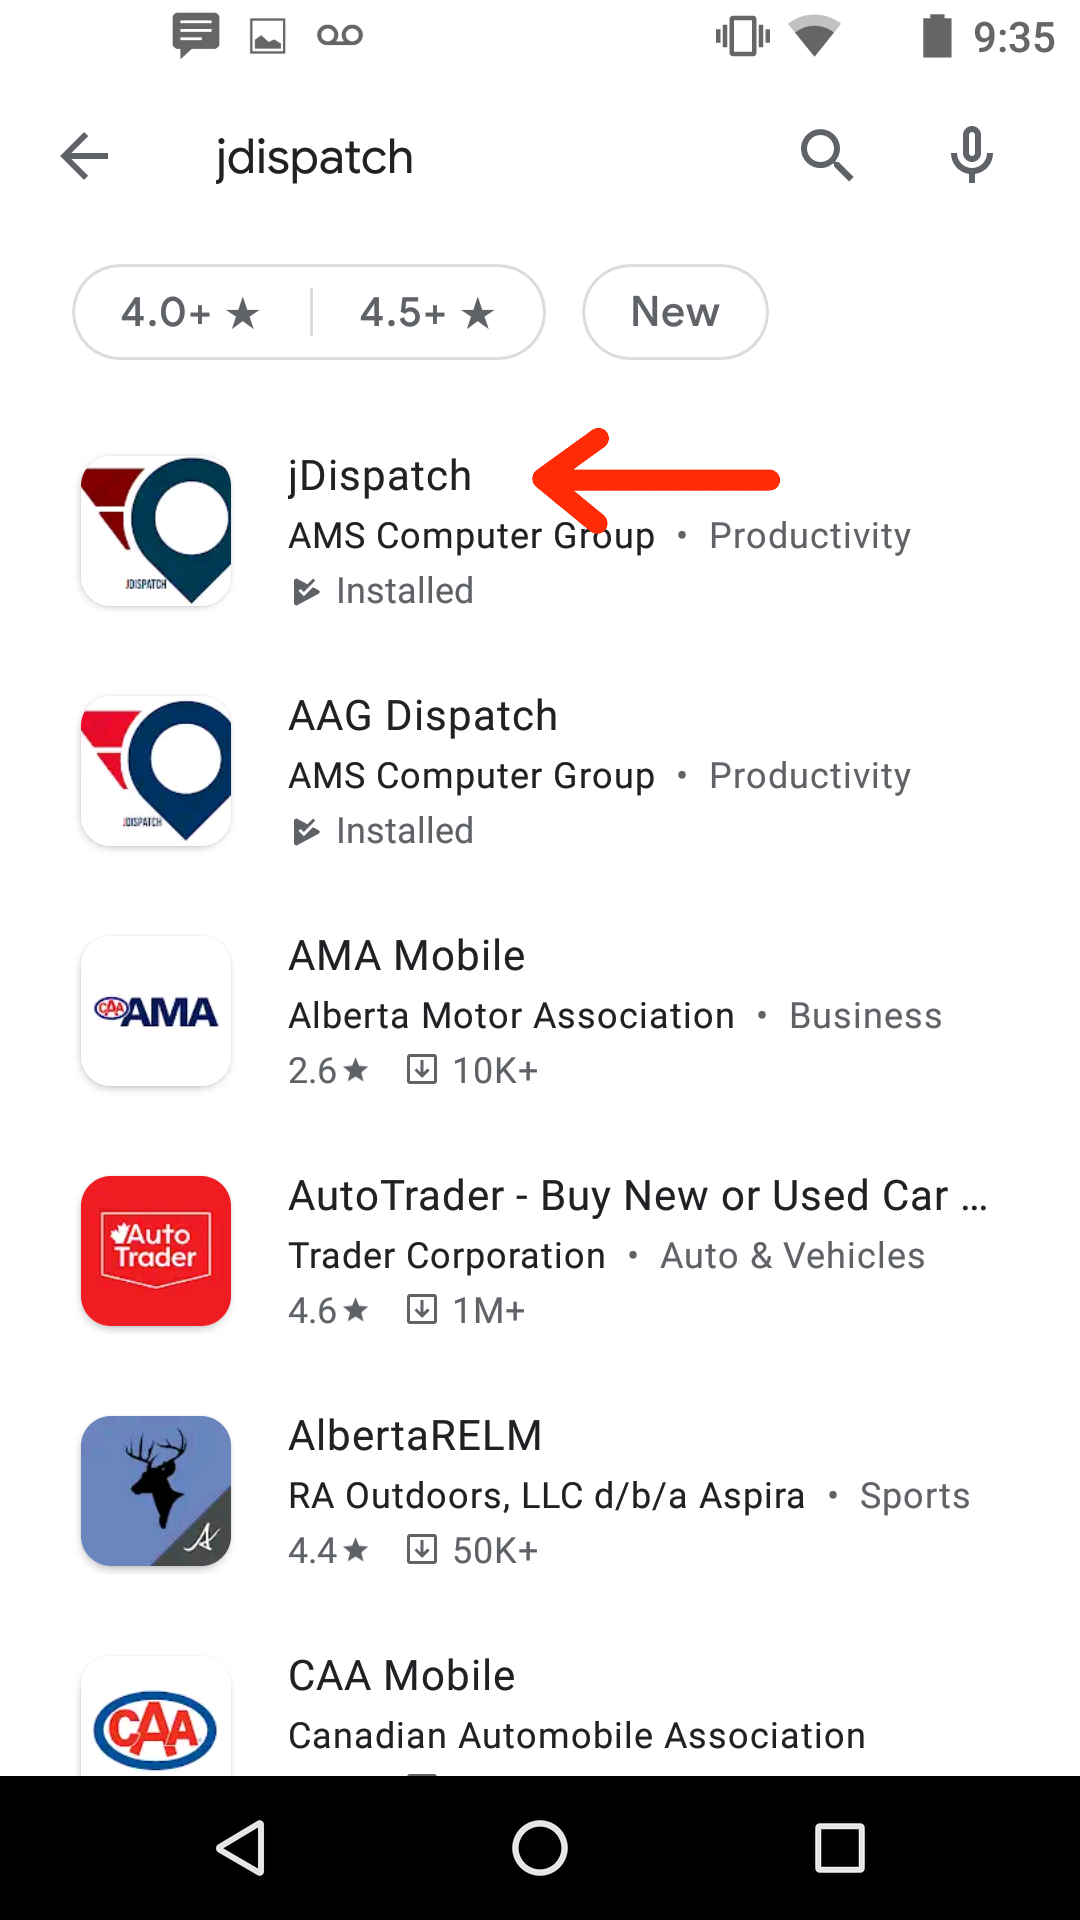
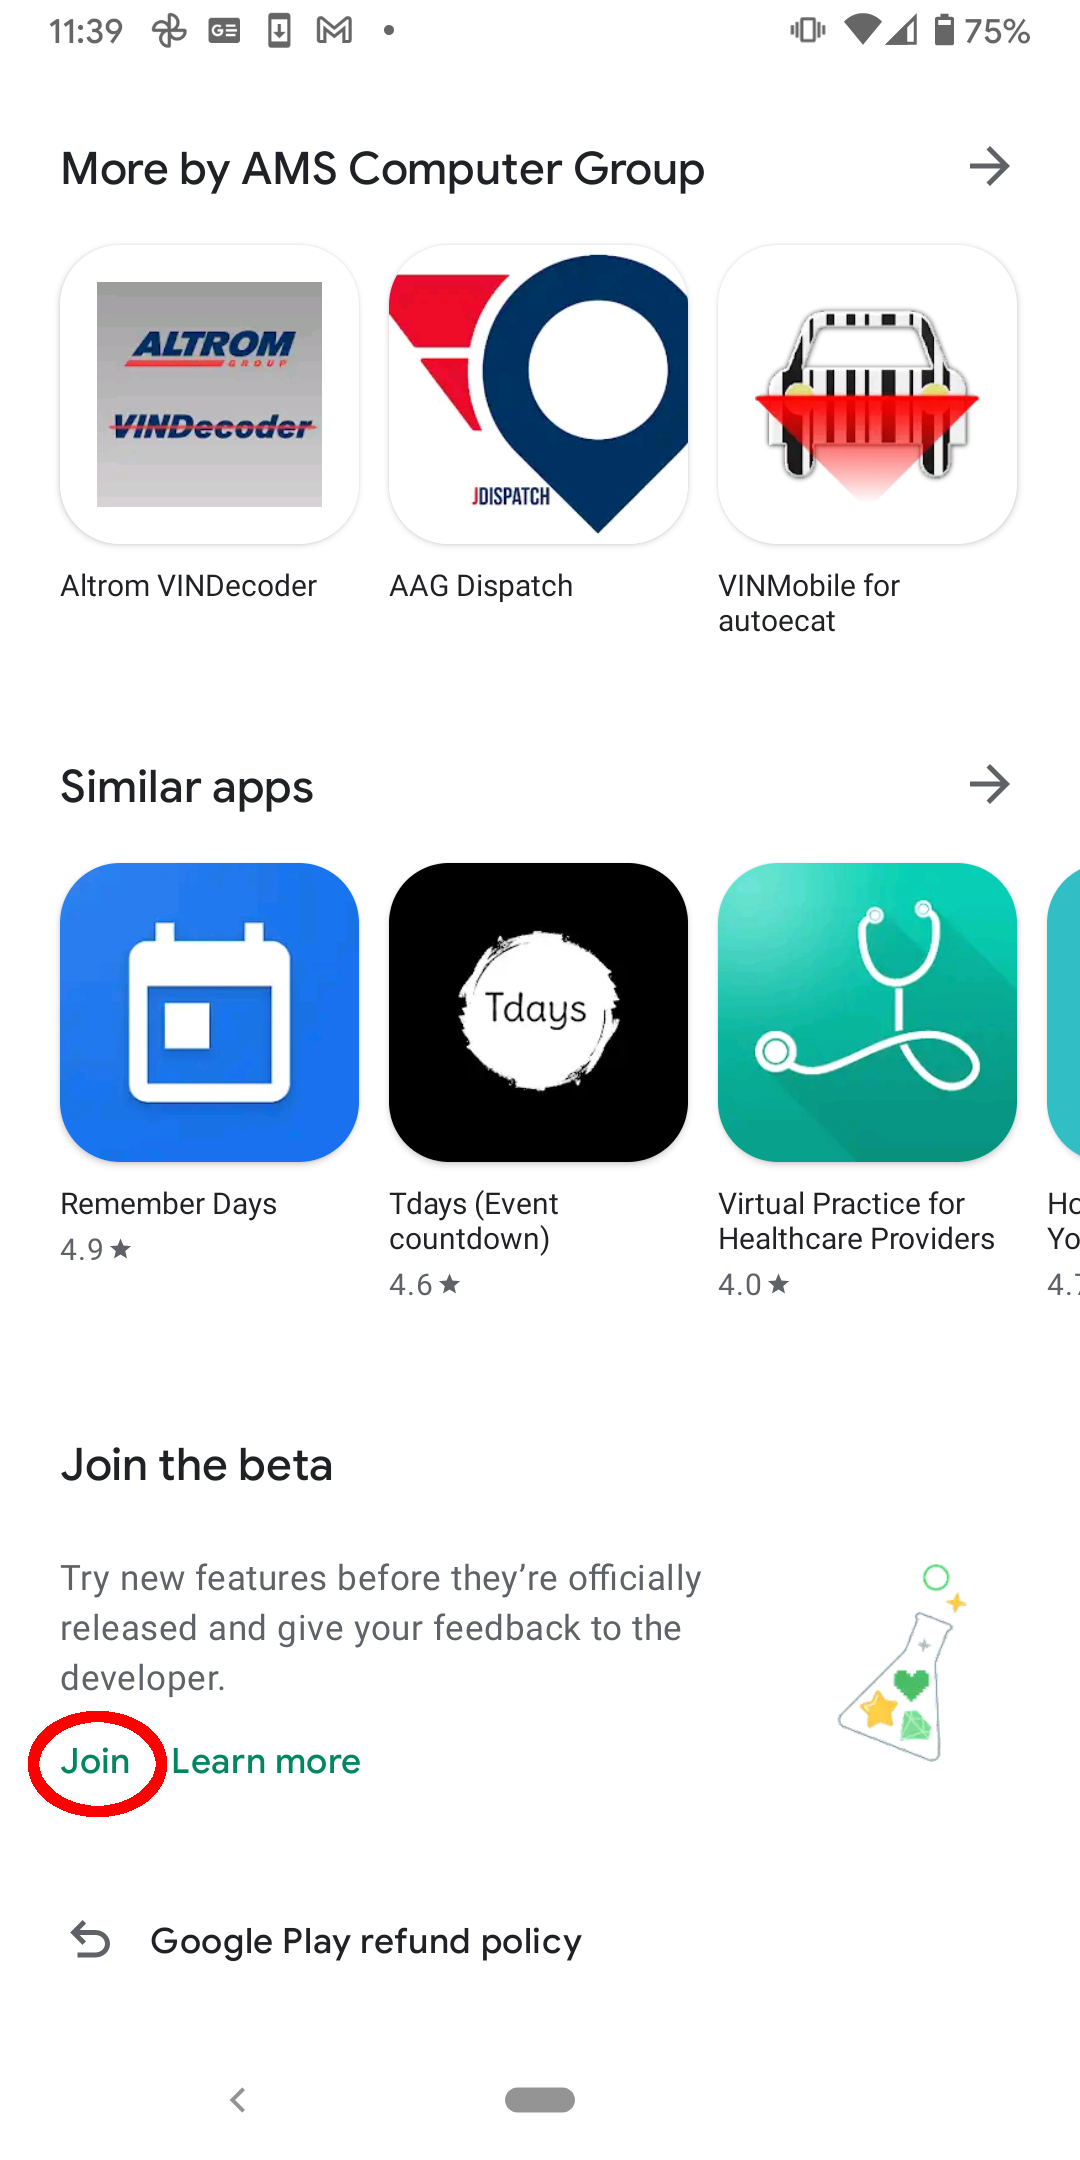
To join the JDispatch beta can be done via the google play app. Simply follow these steps to update your version of JDispatch to the beta test version.
- Open the play store app

- Search for and select JDispatch

- In the JDispatch listing page, scroll to the bottom and tap 'Join' under the beta testing section

Please note that it can take up to an hour for the beta signup process to be complete. Once you have been added to the beta program, you can update the JDispatch app.