Counterpoint
User Manuals & How-To Guides for COUNTERPOINT software
- ** Release Notes - Version 6+
- ** COUNTERPOINT® Version 6+
- Accounts Receivable Enhancements
- Add Inventory from Invoicing
- Barcode Quantities
- Base Price Automated Updates
- Bin Selection in Invoicing
- Branch Stock Inquiry
- Category File Listing
- Change PO Number
- Cheque Void Option
- Consignment Processing
- Core Bank Enhancements
- Credit Check Enhancements
- Cross Dock HTML Pop-up
- Customer Notes
- Customer Notes Enhancements
- Customer Part Numbers
- Process EDI Invoices
- EOQ & ROP Calculation
- Fleet Part Tracking
- Foreign Currency
- General Charges & Core Handling
- Gift Receipts
- GL Budget Upload
- Invoice Price Change Restrictions
- Kit Maintenance
- Locked Product Inquiry
- Lost Sales Reason Code
- Loyalty Rewards
- Multiple Bin Locations
- Multiple Invoice Copies
- Physical Count - Add Bin Location
- Change PO on Pick Ticket
- Price Override Reporting
- Printing of Orders when Customer Backorders Received
- Product Maintenance Access Control
- Product Maintenance Screen Enhancements
- Purchase Orders - Booking & Specials
- Quote Handling Improvements
- RF Gun User Guide - 2022
- Substitute Chaining
- Suspense Payment Enhancements
- Web Order Discounts
- Specials / Contracts Enhancements
- Accounts Payable Invoice Matching
- Accounts Payable
- AP Month End
- AP Reporting
- AP Year End
- Auto Cheque Processing
- Bank Reconciliation
- Data File Maintenance
- Misc Cheque Processing
- Transaction Input
- Vendor Inquiries
- Accounts Receivable
- AR Month End
- AR Reports
- AR Year End
- Cash Receipts Processing
- Customer Analysis
- Customer Notes Inquiry
- Customer Notes Maintenance
- Customer Search
- Data File Maintenance
- Loyalty Rewards Program
- Move ROA Payment from one Customer to Another
- Setting Up Invoice Copies
- Statements
- Transaction Processing
- Delivery Dispatch
- How-To Guides
- Inventory
- Bump All Price levels
- Common Problems / Troubleshooting
- Concepts
- Deleting Categories
- Home Hardware Barcode Receiving
- Inventory Counts
- Item Maintenance
- Kit Maintenance
- Multiple Bin Locations
- Pricing Guide
- Product Popularity Listing
- Receiving Product
- RF Count 'Cheat Sheet'
- Stock Adjustments
- Stock Transfer Reconciliation
- Supporting Files/Information
- Transferring Parts
- Uploading Min/Max/Reorder
- Zero Category On-Hands
- Invoicing
- Adding Flyers to Invoicing
- Bin Selection in Invoice
- Customer History Part Search for Unknown Number
- Fleet Part Tracking
- General Charges & Deposit Handling
- Invoicing with Global Payments Terminals
- Selling a Core
- Suspense Payments with Payment Terminal
- Updating Credit Hold Invoice
- Pricing
- Customer Price List
- F.A.Q.
- MSC / AMS Line Code to AMS Price Level - Lines 102 - 494
- MSC / AMS Line Code to AMS Price Level - Lines 500 - 990
- Price Multipliers
- Price Rounding
- Pricing Theory
- Troubleshooting (Real World Example)
- Updating Prices by %
- Purchasing
- Release Notes
- Release Notes - Version 5
- Release Notes - Version 6
- Sales Analysis
- Warehouse Utilities
** Release Notes - Version 6+
A complete listing of documentation related to the new features and enhancements found in COUNTERPOINT version 6+
** COUNTERPOINT® Version 6+
Release Overview
The upcoming release of COUNTERPOINT will consolidate for the first time in several years a number of features that have not been considered mainstream, meaning only certain customers got certain features based on their requests. This was a strategic mistake as in many cases this has held AMS back from being more aggressive in the software development cycle. This release of Version 6+ will move all customers to the same version, making support, training and new development rollout easier and allow for more frequent updates, which is why we plan to move to a quarterly software release update schedule. Bugs will be released as completed. The listing below may well contain features you already have and use but also others you may not be aware of or have forgotten are available. All active links will take you to a more detailed overview of the specific enhancements.
We encourage you, once settled into Version 6+ to submit to us any functionality you would like to see added or changed for consideration in a future release. We will also be releasing a list of the currently planned updates for 7.1 shortly.
Functionality & Highlights
Point-of-Sale
- Credit Card Integration enhancements: For those dealing with Global, Moneris and Digitech changes have been made to eliminate Suspended transactions prior to day end.
- Improvements to outstanding quote handling: Including deletion upon Invoicing.
- In addition the Quote / Order search combined: When keying in a customer number, instead of the ‘Open Orders for This Customer’ prompt, counter-staff may be presented with any combination of a [A/O/P/Q/N] prompt, allowing them to quickly view any [O]pen Orders, [P]acking Slips or [Q]uotes. Other options include [A]ll or [N]one
- Improvements to handling of over credit limit customers: For transactions that put customer over their credit limit on completion of an invoice the system will offer to keep the order as a quote instead of losing it which can be recalled by searching for a PO # containing CH(Credit Hold).
- Gift Receipt Option: If activated, when finalizing an invoice, the user will prompted to print a gift receipt.
- Support of User Defined Lost Sale Reason codes: With drop down selection list.
- Standard Comments and General Charges: This provides the ability to apply standard comments to an invoice using the “G” line type.
The General Charges feature allows the ability to accept deposits by a pre-set percentage, a default value or a manually keyed amount at the time of sale.
The General Charges also provide the ability to add an automatic charge to all invoices, such as a Fuel Surcharge
- The ability to change the PO number: After the invoice has been completed.
- Change PO# on Zslip: For those using Zslips the PO# can now be changed during the billing process in instances where the customer only issues a PO# when the order is complete.
- New Customer Notes Options: More flexibility for creating customer notes such as notes that can be automatically printed on the invoice, such as delivery instructions or who has singing authority.
- The Branch Stock Inquiry access: Shift/F4 from within the billing screen has been enhanced. You can now also create stock transfers from a branch. These transfers can be for a single item at the time you enter the inquiry, or you can create and add to a running transfer for completion at a later time.
- The ability to ADD a non-stocked part number automatically: From the Price Book, meaning receiving and returns have been made significantly easier.
- Add part to invoice using your Customers Part Number: For customers who have an internal part numbering system, and order from you with those parts, there is now the ability to invoice them with those part numbers, which are tied to your real part number. Will also modify the “customer to your part #” link if you transfer your part to a new number. The order can be keyed by their part # or yours and will print both numbers on their invoice.
- Control of Specials and Contract pricing from one maintenance routine: With the inclusion of both Price Level and Discount group as possible filters to add Contracts/Specials via 4. Sales Desk > 8. Administration > 2. Customer Pricing > 3. Contracts / Specials, there is the possibility to migrate all pricing matrixes and discounts into the Specials, and do all pricing/discount maintenance from that one screen. There is a migration routine that must be run by AMS prior to adopting this method.
- Ability to prevent Counter Staff from lowering prices: This feature is a new field in the clerk maintenance that, when activated, will prohibit the clerk in question from changing the selling price from within the invoice. Any price changes would need to be authorized by a user with authority to change prices by entering their PIN.
- Multiple Bin # display on the billing screen with the option to select which Bin the product was picked from.
- Customer Fleet Vehicle tracking: This is the ability to set up your customer’s equipment/vehicle using their ID number with the parts it takes for ease of lookup.
- Extra Invoice copies for specific customers: Extra invoice copies are now parameterized by transaction type. So, for instance, you can have duplicate copies of invoices but not quotes.
- CAPS Lock: We have updated the PC software to automatically enable the CAPS lock when using Counterpoint. This means you do not need to toggle the CAPS lock on or off when going in/out of Counterpoint
- Icons, Etc.: Many of the menu icons have been updated and standardized
Enhancements to JDISPATCH:
- Inclusion of Pick Tickets in the transactions sent to the dispatching screen. Pick tickets will now be available for dispatch via the COUNTERPOINT dispatch module.
- This provides the customer with an unpriced document.
- Delivery Runs: The delivery dispatch module now has the ability to assign customers to a delivery type, and a run. This allows you to keep cash sale transactions, and non-delivery customers out of the dispatching screen, cleaning up the process for your dispatcher. Delivery type and Run maintenance is handled in the 4. Sales Desk > 7. Delivery Dispatch menu, with delivery types determining whether an invoice is delivered or not, and a run number helping group customers in geographic runs. Once delivery types and runs are set up, they are assigned to a customer in the customer maintenance screen. We include 3 default delivery types [D]eliver, [P]ick-Up, and E[X]press. Both [D]eliver and E[X]press will be pushed to the delivery dispatch screen, which no delivery type or a [P]ick-Up delivery type will not.
- After all maintenance is done, the counter-staff will notice a ‘Deliver’ option when finalizing an invoice. Typing the ‘D’ key will give them the option to change the default value. The dispatcher & drivers can also select a run number when displaying invoices, but do not have to.
- If you are still not signed up with JDispatch, It is a full featured delivery tracking and signature capture module built to interact with COUNTERPOINT and the Counterpoint Cloud Platform. The best part? The base version is included with your COUNTERPOINT system! Keep track of deliveries and pick-ups, track driver locations and more. Information on JDispatch can be found online here.
Web order (autoecat.com) related Changes
- Web order discounts: Allows the setup of a global web order discount (by branch) to be applied to web orders. This discount is then printed on the invoice. However, the printed web discount is printed in place of the customer’s regular discount (Both discounts still apply, only one prints).
- Servicing Branch Fulfilment Changes: Ensures that all web orders print at a customer's servicing branch. autoecat now passes through pre-defined messages to alert your counter staff of product availability and where to source out of stock items from.
- Pick up in store enhancements: Pick up in store orders are now available in the open order review screen. Customers can optionally also request a confirmation email
- autoecat Desktop Browser: The new autoecat browser is aimed at providing your counter staff the the best possible performance and most functionality possible when they use autoecat from within the billing system. Some of the key features of the new browser are:
- Enhanced speed of browsing
- Streamlined transfer of items from the catalogue / shopping cart and back into your invoice
- We have also been very busy upgrading your and your customer's online ordering experience as well. A complete listing of recent and ongoing changes to the autoecat.com website can be found here.
Customer Specific Changes
- Core Billing flag for customers: For those who are allowed to not pay core charges provided they return the core by a certain date, the number of days of the grace period is specified in a related data field. Specific Core statements can be produced for the customers flagged as being in the program.
- The ability to suppress the printing of invoices: For customers set to automatically receive their invoices by Email. In addition the ability to Email to multiple recipients has been added.
- Consignment Inventory: For customers purchasing high volumes of certain part numbers, they can be set up with an opening inventory balance that will only be billed when they reorder.
- Enhancements to the Loyalty Rewards Program: The system has been changed to allow the rewards to be based on Reward Points that is based on a Points/Dollar ratio that can be set by category. In addition, Invoices can now be Emailed to the VIP customer.
Inventory Control Changes
- Product Maintenance Access Control: A new parameter to set which fields certain users have access to within the Product Maintenance
- Revised Maintenance Screen: That has been enhanced to allow for a number of new fields related to the optional “Turns Based” purchasing logic.
- Rename of Minimum to ROP.
- New field to lock recalculation of the ROP for xx number of months.
- New field for Last Price Update: Added on maintenance screen to show when the last price change was applied to the item.
- Item is not returnable: A new flag to indicate if the item is not returnable to the supplier.
- Additional data fields to support imported product:
- Base Price and Base Core (Primarily for foreign currency): Addition of a ‘Base’ price and core. This is the price that was used to update your system pricing, before pricing parameters were added.
- Duty rate
- Ability to Chain Substitutes: As part of the maintenance routine.
- Quantity per barcode as part of product maintenance: Addition of a quantity tied to a barcode, for use on items that come in and can be sold by a unit and/or case.
- Kit Handling: The two types of Kits supported:
- Manufactured Kits – which are assembled from a group of parts then received into inventory for resale as the kit part number
- Counter Kits – which are kits that are put together at the time of the sale the components removed from inventory when the sale is completed
- Category Listing: The category listing has been modified to produce an extract for import into excel with additional fields included.
- Physical Count Bin Add: Has been added to allow the adding of a new bin during a physical count.
Repair Shop Module
- The ability to print Multiple Invoice copies by Customer
- New flexibility by the Integration of Edit Pad Pro for Work Order Labour Notes
- Spell Check
- Auto Line Wrap
- Adjustable Line Length
- Increased Text/Labour line to 2000 characters, up from 480 at present.
Purchasing / Receiving
- Booking and Special Purchase Order handling
- Suggested Order report breaks out On Order Quantity of both types
- Reporting on New Purchase Order Types
- RF Gun/Android Tablet Based Receiving capability
- Updated parameters for Critical Inventory report
- Include and report on items in a low inventory status based on minimum On Hand value
- Enhanced Foreign Currency support: Use of Base Price to maintain the suppliers cost before exchange, duty and freight.
Sales Analysis
- Full Integration to Counterpoint.cloud that includes:
- Nightly Sales Emails - Formatted emails to report on a number of different sales metrics
- Sales By Branch
- Clerk Sales
- Top 10 Categories
- Top 10 Classes
- Top 10 Customers
- Top 10 Gaining Categories
- Top 10 Gaining Classes
- Top 10 Gaining Customers
- Top 10 Gaining Industries
- Top 10 Industries
- Top 10 Losing Categories
- Top 10 Losing Classes
- Top 10 Losing Customers
- Top 10 Losing Industries
- Low Margin Report
- FlightDeck
- Sales Analysis - Track sales metrics via an easy to read sales dashboard comparing current sales to previous
- Sales by Day / Industry / Territory / Product Group
- Online vs. In store sales
- Cumulative Sales
- Product/Inventory Analysis - Review overall inventory performance through the Inventory dashboard
- Old / Invalid Stock
- Inventory Value by branch / category / product type
- Sales Goals - Set incremental sales goals by month / year
- Sales Analysis - Track sales metrics via an easy to read sales dashboard comparing current sales to previous
- CRM
- Easily review high level sales metrics, and detailed sales information by customer
- Automatically track customers based on sales thresholds
- Manually target customers to focus on
- Track correspondence with customers through the CRM CounterMessages module
- Easily review high level sales metrics, and detailed sales information by customer
- Web site ECAT Analysis
- KPI’s
- % of Change
- KPI’s
- A full list of recent updates to the Counterpoint Cloud Platform is available online here
- Nightly Sales Emails - Formatted emails to report on a number of different sales metrics
- Hourly Sales extract: Hourly sales extract is a routine that will analyze your hourly sales for a given time-frame, export the information to an excel template and present you with raw detail and graphed information on your hourly sales.
- Price Override Reporting: The Price Override reporting now allows for reporting over a period of time based on Customer, Sales Clerk, Range of categories and Override type.
- Price override report can also be automatically loaded to the counterpoint.cloud platform on a monthly basis for archiving and review
Accounts Receivable
- A customer change log: Has been added to allow Inquiry on what changes have been made to the customer’s master data, when the change was made and by whom.
- Ability to Switch between Customer Maintenance and Customer Analysis: The Customer Maintenance and Customer Analysis have been enhanced to switching between with a single key stroke.
- Customer Notes Edit/Inquiry: The ability to access Customer Notes has been added to the Customer Analysis and Cash Receipts input.
Accounts Payable
- Ability to Void a Cheque:
- Ability to void a cheque outstanding cheques
- EDI Invoice Processing:
- The ability has been added to receive invoices electronically from vendors via an EDI transaction that can be selected for adding to a A/P transaction batch
General Ledger
- Ability to Upload Budgets:
- Ability to upload budgets from Excel Spreadsheet
- General Ledger Year End:
- The General Ledger Year End step has been incorporated into the Period 12 Month End to eliminate issues with order process being run between these 2 critical steps.
Accounts Receivable Enhancements
Customer Maintenance
The Customer Maintenance screen has been modified to allow access to the Customer Analysis. Select “A” when the message Enter #,P(ricing),C(redit),E(di),A(nalysis) L(og),F1=accept,F2=reject is displayed on screen.
This will display the summary screen of Customer Analysis with the customer from the maintenance screen.
Another new option is the (L)og option where you can view a log of changes made to the Customer master

Customer Analysis
Several new options have been added to the Customer Analysis screen:
- Access to Customer Maintenance
- Access to Customer Notes
- Ability to view Detail based on start date entered
- Ability to view Detail from a specified invoice
- Ability to view only open invoices in the detail or all invoices
- Ability to send invoices electronically from the detail screen
- Customers Statement Email displayed on screen
Summary Screen Options:
In the Summary screen of Customer Analysis the options available when a Customer is selected are D(etail),C(ustomer),N(otes),E(xit).
D - Will access the detail screen showing the invoices outstanding for the customer
C – Will go to the Customer Maintenance screen in change mode displaying the customer selected in the analysis screen.
N – Will go to the Customer Note inquiry prompting to the note type to be viewed. Pressing Enter at the note type will display all notes entered for the customer. The option to Add new notes will be available.
Detail Screen Options:
In the Detail screen of Customer Analysis the options available are E(xit),Q(uit),N(xt),P(rv),S(end),D(ate),I(nv),A(ll),O(pen)
Use of the new options:
S – Used to send an invoice electronically. When selected a prompt will display which line number, select the line number display on screen for the invoice to send. This will then display the Invoice email addresses setup for the customer. The invoice can be sent to an email on file or can be entered manually using line 99 which allows entry of the email address.
Note: Only invoices can be sent by email, not other charges such as A/R transactions or Service Charges.
D – Prompts for a start date to view invoices from.
I – Prompts for an invoice number to start at.
A – Display all invoices and payments outstanding
O – Display only open invoices outstanding
Cash Receipts Input
New options available when entering Cash Receipts are F3 to go to Customer Maintenance or F11 to go to Customer Notes. Both of these options are available after the Customer Number has been entered.
Add Inventory from Invoicing
Definition
The option to add parts to inventory from the invoicing screen has been enhanced so when in use, non-stocked parts added to an invoice which are in the price book will automatically be added to inventory after the quantity is entered without user intervention using the category assigned on the invoice.
Processing
Billing Parameter Maintenance
Menu path System Utilities > Sales Desk > Parameter File Reset.
Screen 2
The Reorder Allowed setting for newly added parts from invoicing is controlled by the Default Reorder Allowed setting shown in field 38.
Screen 4
The setting for “Invoice Qty (F11) Key Use” must be set to “I” field 46
Sales Clerk
In the Sales Clerk maintenance, the clerk MUST be set to “Y” for Add Part #’s to Inventory.

Invoicing
When adding a non-stock part from the price book to an invoice the line will display as a “P” line to start. After the quantity is entered the part will be added to inventory using the price and description from the price book then using the price multipliers to calculate the selling prices.
A new screen will display showing a message “Adding Stocked Part” and there will be a slight pause while the part number is being added as it is added to all locations.
As the part number is added to inventory the invoice line type will change from “P” to Space.
The new part will be treated the same as any other stocked part after it has been added
Barcode Quantities
Definition
Counterpoint has been updated to maintain package quantities by barcode for a part used when scanning parts at the point of sale and receiving.
Processing
Product Master Maintenance when selecting to “Maintain Barcodes” or Alt Barcode option allow for entry of the quantity for a Barcode.
When the barcode is scanned in invoicing or RF receiving the quantity on the barcode will be used.
When entering a quantity on a barcode this must be in selling units as that is how it will be received or sold.
Base Price Automated Updates
Definition
The automation to update the Base Price is part of the nightly price updates where the system will look for files that have an effective date of today or prior and will update the Base Price for the part numbers included in the file. Also as part of this update a standard price file will be created with the effective date for the update to Canadian Cost, Price 6. Price 6 cost will be calculated using the current exchange rate for the supplier currency, plus duty applied to the part, plus any percentages assigned for Freight, Brokerage and Other Charges.
The Canadian cost and selling prices will be updated on the date assigned.
In order for the update to Canadian Cost and selling prices to from a Base price, the pricing multipliers MUST work up from Cost, Price 6.
Parameters
Default GL Accounts
System Utilities > System Set-up > Purchasing > Parameter Maintenance > Screen 3 S/O Defaults
System Utilities > System Set-up > Purchasing > Parameter Maintenance > Screen 2 S/O Defaults
All credits and debits rolling into the GL do so in Canadian dollars
Each branch has to have GL codes amended @ the Branch level
Currency Rate
Purchasing > Data Maintenance > Currency Rate
Foreign Exchange Rates are a global setting and can be added or changed in this screen
Fields:
- Code = Currency
- Rate = Exchange Rate
- Update Prices = If the currency rate has changed this should be set to Y if you want to update the selling prices based on the new rate. The update of selling prices for a currenct rate are only performed weekly.
- Last Update = Date that prices were last updated for this currency rate based on a change in Currency Rate
When prices are updated on a currency rate change this also includes Non-Stock products
Supplier Maintenance
Additional fields have been added to the Supplier maintenance for Freight, Brokerage and Other Charges percentages to be used in the calculation of cost from the base price. These are NOT cumulative, the value is calculated and then each value added to the cost after conversion to Canadian Currency.
The Price Level used for the Supplier must be “B” and currency other than “C”
PRODUCT Maintenance Screen
Inventory > Data Maintenance > Master File > Product Master
Fields
Base Cost/Core – Suppliers cost and core price in their currency from price file.
These prices are normally updated with a price file update but can also be entered manually when necessary.
Tax Code | Duty % | Season – Part tax code | duty % for the part which is applied into the landed cost of the goods at the time of PO receipt and when Canadian prices are calculated.
Information required for Automatic Update of base price
The information required to create the Base Price update file is:
- Category
- Part Number
- Base Price
- Base Price Effective Date
- Canadian Price Effective Date
- Supplier Code
- Description
- Duty Rate
- Core Price
The Base price update will apply the new Base price on the base Price Effective Date and will update the Canadian prices [prices 1 – 6] on the Canadian effective date.
Bin Selection in Invoicing
Definition
New feature when using Multiple Bin Locations and wanting to force the users to select the Bin Location that the product is going to be picked from in order to keep the on-hand quantities for each bin location accurate.
Processing
Billing Parameters
New option added to screen 5 of the Billing Parameters “Select Bin Loc. In Invoice” would need to be set to “Y
For Counter Kits where product is kept in multiple Bin Locations the parameter “18. Kit Detail Display” on screen 3 would also need to be set to Y
Invoicing
In the invoice screen the user will be prompted to select the bin location the product will be picked from after the quantity is entered. Bin locations are displayed in descending order based on quantity on hand. Dock locations are shown at the end of the list and cannot be selected, these are information only. A line number MUST be chosen.
Only the Bin Location chosen will be printed on the invoice and the overall inventory of the part will be reduced and the quantity available in the chosen Bin Location.
Exceptions where this screen will not be displayed:
- If a part is only assigned to a single bin location
- If the quantity sold is greater than the quantity available is any single bin location
When selling a “C”ounter Kit the Kit components will be displayed on screen and if any of the components are located in multiple bin locations you will be prompted to select the Bin Location those parts will be pulled from. The components and the chosen Bin Locations will be printed on the invoice.
Invoice Print
The invoice print will only show the bin location selected for a part.
Exceptions:
- No one bin location had enough quantity to fulfil the order and all locations will be printed.
- Invoices created from backorder fulfilment will show the primary bin location
- Web orders will show the primary bin location.
- Automatic Transfers will show the primary bin location
Inventory Update
The on-hand quantity will be updated for the selected bin location.
The on-hand quantity will be updated for the Primary bin location:
- No one bin location had enough on hand
- Invoices created for back order fulfilment
- Web orders
- Automatic transfers
Branch Stock Inquiry
Definition
The Branch Stock Inquiry has been updated to allow the creation of a Stock Transfer to source product from another location. This program is designed to be a multi- purpose tool to view stock in all locations, if multi branch, as well as initiated a TRANSFER between any of the locations, not just the home branch of the user.
Processing
Branch Stock Inquiry
When in the branch stock inquiry screen either from the menu option, Sales Desk à Inventory Queries à Branch Stock, or from the Invoice screen using Shift F4 in the body of the invoice

SCRATCHPAD
The program will maintain a Scratchpad of transfer requests that have not been actioned, based on the User Login ID. This allows the option for the user to leave the program without the loss of any work they might want to action at a later time. If the scratchpad is not empty the user will be reminded each time they enter the program that they have un-actioned requests pending. If the user elects not to delete the scratchpad the program will take them to the Category Field where they can lookup other product.
Viewing SCRATCHPAD
From the Category Field the user can view the contents by pressing the F11 key. To return to the Category Field press the ENTER key with the “Q” showing in the action field.
If there are several transfer requests in the SCRATCHPAD the program will sort them by the FROM/TO sequence.
SCRATCHPAD Maintenance
To change the content of any request enter the line # which will position the cursor in the Qty Field. After the Qty is entered, simply pressing ENTER will retain the original Qty, the cursor will move to the comment line for the part number in question. This can also be changed or the F1 key can be pressed to return the cursor to the action field. The change is automatically saved.
Leaving the SCRATCHPAD
To leave the program use the ESC or F2 key from the Category Field. If there are any entries in the SCRATCHPAD the program will ask if the transfers are to be created. The Default is (Y)es but this can be changed to (N)o. A second question will be asked if the transfers were not created about whether or not the entries are to be kept or deleted. The default is (N)o.
If the transfers are created the system will provide the document number for each transfer before leaving the program.
Category File Listing
Processing
The category file listing has been updated to produce and extract file for import into excel. Menu path inventory > reporting > master file listings > category file.
After clicking the Close Window button in the report viewer, a new option will be displayed to view the listing in excel

Clicking on the “View Category File Listing in Excel” will open the report in excel, providing Microsoft Excel is installed on the PC.
This extract contains additional information from the printed report such as the Modern Sales and Uni-Select supplier line codes.
Clicking the Close Window button will return to the menu.
Change PO Number
Process
Pick Ticket/Z Slip
The process for changing the Z Pick Ticket PO number:
- When closing the Pick Ticket in the SF2 screen from Invoicing will have a new field for the New Po Number

- If you enter a different PO number you will receive the question to “really change [original PO number]? You will need to answer the question with Y or N, the default being Y
- You will then be prompted “really invoice [original PO number]?
- The PO number will be changed on all associated pick tickets
Invoice
To change the Customer Purchaser Order number on an invoice
- In the invoice screen recall the invoice using F3 then keying in the invoice number
- Select the Change option using “C”
- Press Enter through Payment Method, Invoice Discount, Freight
- Make Necessary changes to the PO Number and press enter
- Press Accept (F1) to complete the change.
- A Modified reprint appear if the parameters are configured to print Modified Invoices
Cheque Void Option
Cheque Void
An option has been added to allow the void of a Cheque which will reverse the G/L entries made when the cheque was updated and restore the invoices paid to the outstanding accounts payable
Cheque Void Option
Accounts Payable > Bank Reconciliation > Cheque Void

Enter the original source of the cheque “A” or “M” and the cheque number.
The date, payee and amount will be displayed based on the cheque information in the system.
This feature is only allowed for outstanding cheques.
A report of the cheques voided will be printed when you exit the screen.
For Automatic Cheques all Invoices paid by the cheque that was voided will be added back to the Accounts Payable and an entry made in the General Ledger to reverse the cheque in the current Accounts Payable fiscal period. The invoices will be available for payment is a subsequent automatic cheque run.
Consignment Processing
Consignment Inventory
CounterPoint presents a suite of new features, enhancing the functionality of the system by creating the opportunity to process and track consignment inventory.
Pre-requisites
There are a few basic changes that must be made to the system in order for the consignment options to be activated.
General Ledger
Create a new account for the consignment inventory in General Ledger > G/L File Maintenance > Account Maintenance à Add Accounts. This is an asset account and would normally be numbered just after the existing Inventory account.
Add the new Consignment Inventory G/L account to the financial statements using the menu option General Ledger > Balance Sheet Maintenance.
Sales Desk
The new Consignment Inventory G/L account number must be added to Sales Desk Control > File Maintenance > GL Autopost Account Maintenance. The new field is at the bottom of the list.
Accounts Receivable
A new flag has been added to the customer record found in Accounts Receivable > File Maintenance > Customer File Maintenance called [acct control flag]. Enter a lower case ‘c’ to any one of the 8 fields available to indicate that this customer is part of the consignment programme.
Processing
Original ‘transfer’ of consignment goods
Using Sales Desk à Invoicing/Transfers, create a consignment invoice using a transact type of ‘M’. The paid by will automatically convert to ‘on account’ and can not be changed. There is no difference between entering a normal invoice and entering a consignment invoice.
Inventory will be relieved at the time of the completion of the consignment invoice and the entry will show in the cardex inquiry. The invoice total will be $0.00 since the consigned inventory is only billed to the customer when it is replaced at the consignment site.
The G/L account for consignment inventory will be increased by the cost value of the goods on consignment and is not affected again until or unless the consignment quantity changes.
Replacement of sold consignment goods
Since the quantity on hand at the customers site must equal the agreed upon quantity, periodic billing will be required to replace products sold. This is done through normal invoicing procedures.
Adjusting the consignment inventory
To increase the quantity on consignment, use another consignment invoice (type M). If the quantity is to be decreased, then the consignment invoice is still used, but the line type is ‘R’. A return search is not valid for consignment goods, since they aren’t actually sold yet).
If one consignment item is being switched out for another, the consignment invoice is able to process both ‘sales’ and ‘return’ types on the same document.
Reporting
A new report has been created in Inventory Control > Inventory Reports > Additional Inventory Reports > Consignment inventory list which will provide information on all consignment products. The report may be printed for all (or single) customer, all (or single) categories, in detail or in summary, showing costs or not. As well as information on the quantity on consignment and the date of the original consignment invoice, the last 12-month sales quantity information is provided to assist with analysis.
If a new customer record was created for the consignment programme, the 12-month sales history will be new as well.

Core Bank Enhancements
Review of Core Billing Process and Enhancement for billing Overdue Cores Not Charged for at Time of Sale
Selling Cores
Selling products which carry a core charge. This is a value that is contained in the product master record at cost. By default, any item that has a core value will automatically add this to the price the item is being sold at. The system has the ability to sell cores at a price other than cost by the use of the Core Markup routine found under Customer Pricing. This works on the basis of a markup over the cost price carried in the inventory master and can be applied either by a percentage or a flat dollar amount. In addition, the markup can be applied by:
- All Customers all categories
- All Customers by specific category(s)
- By Customer for all categories
- By Customer by specific category(s)
Customer Core Pricing setup
When a product with a core is sold the system determines if the customer selected is set to be charged the core at the time of sale or not. This is controlled by whether a specific type of entry exists in the core markup database. An example of where customer 123456 is not to be charged for cores at the time of sale would be a record in the database showing the following:
- Customers account number=123456
- A specific Category or All Categories
- % as the Type of Markup
- -99 as the Percentage
- N for no rounding
If a customer is not to be billed for cores at time of sale on any product category one entry in the database will accomplish this. An important point to remember though is that while one entry in the database will create the global default for a customer exceptions can be handled by additional records that control specific exceptions. An example of this could be Customer 123456 is exempt from paying for cores at the time of purchase on all categories other than products contained under Category RAY. For this category the customer might be required to pay for cores at a 50% markup over cost. A second entry in the core markup file would look like this:
- Customers account number=123456
- Category=RAY
- % as the Type of Markup
- 50 as the Percentage markup (If the core is to be charged at cost this field would be zero)
- N for no rounding of cents
Core billing
If a customer is billed the core on an invoice the system creates a record in the Core Bank database. This allows future validation for returns as it contains the invoice detail, including the qty and price charged as well as core cost. For those customers that are set up as being exempt from core charges at time of sale, or where the core charge is set to zero at the time of sale, the system will still create an entry in the core bank but with a zero in the price charged field. This results in a margin impact as the core cost is still charged against the cost of the sale.
Example
Part # 5555 sells at $50.00 and no core is charged although has a core cost of $10.00. The cost of this transaction is Average cost of $30.00 plus the $10.00 core cost for a total cost of $40.00 on the $50.00 reported as the sale amount. Had the customer been charged the core the transaction would report a higher gross margin, Sell = $60.00, Cost = $40.00.
Core Returns
A core is processed through the POS as a C line type. The user is prompted to select the invoice the core was sold on in order that the system can credit the correct price. Irrespective of whether the core was charged or not the Qty of cores outstanding is still adjusted by the Qty returned. The return can be applied against any invoice containing the part number in question that has a core qty balance outstanding.
Unbilled Core Management - Enhancement
For those customers not charged cores the system has now been enhanced to support the automatic billing of cores where the customer has exceeded the return grace period. The number of days, from the original billing date, is customer specific assuming the maintenance has been done on the customer’s master record. In addition, there is a second new customer flag that controls whether the customer would fall into the Auto Bill process or not.

Electronic Statement Set up
The customer’s master record will also contain a new transaction type of C that will allow the direction of the core statement to a unique email address. This would be set under the EDI Info section. In addition, there will be a copy of the customers email sent to a pre-determined internal email, unique by branch.
Overdue Core Billing Menu
The overdue Core Billing menu options are found through Sales Desk > Administration > Overdue Core Billing.
Overdue Core Billing Parameters
Aging dates, Statement Message and Email Subject Line along with the internal email address for statements are all controlled in the Core Billing Parameters

Processing Flow
- Mid month the Customer Core Statement will be created on demand using the Extract Overdue Cores option which will:
- Create an electronic or hard copy statement for each customer with outstanding cores, Email Statements = Y. It will show all cores outstanding as well as the number of days they will be outstanding as of the last business day of the current month. A message on the statement will advise the customer that those cores showing as overdue will be billed at month end if not returned before that date.
- Electronic copies will be emailed or faxed per the customer setup and copies will be emailed to the internal email address in the Core Billing Parameters.
- Month End the outstanding core billing process will be run and create a pre-billing work file for review. The Extract Overdue Cores option will be run again but the Email Statements = N
- The user will have the option to review on screen, through the Select for Billing option, customers will be billed for what cores. Any item may be deferred which means it will appear on the next months statement if still outstanding. Once the review is complete and accepted the system will automatically create invoices for all outstanding cores that were not deferred.
- The screen detail will be as follows:
- Branch
- Customer
- Category
- Part Number
- Description
- Invoice Number
- Invoice Date
- Overdue Quantity
- Value (Core Value for selling these cores will be at the default Core Markup for All Customers and all categories)
- number of days overdue from the due date of return
- Defer Billing Y/N
The system will automatically retire the entry in the core bank that is carrying a zero core value based on the invoice number shown on the billing screen. In addition, a second record will be added to the core bank carrying the new invoice number and the core value as calculated above.
Internal Reporting
In addition to the customers core statement there will also be a consolidated report available for branch use that is generated at the same time as the customer’s statements are produced.
Enhanced On-Demand Outstanding Core Report
The current routine has been enhanced to offer the following options:
- Customer detail (Y/N)
- Part # detail (Y/N)
- Starting Customer
- Ending Customer
- Starting Category
- Ending Category
- Starting Part #
- Ending Part #
- Start date
- Branch # (1 or all)
- No Charge Only (Y/N)
Credit Check Enhancements
Invoicing Credit Check
The use of Credit Limits through the point of sale has been parameterized to prevent any sale that goes over the customers credit limit or the current option to display a message advising the user if a customer is going over their credit limit and giving the user the option to complete this sale.
These parameters are found in Screen 1 of the Billing Parameters menu option System Utilities > System Setup > Sales Desk > Parts Billing Parameters fields 19 and 20

Invoicing
If parameter field 19 is N then no credit checking against customer credit limits is done.
If parameter field 19 is Y and field 20 is BLANK or N the user will be prompted with the question to allow a sale to take the customer over their credit limit.
The user will see the first message that the customer is “Now over credit limit” when they accept the invoice lines entered
And when the user does the final accept, they will receive a second message “Allow sale over credit limit? (Y/N)” which they must answer with a Y or N.

The new update is when parameter fields 19 and 20 are both set to Y.
In this situation when an invoice takes the customer over their credit limit the user will see the same first message as above “Now over credit limit” when they accept the invoice lines entered.
When they do the final accept of the invoice which will take the customer over their credit limit they will see a new message, “Over Limit Save as Quote? (Y/N)” that must be answered with Y or N.

If it is saved as a Quote the PO number will be changed to “CH” so these credit hold Quotes can be easily searched when recalling the customer and the quote will be printed for reference.
If a PO number was entered on the original invoice this will become a comment line on the Quote “CH FOR: [PO Number]”
If a Quote is recalled that will take the customer over their credit limit the user will receive the same questions to save as a Quote again.
When creating an Order, the user will see the messages that the customer is “Now over credit limit” and then “Allow sale over credit limit? (Y/N)” when doing the final accept. When the Order is invoiced if this still takes the customer over their credit limit the user will be prompted to save as Quote as shown above. The user can reject from this and leave the Order outstanding. The amount of outstanding orders in the system do affect the available credit for a customer.
If a customer is over their credit limit when starting an invoice, the Credit Rating will be COD or HOLD based on the setting in the Accounts Receivable Parameters forcing the sale to be paid by some form of cash or prohibit selling using the customers account number.
Cross Dock HTML Pop-up
View of On Order and Cross Dock Quantities
New HTML Pop-Up
A new Pop-Up has been added to COUNTERPOINT for viewing of all Branch On Order and Cross Dock quantities.

This information will be available for all parts except Kits and will be refreshed nightly
Product Maintenance and Inquiry
The Product Maintenance and Inquiry screens have been updated to view this information by clicking on the magnifying glass icon in the On Order description.

Branch Stock Inquiry
The Branch Stock Inquiry screen has also been updated to view this information by clicking on the magnifying glass icon on the On Order description.

Invoicing
The Invoice screen has also been updated to view this information by clicking on the magnifying glass icon on the On Order description.

Daily HTML extract
The Daily HTML exports has been updated to include a new column indicating the Cross Dock quantities. This is in Column R with heading DC Cross Dock
Customer Notes
Customer Notes
New programmes have been added to accounts receivable for adding and inquiring into free- form notes for a customer. The inquiry into customer notes has also been added to the sales desk menu.
There is a total of 6 note types, spread across two styles: reserved and non-reserved, with a maximum number of reserved note types of three (3). Customer notes are date and time stamped during entry and then assigned to a particular type. There may be many notes of the same type attached to the same customer.
The use of “A” type notes will display automatically as a customer is selected in the invoice screen.
The other reserved or default note types are “B” and “C”.
Creating a new Note type
Adding notes to customers
To add a note to a customer, use the menu option accounts receivable > DATA MAINTENACE > customer notes (add). A TAB to search is available from the customer number field. Only A/R customers are available for notes, not VIP customers. The note is date and time stamped and the user is prompted to classify this note with a particular type.
When the note text has been completed, press [enter] to complete the field, then [F1] to accept.
Changes are allowed at the any change? prompt. Entering the line number for change will bring the user to the beginning of the line. If the first field of the line requires no change, pressing [enter] will advance to the beginning of the second field/section on that same line. Changes to notes are also available from the change notes menu option. A note that has been assigned to a reserved type may still be deleted.
Viewing/Adding Customer Notes
Accounts Receivable > Inquiry Functions > Customer Analysis
Accounts Receivable > Inquiry Functions > Customer Notes Inquiry
Sales Desk > Customer Queries > Customer Analysis
Sales Desk > Customer Queries > Customer Notes
Sales Desk > Invoicing – Press Shift F11 from the Customer field or from the Line Type
Accounts Receivable > Transaction Processing > Cash Receipts Processing > Cash Receipts Input – Press F11 after the Customer is entered
Enter the customer number or use the search option to find the customer then select a note type or press enter to view all notes for the customer.
Notes are displayed in date sequence with the most recent first
Print Customer Notes on Invoices
The ability to include Customer Notes has been added to the invoice print. This requires that a Note Type be added with the setting to Print on Invoice = Y. These notes will print in the body of each invoice for the customer.
Note Type Maintenance
A new Note Type must be added to the system to identify which notes are to be included on the invoice. This is done using the menu option Utilities > System Setup > Accounts Receivable > Note Parameters. Use “1. Add Type” and use a letter or number as a code (eg “P”), assign a description and set Print on Invoice to “Y”.
Customer Note
Notes for the customer can be added through Accounts Receivable > Data Maintenance à Customer Notes or through the Invoice Screen using Shift F11 from the “customer #”. When adding the note use the type setup above and enter the text to be printed on the invoice.
The invoice will only print the first 40 characters of each line of the note text
If multiple print type notes are setup for a customer, all of them will print on each invoice.
Customer Notes Enhancements
Customer Notes
New programmes have been added to accounts receivable for adding and inquiring into free-form notes for a customer. The inquiry into customer notes has also been added to the sales desk menu.
There is a total of 6 note types, spread across two styles: reserved and non-reserved, with a maximum number of reserved note types of three (3). Customer notes are date and time stamped during entry and then assigned to a particular type. There may be many notes of the same type attached to the same customer.
The use of “A” type notes will display automatically as a customer is selected in the invoice screen.
The other reserved or default note types are “B” and “C”.
Creating a new Note type
Adding notes to customers:
To add a note to a customer, use the menu option accounts receivable > DATA MAINTENACE > customer notes (add). A TAB to search is available from the customer number field. Only A/R customers are available for notes, not VIP customers. The note is date and time stamped and the user is prompted to classify this note with a particular type.
When the note text has been completed, press [enter] to complete the field, then [F1] to accept.
Changes are allowed at the any change? prompt. Entering the line number for change will bring the user to the beginning of the line. If the first field of the line requires no change, pressing [enter] will advance to the beginning of the second field/section on that same line. Changes to notes are also available from the change notes menu option. A note that has been assigned to a reserved type may still be deleted.
Viewing/Adding Customer Notes:
- Accounts Receivable > Inquiry Functions > Customer Analysis
- Accounts Receivable > Inquiry Functions > Customer Notes Inquiry
- Sales Desk > Customer Queries > Customer Analysis
- Sales Desk > Customer Queries > Customer Notes
- Sales Desk > Invoicing – Press Shift F11 from the Customer field or from the Line Type
- Accounts Receivable > Transaction Processing > Cash Receipts Processing > Cash Receipts Input – Press F11 after the Customer is entered
Enter the customer number or use the search option to find the customer then select a note type or press enter to view all notes for the customer.
Notes are displayed in date sequence with the most recent first
Print Customer Notes on Invoices
The ability to include Customer Notes has been added to the invoice print. This requires that a Note Type be added with the setting to Print on Invoice = Y. These notes will print in the body of each invoice for the customer.
Note Type Maintenance
A new Note Type must be added to the system to identify which notes are to be included on the invoice. This is done using the menu option Utilities à System Setup à Accounts Receivable à Note Parameters. Use “1. Add Type” and use a letter or number as a code (eg “P”), assign a description and set Print on Invoice to “Y”.
Customer Note
Notes for the customer can be added through Accounts Receivable à Data Maintenance à Customer Notes or through the Invoice Screen using Shift F11 from the “customer #”. When adding the note use the type setup above and enter the text to be printed on the invoice.
The invoice will only print the first 40 characters of each line of the note text
If multiple print type notes are setup for a customer, all of them will print on each invoice.
Customer Part Numbers
Description
The customer part number is used to allow you to print your customer’s part number on an invoice along with your own part number. Typically used where the customer has an internal number that they use for their own stocking purposes. The customer must be identified as having their own part numbers. This feature only works with Stocking Part Numbers
Customer Maintenance
The customer must be identified as having their own part numbers which is done through the Customer Maintenance by adding an “A” into one of the Account Control Flags.
Customer Part Number Maintenance
Customer Part Number maintenance is done through Inventory > Data Maintenance > Utilities à Setup Customer Part #'s. The customer MUST be setup before trying to enter the part numbers. When adding new part numbers you can enter past the Category field and enter the part number. If there are multiple categories you will have to select the proper category.
A Customer Part must be entered and the description is optional

In the invoice screen when creating an invoice for a customer assigned Customer Part Numbers, if you enter the customer’s part number it will be translated to your part number.
After entering the part number then pressing Enter the stocking part number is displayed. If the stocking part number has substitutes you will be prompted to select from the list
Both the stocking part number and the customer’s part number will be printed on the invoice. The customer’s part number will be on a separate line with a comment “customer part#”
Process EDI Invoices
Definition
When EDI Invoices are received from the vendors that invoices will be processed and added to the new EDI Transaction List available for selection and processing.
Processing
Vendor Maintenance
Vendor Maintenance has need modified to allow entry of the Vendor EDI ID and the Vendor Currency. The EDI ID is provided by the Vendor/Supplier when setting up for EDI.

Note: only EDI invoices received from Vendors with a matching EDI ID to what is setup on the Vendor will be processed. This setup is separate to the setup of the Suppliers for placing purchase orders as there can be many Suppliers for a single Vendor.
EDI Transaction Selection
This option will list all of the received EDI invoices not yet processed or show a summary of invoices received for a selected vendor or all vendors.

Using the tab or clicking the magnifying glass in the first screen will launch the Vendor Search
Using F3 will display the Vendor Summary screen where a summary of the number of invoices and total value is displayed by Vendor.

Once again, the Vendor Search is available using the TAB key or clicking on the magnifying glass.
Pressing the Enter key in the Vendor field will display a summary for all vendors.
Exit will exit back to the Vendor Invoices screen, Quit will allow the selection of a new Vendor, entering a line number will select that Vendor and display the invoice details on the Vendor Invoice screen.
In the Vendor Invoice screen all available invoices for the Vendor will be displayed and you will be prompted whether the invoice should be selected to add to a transaction batch. The Select Options are Y to have the invoice added to a transaction batch for posting, N or blank to not select and leave the invoice available for future selection or D to Delete the invoice from the selection screen. The delete option would be used if the invoice was processed manually or received in error.
Using Accept after the invoices have been selected will prompt “create transaction batch N”, changing the response to Y will append to the users A/P Transaction batch.
If invoices are being deleted a prompt will be displayed “delete flagged invoices ? N” changing the response to will delete the invoices so they will no longer appear on the selection screen
The transaction batch created will use the following information:
- EDI document Invoice Number to Invoice Number
- EDI document Invoice Date to Invoice Date
- Edi document PO Number to Reference Number
- Payment and Discount Days are from the Counterpoint Vendor Setup and the day of the following month.
- Financial is the current Counterpoint financial period.
- EDI document Invoice Amount to Invoice Amount.
- EDI document tax value to Federal Tax Amount.
- Distribution to the Vendor Default GL Account
Any required adjustments can be made through the regular Transaction Input option and the edit list is available prior to update for review.
The update of these transactions would be done through the normal Transaction Update option.
EOQ & ROP Calculation
Ranking Table
- Product Ranking Table for Corporate and by Branch including required Turns and Safety Stock Factor based on Annual Sales Dollars or Units.
- Use of dollars or units determined by billing parameter setting.
Purchasing Parameters
- Default Timer for new product added
- Weeks Active
- Number of Weeks with Activity
- Weighting Weeks
- EOQ and ROP rounding
- ROP and EOQ corporate or store
- Use Demand Smoothing
- Internal Review
- ROP/EOQ Use – DC or Corporate
- Branch Replenishment from DC – B/S/N
Ranking Calculation
- Ranking calculated based on Unit Sales or Dollar Sales according to Billing Parameter setting screen 4 – Sales Rank Basis (U/$)
- Run once for all locations
- Calculate Active Weeks from first receipt date to current date
- Ignore items without a first receipt date
- Calculate sales value by week for weighting weeks using invoice costing based on billing parameter setting, screen 2 invoice costing Average or Last (P6)
- Sum these values and the rank will set when the total sales value is less than the next value in the rank parameters.
- The sum of the sales value for all branches is used to calculate the corporate sales rank
Calculate EOQ Values
- This is done for each branch separately
- Age Week Sales
- If Reorder Allowed = N, S or K do nothing
- If Reorder Lock not 0 do nothing
- Calculate the Active Weeks
- Only done for products that have a first receipt date
- Active weeks from First Receipt to current
- If the Active Weeks is > Weeks Active parameter use the parameter value
- If the Active Weeks is 0 do nothing
- Calculate Annual Unit Sales = previous 52 weeks sales.
- If Active weeks is < 52 calculate annual units as sum of previous 52 weeks * 52 / Active Weeks.
- Weeks with Activity = Weeks in Active Weeks that have sales not = 0
- If Weeks with Activity < Number of Weeks with Activity move zero to Vendor and Transfer EOQ
- Assign the EOQ
- Based on the ranking parameter for the part divide the annual unit sales by the turns parameter giving the EOQ Vendor and Transfer.
Calculate Lead Time by Part
- Use the number of receiving’s set on the supplier record. If blank or 0 then default of 8 is used
- Calculate the average lead time for the most recent number receiving’s of the part.
- Compare the average lead time to the highest number of days and add the lower of the difference or 25% of the average lead time.
Calculate ROP Values
- Use DC lead time from branch record.
- If Lock value = 99 do nothing
- Does not use RANK-CUTOFF value
- Reduce the lock value by 1
- Calculate active weeks from first receipt date to current date
- Sum the sales units for the Weighting weeks.
- Compute the daily sales = total sales by week / (weighting weeks * 6). It was decided early on that only 6 business days per week should be used for the daily sales calculation.
- Using the sales ranking and lead time for the part calculate the Vendor ROP. Daily Sales * (Lead Time + Internal Review Time). Round this value based on Purchasing Paramenter settings. Add safety stock percentage and round again.
- Calculate the DC ROP value as Daily Sales * DC Lead Time, then round based on purchasing parameter setting. Add safety stock percentage and round again.
Calculate Corporate Values
- Add the Vendor EOQ for all locations and put the total as the Corporate EOQ
- Add the Vendor ROP for all locations and put the total as the Corporate ROP
Daily Suggested Order
- The daily suggested order calculation can be based the DC or Corporate ROP/EOQ
- Recalculates for all parts each day with the exception of parts on outstanding suggested orders where the order quantity has been modified and not ordered yet.
- Suggested order will buy direct to branch based on supplier setting
- Do not order product set as N for reorder allowed unless there is a customer backorder.
- DC available quantity for replenishment to branches calculated based parameter Branch Replenishment from DC.
- Transfers it the quantity available is equal to or less than the ROP DC order the DC EOQ – Qty Available + ROP DC base on DC Available Quantity. Use branch purchase quantity for transfers
- Corporate Vendor Orders compare the DC available quantity to the Corporate ROP and order when the available is less that the corporate ROP
Fleet Part Tracking
Fleet Tracking Setup
The Billing invoice screen has a built in Customer Fleet Part Tracking module. This module allows the counter staff to in affect build customer, unit, specific electronic catalogues. The creation of these catalogues can have a dramatic affect on the accuracy and speed with which counter staff can service parts requests on a customers fleet vehicles. The fleet part tracking is available from the LINE TYPE field on any invoice line while building an invoice by hitting Shift/[F10]. Doing so will launch the following screen.

If this is the first time you have launched fleet part tracking on the system you will need to take the (M)aintain records option. Which will change the prompts at the bottom of the screen to read as follows.
“(E/P/G) Equipment, Parts , or Groups”
If this is the initial launch of Fleet Part Tracking take the (G)roups option, which will bring up the Add Change Delete Screen. Select ADD which brings up the following screen.

Sub Groups are required to support future reporting potential, so in this case you can make the subgroups very simplistic if you choose. For example if your operation sells HD parts and well as automotive and light truck you may want to set up only two sub groups being AUT and HD as shown below.


Once your groups are set up you will only need to return to this screen if you decide to change the basic groups that you set up. Upon Completion of the Groups Maintenance hit [F2] to exit this routine which will return you to the initial screen. As shown below.

Note that the prompt at left bottom starts with “No Records” This is an indication that this customer, has not had any vehicles added to his fleet. In this case take the M(aintain Files) option then select The Equipment option which will bring up the Add/Change/Delete screen. Selecting Add brings up the following screen

Enter Data as outlined below.
Description – Enter a meaningful description of this vehicle. Try to use the description that the customer will relate to as they will likely tell the counter staff that they are working on the “old red beast” or some other such internal name for this unit when they call in for parts.
Year – Yr of Vehicle.
Make – A three digit Alpha code for the make of the vehicle. Hit TAB to see a list of valid Car and Light Truck models. If the Unit is not automotive/light truck (ie a Heavy Duty or Construction vehicle) simply enter in the information required.
Model – A three digit Alpha code for the model of the vehicle. Hit TAB to see a list of valid options. If the Unit is not automotive/light truck (ie a Heavy Duty or Construction vehicle) simply enter in the information required.
License Plate, VIN, - Fill or leave blank as appropriate you your use
Unit Number – Typically a customer assigned number or name for this vehicle.
Odometer – Optional Enter if required. When field is accepted cursor to skip down to Remarks field.
Last Service, Last Invoice Number – These fields are system maintained from the repair shop module if it is used.
Fields 19 thru 14 - Reserved for Future use. No entry is required or possible in this screen.
When all fields are complete and you are happy with the results hit [F1] to add this vehicle to the customers fleet. If there are no other units to be added to this fleet, hit [F2] to exit the program. This will return you to the Fleet Vehicle list page.
Select M(aintain) and then select PartsList enter Add/Change/Delete as appropriate which will bring up the screen as shown on the following page.

Enter Data as follows
Customer – Entered by the system.
Customer Unit Number – Enter the unit number or name that the part(s) you are about to enter will be used on.
Product Group – Enter the Product Group that the entered parts will have sales data captured under. (ie HD or AUT in this example)
Category – Cursor will skip this field and auto fill when you enter a part number. In the case where the part exists in more than one category you will need to select the correct category from the displayed options.
Part Number – Part number used on the specified vehicle.
Quantity Required – Enter the quantity required in this units use of the part.
Comment – Optional Enter a free form comment that will assist in ensuring this part is correctly chosen when the request comes in (ie “Used on the PTO for the hydraulic pump”) or something similar.
When you are happy with the screen hit [F1] to accept the entry.
Repeat for all other parts used on this Unit. When done hit [F2]
This completes the set up of a Unit and it associated parts.
Using The Fleet Part System Within COUNTERPOINT
When a customer calls in for parts and identifies that these are for a unit in his fleet proceed as follows.
- Set up the invoice for the customer as normal (ie enter customer number PO if required and your customer number.
- When the cursor is in the Line Type field hit Shift/[F10] which will bring up the customer fleet list similar to that shown below.

- Select the appropriate unit as specified by the customer which will bring up the parts list. As shown below.

- Enter line number(s) corresponding to the parts you need to sell. Note that as you select line numbers the program moves selected lines to the space just above the “Maintain files” line.
- When you have selected all required parts hit “E” to exit the screen and move the parts in the quantities specified at the customers prices onto the invoice.
Notice that the parts list displays the quantity on hand and the quantity required for each part.
If you need to add, delete or change a part for this unit it can be done at this point by entering M to launch the maintain files routine.
Foreign Currency
Foreign Currency
Purchases made outside Canada can be purchased in the foreign countries’ currency
In addition to the currency enhancement, three additional fields allow the system to roll into the average cost @ the time of Purchase Order Receipt, Freight, Brokerage and Additional Costs. These values can be entered as part of the PO receiving or as a default % in the Supplier Maintenance screen. In addition, where Duty is applicable @ the part level, this cost rolls up as a part of the cost
Default GL Accounts
System Utilities > System Set-up > Purchasing > Parameter Maintenance > Screen 3 S/O Defaults and Smoothing
System Utilities > System Set-up > Purchasing > Parameter Maintenance > Screen 2 System Configuration
All values posted into the GL are in Canadian dollars
Each branch has to have GL codes amended @ the Branch level
Foreign Exchange Rate
Purchasing > Data Maintenance > Currency

Foreign Exchange Rates are a global setting and can be added or changed in this screen. This can also be used where there is an uplift from the supplier or additional changes are incurred such as freight. Adding a currency code other than “C” with an exchange rate of 1.0000 and assigning supplier to this code allows for updating of P6 cost and selling prices based on the base cost allowing purchase orders to be issued with the accurate supplier cost.
Fields
1 – Code = Currency
2 – Rate = Exchange Rate
3 – Update Prices = If the currency rate has changed this should be set to Y if you want to update the selling prices based on the new rate.
The automatic price update for currency rate changes is typically scheduled to run weekly on Sundays.
4 – Last Update = Date that prices were last updated for this currency rate based on a change in Currency Rate
Supplier Set-Up
Purchasing > Data Maintenance > Supplier

While the Exchange Rate is global the Supplier Maintenance screen is where you select the currency you are going to buy in.
Fields
19 – Currency; select currency
21 – Price Level = Base; the field in the Inventory Maintenance screen the supplier’s price is displayed from their price list
- Enter “B” in this field for all foreign exchange suppliers
29 – Update Last Cost to Inventory Y/N; at time of PO receipt “Y” will update Canadian selling prices “N” will not update selling prices but average price is updated.
34 – Freight Percentage: is a default percentage for freight costs.
35 – Brokerage Percentage: is a default percentage for brokerage fees
36 – Other Charges; any additional costs such as a pallet cost or insurance
These default costs are applied to all parts received from the supplier in the calculation of the landed cost to update average cost and when Canadian cost [Price 6] and selling prices are calculated during the Base Cost update
Inventory Maintenance Screen
Inventory Data Maintenance > Master File > Product Master

Fields
Base Cost/Core – Suppliers cost and core price in their currency from price file
Tax Code | Duty % | Season – Part tax code | duty % for the part which is applied into the landed cost of the goods at the time of PO receipt and when Canadian prices are calculated.
Purchase Order
Foreign purchase orders will print with the supplier’s base cost

Purchase Order Receipt
Purchasing > Purchase Order Receipt > PO Receipts Input

Fields
Currency – the currency the purchase order was created in and the current exchange rate for that currency.
Price Level – relating to the Supplier, “B” = Base Price
Freight – freight costs are entered here, are spread evenly across all SKU’s on the purchase order and are in CDN dollars
Brokerage – brokerage costs are entered here, are spread evenly across all SKU’s on the purchase order and are in CDN dollars
Other Costs – any other cost associated with the acquisition of the PO can be entered here and are spread evenly across all SKU’s on the purchase order and are in CDN dollars
If these values are left blank the percentages assigned to the supplier, if any, will be used to calculate approximate costs.
PO Receipts Journal
The PO Receipts journal will include these additional costs

General Charges & Core Handling
Definition
General charges are a new line type in the COUNTERPOINT invoicing program which allows you to include amounts on the invoice which do not impact inventory or apply standard comments to an invoice. The charges can be automatically applied to all transactions based on a percentage up to a maximum value or a set dollar amount. General charges can also be added to an invoice manually. This feature will also allow deposits to be added to Order transactions which will automatically reduce the amount owed when the order is completed and turned into an invoice.
Processing
General Charge Codes
The maintenance of General Charge Codes is found through System Utilities > System Setup > Sales Desk > General Charge Code Maintenance.
A maximum of two characters is used for the code. The description used will be put on the invoice when the code is used. The Type can be a $, % or C for a standard comment. The charge can either be setup as a percentage or as a dollar value. This is used for automatic charges and deposits. For manually added charges the value would be left at zero. If a percentage charge is to be capped at a certain value that would be entered in the maximum value. The tax codes are based on the values setup in the Billing Parameters. If levies are to be included in the calculation of an automatic charge this flag must be set to Y. Deposits are not to be set as an automatic charge. If the “enter text” setting is Y the user will be able to alter the comment which will be printed on the invoice. If the value is allowed to be changed or entered manually the “enter value” setting must be Y. In the case of a return the date range is also used to determine if an automatic charge should be refunded based on the original purchase date.

Customer Maintenance
Customers that are exempt from Automatic general charges require a “G” be entered in one of the “account control flags” in the customer maintenance screen.
Invoicing
Any Automatic charges will be added as the last line on an invoice when the body of the invoice is accepted. If new lines are added later, the value of the automatic charge will be adjusted to reflect the new total of the invoice. Should an automatic charge be adjusted manually it will not be altered if any other changes are made to the lines on the invoice.
To enter a general charge or standard comment manually use the new line type of “G”. This will display a list of up to 18 codes in the information window or you can use the TAB key to search additional codes
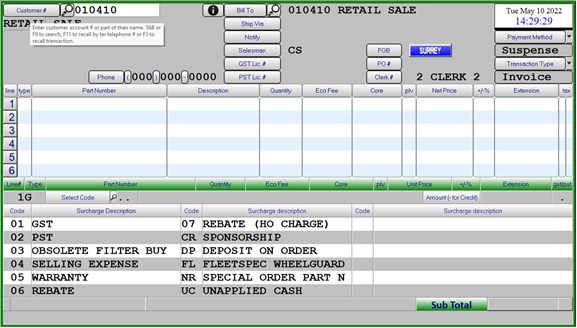
Deposit type codes may only be used on Order transactions.
Comment codes will have no value associated with them.
When taking a deposit for products that will be delivered at some future time you must use a transaction type of “O”rder. The items being purchased are to be added to the order as Backorder (Normally stocked items) or a Special Order (Non Stocked/Pickups) lines. When the items have been added enter a “G” line for the deposit and select the deposit code which has been setup. Providing the deposit code has been setup with a percentage the amount of deposit required will be shown on the screen. This can be changed if necessary providing the code has been setup to allow the value to be entered.
When recalling the order and turning it into an invoice the value of the deposit amount will automatically be reversed so the total owing will reflect the price of the items less the amounts previously received. If a customer returns to make additional deposits the original order must be recalled and the second deposit added to the order.
Customer Backorders
When a backorder is being fulfilled upon receipt of the product and an invoice is created the standard comments contained on lines 1 through 3 of the original transaction will be included on the fulfillment invoice.
Invoice Register
The total value of any Freight and General Charges will be shown on the invoice register in the relabelled column “Freight /Oth Chgs”.
Gift Receipts
Parameter Maintenance
The use of Gift Receipts in Counterpoint is controlled by settings in the Billing Parameters, System Utilities à System Setup à Sales Desk à Parts Billing Parameters à Screen 5.
Field 1 = Y/N for the use of Gift receipts in the store.
Field 2 = Y/N for the default on the printing of Gift Receipts
Fields 3 – 14 = Single Character for alignment of the message on the receipt
C = Center
L = Left
R = Right
Up to 40 characters of text over 6 lines to be printed on the Gift Receipt
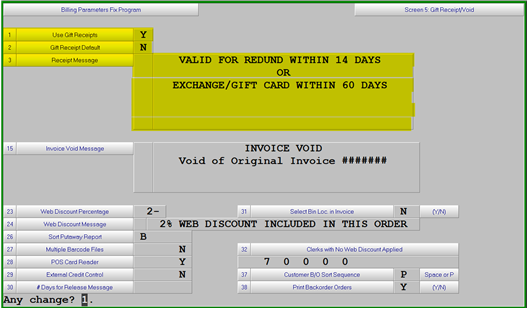
The message is optional and “GIFT RECEIPT” will be automatically printed in the same position as the “DUPLICATE” message is printed on the invoice
Invoicing
If the use of Gift Receipts is turned on in the parameters the message when completing and invoice will show as – “Header,Line#,Cust#,Footer,GiftRec N ?”. The parameter setting for the default print is the last character in the message. In this case the parameters are set to not print a Gift Receipt automatically. To change this on the individual invoice press “G” then Gift Receipt could be changed to Y to have the additional copy printed when the invoice is completed.
Should a Gift Receipt be required after the original invoice has been created you would recall the invoice by pressing F3 from the Customer # and keying in the invoice number, or if it was the last invoice generated that would already be displayed on screen and you would just need to press ENTER. The message at the bottom of the screen would be “Change,Reprint,Void,GiftRec Y ?”, press “G” and the message “gift receipt (Y/N),R(eprint)?” will appear where you can select “R” to Reprint. You could also use the F11 Alt Print to redirect to a printer other than the default printer or to email/fax the Gift Receipt
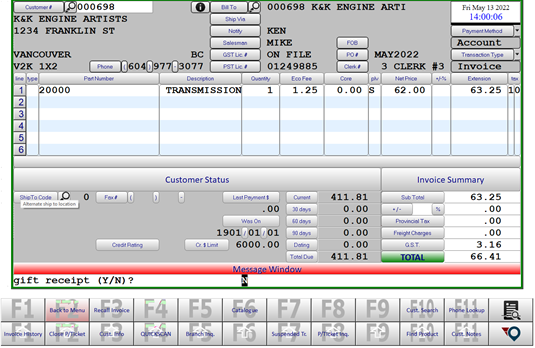
If desired Gift Receipts can be defaulted to print on an alternate printer using the Printer Profiles system utilities > system setup > sales desk > printer profiles. The Gift Receipt printer ID would need to be changed to the desired printer ID.
GL Budget Upload
Processing
Load Budgets
The Load Budget option, General ledger > Data maintenance > Load budgets, requires a spreadsheet file containing the monthly budget values first be saved to Z:\html\gl1 as a tab delimited text file named GLBUDGET.txt.
Notes:
- An excel template is available named Z:\html\gl1\GLBUDGET.xltx
- Credit values must include the “-“ sign
- Please do not include “$” or “,” for thousand separators in any of the values
- Only accounts included in the file will be updated
- Not all GL accounts need to be included
- All GL Budget values will be cleared before the new ones are loaded.
- Any errors found during the upload will be included in the upload report created.
Invoice Price Change Restrictions
Definition
Counterpoint has been updated to provide the ability to restrict Sales Clerks from changing prices. For this process to work it is required that all users have a unique login ID for Counterpoint.
Processing
Clerk Maintenance
The User Login ID can be assigned to a clerk and this will force the clerk number used on the invoice based on the Login ID. They will not be able to change the clerk number when processing an invoice or credit note.
The Sell Below Cost option prohibits the clerk from selling below cost.
The Invoice Prices options are:
- Y – Display the price level in the information window and allowed to view/key on the invoice line
- N – Do not display in the information window and do not allow entry in the invoice line
- L – Do not display in the information window but allow entry in the invoice line to see the price value.
Disallow Price Changes will prevent the clerk from changing prices without the entry of a PIN code by a user that IS allowed to change prices. The Disallow Price Changes field MUST be set to N in order for a clerks PIN # be allowed to authorize a price change.
For these changes to be effective those clerks authorized to changes price should reset their PIN #’s and keep them private.

Invoicing
With the Sales Clerk Login ID assigned the clerk number will be automatically entered after the customer is entered. Using the Field Up, Field Down or Enter will not allow access to the clerk field of the invoice, therefore preventing them from changing the number to be allowed to change prices.
If the Sales Clerk is set to Disallow Price Changes, when entering an invoice line the clerk will be prompted to “Enter pin #:” if there has been any changes to the price or discount when the line is completed.
The options at the “Enter pin #:” message are:
If the sales clerk is not allowed to change prices and the Customer number is changed on an invoice, they will no longer be offered the option to Recalculate the prices, the prices will be recalculated automatically based on the new customer on the invoice.

Kit Maintenance
Definition
Kits
A KIT is defined as either a COUNTER KIT: one that is created at the time of sale, or a MANUFACTURED KIT, one that is created and placed on the shelf ready for sale. A COUNTER KIT has no inventory on hand, a MANUFACTURED KIT does.
A kit item may belong to any category, or a separate category may be created for manufactured kits, if desired. There is no difference between a regular category record and one that is created for kit items.
Processing
Add the Kit Part Number
Identifying a kit item involves two steps. First, enter [K] (not displayed as an option) in the REORDER FIELD on the item record in INVENTORY > DATA MAINTENANCE > MASTER FILES > PRODUCT MASTER. Then differentiate the item as a COUNTER [C] kit or a MANUFACTURED [M] kit in the KIT TYPE field directly below. The remainder of the fields may be set up as usual.
If the part is being manufactured in one branch only the reorder type can be changed by branch in the MAINTAIN BRANCH INFO screen. This scenario would not apply to Counter kits.
Attach Components to the Kit
Once the kit item has been created and [F1] accepted, the user is prompted with MAINTAIN KIT DEFINITION? If [N], the function is complete and the user is able to add a new kit number. The kit definition will have to be set up at a later date using the CHANGE PRODUCT menu option. If the response to MAINTAIN KIT DEFINITION? Is [Y], a secondary input screen is presented for entry.
The user will enter the category/part number combination for each product that will be used in the manufacture of this new item and the quantity that will be used. If the kit type is [M], the default for the SUB field will be [N] and may not be changed. If the kit type is [C], then the SUB field is available for entry and may be either [Y] or [N].
A SUB refers to the user’s ability to substitute another item for the one listed in the kit definition at the time of sale. Since a manufactured [M] kit is created and assembled prior to sale, no substitutions are permitted. However, a counter [C] kit is assembled at the time of sale and by its nature, requires the ability to sub out items on the fly.
The HIDE field refers to whether or not to hide the component items on the printed invoice. If the items are hidden on the printed invoice, then only the kit item will appear as with a normal item. When the items are not hidden on the printed invoice, then the kit item is printed as usual, and the component items are listed underneath. No pricing information is printed for the component items.
How Kit components print on an invoice may differ based on custom invoice developed for certain customers.
Inventory Considerations
As stated previously, no inventory is held on hand for counter [C] kits. The components are subtracted from inventory at the time of the sale, just as if each individual item was sold separately. Reporting of the sales demand and cardex entries for parts included in a counter kit are shown on the individual components.
Customer back order should not be used for Counter Kits.
Manufactured [M] kits are held on the shelf ready for sale and therefore must be received prior to being able to be sold. Increases in inventory levels for [M] type kit items are done through PURCHASING > PURCHASE ORDER RECEIPTS > RUSH RECEIVING. As the inventory of the full good is increased, the inventory of the component items is reduced.
The changes in on hand quantity all happens in the branch the product is received in.
Type [M] kits can also be added to a purchase order either from a suggested order or manually to be used for requesting assemble of the kits. This purchase order would then be received PURCHASING > PURCHASE ORDER RECEIPTS > P.O. RECEIPTS INPUT and the component inventory would be removed from stock and the assembled kit part would be added to inventory.
Sales of the components will be recorded at the time the [M] kit is received into inventory
Locked Product Inquiry
Definition
Processing
Locked Products Inquiry

Any items stopping inventory updates from invoicing will be displayed.
Also, a message is sent to the offending users screen when this situation occurs.
The Refresh option will redisplay the screen with the new status of the parts
The message “No AUDITLOCK on file” when there are no products locked that are holding up inventory updates. Pressing enter will go back to the “R(efresh),E(xit),Q(uit)” message
Exit or Quit will return to the menu.
Other Messages for Locked Products
- Product Maintenance – “locked by [user name] on [session ID]
- Rush Receiving – “locked by [user name] on [session ID]
- Stock Adjustment – “locked by [user name] on [session ID]
- Stock Transfer Confirmation – “locked by [user name] on [session ID]
- Purchase Order Maintenance – “locked by [user name] on [session ID]
- Purchase Order Update – “locked by [user name] in [abbreviated program description]
Lost Sales Reason Code
Processing
The recording of lost sales now has a Reason Code attached; these reason codes are setup using the menu option System Utilities > System Setup > Sales Desk > Lost Sale Reason Codes.

If the Include in Sales Total flag is set to Y any Lost Sales recorded through invoicing will be added to the Monthly and Weekly sales totals, increasing the demand for the part.
Invoicing
When recording a Lost Sale in the invoicing screen [using F6 after the quantity is entered] a list of the Lost Sale codes will be displayed to select the appropriate reason.

Reporting
The Lost Sales Detail report allows for the selection of one or all Categories, Customers or Reason Codes for a selected date range

Running this report will also create an extract file that can be loaded into excel Z:\html\b1\BLDRP.csv
Loyalty Rewards
Loyalty Rewards
Definition
The new LOYALTY REWARDS program will allow you to offer and track point rewarded to customers for purchases made. This program can be for selected customers and products and the rewards value can be maintained by Category.
The new suite of programs is available through Sales Desk > Administration > Loyalty Rewards
Loyalty Programs
- Assign a Program Code for customers to be included in the program
- Setup a Type Code which will be assigned to Customers included in the program such as “R”
- Add a Description for the program
- Default Redemption Rate for the program, points per dollar
- There is no automatic Redemption at this time
- Extra charges to be included in the value such as Taxes and Levies
- The initial default for this setting is “N”
- Default Statement Message

Loyalty Customers
- Add, Change or Delete Customers from a Loyalty Program
- You can assign a customer to multiple programs should you choose.

Loyalty Adjustment Codes
- Used to setup codes and descriptions of the various adjustment types required.
- Example RE = Redemption

Loyalty Rates
- This is to assign the reward rates for various categories.
- Using an “All Category” entry could setup the default and then you could setup individual categories as exceptions.
- The Start and End Dates control the time that the Special Rate is in effect.
- The rate is the number of points earned per sales dollar.
- Only those extra charges set to Y for the program would be included in the sales total.

Loyalty Reward Adjustments
- To make adjustments to a customer total point not related to sales invoices
- Used to assign the initial start point and to adjust for point redemptions
Loyalty Rewards Inquiry
- View the current status of a customer’s Loyalty Rewards points and the activity
Loyalty Rewards Report
- A listing of the customer’s Loyalty Rewards point activity
Loyalty Rewards Statement
- Similar to a customers A/R statement showing their activity and balance.
- These Loyalty Reward statements can also be emailed to the customer.
Once the customers have been assigned to the program and the rates have been setup the point information can be built from invoice history from a start date if desired.
Invoicing
- When an invoice is generated for a customer included in the program their Loyalty Rewards will be updated when the invoice is completed and the current Loyalty Reward total can be printed on the invoice.
Multiple Bin Locations
Overview
There is now the option for setting up alternate bin locations for each item. Before proceeding, make sure that the flag to allow multiple bin locations (field # 45) has been set to [y] in System Utilities > System Setup > Sales Desk > parts billing parameters > Screen 2.
Another parameter change is required to have the bin location sold from selected on the invoice screen, Screen 5 > Select Bin Location in Invoice (field # 31) needs to be set to Y
Process
Bin Location Maintenance
This option is used to set up, view a specific location or view all locations for a specified product. Deleting an alternate bin location is also available from this menu. This option is found in the menu inventory > Data Mantenance > Master Files > Bin Location Maintenance.
Bin Location maintenance can also be performed when in the Product Master maintenance by selecting “B(ins)”.
The Bin Type “R”, Retail, is used to identify product in the retail space of the store. Nightly reporting is available to indicate which retail products currently have zero available and need to be replenished from other locations.
The retail bin location can only be the primary location if it is the only location for the product and POS transactions will update the on hand in the Retail location.
Receiving and Stock Transfers will update the quantity on hand in the primary location which is the location shown on screen in Product Maintenance and Inquiry.
Any product with multiple bin locations and the Retail location that has a negative on hand quantity will have the Retail location adjusted up to zero and the primary adjusted down by the same quantity nightly.
Stock Relocation Adjustment
inventory > Data Maintenance > Inventory Adjustments > Stock Relocation Adjustment
Use this option to adjust the on-hand quantities for each alternate bin location. Enter the category and part number. All of the locations will be displayed. At the any change prompt, press enter to get to the quantity to adjusted by field. Enter the quantity (followed by a minus sign) that is to be moved to other locations. Then distribute that amount to the alternatives. The total field at the bottom must be 0 in order to [f1] accept the entry. Pressing enter after the accept will allow you to continue with further adjustments and “N” will exit to the menu.
this would be the preferred method for adjusting bin location quantities.
Stock Relocation Report
This will report all Retail Locations that have and On Hand Quantity of 0 or less which is to be used to replenish these locations. This report will be run automatically each night.
On Dock Purchase Orders
To flag a purchase order as On Dock use Purchasing > Purchase Order Receipts > On Dock Assignment. Enter the PO Number then confirm it is the correct PO, the first page of lines on the PO will be displayed and answer “Y” to create the Dock locations for this PO.
The Dock locations are automatically removed when the PO Receipts Update is completed for the PO.
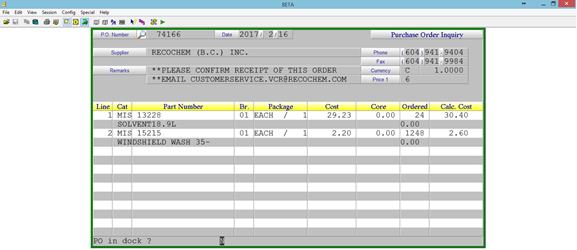
P.O. Receipts Relocation Listing
Multiple bin location items are automatically received to the primary bin location as listed on the PRODUCT master maintenance screen. This report provides the information necessary for the user to relocate the quantity received to different locations.
This report is Purchasing > Purchase Order Receipts > P.O. Rec. Relocation Listing
P.O. Receipts Relocation Adjustment
Similar to the Stock relocation adjustment, the user is able to move the recently received quantity from the primary (default) location to multiple locations.
P.O. Receipts Relocation Update
The adjustments made in the above step will be updated.
Alternatively, the adjustments can be made using the Stock Relocation Adjustment described earlier in this document.
Inventory Adjustments
When entering Inventory Adjustments, inventory > Data Mantenance > Inventory Adjustments > Stock Adjustments, if a part is assigned to multiple bin locations you will need to enter the quantities adjusted by bin location when completing the adjustment
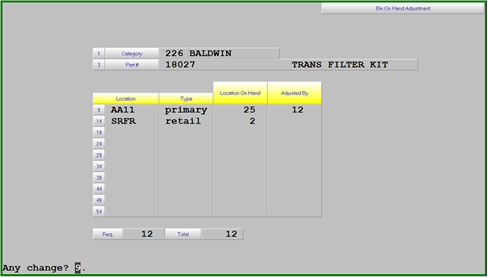
The default is to adjust the primary bin but you can change the quantities however the adjusted quantity for the bin locations must equal the total adjustment quantity.
This is the same procedures as used in the Stock Relocation Adjustment
Bin Location Lookup in Invoicing
Products with Multiple Bin Locations that have an on hand quantity will be identified on the invoice screen with a comment of “*MANY*” and products that have zero on hand but are included in an On Dock PO will have a comment of “*DOCK*”.
To check the available quantities for multiple bin locations within the invoicing screen press Shift F8 from the line Type field and you will be prompted for a line number to search. The bin location quantities for the selected part will be displayed in the Information Window. The sale of a product will always reduce the on hand quantity for the Retail bin location if one exists and if no retail location exists the Primary location will be adjusted.
All bin locations will be included on the printed invoice.
If the Select Bin Location in Invoice option is on and the part being sold is assigned to Multiple Bin Locations the locations with available inventory to fulfill the sale will be displayed on screen
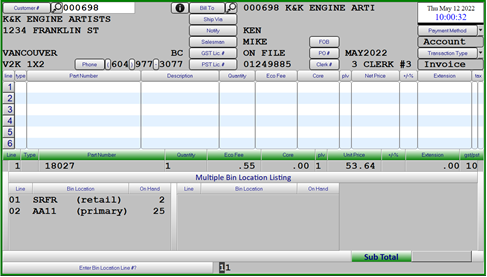
Bin Location Selection in Invoicing - Optional
New feature when using Multiple Bin Locations and wanting to force the users to select the Bin Location that the product is going to be picked from in order to keep the on-hand quantities for each bin location accurate.
Billing Parameters
New option added to screen 5 of the Billing Parameters “Select Bin Loc. In Invoice” would need to be set to “Y
For Counter Kits where product is kept in multiple Bin Locations the parameter “18. Kit Detail Display” on screen 3 would also need to be set to Y
Invoicing
In the invoice screen the user will be prompted to select the bin location the product will be picked from after the quantity is entered. Bin locations are displayed in descending order based on quantity on hand. Dock locations are shown at the end of the list and cannot be selected, these are information only. A line number MUST be chosen.
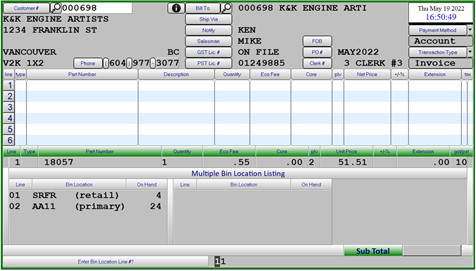
Only the Bin Location chosen will be printed on the invoice and the overall inventory of the part will be reduced and the quantity available in the chosen Bin Location.
Exceptions where this screen will not be displayed
If a part is only assigned to a single bin location
If the quantity sold is greater than the quantity available is any single bin location
When selling a “C”ounter Kit the Kit components will be displayed on screen and if any of the components are located in multiple bin locations you will be prompted to select the Bin Location those parts will be pulled from. The components and the chosen Bin Locations will be printed on the invoice.
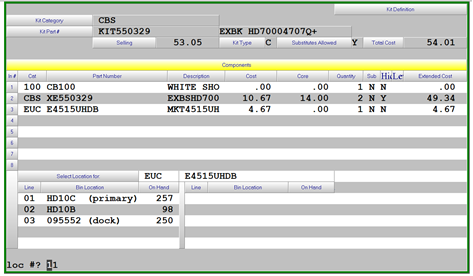
Invoice Print
The invoice print will only show the bin location selected for a part.
Exceptions
- No one bin location had enough quantity to fulfil the order and all locations will be printed.
- Invoices created from backorder fulfilment will show the primary bin location
- Web orders will show the primary bin location.
- Automatic Transfers will show the primary bin location
Inventory Update
The on-hand quantity will be updated for the selected bin location.
The on-hand quantity will be updated for the Primary bin location when:
- No one bin location had sufficient quantity on hand
- Invoices created for backorder fulfillment
- Web Orders
- Automatic Transfers
Multiple Invoice Copies
Overview
Multiple invoice copies can be printed at the time of sale or as a batch during the Accounts Receivable month end
Process
Customer Maintenance
If multiple copies are to be printed at the time of sale then the customer must have an “Account Control Flag” of “m” and the “ME Invoice Copies” field needs the number of invoice copies that are to be printed, use 2 if you require 1 extra copy for the customer.
Where you have the customer setup to receive automatic emails this feature can now be used to suppress the printing of invoices by leaving the “ME Invoice Copies” as 0. Also the Billing Parameter “Duplicate On Multiple Inv” must be set to “N” to print 0 copies
The printing of DUPLICATE on the additional invoice copies is controlled by the billing parameters, screen 1 “DUPLICATE on Multiple Inv”.
To print invoice copies as a batch during the month end the ME Invoice Copies field needs a number. Only 1 copy of each invoice for the customer will be printed as part of the month end. Changing this field during the month will result in the invoices after the change getting printed during the month end.
Where customers are set to print extra copies this can be turned off for different document types using Utilities > System Setup > Sales Desk > Printer Profiles.
If the Extra Copies field is set to “N” the extra copies set for the customer is ignored.
Physical Count - Add Bin Location
Definition
The Physical Count Input routine has been updated to include the option to Add a Bin Location during the count. This will add the bin location to the part immediately and the quantity will be updated when the count update is completed.
Processing
Changes to the count input screen are the new option to A(dd loc).

Using this option will prompt first for the Category and Part Number
Cat/Part .../...................
The next prompt will be for Bin Location
bin location/......
Next will be the Quantity
qty/......
last will be the Bin Type, blank or R for retail
type/.
When the bin has been added the input screen will show with the added part on line 1. If the part was not assigned a Primary bin location previously the new bin added will be considered the Primary Bin location and with should in the product maintenance and inquiry screens.
The new bin location quantity will be updated when the count update is complete and the quantity added to a new bin location will be considered a count variance as it is assumed the product will have a negative variance in another bin location.
Change PO on Pick Ticket
Process
The process for changing the Z Pick Ticket PO number:
- When closing the Pick Ticket in the SF2 screen from Invoicing will have a new field for the New Po Number

- If you enter a different PO number you will receive the question to “really change [original PO number]? You will need to answer the question with Y or N, the default being Y
- You will then be prompted “really invoice [original PO number]?
- The PO number will be changed on all associated pick tickets
Price Override Reporting
Definition
The reporting of price overrides has been updated to continue to provide the daily report and also allow for reporting of price overrides done in the past.
Processing
The new reporting option is found in the menu through Sales Desk > Administration > Reporting > Pricing > Price Override Analysis or using the menu search (TAB key) Search String “PRICE O”.

In the selection screen leaving the fields blank will report all branches, customers, clerks, categories and exception types.
Alternatively, the report can be filtered to include only selected overrides
The report content is the same as the nightly report and is also available in a .csv format for import into excel. After the report is viewed on screen the option to load into excel will show

Click on the View Price Override Analysis in Excel to load the report into excel. When complete click on the Close Window to return to the menu.
Printing of Orders when Customer Backorders Received
Definition
Update to allow Order type transactions to be reprinted when Customer Backorders are received
Processing
Billing Parameters
The Billing Parameters maintenance has been updated with a new parameter to indicate if Orders should be reprinted when a customer backorder is received. This new setting will be found in screen 5 field 38.

Product Receiving
When goods are received either through PO Receipts Update or Rush Receiving, any customer backorders on Order transactions will be reprinted with the quantity received and extended value. The Order will still have to be recalled and invoiced.
Product Maintenance Access Control
Definition
The Product Maintenance has been modified to allow Field level authorization by login ID
Processing
Branch Maintenance
The branch must first be flagged to use the user level Product Maintenance Limits

The Product Maintenance Limits must be set to Yes
Product Maintenance Screen Enhancements
Definition
Enhancements made to the product maintenance screen.

- Class and Subclass – can be used for special pricing and reporting
- Corporate and Branch ranking – informational display of the part ranking for the “Turns Based Purchasing”
- Fields moved to provide additional screen space
- On Order/Committed
- Customer b/o / Supplier b/o
- Defective On-hand/Cores Out
- On RGM/Lost Sales
- EOQ Corp/Dir – Tran – Economic Order Quantity calculated based on the part ranking for use with the “Turns Based Purchasing”
- Auto Lck – used with the “Turns Based Purchasing” to set the number weeks to lock EOQ and ROP typically for new parts.
- ROP Vendor/Transfer – ROP [Replenish Order Point] alternate term for Minimum. ROP Vendor is the value used for the minimum on hand when ordering from the supplier and ROP transfer would be the branch minimum when replenishment is done from the DC branch. Both are calculated values when using the “Turns Based Purchasing”
- Last Price Update – date of the last price file updated
- Ret Allowed – information field to indicated if the part can be returned to the supplier
- Currency – information field to show the currency code of the supplier
- B Cost/Core – base cost and core cost typically used for products sourced outside the country in foreign currency. Supplier purchase orders will show the Base Price and the exchange, duty and freight costs will be added at the time of receipt in the calculation of average cost. Further details on Base Price are found in the Foreign Currency document.
- Duty – duty percentage for product being imported
Purchase Orders - Booking & Specials
Definition
Alternate purchase order types can be allowed by Supplier, Booking and Special so the order quantity does not affect normal replenishment at all or until the purchase order should be in transit. The visibility of the order quantity is controlled by a setting in the purchasing parameters, always show the on order quantity the same as a regular PO, never show the on order quantity or only show the on order quantity when the PO Required Date is withing the Suppliers lead time
Processing
Parameter Maintenance
The options are:
- Y – Always update the part on order quantities
- N – Never update the part on order quantities
- D – Only update the part on order quantities when the PO required date is within the suppliers lead time in days.
- A nightly update is run to check the Booking and Special purchase orders, if the D setting is used and the conditions are met the on order for the part will be updated
Supplier Maintenance
In order to use the Booking or Special purchase order option the Supplier must also be set to allow this. Menu option Purchasing > Data maintenance > supplier

Field “27 Booking/Special?” must be set to Y to allow these types of PO for the Supplier.
Create Purchase Order from Suggested Order
When selecting “Order” from a suggested order one of the options is to designate the purchase order a Booking or Special PO.
The On Order quantities will be updated based on the purchase order type chosen. A regular purchase order will be created if this field is left blank.

Once the purchase order is created the Booking/Special flag cannot be changed on the purchase order.
Purchase Order Maintenance
If adding a new purchase order manually through the Add/Change Purchase Order the Booking/Special can also be assigned.

Leaving this field blank with treat the on order quantities as a regular PO, if changed to B or S the on order quantities will be updated based on the type chosen.
The type of Booking or Special can only be set when initially Adding a purchase order, once the purchase order number has been assigned and parts are about to be added this can no longer be changed
Suggested Order Report
A new column has been added to the Suggested Order report, “B/S Order”, which will show the Booking and Special on order quantities for information.
Items On Order by Vendor

Quote Handling Improvements
Overview
Parameter Maintenance
The Billing Parameters have been updated to allow the inclusion of Orders, Quotes and Packing Slips in the document search options when you call up a customer in the invoicing screen. For Quotes the option to Delete and the Default setting for the Delete have also been added.

Invoicing
In the Invoice screen when a customer is entered various messages could be displayed based on the outstanding documents of file for the customer. One or many of these options could be displayed O – Open Orders, P – Packing Slips, Q – Quotes, A – All, N – None such as shown below.

The default is always “N” to continue and start a new transaction but any of the other options can be entered to launch the search function.

The search offers to option to search by Purchase Order number or pressing Enter will list all Open Transactions for the selected type.
For Cash Sales using the PO Number or Ship To Name to identify the customer will assist in the recall of Open Transactions.
Quotations created for transactions that exceed the customers credit limit will automatically have a purchase order assigned as “CH”.
RF Gun User Guide - 2022
RF Gun Procedures
Login and password
The standard login of the RF gun is [rf]. Multiple store installations or sites with more than 1 rf gun will have custom logins that you will be advised of at the time of install. The password matches the login.
Control Keys
- CTRL A = to accept an entry
- CTRL C = to switch between the barcode and part number fields
- CTLR F = to move cursor to order quanity
- CTRL I = to display last 12 months purchases
- CTRL R = to reject an entry
3) Receive O/S P.O.
This option will list all of the outstanding Purchase orders on the system and will allow you to select one to be received. To select a P.O. simply select one of the three options, 0=PO, 3=NEXT and 9= QUIT. When you use option 0 you will be prompted to enter the PO number. The P.O. number to be received does not have to be displayed on the screen to enter the P.O. number. CTLR followed by R will take you back to the main menu.
The PO Listing screen could be bypassed if desired and the menu altered to go to the second screen to enter the PO Number with freight, brokerage and other costs
P.O. # SUPPLIER NAME 105053 NTN BEARING C 105312 FLEETSPEC 106325 MODERN SALES 106372 MODERN SALES 106771 DANA HEAVY VE 106783 AUTOMANN CANA 106833 ZF CV SYSTEMS 106923 MODERN SALES 106931 GLOBAL PARTS- 106933 GLOBAL PARTS- 107041 DANA HEAVY VE 107252 ZF CV SYSTEMS 107253 BENDIX CVS CA
0=PO,3=Next,9=Quit N
When a PO Number has been selected the supplier will be displayed with the option to enter the freight, brokerage and other cost values.
po# 111346 GABRIEL RIDE CO freight ......... brokerage .00 other costs .00
The first question to be answered in the third screen is if you wish to use “Autoscan” Y or N.. The use of “Autoscan” prompts you to scan each item and it defaults the received quantity to 1 unit for each scan and then goes back to the barcode field for the next scan. Alternatively, if “Autoscan” is turned off N you will be prompted for a quantity each time you scan an item. You will have to accept each entry with CTRL followed by A.
If you are using the “Autoscan” mode you can correct the quantity after the item is scanned by pressing Tab or CTRL I. After entering the new quantity press CTRL A at “Any change” to accept the entry.
When not using Autoscan, the cursor will go to the “received” field after the barcode is scanned waiting for a quantity to be entered. The quantity entered will be ADDED to any previous quantity received. A negative quantity received can be used to correct an error.
If the quantity received is excess of the total quantity ordered for that part a message will display Over-receive?(Y/N) Y
po# 111364 sup RIDE-AIR CONTRO #lines/OS 6/ 4 b/c ............... cat ... ...........
.................... .................... PO line# ..... units ord'rd ...... units rec'vd ...... back-ordered .
Autoscan? N
If the part scanned is to be cross docked to other branches a message will display near the bottom of the screen “CROSS DOCK” so the user can separate these parts for splitting to the branches during the update.
po# 111384 sup KLEEN-FLO TUMBL #lines/OS 6/ 6 b/c 700002354940 cat KLE KLEEN-FLO part 291 LEMON DASHBOARD CLE PO line# 1 units ord'rd 24 units rec'vd back-ordered Y received ...... CROSS DOCK
Pressing CTRL A at the barcode will start the completion process where you will be asked “update now?” where the options are Y or N. When answered with an “N” the user is asked if they wish to print the Edit List.
When starting the update, the next option is to enter the invoice number.
If the PO included parts for cross dock, these parts will be shown with the split quantities for each location. This information is to be used to separate the parts received for the various locations. If the part is not received in full the user will need to allocate the quantity received to the locations based on their needs. The quantity allocated to a branch CANNOT exceed the original quantity ordered. If a branch requires more than has been ordered for them, a manual transfer will need to be created to send the additional amount.
cat GAB order 56 85934 rec 56 split 56 br order o/h split 01 18 5 18 02 0 0 03 8 0 8 05 0 8 06 30 9 30 08 0 25 09 0 0 10 0 0
After all of the quantity splits have been reviewed the update process will begin and the various update reports printed. Also, Stock Transfers for the split quantities will be printed during the update process.
Substitute Chaining
Definition
Part number Substitutes can now be chained and maintained from a single screen for all parts in the chain
Processing
Parameter Maintenance
A parameter must first be set to use the substitute chaining feature in the product maintenance screen. Menu option system utilities > system setup > sales desk > Parts Billing Parameters > screen 1

There are 2 flags, Substitute Chain is to show all related substitutes in the information window on the invoice screen and the new addition is the Maintenance option to show the substitute chain when using Product Maintenance.
Product Maintenance
When using the product maintenance screen with the Substitute Maintenance set to “Y” another message will appear after accepting the part, Maintain substitutes?. Entering “Y” to this question will bring up the Substitute Chain screen.

From this screen a new substitute can be added, providing it does not already have a substitute, or a substitute can be deleted from the chain. The Substitute information for any changes will be updated on the affected parts.
Suspense Payment Enhancements
Definition
Modifications have been made to remove any invoices with a payment type of Suspense prior to the end of day being completed so they do not impact the General Ledger because they have not impacted Inventory when they were created. Also, to prevent an attempt to process a card payment on a PC without a card terminal the payment screen has been modified to test for the presence of an active card terminal.
Processing
Payment Screen
When processing a cash sale, the payment screen will now test for a card terminal being properly connected when first entering the screen. If the card terminal is not properly connected or if the PC does not have a card terminal you will see a message “please wait testing terminal”

If the card terminal is not active or if the work station does not have a card terminal the payment screen will show a message “No Card Terminal, Only Cash Payment Types, Press ENTER to test for Terminal Again”

If there is no card terminal then the only options allowed for payment are $ - Cash , C – Cheque or E – E-Transfer. If the card terminal issue has been corrected pressing Enter will test for the terminal again and if found will allow a card transaction.
End of Day
A new report has been added to the end of day processing which will list any invoices created that day with a payment type of Suspense. This report will be run separately for each location
Also, a new process has been added before the End of Day updates which will:
- Check to see if a payment was received for the invoice
- If a payment was received update the payment information on the invoice to the correct payment method and amount received.
- Update the inventory and Cardex for the parts on the invoice as this was not done when the invoice was originally created.
- If no payment has been made on the invoice, remove the invoice from the invoice file and add it to a new database of Suspense Invoices.
Once this process is complete the normal End of Day updates will run and there will be no invoices with a payment type of Suspense included.
Web Order Discounts
Definition
Counterpoint can be configured to automatically apply a percentage discount to web orders received. This discount can also be limited to customer assigned to certain sales clerks.
Processing
Billing Parameters
The percentage discount must be added to the Billing Parameters, system utilities > system setup > sales desk > parts billing Parameters > screen 5
- In order for the web order discount to work the “Discount on Screen” parameter screen 3 > field 50 must be set to N. Customer price discount cannot be shown on screen or printed in combination with a web discount percent. The invoice screen and printed invoice will show the customers net price after any price discounts or surcharges.
- The discount percentage must be entered with a minus sign.
- The web discount message can be Centered, Left Justified or Right Justified
- There are 40 characters available for the message and it will print as a comment line on the invoice at the top under the “purchase order reference” comment.
- To exclude certain customers from receiving the web discount you can assign then to a clerk number that is included in the parameters. Up to 5 clerk numbers can be excluded from the web discount.

Specials / Contracts Enhancements
Overview
Modifications have been made to the Specials/Contract screen to allow the creation of a Special or Contract based on the Discount Level assigned to parts within a category, Product Class, Product Subclass and Customer Discount Group.
Another option added to the Specials/Contracts is the inclusion of Non-Stocked products. This only applies to Specials/Contracts setup for an entire category where the part being sold is found in the Price Book. If using the Discount Level option for the Special the Non-Stocked pricing parameter on the part would need to match the Discount Level on the Special


Specials Maintenance
At least one of the main options must be chosen when setting up a new special, Customer, Category, Discount Level, Discount Group, Class or Sub Class or a combination of these can be selected.

Customer
If left blank the special will apply to all customers and if you wish to use a specific customer they will need to be setup to “Allow Contract Pricing = Y” in the Customer Maintenance screen. Depending on the Billing Parameter setting “Contract Only” found on screen 3 a Contract setup for a specific customer will always sell at the Contract price if set to Y and will sell at the lowest available price based on Discounts and Specials for the product if set to N.
The Billing Parameter Maintenance is found under Utilities > System Setup > Sales Desk > Parts Billing Parameters.

Category – Part Number
A Special/Contract can be setup for a specific Category/Part Number or an entire Category by just entering the Category and leaving the Part Number blank. If setup for an entire Category then the pricing will be entered as a Price Level and Discount (+/-).
Discount Level
The use of Discount Level for a Special or Contract requires that the Special/Contract be setup for an entire Category or All Categories. When adding a Special/Contract for an entire Category it also requires that you identify if the Special/Contract is to only affect parts with a blank Discount Level or if it is to be all parts. If a specific Discount Level is assigned to the Special/Contract the Only if Blank will be automatically filled in.
Discount Group
Specials setup for a Discount Group will apply to all customers assigned to that discount group regardless of the “Allow Contract Pricing” setting on the customer.
Class/Subclass
The Special/Contract will apply to all part numbers contained in the Class or Class and Subclass. The pricing will be by Price Level and Discount (+/-).
Only at Net
When this is set to “N” [Net Only] the Special will apply to All Customers as the net price. This will override the customers regular discounts but if the Billing Parameters are set for “Contract Only” = Y then an existing Contract price will take precedence.
Start – End Dates
This is the time frame the Special/Contract will run for, inclusive of the start and end dates. If a To Be Sold quantity is used then the Special/Contract will be in effect until the available quantity is sold or the end date is reached, whichever occurs first.
Price
If the Special/Contract is for a specific part number then a Unit Price can be entered otherwise the price will be based on a Price Level and Discount (+/-)
Price Break
The Quantity Price Breaks option has been updated to allow Quantity Breaks for individual customers or discount groups as well as all customers. The dates may be used to limit the time this price break is offered. The net price is left blank and “0” (zero) is used for the price level with a blank percentage value when adding a Price Break Special. The Price Break code is entered into the special, the Tab key can be used to search the codes setup in the system. Only S type Price Break codes can be used in the Specials.
Within the Billing Parameters the system must be set to not show line discounts in order to take advantage of Quantity Price Breaks. This setting, D% on screen YNDS is found on screen 3 of the Billing Parameter Maintenance and must be an N as shown in the parameter screen above.
Include Non-Stocked
Specials/Contracts setup for an entire category or discount level can be applied to Non-Stocked parts included in the price book.
To Be Sold
This will limit the Special/Contract to the number of units entered. When the quantity sold exceeds the “To be Sold” value the price will revert back to the normal price.
Quantity Sold
This value is updated automatically as sales take place
Flyer
This is a reference description used for reporting.
Accounts Payable Invoice Matching
Overview
The Accounts Payable matching in Counterpoint®has been updated to allow matching of invoices, received through EDI or entered manually, to Purchase Order receipts and product received through Rush Receiving along with the ability to match a single invoice to multiple receipts.
Additional reporting has also been added for review of invoices or receipts that are not matched.
Processing
Accounts Payable Parameters
A new date has been added to the Accounts Payable parameters to limit the invoices listed in the matching screen at startup, ignoring invoices prior to the Match Date.
The Invoice Adjustment allows for inclusion of a default percentage or amount in the transaction entry to be included in the distribution amount and allocated to a separate G/L Account.
The Invoice Matching process uses is the Threshold Data where invoices that have a price difference less than the threshold will have the variance amount posted to the A/P Invoice Price Variance GL Account indicated in the branches Purchasing Parameters as described later.
Override Codes
A new database for Override Codes has been added to allow users to bypass the matching process, however these overrides are logged and can be reported on and require a PIN # to be used.
The new option to maintain these codes is Accounts Payable à Data Maintenance à Override Codes. The Add, Change and Delete options are available for the 2 character code and 30 character description.
Whenever an invoice for a Vendor which is setup for invoice matching is not matched a PIN # will be required and an Override Code will be required. The reason for this is to allow reporting of unmatched invoices.
Invoice Adjustment Codes
Transaction Adjustment Codes are used to apply a default adjustment amount to an A/P Transaction for a Vendor.
These codes can be applied as a default to the Vendor or can be entered manually during the Accounts Payable transaction input
Vendor Maintenance
Changes have been made to the Vendor Maintenance screen so the Vendor can be flagged as a Vendor which requires matching and a default transaction adjustment code.
This field must be populated with “Y” to invoke the matching process when processing Accounts Payable Invoices.
The Adjustment code will be applied to all A/P Transactions for the Vendor by default but could be removed during the transaction entry if needed.
Supplier Maintenance
As there can be many Purchasing Suppliers setup for a single Accounts Payable Vendor a new field has been added to the Supplier Maintenance screen to identify the Accounts Payable Vendor number. This can be a Canadian or US Vendor
Purchasing Parameters
A new GL Account entry has been added to the purchasing parameters for use with price variances between purchase receipts and accounts payable invoices. Amount variances within the allowable threshold will be posted to this account.
Accounts Payable Transaction Input
Vendors setup with a default Transaction Adjustment code will have the code and rate displayed when the transaction is entered.
- Changes to the Adjustment Code or value must be made from the “Chg Header?” prompt
For Vendors setup to require invoice matching, after the GL Distribution amounts are entered:
- If the invoice number and amount are a match to the amounts received the invoice will be automatically matched and no further selection will be required.
- If the invoice amount does not match the received amount the amount will have to be matched to the outstanding list of received orders.
- The listing of goods received is n Date order, oldest to newest.
The Allocate value must balance to the invoice amount entered or be within the threshold value to complete the entry without requiring an Override Code and PIN
- If the Available amount for each receiving matches the amount Allocated then the screen will return to the transaction input when complete.
- If the Allocate Amount does not match the invoice amount but is within the threshold the distribution of the A/P Transaction will be adjusted to reflect the price variance
- Enter O or R to search by P(O) # or (R)eference. This will list the transactions ascending by the selection with the closest match at the top.
- In the screen above a PO # search for 609759 was used. Please note that there have been multiple receivings for this purchase order.
- The default display order when the match screen is opened uses the date from oldest to newest.
- If the Allocate value entered does not match to the Available amount for the receiving the individual lines from the receiving will be displayed and the amount to be paid will be distributed by line as per the screen below.
Select EDI Invoices for Payment
The EDI invoices to process will be selected from the list of EDI invoices received. When the selection is complete and Create Transaction Batch is selected:
- If the invoices selected are a match to the value of the goods received the entries will be automatically flagged as matched and will return to select another Vendor for EDI invoices after the transaction batch is created.
- If the invoice amount does not match the received amount the amount will have to be matched to the outstanding list of received orders.
- If the EDI invoice information, invoice #, packing slip or po number, the invoice will have to be matched to the outstanding list of received orders.
- If multiple invoices have been selected the match screen will only be displayed for those invoices which require matching, not those that are an exact match.
- Invoices within the threshold percentage will require matching the same as in transaction input.
- If the Allocate value entered does not match to the Available amount for the receiving and is outside the threshold amount the individual lines from the receiving will be displayed and the amount to be paid will be distributed by line as per the screen below.
Foreign Currency Rush Receiving Match
Adding an Adjustment Code for Foreign Currencies, coded to the GL Foreign Exchange account number, will assist in the matching of goods received through Rush Receiving from foreign suppliers allowing the transaction to be fully match through the transaction input screen.
Adding the Adjustment code to the transaction then updating the amount to match the receipt and Vendor invoice. Using the Adjustment value to increase the distribution amount by the currency exchange value.
Manual Matching
The Receipt PO number is used to recall a receipt of goods and the items to match are selected to match to the vendor invoice.
Invoice Match Override Clear
A Vendor number can be entered to view a single vendors invoices or the field can be left blank to view all invoices overrides.
Enter a “Y” to select the invoices to be cleared.
The total selected to be cleared will be displayed at the to of the screen
When complete a PIN number and Override Code will be required to exit.
Reporting
Available Purch. For Payment
This report is to list product receiving’s that have not been fully paid.
Report has been modified to include:
- An extract file for import to excel
- core and levy values in available costs
- the Supplier Vendor in the selection criteria
- receipt date
After the closing the Report Viewer window the option to open the extract with excel will be displayed
The extract file to import into excel manually is Z:\html\ap1\APAVAILLS.csv
Invoice Match Overrides
Report to list all invoices that where an Override was used to complete the invoice process
This will create both a report and extract for import to excel.
After the closing the Report Viewer window the option to open the extract with excel will be displayed
Click on the Close Window to return to the menu
The extract file for import to excel is Z:\html\ap1\APLOGRP.csv
|
Vendor |
Vendor Name |
Invoice |
Invoice Reference |
Invoice Date |
Federal Tax Amount |
Invoice Amount |
Amount to Distribute |
Reason |
User |
Pin |
|
|
001320 |
BALDWIN FILTERS INC. |
23425684 |
2023-01-23 |
0 |
1075.8 |
1183.38 |
Force Pay Invoice |
amslogin |
3 |
||
|
001320 |
BALDWIN FILTERS INC. |
23468406 |
2023-02-10 |
0 |
1368.36 |
1505.2 |
Invoice Not Paid |
amslogin |
698 |
||
|
001340 |
DAYTON PARTS |
12345 |
0 |
0 |
0 |
Invoice Not Paid |
amslogin |
698 |
|||
|
001340 |
DAYTON PARTS |
123456 |
2023-05-01 |
19.05 |
400 |
0 |
Force Pay Invoice |
amslogin |
698 |
||
Accounts Payable
Manuals, Users Guides and Troubleshooting Guides for the COUNTERPOINT Accounts Payable Module
AP Month End
The Accounts Payable Month End does not have to be run on the last day of the month. You may hold the period open, delaying the process until all vendor invoices have been posted for the previous month.
Transaction Purge
- ACCOUNTS PAYABLE…à8. month end processing…à1.transaction purge
Purge any transactions that may be on file. Only those invoices with payments or credit/debit memos in full will be removed. This is the same process that is run from the 2. Accounts payable à 6. automatic cheque processing menu and may be skipped here if completed as part of each cheque run.
Set Month End Date
- ACCOUNTS PAYABLE…à8. month end processing…à2.set month end date
Enter the date to be used in ageing the remaining outstanding invoices. This is most often the last day of the month being closed. Once the month is closed, returned here and set the date to the end of the new current month.
Aged Detail Trial Balance
- ACCOUNTS PAYABLE…à8. month end processing…à3.AGED DETAIL TRIAL BALANCE
This report will print the details of each outstanding vendor invoice. The report shows the vendor number and name, the invoice number, due and payment date, the ageing as well as the discount amount and date.
Aged SUMMARY Trial Balance
- ACCOUNTS PAYABLE…à8. month end processing…à4.AGED SUMMARY TRIAL BALANCE
Accounts Payable Month End Update
- ACCOUNTS PAYABLE…à8. month end processing…à5. ACCOUNTS PAYABALE MONTH END
The last step in the Accounts Payable Month End process is to advance the GL period, which is done by selecting this function once. If you are in doubt whether this has been run, check the financial period field in 9. SYSTEM UTILITIES à 3. SYSTEM SETUP à 2. Accounts payable à 1. SYSTEM PARAMETERS
AP Reporting
VENDOR MASTER(NUMERIC)
- ACCOUNTS PAYABLE…à3. REPORTING…à1. MASTER FILE LISTINGS…à1. VENDOR MASTER(NUMERIC)
This report will print almost all of the information contained on the 2. Accounts payable… à 1. DATA maintenance… à 1. Vendor MaSTER screen in numerical (vendor number) order.
VENDOR MASTER(ALPHA)
- ACCOUNTS PAYABLE…à3. REPORTING…à1. MASTER FILE LISTINGS…à2. VENDOR MASTER(ALPHA)
This report will print almost all of the information contained on the 2. Accounts payable… à 1.DATA maintenance… à 1. Vendor MaSTER screen in alphabetical (vendor name) order.
VENDOR SUMMARY(NUMERIC)
- ACCOUNTS PAYABLE…à3. REPORTING…à1. MASTER FILE LISTINGS…à3. VENDOR SUMMARY(NUMERIC)
This report provides the basic information on one line per vendor: the number and name, address, and phone and fax number and prints in numerical (vendor number) order.
VENDOR SUMMARY(ALPHA)
- ACCOUNTS PAYABLE…à3. REPORTING…à1. MASTER FILE LISTINGS…à4. VENDOR SUMMARY(ALPHA)
This report provides the basic information on one line per vendor: the number and name, address, and phone and fax number and prints in alphabetical (vendor name) order.
MAILING LABELS – CREATE
- ACCOUNTS PAYABLE…à3. REPORTING…à1. MASTER FILE LISTINGS…à5. MAILING LABELS-CREATE
MAILING LABELS – ALIGN/PRINT
- ACCOUNTS PAYABLE…à3. REPORTING…à1. MASTER FILE LISTINGS…à6. MAILING LABELS-CREATE
Cash Forecast Report
- ACCOUNTS PAYABLE…à3. REPORTING…à2. STATUS REPORTS…à1. CASH FORECAST
- Vendors
Either use [A] to select all vendors or [S] to select specific vendors. There is no default for this field.
- Type
Either use [d] for the detail or [s] for the summary version of this report. There is no default for this field.
Whichever you choose, the purpose of this report is to give you the opportunity to see the cash that will be required in order to pay the outstanding invoices currently posted to vendor accounts.
- Date 1
- Date 2
- Date 3
Enter three dates in ascending (from most recent to most future) order. These would most likely be the next three cheque run dates.
The detail report shows the vendor number and name, the invoice number and date, and the discount amount and due date. Plus, each invoice for each vendor is slotted into the appropriate date range. Invoices that are due on or before the specified date will print in that column.
The summary report prints the same information, but just a total line for each vendor. The amounts assigned to the dated columns would be the same, regardless of format.
VENDOR ANALYSIS
- ACCOUNTS PAYABLE…à3. REPORTING…à2. STATUS REPORTS…à2. VENDOR ANALYSIS
This report prints the vendor number and name, the hold expiry date (if there is one), the account balance. The number of purchases, the YTD total purchases and the date of last purchase, the number of memos, the YTD totals for memos and the total discounts taken and lost are also included.
It is recommended that this report be printed just prior to completing the accounts payable à ap year end update since that function will clear any information accumulated during the year.
VENDOR HOLD
- ACCOUNTS PAYABLE…à3. REPORTING…à2. STATUS REPORTS…à3. VENDOR HOLD
Enter a date range or [enter] through the date fields for all. This range refers to the hold expiry date field for any on hold vendor as set in 2. Accounts payable… à 4. automatic cheque processing…à 3. CASH REQUIREMENTS… à 1. set vendor hold status
The report will print most of the same information that is printed on the vendor analysis report.
INVOICE HOLD
- ACCOUNTS PAYABLE…à3. REPORTING…à2. STATUS REPORTS…à4. INVOICE HOLD
Enter the vendor number range or [enter] through the fields to all vendors. This report prints, for any on hold invoice as set in 2. accounts payable… à 6. automatic cheque processing à 3. cash requirements… à 2. set invoice hold status.
The report will print most of the same information that is printed on the vendor analysis report.
Vendor History – Summary
- ACCOUNTS PAYABLE…à3. REPORTING…à2. STATUS REPORTS…à5. VENDOR HISTORY-SUMMARY
This report will print the same information, based on the ranges you enter, as the Vendor History Inquiry – Summary.
Enter the starting and ending vendor numbers, or the specific vendor (use the same number for both from and to) or press [enter] twice to request all vendors. Use the same philosophy for the date range.
Vendor History – Detail
- ACCOUNTS PAYABLE…à3. REPORTING…à2. STATUS REPORTS…à6. VENDOR HISTORY-DETAIL
This report will print the same format as the Vendor History Inquiry – Detail shows on screen. Your request may be as narrow as a single vendor for a specific invoice on a specific date or as wide as all vendors for all invoices for all time.
AP Year End
- ACCOUNTS PAYABLE…à8. month end processing…à6. Year end update
The Accounts Payable Year End Update will clear the YTD information for purchases, memos and discounts from the 2. Accounts payable… à 1. DATA maintenance… à Vendor MASTER screen. It should only be run once, immediately following completion of the 2. Accounts payable… à 8. MONTH END PROCESSING… à 5. ACCOUNTS PAYABLE month end update process.
The 2.Accounts payable… à 3. REPORTING…à 2. STATUS REPORTS…à2. VEndor Analysis report should be run before completing this process.
Auto Cheque Processing
Set Cheque Date
- ACCOUNTS PAYABLE…à6. AUTO CHEQUE PROCESSING…à1. SET CHEQUE DATE
Required
Automatic cheques are those that pay invoices which have previously been entered to existing vendors via 2. Accounts payable à 4. transaction processing à 1. transaction input or through the PO Matching processes. You can print the cheques and statements, which is the payment advice or remittance sheets for instances when there are more than 14 invoices being paid on one cheque, or hand-write your own cheques and just print the statements.
To start the process, enter in the date to use as the cheque date for this batch of cheques. Any invoice with a payment or discount due date on or before this date will be flagged for payment during this process. You may enter a date in the future, but you may not enter any date prior to the current one.
Transaction Purge
- ACCOUNTS PAYABLE…à6. AUTO CHEQUE PROCESSING…à2. TRANSACTION PURGE
Optional
Run this to clear out all paid invoices and invoices with credit memos that cancel each other. This process will not destroy any outstanding invoices or credits and you may run this function at any time or many times during a month. Should you choose not to run this with each cheque run process, the same function is accessible from the accounts payable à ap month end menu.
Set Vendor Hold Status
- ACCOUNTS PAYABLE…à6. AUTO CHEQUE PROCESSING…à3. CASH REQUIREMENTS…à1. SET VENDOR HOLD STATUS
Optional
When you do not wish to have a cheque generated to a particular vendor regardless of the state of the account or the due date of any particular invoice, set the Hold? field to [Y] and then indicate the hold expiry date when the Hold status will be lifted. This vendor will be completely skipped during the selection of invoices.
Placing a vendor on hold is different than deferring payment until a later date. Normally used is cases of dispute, setting a vendor on hold means that the vendor will not be considered for payment until the hold status is removed via this menu option.
Set Invoice Hold Status
- ACCOUNTS PAYABLE…à6. AUTO CHEQUE PROCESSING…à3. CASH REQUIREMENTS…à2.SET INVOICE HOLD STATUS
Optional
Sometimes, not all invoices on a vendor account are to be held back from being considered for payment until a specified date. In that instance, this function will hold only those invoices specifically selected. Enter the vendor number, or use the [tab] to search for a vendor number, then enter the specific invoice to be held. The invoice number must match exactly to the one on file, including leading zeros and/or any spaces.
Placing an invoice on hold is different than deferring payment until a later date. It means that the invoice will not be considered for payment until the hold status has been removed and is normally used in cases of dispute.
Cash Requirements – All Vendors
- ACCOUNTS PAYABLE…à6. AUTO CHEQUE PROCESSING…à3. CASH REQUIREMENTS…à3.CASH REQ-ALL VENDORS
Optional
Run this report when you want a listing of all vendors with outstanding invoices due on or prior to the cheque date you entered in the set cheque date menu function. If you choose to include the holds, then they will appear on the report for you to decide whether or not they can be considered for payment, in which case, you must remove the hold status on the vendor or invoice using the set vendor (or invoice) hold status function.
Cash Requirements – Selected Vendors
- ACCOUNTS PAYABLE…à6. AUTO CHEQUE PROCESSING…à3. CASH REQUIREMENTS…à4.CASH REQ-SELECTED VENDORS
Optional
This is identical to the Cash Requirements – All Vendors function, except that you need to specify the vendor number (up to 16). If they have outstanding invoices with payment due dates on or prior to the cheque date you entered earlier, then they will appear on the report. The same rules apply for holds as with the All Vendors option.
Invoice Payment Deferral
- ACCOUNTS PAYABLE…à6. AUTO CHEQUE PROCESSING…à3. CASH REQUIREMENTS…à5.INVOICE PAYMENT DEFERRAL
Optional
Deferring an invoice is moving the payment due date forward, past the cheque date you set earlier, effectively removing that particular invoice from the list of those to be paid in this cheque run. This is different than a hold as the hold process keeps all original dates, and will not consider the invoice for payment until the hold is removed.
Deferring actually changes the payment due date, (although ageing is not affected) so that the invoice is considered for payment again once the new payment date falls on or before the cheque date you select in a subsequent cheque run. If any vendor accounts have a credit balance (they owe you), then those documents must be deferred as well prior to continuing.
Payment Deferral – by Vendor
- ACCOUNTS PAYABLE…à6. AUTO CHEQUE PROCESSING…à3. CASH REQUIREMENTS…à6. PAYMENT DEFERRAL BY VENDOR
Optional
This is the same as the By Invoice option but is used if you need to defer multiple invoices for a particular vendor. There is an option to defer all invoices to the new payment and discount dates you enter, or just selected invoices. Even invoices that have previously been placed on hold will be deferred and will have new payment and discount dates applied from this function.
Deferring an invoice has no affect on the hold process.
Deferred Invoice Report
- ACCOUNTS PAYABLE…à6. AUTO CHEQUE PROCESSING…à3. CASH REQUIREMENTS…à7. DEFERRED INVOICE REPORT
Optional
This report will print invoice information for the vendor(s) selected, as long as the vendor has deferred invoices. The Vendor number and name, invoice number, invoice date and (new) payment date are printed as well as ageing information (will be the same as prior to the deferment since the invoice date hasn’t been changed), the discount amount and the new discount date. Included on this report are not only deferrals just completed, but also any invoice that has been deferred since the last time the Auto-Cheque process was completed.
Cheque Calculation
- ACCOUNTS PAYABLE…à6. AUTO CHEQUE PROCESSING…à4. CHEQUE CALCULATION
Required
Once you have finalized the decisions on which vendors and invoices are to be paid by using the Hold and Defer functions to remove invoices from eligibility, use the cheque Calculation option to prepare the file from which the physical cheques and/or statements will be created and printed.
This step may not be skipped for it is the foundation for all remaining cheque run tasks.
You can enter in a minimum cheque value (the default was set in 9. SYSTEM UTILITIES à 3. SYSTEM SETUP à 2. Accounts payable à 1. SYSTEM PARAMETERS. Either choose all vendors/invoices or again select specific vendors.
If you choose to create cheques for all, then all invoices with a payment date on or prior to the cheque date set earlier will be paid. If you choose to only pay selected vendors, then you have the opportunity to do that, as well as selecting the payment due date for each vendor. Pressing [ENTER] through the due date field here will default to the cheque date you set as the first step in this process. Any date is permitted when selecting specific vendors, even those in future periods.
Should you be required to make changes to the invoices or vendors that are selected for payment, this step may be re-run as many times as required as long as the step for auto-cheque / statement create has not been run. In that instance, a warning message data already exists. Continue and overwrite ? will be shown. To continue, reply [y]. Any information previously created will be removed and will need to be re-created.
Cheque Register
- ACCOUNTS PAYABLE…à6. AUTO CHEQUE PROCESSING…à5. CHEQUE REGISTER
Required
This report prints the information for the selected vendors and associated invoices and shows the cheque number, the vendor number and name, the invoice number, date, reference number type, gross amount, any penalty or discount amount and the net amount. Each vendor is totalled to provide a total cheque amount.
This is the last opportunity available for correcting any errors or omissions for this cheque run. You may go back to the cheque calculation step to re-do it as many times as you need to in order make the data correct.
Cheque / Statement Create
- ACCOUNTS PAYABLE…à6. AUTO CHEQUE PROCESSING…à6. CHEQUE PRINT…à1.CHEQUE/STATEMENT CREATE
This step is Required and the POINT OF NO RETURN
Once this step is taken, the choices made in the steps above cannot be changed, as this is the process that physically creates the cheque and statement print files. A statement is automatically created for any cheque that has more than 14 invoices being paid. The stub portion of these cheques will be printed with the message see attached statement.
Cheque Alignment
- ACCOUNTS PAYABLE…à6. AUTO CHEQUE PROCESSING…à6. CHEQUE PRINT…à2.CHEQUE ALIGNMENT
Optional
Switch to your cheque forms and use the alignment to ensure that they will be printed correctly.
Cheque Print
- ACCOUNTS PAYABLE…à6. AUTO CHEQUE PROCESSING…à6. CHEQUE PRINT…à3.CHEQUE PRINT
Required
Once the alignment is correct, print the cheque forms. If a problem with the physical printing of the cheques arises (ribbon break, paper jam etc), the cheques may be reprinted. However, this means that the entire cheque run would reprint.
Cheque STATEMENTS - ONLY
- ACCOUNTS PAYABLE…à6. AUTO CHEQUE PROCESSING…à6. CHEQUE PRINT…à4.CHEQUE STATEMENTS - ONLY
Cheque Update
- ACCOUNTS PAYABLE…à6. AUTO CHEQUE PROCESSING…à7. CHEQUE UPDATE
Required
Once the cheques have successfully printed, the last step is to apply the payments to the invoices on the vendor account and create the correct journal entries in the General Ledger.
The Update will post the cheques against the invoices paid and purge them from the vendor file. As with other Updates, a Transaction Journal and General Ledger Summary Journal will be printed.
Bank Reconciliation
Outstanding Cheque Report
- ACCOUNTS PAYABLE…à7.bank reconciliation…à1.outstanding CHEQUE report
All cheques processed through accounts payable are kept on file to assist you in balancing your bank account when the statement arrives. This report is sorted in cheque number order and prints the source (automatic or manual/miscellaneous cheques), the cheque number, the vendor or payee (if miscellaneous cheque), and the date and amount of the cheque.
Bank Reconciliation Input
- ACCOUNTS PAYABLE…à7.bank reconciliation…à2.bank rec input
- start date
Press [enter] to default the stating date of the cheques to be cleared to the earliest date.
- Source
Enter the source of the cheque, [A/P] for automatic or [M/C] for manual/miscellaneous cheques. Pressing [enter] will result in cheques from all sources being displayed.
The cheques are displayed in numerical order, by date. In the 9. SYSTEM UTILITIES à 3. SYSTEM SETUP à 2. Accounts payable à 1. SYSTEM PARAMETERS, the field called default cancel will control whether the cheques are automatically cleared or not. If the default cancel is set to [y], then all cheques will be marked as cleared. Should any cheque listed remain outstanding, enter the line number associated with the cheque number and change the cancel flag to [n]. If the default cancel field in the parameter file have been set to [y], then the opposite will apply. When exiting the program use F2 (reject) F1 (to accept), E (to exit) or Q (for quit). The system now asks to update cheques? (Y/N). The default is “Y” unless F2 (reject) is used then the default is “N”.
Bank Reconciliation Edit List
- ACCOUNTS PAYABLE…à7.bank reconciliation…à3.bank rec edit list
As with other processes, the Edit List is available for you to check your work before proceeding to the Update stage.
Bank Reconciliation Update
- ACCOUNTS PAYABLE…à7.bank reconciliation…à4.bank rec update
Use the Update process to remove all selected cancelled cheques from the Outstanding Cheque file. A journal will print as proof that the file was updated and will show the source, cheque number and payee, date and amount.
Data File Maintenance
Vendor File Maintenance
- ACCOUNTS PAYABLE…à1. DATA MAINTENANCE…à1. VENDOR MASTER
Vendor
Enter in a vendor number that is up to 6 numbers in length. The vendor number may only be a numeric number. The number may be entered with or without leading zeros, there is no difference to the system between entering 000509 and just 509.
If you are adding vendors with a particular numbering sequence, you may use the [tab] to search by vendor name. Use (asterisk) to list all vendors in numerical order. Or you may use the first letter of the vendor name followed by (asterisk) to list those specific vendors in numerical order. Once you determine the desired number to be used for the new vendor, you may either [f2] to return to the entry screen and enter it in manually, or you may enter it on this screen and be automatically returned to the entry screen.
During the addition of the vendor record, the user will be asked if the new vendor should also be added to Purchasing as a supplier. If the response is [Y], then the system will check to ensure that the number to be used is not already in existence within Purchasing. If a supplier with the same number does not already exist, then a new supplier record will be automatically created, copying over the vendor name, address and telephone numbers previously entered into the vendor record. Then the remainder of the supplier fields can be set up. Once accepted, the user will be returned to the add vendor screen.
Wherever possible, purchasing suppliers and accounts payable vendors should be set up with the same number, but it should be noted that changes to fields on the vendor record in Accounts Payable will not affect corresponding fields on the supplier record in Purchasing.
- Name
- Address
- POSTAL code
Enter the vendor name and address, including postal code exactly in the format that is to appear on cheques. You may wish to use the last address line for the postal code if you are concerned about the window placement on your envelopes. There is no formatting for this field so if you prefer spaces, you must enter them. For American suppliers, the zip code may be entered with or without dashes as you prefer.
- Phone NUMBER
Enter in the phone number without spaces or dashes. The phone number entered as 4445556666 will be displayed and printed as (444) 555-6666 during entry and on reports.
- Fax NUMBER
Enter the fax number in the same manner as the phone number.
- Balance
This field is never available for change. It is updated from the processing of transactions and cheques and is the current amount that is owing to this vendor.
- Purch ytd
- # of purch
- last purch
- memos ytd
- # of memos
These fields are normally not changed by the user, however, during initial set-up, you may wish to enter this information. These fields are updated by transactions and cheques made to this vendor.
- hold?
- Hold expiry DATE
These fields display the hold status of the account that has been set in Automatic Cheque Processing à set vendor (or invoice) hold status. They are not accessible from this screen.
- contact
This is an optional field. Enter the name of the Accounts Receivable person at this company.
- remarks
This is an optional field used for information only. Enter any free-form message of up to 40 characters in length.
- Fin year end
Enter the day and month of the vendor’s fiscal year end in this reference field (for info only).
- Discount taken
- Discount lost
These fields are not available for change by the user. They are updated from cheques processed for this vendor. If prompt payment terms are in place and cheques have been issued in time to qualify for those discounts, then the amount of the discount is applied to the Discount Taken field. On the other hand, if prompt payment terms apply and the cheque to the vendor has not been in time to qualify for that discount, that amount is recorded in the Discount Lost field.
- G/L dist acct
If the part or service purchased from this vendor is always applied or expensed to the same General Ledger account, enter the number here. During accounts payable à transaction processing à Transaction Input, pressing [Enter] in the distribution area will default to this account number, reducing the number of keystrokes required.
In the case where the vendor is also a supplier of product for re-sale, then this account number should be the clearing account number set up in the 9.system utilities à 7. purchasing à 3. purchasing parameters reset àScreen 2. system configuration screen.
Notes for accounting personnel regarding inventory:
When inventory is received, the inventory account as set up in the associated 6.inventory à 1. data maintenance à 1. master files à 1. category master record is increased (debited). The opposite entry is to the clearing account (credited).
When the invoice has been received from the vendor, the distribution will remove the amount from the clearing account (debited) and increase (credited) the amount to the accounts payable control account.
When the inventory is sold, the value of the inventory account is reduced (credited) and the expense called cost of goods sold is increased (debited).
- PAYMENT due day
Depending on how the 9. system utilities à 3. system setup à 2. accounts payable à 1. system Parameters file is set-up, this field either indicates the number of days old that an invoice should be before payment is required, or on which day of the month following the invoice is due. The due date for an individual invoice can be changed during 2. accounts payable à 4. transaction processing à 1. Transaction Input.
- discount 1
- discount 2
- DiscOUNT inclUDE GST
These fields control how the prompt payment discounts work for this vendor. When the invoice is paid prior to the discount date entered during 2. aCCOUNTS payable à 4. transaction processing à 1. Transaction Input, these are the default discount amounts that will be applied to the invoice. Normally, discounts do not apply to the gross value of an invoice, but the net of GST amount of the invoice, so the field called disc incl gst should be set to [N]
- gst rate
If your vendors have been converted from another accounting package to counterpoint, field may be blank (all spaces). If that is the case, the GST rate from 9. system utilities à 3. system setup à 2. accounts payable à 1. system Parameters will be used. There is no need to change the value.
- edi vendor
- edi always
Both these fields are reserved for future use.
Tab Set
The TAB SET function can be a useful tool in making repetitious changes to a single field or to multiple fields.
If you want to change the value in a field regardless of what the current value is, then enter in that field number. If you need to check the current value of the field prior to making the change, enter in the field number before and then the field you want to change. In other words, if you want to change field [32] and you want to see what the current value is first, enter in 31 [enter] and then [32] [enter]. After each field number is entered, press [enter]. After all the field numbers that require changing are entered, [F1] to accept your choices.
Some field numbers will not be accessible to you for change due to their function within the software.
After acceptance of your field choices, you will be prompted for the vendor number. Pressing [F7] will bring up the first record on file. You will be brought to the first field you requested. If there is a no change to be made to any of the fields on this record, reject with [F2] and request the next record with [F7]. If there is a change to this field, make it now and press [enter] to either move to the next requested field or to the any change prompt. Once at the any change prompt, if the changes made are correct, [F1] to accept, then [F7] to request the next record.
You may [F2] to exit at any time, either in the middle of a record (the changes will not take effect) or instead of pressing [F7] for the next record. Any changes that you’ve made and accepted with [F1] will be kept. You may start again at any time, but you will have to re-select your requested fields.
Parameter File Maintenance
The parameter file is generally set-up by AMS personnel during the initial installation of the Accounts payable system. It is advised that no changes to it take place after the initial options have been chosen without first checking with AMS.
The 9. system utilities… à 3. system setup… à 2. accounts payable… à 1. system parameters File contains the GL information required by the system to correctly update the General Ledger. All transactions posed through AP find their way to the GL. The Parameters File ensures that all transactions are processed with a minimum of keystrokes. This file also stores the current GL period.
- A/P account
This is the liability account in the General Ledger where all outstanding invoices accumulate until paid.
- Discount earned account
Any discounts taken from supplier/vendor invoices are posted to this GL account.
- Bank account
This is the default GL account to record the payment of invoices.
- Gst credit acct
This account is updated with the amount of the GST on posted vendor invoices.
- Penalties account
If penalties are charged against a vendor, the amount of the penalty is updated to this account.
- Financial period
This period is the current month according to the AP system. Entries may be updated to a future period, but not a prior period. It is updated when the 2. ACCOUNTS PAYABLEà 8. month end processing à5. ap month end update procedure has completed.
- Cheque run date
This field is updated with each cheque run. When the 2. accounts Payable…à8. Month End processing… à5. ap month end update procedure is run this date is also updated. Cheques can not be dated for
any date prior to today’s date.
- last cheque no.
The system keeps track of the cheque numbers that are used in the 2.Accounts payable… à 6.automatic cheque processing steps.
- minimum cheque
In the case where a cheque amount is too low to print a cheque for, enter that number here. Entering 100 (for $1.00) here means that any cheque valued at less than $1.00 will not be printed but deferred until the value is greater than $1.00. This field may be over-ridden when completing the 2.accounts payable… à 6.automatic cheque processing… à4.cheque calculation step.
- last misc cheque
The 2.accounts payable… à5.Miscellaneous cheques processing function is usually used to record hand-written cheques. These cheques would have a separate numbering sequence from those used in automatic cheques.
- Gst rate
Enter in the current GST rate as 600 (6%)
- Days Type
You may select the type of payment terms; either proximo (a specific date in the next month) or days (number of days old) for payment to be due. If you enter [D], then when the vendor is added, the Pmt Due Day field will mean which Date in the following month will the default due day be. If you enter in [#], then the Pmt Due Date field in the Vendor file will be the number of days after the date of the invoice the due date will be. Only one of the two options may be chosen and works as a company wide default. There is no ability to change a vendor to have the opposite method.
The next three fields are used in conjunction with the 2. accounts payable…à 4.transaction processing… à2. Match PO receipts function. They indicate the type and amount of variance allowed before needing authorization.
- type
- base
- value
Reserved for future use.
- Penalties
A contract with a vendor may sometimes have penalties included for failure to supply. Indicate with [y] or [n] if you will use this feature.
- default cancel?
In the 2.accounts payable …à 7.bank reconciliation… à 2.bank reconciliation input function, you can have the cheques automatically set to a cleared [y] status and then alter the status for the ones that did not clear. Or, if you set this flag to [n], then the status on the cheques will be not cleared and the status will have to be changed for the ones that have cleared. This option can be changed at a later date if you feel the alternative is a better option.
- ACCOUNTS PAYABLE…à1. DATA MAINTENANCE…à2. PENALTY CODES
- code
Enter either a letter or number for this penalty.
- name
Enter a description of the penalty.
- type
The penalty can be a percentage [%] or a dollar value [$]
- Rate
Enter the percentage rate or dollar value that will be discounted from any invoice tagged with this penalty code.
History Data Purge
- ACCOUNTS PAYABLE…à1. DATA MAINTENANCE…à3. history data purge
History is kept for all vendor invoices and their associated payments in a separate file.
- Prior to date
Enter the date up to which you wish to purge. Entering [2009 12 31] will mean that all history for the specified vendor up to that date will be removed. Any history in the year 2010 and subsequent will be retained.
- Vendor
Enter the number of the vendor for which you wish to purge history, or press [enter] for all vendors.
Misc Cheque Processing
Misc Cheque Input
- ACCOUNTS PAYABLE…à5. MISC. CHEQUE PROCESSING…à1. MISC. CHEQUE INPUT
Miscellaneous Cheques are those written to a vendor that is not currently set up in as a vendor in 2. accounts payable à 1. data maintenance à 1. Vendor master, consequently the vendor name (payee) and address must be manually typed in. You may print the cheques or use hand-written cheques, whichever you prefer, but you can not mix the two together in the same batch. Entries may be made to the current financial period or one in the future, but more than one financial period in a batch is not permitted. Since this option is designed for cheques written to non-vendors, the majority of the fields are the same as if you were entering a vendor invoice for the first time.
- Cheque #
Press [enter] to accept the default cheque number taken from 9. SYSTEM UTILITIES à 3. SYSTEM SETUP à 2. Accounts payable à 1. SYSTEM PARAMETERS or enter the cheque number to use.
- date
Enter the date of the cheque. Because this process can be used to record cheques that were written earlier in the period, any date is allowed, even a date for a prior period.
- gross
Enter the amount of the cheque.
- fed tax amt
This amount will NOT be automatically calculated, it must be manually entered.
- Discount 1
- Discount 2
In a regular transaction, these amounts are calculated from the information contained on the vendor record. Since miscellaneous cheques are for those vendors without a vendor record, this process requires that any discounts taken be manually entered.
- fin period
Enter the financial period for the general ledger transactions that will be created during the update process. You may not use a financial period that has been closed in the General Ledger. You may use a financial period in the future, however you may not mix the financial periods in one batch. Should there be cheques to record from two separate periods, enter the cheques for one period first, and complete the steps through to update. Then repeat the steps for the second financial period.
- Payee
- Address
Enter the name and address of the vendor exactly the way you wish them to appear on the cheque form.
- Remarks
Enter remark you wish to have printed on the cheque in exactly the way you wish them to appear. There is no formatting for this field.
- Br / Account / Job num / D / Po no / Amount
Because miscellaneous cheques also record the vendor invoice at the same time as the cheque, the distribution that is required is to the expense portion of the transaction, not the bank as with manual cheques as entered in 2. Accounts payable à 4. transaction processing à 1. transaction input, type [2]. That is because the manual cheques are paying invoices already recorded in the system and therefore, the expense side has already been done.
Misc Cheque Edit List
- ACCOUNTS PAYABLE…à5. MISC. CHEQUE PROCESSING…à2. MISC. CHEQUE EDIT LIST
You may print the Edit List to verify your work before moving onto the next steps. As with other edit lists, a General Ledge Summary Edit List is also generated so that you may double-check the distributions of both the cheque and the invoice.
Misc Cheque Run – Create
- ACCOUNTS PAYABLE…à5. MISC. CHEQUE PROCESSING…à3. MISC. CHEQUE RUN-CREATE
If you are recording a hand-written cheque, you may skip directly to the Misc cheque Update step, however if you are now required to print the cheques you’ve entered, continue with the steps for Create, Align and Print before selecting Misc cheque Update.
The creation of the file for printing cheques has no other screen, simply select the option from the menu and the file will be created.
Misc Cheque Run – Align
- ACCOUNTS PAYABLE…à5. MISC. CHEQUE PROCESSING…à4. MISC. CHEQUE RUN-ALIGN
If you have switched paper on your printer in order to print the cheques, run the alignment option until you are satisfied with the set-up and then proceed to the Print option.
Misc Cheque Run – Print
- ACCOUNTS PAYABLE…à5. MISC. CHEQUE PROCESSING…à5. MISC. CHEQUE RUN-PRINT
Your cheques will be printed.
Misc Cheque Run – Update
- ACCOUNTS PAYABLE…à5. MISC. CHEQUE PROCESSING…à6. MISC. CHEQUE RUN-UPDATE
When all cheques have been recorded and printed, run the misc cheque Update option to post the information. A Transaction Journal and a General Ledger Summary Journal will be printed.
Transaction Input
Transaction Input
- ACCOUNTS PAYABLE…à4. TRANSACTION PROCESSING…à1.TRANSACTION INPUT
There are a number of types of transactions that are available from this input screen. Invoices and credits from the vendor are type [0] and the default if you simply press [ENTER]. Type [1] will allow you to enter a reversing transaction to an existing invoice and type [2] is used to record manual cheques against an existing invoice.
Type 0 - Invoice
- Vendor
Enter in the vendor account number or use the search function by pressing [TAB]. If you are using the search, enter in all or a portion of the vendor name followed by an [], then select the line number associated with the correct vendor in order to copy it back to the input screen.
If you are entering a number of invoices for the same vendor, you can press [ENTER] at this field to default to the last vendor number you entered.
- Type
There are a number of types of transactions that you are able to do from this input screen. Invoices from the vendor are type [0] and the default if you simply press [ENTER].
- Invoice
This is the vendor’s invoice number and can be either numeric or alphanumeric, up to 10 characters in length. The system will check to see if the same invoice number has been previously used for the same vendor and will then disallow its entry. However, it is possible to enter the same vendor/invoice number combination in the same batch, so caution is required.
- Invoice date
This is the date the invoice was issued by the vendor. It is used in the calculation of the due date, either with number of days or proximo days (a specific date in the month following) depending on how the flag is set in 9. SYSTEM UTILITIES… à 3. SYSTEM SETUP… à 2. ACCOUNTS PAYABLE… à 1. SYSTEM parameterS. The default date (what you get when you press [ENTER] through a field) is always today’s date.
- Reference
This is usually your own Purchase Order number, but the field is free form and could also remain blank.
- Payment days
The system will check the pAYMENT due day field that you have previously set up vendor record in 2. Accounts payable… à 1. DATA maintenance… à 1. vendor maSTER and use it as the default. If there are special terms for this particular invoice, then the payment days may be changed, either by altering the days field (number or proximo) field or by changing the actual date.
- DiscOUNT days
Following the same format as the payment days field, you can change this date or enter in the number of days in order to reflect the date that the payment is required by the vendor in order to receive the early payment discount.
- FinANCIAL period
In an Open Payables system, invoices may be posted or assigned to more than one financial period. While you can not backdate an invoice to a previously closed financial period, you may assign the invoice to a future period. You may not assign invoices to different financial periods within the same batch. If that becomes necessary, enter the invoices for one period; print the transaction edit List to check the entries and then transaction update to complete the processing. Then you may continue with the entry of invoices for the next financial period.
- Invoice amount
Enter the total of the invoice, including any taxes or shipping and freight surcharges.
- FedERAL tax amount
Press [ENTER] through the % field to default to the percentage of GST that is charged on this invoice. The amount of GST will be calculated. If the calculated amount is the same as on the vendor invoice, continue entry. If the amount calculated for GST is different than that of the vendor invoice, use the [f4] to return to the GST amount field, change it and continue.
- Penalties
Enter in the appropriate penalty code if you are using this feature as determined by the penalties? field in 9. SYSTEM UTILITIES… à 3. SYSTEM SETUP… à …2. ACCOUNTS PAYABLE à 1. SYSTEM parameterS. You can accept the calculated amount or percentage and amount set up from the codes in Penalties Maintenance, or change them as you wish.
Dist amount
This is the amount that needs to be distributed in the next section and is the subtotal of the fields above. It is a calculated field and may not be changed.
- Discount 1
- Discount 2
These fields will default to the percentages that have been set up in 2. Accounts payable à 1. DATA maintenance à 1. Vendor MaSTER and are applied to the invoice when the cheque date is on or prior to the discount date. The GL account number for discounts is set up in 9. SYSTEM UTILITIES à 3. SYSTEM SETUPà 2. Accounts payable à 1. SYSTEM ParameterS, so there is no need to specify that account in the next section.
Net amount
This is the total of the invoice amount, plus taxes and penalties; minus any discounts and will be the same as the amount to distribute. This amount may not be changed.
To distribute
The system will always calculate the net amount required to be distributed to the General Ledger and will not allow the transaction to be accepted for updating until the to distribute amount is at 0.00
- Br / Account
Enter the branch number (or just press [ENTER] for the default branch and then enter the account number you wish to have the invoice distributed to. If the default GL dist acct field has been set up on the vendor record in 2. Accounts payable à 1. DATA maintenance à 1. vendor maSTER, pressing [ENTER] here will default to that account. However, you can enter in any valid account number. This is NOT the Accounts Payable account number, by default that account is used automatically.
The tab search routines are available at the GL distribution (branch and account) fields. A tab in the br field will mean that the search will return accounts from all branches (for multiple branchs). A tab at the account field will return accounts from just the entered branch.
Job no / D / PO number
Reserved for future use
- Amount
Either press [ENTER] to apply the entire net amount of the invoice to the indicated account, or enter in the amount you wish to apply, then repeat until the to distribute amount is 0.00.
Type 1 – Debit Memo
Only fields that are different from Type [0] are listed here
- Type
For this section, the type is [1], indicating a debit memo, which reduces the amount owed to this vendor.
- Invoice
The invoice number must already have been posted for this vendor and the number entered here must exactly match the one that is on file, including leading zeros or spaces.
- Invoice amount
Enter the total of the debit memo, but do NOT enter with a [–] as the system already knows the sign of the document.
Type 2 – Manual Cheque
Only fields that are different from type [0] are listed here. Manual cheques are used to immediately record hand-written cheques, usually when you have to pay only one or two invoices that have previously been entered and updated to the vendor account.
- Type
For this section, the type is [2], indicating a manual cheque.
- Invoice
The invoice number must already have been posted for this vendor and the number entered here must exactly match the one that is on file, including any leading zeros or spaces. The remaining fields are defaulted to the values from the originating invoice.
- Reference
At the chg Hdr? prompt, enter in the field number for the Reference and enter in your cheque number. The same cheque number can be used to record the payment for more than one invoice.
- Br / Account
Press [enter] at the branch and account fields unless you wish to change the entry from the default GL account for the bank as set up in 9. SYSTEM UTILITIES à 3. SYSTEM SETUPà 2. Accounts payable à 1. SYSTEM ParameterS
Match P.O. Receipts
- ACCOUNTS PAYABLE…à4. TRANSACTION PROCESSING…à2.MATCH P.O. RECEIPTS
When a vendor invoice or credit has been received for goods processed through Purchasing or Returned Goods, the new menu option 2. accounts Payable à 4. Transaction Processing à 2. Match PO Receipts may be used to process the transaction and update the vendor account (in place of transaction processing à transaction input).
Transactions created in Match PO Receipts are updated to the vendor accounts in the same manner as regular Accounts Payable transactions using 2. Accounts Payable à 4. Transaction Processing à 4. Transaction Update. If there are regular A/P transactions not yet updated on file, they will be updated to the vendor account at the same time. Match PO transactions look identical to regular transactions on the vendor account. They also update to the General Ledger in the same way. The GL Summary Journal from 2. Accounts Payable à 4. Transaction Processing à 4. Transaction Update will show the offsetting entry to the A/P Clearing Account.
- po number
Press [enter] to bypass the field and enter the AP vendor number instead.
- vendor
Enter the vendor number to search the available purchase orders, the branch and date range are also required.
- branch
Enter the branch for the purchase order
- date from
- date to
Enter the date range ([enter] for the default dates).
A list of all unbilled PO’s available for the vendor and entered date range will be displayed. Select from the list each packing slip (one or more) that is to be matched. The amount shown on the screen is the total available for that packing slip. If the total amount is not what is being invoiced, enter the amount, and the detail for that packing slip is displayed to allow the selection of individual lines for that packing slip.
Continue until all desired packing slips have been accounted for, then press [f1] to return to the invoicing screen. When the header is accepted, the system will search for the originating transaction within the Purchasing system and automatically fill in the rest of the fields. Enter the invoice number and make any changes that may be required. Accept the entry with [F1]. Multiple AP invoices/credits are possible for the same PO until the total amount of the PO/RGM has been recorded as invoiced/credited. Once fully invoiced, an RGM or PO may not be not be used again in this function.
Transactions created in Match PO Receipts are updated to the vendor accounts in the same manner as regular Accounts Payable transactions using 2. Accounts Payable à 4. Transaction Processing à 4. Transaction Update. If there are regular A/P transactions not yet updated on file, they will be updated to the vendor account at the same time. Match PO transactions look identical to regular transactions on the vendor account. They also update to the General Ledger in the same way. The GL Summary Journal from 2. Accounts Payable à 4. Transaction Processing à 4. Transaction Update will show the offsetting entry to the A/P Clearing Account.
Transaction Edit List
- ACCOUNTS PAYABLE…à4. TRANSACTION PROCESSING…à3. TRANSACTION EDIT LIST
The Edit List process creates and prints the Transaction Edit List to provide you with the opportunity to check your work before proceeding. A GL Summary edit list will also print.
Transaction Update
- ACCOUNTS PAYABLE…à4. TRANSACTION PROCESSING…à4. TRANSACTION UPDATE
The Accounts Payable and General Ledger files are updated according to the information entered in transaction process à transaction Input and verified with the Edit List. Reports for the Transaction Update and General Ledger Summary Journal are printed.
FLAG RECEIPT FOR NO PAYMENT
- ACCOUNTS PAYABLE…à4. TRANSACTION PROCESSING…à5. FLAG RECEIPT FOR NO PAYMENT
AVAILABLE PURCH. FOR PAYMENT
- ACCOUNTS PAYABLE…à4. TRANSACTION PROCESSING…à6. AVAILABLE PURCH. FOR PAYMENT
Vendor Inquiries
Vendor Inquiry
- ACCOUNTS PAYABLE…à2. inquiry functions…à1.vendor
Enter the number of the vendor desired. A [tab] to search option is available from the vendor number field.
This option allows the user to check the current activity for each selected vendor. The screen displays year-to-date information as well as any currently outstanding invoices and the balance on the account.
Vendor History Inquiry – Summary
- ACCOUNTS PAYABLE…à2. inquiry functions…à2. history-summary
The Summary version of the Vendor History Inquiry allows you to enter a specific date for the vendor and view the invoices since that date. There is only one line per invoice displaying the invoice number, date and amount, any amounts for debit memos attached to this invoice, any payments made against the invoice, either automatic or miscellaneous, the balance of the invoice still owing, as well as the balance on the account.
Vendor History Inquiry – Detail
- ACCOUNTS PAYABLE…à2. inquiry functions…à3. history-detail
Enter in the vendor number and a starting date as with the summary version of this inquiry. The invoices are displayed in date order, and as well as the information in the summary version, the type and reference, discount information, due date, any penalties and cheque number information are also displayed.
batch history inquiry
- ACCOUNTS PAYABLE…à2. inquiry functions…à4. BATCH HISTORY INQUIRY
Enter in the BATCH NUMBER. The vendor, invoice, date, invoice amount, federal tax, discount, net information are displayed and by choosing a line will display the details of the batch.
Inquiry by Cheque Number
- ACCOUNTS PAYABLE…à2. inquiry functions…à5. CHEQUE NUMBER
Enter in the cheque number, and the vendor history record will be located and displayed. The information shown for invoice number, reference, date and amount are specific to that particular cheque number.
Inquiry by Invoice Number
- ACCOUNTS PAYABLE…à2. inquiry functions…à6. VENDOR INVOICE NUMBER
Enter in the specific invoice number. This inquiry has the same layout as the Vendor History Inquiry – Detail screen, however, only the specific invoice entered will be displayed with all of its associated information.
Vendor Hold Inquiry
- ACCOUNTS PAYABLE…à2. inquiry functions…à7. VENDOR HOLD
This option will display all vendors on file that are on hold for payment purposes for the selected date range. The date relates to the date that the hold will expire.
Invoice Hold Inquiry
- ACCOUNTS PAYABLE…à2. inquiry functions…à8. INVOICE HOLD
This option will display all invoices on file that are on hold for payment purposes for the selected vendor or vendor range.
Accounts Receivable
AR Month End
a checklist is provided with this documentation to assist you in the successful completion of the accounts receivable month end.
Set Statement Date
1. ACCOUNTS RECEIVABLE > 5. MONTH END PROCESSING > 1. SET STATEMENT DATE
The date should be the last date on which Invoices or other Transactions were processed, normally the last date of the month. The Accounts Receivable > ar Month End routines are run after the last business day of the month, and after the Sales desk control > Sales desk month End routines have completed. The AR Month End must be completed before the next End of Day process is run, and is designed to be run from start to finish at one time.
Service Charge Processing
Calculate Service Charges
1. ACCOUNTS RECEIVABLE >5. MONTH END PROCESSING >2. SERVICE CHARGES >1. CALCULATE SERVICE CHARGES
This program will calculate the Service Charges based on the figures that you have previously set up in 9. SYSTEM UTILITIES >3. SYSTEM SETUP > 1. ACCOUNTS RECEIVABLE > 1. SYSTEM Parameters , you may wish to double check the ensure that they are correct before you run this procedure for the first time.
Only those customers flagged [y] in the 1. accounts receivable > 1. data maintenance > 1. customer field number 55. Service charges will be considered for calculation.
Once the service charge calculation has taken place, do NOT use this option again, until and unless you have deleted all the system calculated service charges using the service charge adjustments process. If you do so, then customer records will be updated with duplicate service charges.
Service Charge Edit List
1. ACCOUNTS RECEIVABLE > 5. MONTH END PROCESSING >2. SERVICE CHARGES >2. SERVICE CHARGE EDIT LIST
This process will create and print a Transaction Edit List of all transactions entered/created for verification before updating and will also print a GL summary Edit List, which totals the proposed entries to the General Ledger during Update.
Service Charge Adjustments
1. ACCOUNTS RECEIVABLE >5. MONTH END PROCESSING >2. SERVICE CHARGES >3. SERVICE CHARGE ADJUSTMENTS
Any changes you wish to make to the calculated entries shown on the Transaction Edit List have to be done as a Change or Delete (to remove the service charge completely). The Add option will allow you create a Service Charge to a Customer’s account when none has been calculated and follows the same format as those processed in accounts receivable > transaction processing. Make sure that type [1] is chosen.
Service Charge Update
1. ACCOUNTS RECEIVABLE >5. MONTH END PROCESSING >2. SERVICE CHARGES >4. SERVICE CHARGE UPDATE
Press [ENTER] to continue if you are ready to update the Service Charge Transactions, then [ENTER] to start the Update. The screen will display the date and time as it completes each step. A Transaction Journal and a GL Journal will print automatically. Once the update completes, the service charge entries will appear on the customer account and can be displayed in accounts receivable > customer analysis screen.
Trial Balance Reports
Detailed Trial Balance
1. ACCOUNTS RECEIVABLE > 5. MONTH END PROCESSING >3. TRIAL BALANCE REPORTS >1. DETAILED TRIAL BALANCE
This report will print the Customer number and name, the document type and number, date, reference and the amount for any and all entries made to the customer during the period, or since the last open item purge completed. Each customer account is totalled, but there is no ageing on this report.
Open Item Purge
1. ACCOUNTS RECEIVABLE > 5. MONTH END PROCESSING > 3. TRIAL BALANCE REPORTS > 2. OPEN ITEM PURGE
This program will purge all fully paid items from the customer’s account. A fully paid invoice is one that has either a payment or Credit Memo applied against it, or a combination of the two in or to bring the net amount of the invoice or document to $0.00.
Aged Detail Trial Balance
1. ACCOUNTS RECEIVABLE > 5. MONTH END PROCESSING > 3. TRIAL BALANCE REPORTS >3. AGED DETAIL
The Detailed Aged Trial Balance report will age the amounts owing on the customer’s transactions based upon the criteria set up in the 9. SYSTEM UTILITIES > 3. SYSTEM SETUP > 1. ACCOUNTS RECEIVABLE > 1. SYSTEM ParameterS file. You may wish to check this to ensure it is correct prior to running these reports for the first time.
This report shows the customer number and name, the document number, date and reference, and the net amount owed on the account. Then the documents are aged as current, 30 days, 60 days, 90+ days and any future amount (if you used the cash receipts processing > Dating Terms function). The net amount and the aged amounts are totalled.
Aged Summary Trial Balance
1. ACCOUNTS RECEIVABLE > 5. MONTH END PROCESSING > 3. TRIAL BALANCE REPORTS > 4. AGED SUMMARY
The Summary Aged Trial Balance report will age the amounts owing on the customer’s transactions based upon the criteria set up in the 9. SYSTEM UTILITIES > 3. SYSTEM SETUP > 1. ACCOUNTS RECEIVABLE > 1. SYSTEM ParameterS file. You may wish to check the fields called summary aged totals prior to running this report for the first time.
This report shows the customer number, name and phone number, the documents/invoices are aged at current, 30 days, 60 days, 90+ days and any future amount (if you used the Dating Terms function) and the totals are printed.
Aged Detail Trial Balance – Alpha
1. ACCOUNTS RECEIVABLE > 5. MONTH END PROCESSING > 3. TRIAL BALANCE REPORTS > 5. AGED DETAIL - ALPHA
This is the same report as the Aged Detailed Trial Balance, but it prints in Customer Name order instead.
Aged Summary Trial Balance – Alpha
1. ACCOUNTS RECEIVABLE > 5. MONTH END PROCESSING > 3. TRIAL BALANCE REPORTS > 6. AGED SUMMARY - ALPHA
This is the same report as the Aged Summary Trial Balance, but it prints in Customer Name order instead.
Aged Detail by Salesman
1. ACCOUNTS RECEIVABLE > 5. MONTH END PROCESSING > 3. TRIAL BALANCE REPORTS > 7. AGED DETAIL BY SALESMAN
This is the same report as the Aged Summary Trial Balance with the customers by SALESMAN
Aged Summary Trial Balance by Salesman
1. ACCOUNTS RECEIVABLE > 5. MONTH END PROCESSING > 3. TRIAL BALANCE REPORTS > 8. AGED SUMMARY BY SALESMAN
This is the same report as the Aged Summary Trial Balance with the customers grouped by Salesman. After each salesman’s customers are printed, a total is printed for each of the ageing periods.
Here you would process your statements. Review the Statements documentation and resume from here.
Balance Forward Update
- ACCOUNTS RECEIVABLE >5. MONTH END PROCESSING >5. COMPLETE MONTH END >1. BALANCE FORWARD UPDATE
If you have balance forward customers, then use this option to take all the current invoices for each customer and combine them into one balance forward total. Once this step has completed, all details that have been displayed on the Customer Analysis screen will be removed and replaced with the balance forward figure.
Balance Forward Aging
1. ACCOUNTS RECEIVABLE >5. MONTH END PROCESSING >5. COMPLETE MONTH END >2.. BALANCE FORWARD AGING
Once the details have been combined to one value, the ageing process must take place, advancing each balance into the correct age, current, 30 days, 60 days and 90+ days.
AR Month End Update
- ACCOUNTS RECEIVABLE >5. MONTH END PROCESSING >5. COMPLETE MONTH END >3. a/r month end update
Once all steps are complete, the ar month end Update can commence. This option will advance the GL period for Accounts Receivable. If you want to confirm that the update has completed successfully, then check the accounts receivable > data file maintenance > AR Parameters File for the value in the Financial Period field.
SET STATEMENT DATE
1. ACCOUNTS RECEIVABLE > 5. MONTH END PROCESSING >5. COMPLETE MONTH END > 4. SET STATEMENT DATE
Set the statement date to the next month end for proper aging on the invoice screen.
Customer Counter Balances Reset
1. ACCOUNTS RECEIVABLE > 5. MONTH END PROCESSING >5. COMPLETE MONTH END > 5. COUNTER BALANCES RESET
Use this option to recalculate the customer’s ageing figures that appear at the bottom of the screen during sales desk > Invoicing/transfers. The statement date should be reset to the end of the new month prior to resetting the customer balances. Otherwise, any sales made in the new month will be considered as future.
AR Reports
Customer Master List (Numeric)
1. Accounts receivable >3. reporting >1.customer listings >1. customer master -numeric
This report shows most of the information from the Customer Record and is printed in numeric order based on the Customer code (number)
Customer Master List (Alpha)
1. accounts receivable >3. reporting >1.customer listings >2. customer master -alpha
This report shows most of the information from the Customer Record and is printed in alphabetical order based on the Customer name.
Customer Summary List (Numeric)
1. accounts receivable >3. reporting >1.customer listings >3. customer SUMMARY-NUMERIC
This report shows the Customer number, name, and phone number, as well as the complete address (all three lines) and postal code (you entered this in the 4th address line) in numerical order based on the Customer code (number).
Customer Summary List (Alpha)
1. accounts receivable >3. reporting >1.customer listings >4. customer SUMMARY-ALPHA
This report shows the Customer number, name, and phone number, as well as the complete address (all three lines) and postal code (you entered this in the 4th address line) in alphabetical order based on the Customer name.
Shipping Address Report
1. accounts receivable >3. reporting >1.customer listings >5. SHIPPING ADDRESS REPORT
This report prints in Customer number order and shows the Customer number and name, and the code and addresses set up in data file maintenance > Shipping Addresses Maintenance.
VIP CUSTOMER LIST
1. accounts receivable >3. reporting >1.customer listings >6. VIP CUSTOMER LIST
This programme needs the input range of VIP Customers numbers and a selection of a print order. The order may be “V” for VIP no order, “A” for VIP name order, “T” for telephone order, “C” for Cell phone order or “N” for card # order.
Customer List by Salesman
1. accounts receivable >3. reporting >1.customer listings >7. CUSTOMER LIST BY SALESMAN
This is the same report layout as the Customer Summary List, except that in this report, you can select any or all territory and/or salesman to limit the list. If you choose to print all territories and salesmen, then the report is sorted numerically by salesman number, with a page break between salesmen.
Customer List by industry
1. accounts receivable >3. reporting >1.customer listings >8. CUSTOMER LIST BY INDUSTRY
This is the same report layout as the Customer Summary List, except that in this report, you can select any or all industry types in order to limit the list. If you choose to print all industries, then all customers for all industries will be printed, grouped by industry.
INACTIVE Customer LIST
1. accounts receivable >3. reporting >1.customer listings >9. INACTINVE CUSTOMER LIST
The customer record is updated with a last sale date with each invoice. This report will show all customers having no sales after the date you enter. The report prints the customer number, name and phone number, the account balance and aging in summary, including any future amount and the date of the last sale.
Customer Mailing Labels
1. ACCOUNTS RECEIVABLE >3. REPORTING >3. LABEL PRINTING >1. CUSTOMER MAILING LABELS
The standard format for customer mailing labels is 3-1/2” x 15/16” 1 wide
- Starting Customer
- Ending Customer
Select the individual customer or range of customers. Pressing [enter] through these fields will default the selection to all, or from the beginning to the end of the customer records.
- Starting Territory
- Ending Territory
Select the individual territory or range of territories. Pressing [enter] through these fields will default the selection to all territories.
- Starting Salesman
- Ending Salesman
Select the individual salesman or range of territories. Pressing [enter] through these fields will default the selection to all salesmen.
- Include Ship-to’s
Reply [y] if you wish to have a mailing label for the customer’s shipping addresses as set up in data file maintenance > shipping address maintenance.
- Days Overdue
You can further limit the selection of customer labels to print if you wish to only send to those customers with an outstanding and overdue account status. Enter the number of days a customer account is to be aged before being considered for this selection.
- Specify Categories
If you only wish to send a mailing to customers having purchased a specific product line (category) then reply [y]; otherwise all customers regardless of their purchase history will be selected for labels, as long as they also fulfil the other selection criteria.
- – 20. Categories:
You may enter up to six categories.
vip mailing labels
1. ACCOUNTS RECEIVABLE >3. REPORTING >3. LABEL PRINTING >2. VIP MAILING LABELS
This programme allows the entry of a range of VIP customers. This is a create programme and would be printed from the CUSTOMER MAILING LABELS–ALIGN/PRINT
Label AlignMENT TEST
1. ACCOUNTS RECEIVABLE >3. REPORTING >3. LABEL PRINTING >3. LABEL ALIGNMENT TEST
Place the forms in your printer and use this option to align them and then print when the alignment is correct.
Customer Over-Due Report – Summary
1. ACCOUNTS RECEIVABLE >3. REPORTING >2. CREDIT REPORTS >1. SUMMARY OVERDUE
- Starting territory
- Ending territory
Select the individual territory or range of territories. Pressing [enter] through these fields will default the selection to all territories.
- Starting salesman
- Ending salesman
Select the individual salesman or range of territories. Pressing [enter] through these fields will default the selection to all salesmen.
- Days overdue
You can further limit the selection of customer to print on this report if you wish to only include those customers with an outstanding and overdue account status. Enter the number of days a customer account is to be aged before being considered for this selection.
- Date for Aging
Enter the date upon which to calculate the overdue status of the account.
This report has a similar layout to the Ar month end > trial balance reports > aged Detail Trial Balance, showing the customer number, name, contact and phone number, the last payment date and amount, and a summary of the account with the overdue amount and account balance.
DETAIL OverDue
1. ACCOUNTS RECEIVABLE >3. REPORTING >2. CREDIT REPORTS >2. DETAIL OVERDUE
This report has a similar layout to the Ar month end > trial balance reports > aged Detail Trial Balance, showing the customer number, name, contact and phone number. The last payment date and amount, and the details of each invoice with the overdue amount and account balance are also printed for each customer
Over Credit Limit Report
1. ACCOUNTS RECEIVABLE >3. REPORTING >2. CREDIT REPORTS >3. CREDIT LIMIT REVIEW
This report will list all customers with outstanding balances greater than that of the credit limit amount set on the customer record. You can include customers with no credit limit (cash customers) if you wish.
This report prints the customer number and name, the salesman, the balance of the account and the credit limit from the data file maintenance > customer maintenance record, as well as calculating and printing the amount over the credit limit. Any future amount is printed as well should you have used the transaction processing > Dating Terms function.
CUSTOMERS ON HOLD
1. ACCOUNTS RECEIVABLE >3. REPORTING >2. CREDIT REPORTS >4. CUSTOMERS ON HOLD
This report all customers on credit HOLD or COD.
PAYMENTS REGISTER
1. ACCOUNTS RECEIVABLE >3. REPORTING >2. CREDIT REPORTS >5. PAYMENTS REGISTER
This report shows the monthly payments by customer, invoice number, date, amount, discount.
AR Year End
A/R YEAR END UPDATE
- ACCOUNTS RECEIVABLE >6. YEAR END PROCESSING >1. A/R YEAR END UPDATE
This program clears the Year-To-Date sales figures on the customer record. It must be run immediately following the completion of the final month end procedures for the year.
SALES SUMMARY YEARLY CLEAR
- ACCOUNTS RECEIVABLE >6. YEAR END PROCESSING >2. SALES SUMMARY YEARLY CLEAR
This function will clear the Year-To-Date salesman figures as seen in Salesman Maintenance.
SUB-SYSTEM YEARLY CLEAR
- ACCOUNTS RECEIVABLE >6. YEAR END PROCESSING >3. SUB-SYSTEM YEARLY CLEAR
This function will clear the YEAR-TO-DATE total from SUBSALES used in sales by category type.
Cash Receipts Processing
Cash Receipts Input
1. ACCOUNTS RECEIVABLE > 4. TRANSACTION PROCESSING >5. CASH RECEIPTS PROCESSING >1. CASH RECEIPTS INPUT
The receipt of monies from a customer in order to pay their account may be accomplished either at the till/counter through sales desk > invoicing/transfers or through cash receipts processing in accounts receivable.
Enter in the customer number for the payment you have received, the contact from the customer record will be displayed. The date will always default to today’s date. If you enter another date, be aware that each record after this one will duplicate that date, unless you specifically change it. Enter in a reference number (usually the customer’s cheque number) and the amount of the payment being made.
If you use separate gl accounts for the different types of payments received in sales desk > Invoicing/transfers, you can use those same codes here to indicate the type of payment that was received. The choices are [c] cheque [$] CASH [D] DEBIT [V] VISA [M] MASTERCARD. Other payment methods are available if you have set them up in 4. Sales desk > 7. ADMINISTRATION > 1. DATA maintenance > 2. credit card. If you only have one GL account for your bank, then you may choose to simply accept the default [c] for cheque.
You will notice that the left to allocate figure is set to the same amount as the amount received.
If the Cash rec autopay (FIELD 43) flags in the 9. SYSTEM UTILITIES > 3. SYSTEM SETUP > 1. ACCOUNTS RECEIVABLE > 1. SYSTEM ParameterS screen is set to [N], then you can choose whether or not to apply the payment to the oldest invoices first. If you choose to not automatically apply the payment, then you will need to pick and choose the invoices to be paid, entering in the gross amount (usually accepting the value there, unless this is a partial payment) and any discount that may apply to the invoice.
If the customer is an Open Item customer, then the screen will display the first 12 outstanding invoices on file. When the amount to allocate is 0.00, pressing F1 may complete the entry.
If you have turned on the flags for Cash Rec autopay in the Parameter file, then the oldest invoices will be shown as automatically paid, with any partial payments being applied to the more recent invoice.
If the customer is a Balance Forward customer, and the Cash rec autopay flag is set to [N], then you will have to decide whether or not to pay the oldest balance first in the same manner as an Open Item customer. If the Cash rec autopay flag is on, then the oldest balance will be paid automatically. You are always given the option of changing what the system has done before the record is accepted.
If a payment is received and it is unknown at the time of entry which invoices are being paid, enter the amount to the UNAPPLIED line. Application of the payment to the appropriate invoices may be done at a later date.
Cash Receipts Edit List
1. ACCOUNTS RECEIVABLE > 4. TRANSACTION PROCESSING >5. CASH RECEIPTS PROCESSING >2. CASH RECEIPTS EDIT LIST
This (optional) program will create and print a Cash Receipts Edit list of all transactions entered so that you can verify your entries before updating. A GL Summary Edit list will also print, which totals the amounts that will be posted to the General Ledger during the cash receipts Update process.
When you press [Return] to begin, the date and times that the process completes each step will be displayed.
Cash Receipts Update
1. ACCOUNTS RECEIVABLE > 4. TRANSACTION PROCESSING >5. CASH RECEIPTS PROCESSING >3.. CASH RECEIPTS UPDATE
The start of any Update program begins with an extra screen display to alert you to the fact that the Update has been selected. If you do not wish to continue, press the [F2] key to exit this screen and reply [N] to the next prompt.
If you do wish to continue, then press [enter] to get to the next step:
As with Cash Receipts Edit, once you have replied [Y] that you want to start the update, the date and times of each step will be displayed upon completion of that step. You will receive a Cash Receipts Journal and a GL Journal when all steps are complete. If the update fails to complete properly, please note any error message on the screen and contact the Support Department at AMS. You will not be able to do another update until the problem is resolved.
Apply unapplied cash
1. ACCOUNTS RECEIVABLE >4. TRANSACTION PROCESSING >5. CASH RECEIPTS PROCESSING >4. APPLY UNAPPLIED CASH
Use this screen to apply payments that have not previously been applied to invoices and/or transactions or those payments taken at the counter through the sales desk > Invoicing/transfers process. This option applies only to open item customers.
The amount of unapplied cash is displayed and matches the amount to allocate. Either accept with [f11] the amounts as displayed or change the to allocate amount to be the appropriate amount. Once the header has been accepted, the unpaid invoices are displayed and you can indicate whether or not to pay them and how much to apply to each one. Once the amount to allocate is 0.00 the transaction can be completed and not before.
The allocation of the unapplied cash takes affect on the customer account immediately. There is no report generated by this function.
Unapplied cash listing
1. ACCOUNTS RECEIVABLE >4. TRANSACTION PROCESSING >5. CASH RECEIPTS PROCESSING >5. UNAPPLIED CASH LISTING
This is a report showing all of the payments within the Accounts Receivable system that are as yet unapplied to specific invoices or balances. The report shows the customer number and name, the date of the payment, the reference if any, and the amount of the unapplied payment.
Payment history inquiry
1. ACCOUNTS RECEIVABLE >4. TRANSACTION PROCESSING >5. CASH RECEIPTS PROCESSING >6. PAYMENT HISTORY INQUIRY
Use this function to display a customer’s paid invoices between dates that you specify or from the first date on file to today’s date if the default dates are accepted (by pressing enter through the field). If the reference number (usually the cheque number) is known, it may be entered as well. If the reference field is left blank, all references will be included.
Payments processed in accounts receivable cash receipts and payments applied in the apply unapplied cash function are available for inquiry. The reference number, payment date, and discounts applied, the original invoice amount, the original invoice date and the method of payment are displayed. A [?] is used as a method of payment for all invoices paid as part of the apply unapplied cash process.
Customer Analysis
1. ACCOUNTS RECEIVABLE > 1. INQUIRY FUNCTIONS > 1. CUSTOMER ANALYSIS
These screens will provide an overview of the AR customer’s financial position with your company.
The customer must already exist, and the information displayed here comes from the customer record you have previously set up. At the bottom of the screen show detail Y/N is displayed. Reply [Y] to have the customer’s outstanding invoices displayed. If the customer is a balance forward customer, then any outstanding invoices prior to the current month will have been summarised into the bal. Fwd figure at the top of the detail screen.
From the detail screen, you can enter [E] to return to the menu, or [Q] to quit this customer and then enter in another customer to retrieve their information.
Customer Notes Inquiry
1. ACCOUNTS RECEIVABLE > 2. INQUIRY FUNCTIONS >3. CUSTOMER NOTES INQUIRY
Enter in the customer number and press [enter]. Indicate the type of note to inquire into. If un-sure of the type, pressing [enter] at the type will display all notes associated with the selected customer, in date order (regardless of type). When a specific type is selected, only notes of that type will be displayed.
The [A] option within the inquiry screen will take the user to add notes feature.
Customer Notes Maintenance
1. ACCOUNTS RECEIVABLE > 1. DATA MAINTENANCE >6. CUSTOMER NOTES
Providing that the note types have previously been set up using the menu option 9. SYSTEM UTILITIES > 3. SYSTEM SETUP > 1. ACCOUNTS RECEIVABLE > 3. NOTES PARAMETERS,
free-form notes may be added for any customer currently on file.
There are a total of 6 note types, spread across two styles: reserved and non-reserved, with a maximum number of reserved note types of three (3). In future releases of the software, reserved notes will be accessible with hot/function keys from inside various processes (example: invoicing / cash receipts etc.)
A TAB to search is available from the customer number field. Only A/R customers are available for notes, not VIP customers. The note is date and time stamped and the user is prompted to classify this note with a particular type.
When sorting the order of note types displayed during maintenance, reserved notes are listed first, in the order in which they have been entered in the parameter file. After reserved types, numeric and then upper case alphabetic types are listed, and finally lower case alpha types. Reserved note types are indicated with after the code.
There are 6 text fields available for the free-form note, contained on three lines numbered [1] [2] and [3]. The first line has 2 fields; the first is 40 characters in length, followed by 36 characters in the second field. The same applies to the next 2 lines. Should the note extend further than the number of characters available in any one field, the note will automatically be wrapped to the next one.
Word wrapping is done on a letter by letter basis, meaning that a single word may be split across two lines. No hyphenation of the split word is done. Pressing [enter] anywhere on a line will advance to the beginning of the next section, either on the same line or on the next. When the note text has been completed, press [enter] to complete the field, then [F1] to accept.
Changes are allowed at the any change? prompt. Entering the line number for change will bring the user to the beginning of the line. Changes are ALL overtype mode, meaning as soon as typing begins in a field/section, what is currently written will be over-written. If the first field of the line requires no change, pressing [enter] will advance to the beginning of the second field/section on that same line. Changes to notes are also available from the change notes menu option. A note that has been assigned to a reserved type may still be deleted.
Customer Search
1. ACCOUNTS RECEIVABLE > 1. INQUIRY FUNCTIONS > 2. CUSTOMER SEARCH
Enter in the customer name or portion of the customer name followed by the [] to pinpoint the starting place for the search. Enter in only [] in the customer number to start the search at the beginning of the customer file.
If there are multiple customers that are displayed, you can press [enter] or [N] [enter] to advance to the next page.
Data File Maintenance
Customer File Maintenance
1. ACCOUNT RECEIVABLE > 1. DATA MAINTENANCE > 1. CUSTOMERS > SELECT ADD/CHANGE/DELETE AS APPROPRIATE
Account #
When adding new customers, you must first specify the customer number to be used. In 9.SYSTEM UTILITIES…-> 3.SYSTEM SETUP…-> 4. SALES DESK…-> 2. PARTS BILLING PARAMETERS , (Screen 1) FIELD 13 CUSTOMER CODE the type of customer code is selected. You should have indicated which type of customer code you want your countermen to be using, alphanumeric or numeric - (A for alphanumeric is recommended).
If you have chosen alphanumeric, then entering 1000 as the customer will mean that the customer number will be entered as 1000 throughout the system. If the customer number type is numeric only, then 1000 will mean 001000 and the leading zeros will have to be entered.
Start with a number greater than 100, since accounts numbered less than 100 have special uses. (See the explanation for the field Sales Summary number # later on in this section)
Once entered, the customer code may not be changed, although the entire customer record may be deleted under the correct circumstances.
- Name
- Bill to
Enter these fields in the format you wish to have printed on invoices and statements. Use the 4th line of the Bill to field for the customer’s postal code.
- AR method
Enter in either [O] (open item) or [B] (balance forward). For Balance Forward customers, the application of payments is very simple, but the ability to justify or reconcile specific invoices is more difficult.
At the end of the month, customers that have been set to balance forward will have all current invoices summarised into one amount. The aged amounts for 30, 60 and 90 days are kept, but all invoice detail is removed. No detail is removed for outstanding invoices for customers that are set to open item.
You may wish to assign some customers to balance forward, while keeping others at open item. Should you desire to change a customer from one method to another, you may do so only immediately following the completion of the AR Month End process, prior to any Cash Receipts or End of Day process. The function is found in
9. SYSTEM UTILITIES > 9. FINANCIAL SUB-SYSTEM > 1.OPEN/ITEM BAL. Fwd. Switch.
- Phone
- Fax
Phone and fax numbers are to be entered without any formatting and will print with dashes between the sections. If the module called Repair Shop has been installed on your system, then the fax number can be used during invoicing to locate a customer.
- LD?
Enter [y] to indicate a long distance number, [n] to indicate a local number.
- Contact
Enter in the primary contact for this customer.
- Salesman
This is a validated field, which means that the salesman number must have already been created in
1. ACCOUNTS RECEIVABLE >1. DATA MAINTENANCE > 4. SALESMAN
prior to being able to use it here. Validation also means that the salesman number may not be changed at the time of billing (point of sale) to a number other than a valid one. A [TAB] to search for a valid salesman number is available.
Once sales have taken place, a change to this field will affect those sales reports that are created out of the month end process. However, daily sales reports will not be altered, keeping the sales rep information from the invoice as it was created.
- Territory
You may wish to divide or assign your customers to specific territories. These fields are used in the Sales Analysis reports to separate the customers. This is NOT a validated field and so may be left blank or set to any value.
- Start Date
Pressing [enter] will default the date to today’s date, reflecting the starting date of your business relationship with this customer.
- GST Lic. #
An entry of any kind in this field exempts this customer from GST taxes on all sales.
- PST Lic. #
An entry of any kind in this field exempts this customer from PST taxes on all sales, including end user levies (e.g. battery tax etc) that have been set up in
4. SALES DESK >7. ADMINISTRATION > 2.CUSTOMER PRICING > 6. LEVY/ECO FEE
- Remarks
Enter in any remarks to display (but not print) when looking up the customer in
1. ACCOUNTS RECEIVABLE >2. INQUIRY FUNCTIONS >1. CUSTOMER ANALYSIS
or billing the customer in
4. SALES DESK > 1. INVOICING / TRANSFERS
- Default Shipper
Enter in the customer’s preferred method of shipping.
- Standing PO
If the customer wishes to have one PO for all purchases within a given time, enter it here. It will be the default to the PO field in Sales/Invoicing.
- Start
Enter start date for Date Limited PO
- End
Enter end date for Date Limited PO
- Industry Reporting Group
In the same way that the territory field is a way of assigning specific customers together in a group for sales reporting purposes, the industry type allows a different grouping to be created. The individual types are created in 5. Sales and core analysis…. > 1. data maintenance….> 7. industry types and therefore this is a validated field. Press [TAB] to search for the appropriate industry to select.
- Default Payment Terms
This is a validated field, with the codes being set-up in 1. accounts receivable… > 1. DATA maintenance…> 3. payment terms. Use [TAB] to search for appropriate terms code. If this field is blank, then the invoice generated will use the default payment terms that are set-up in the 9. SYSTEM UTILITIES…-> 4. sales desk…-> 2. PARAMETERS FILE RESET > Screen 2: user configuration (FIELD 21 Terms). Regardless of what the individual invoice shows, all invoices are aged by invoice date, there is no due date calculated by the system.
- Default Invoicing Branch
- Account Control Flags
Select up to 8 (eight) options which will apply to this customer, pressing [enter] until the next field is reached. Available options are:
$ - COD Customer
Adding this flag indicates that the customer’s preferred method of payment is COD. At the time of billing (point of sale) the individual invoice may be altered to have a payment type of account, providing that the customer is not overdue and not over the assigned credit limit.
P – Purchase Order is Required
This indicates that either your business or the customer requires all purchases to have a purchase order. If this flag is set, then a PO must be entered at the time of billing (point of sale). If the standing PO field has been assigned, then that number will become the default.
U – US Dollar Account
Invoices generated to US customers are generated and charged to the customer account in Canadian dollars. When the cash receipts are updated, monies received are sent to a separate account in the General Ledger. Please advise AMS if you have US customers.
B – No Backorders
This customer does not permit backorders.
Y – Price the Packing Slip
If using packing slips, prices will be printed.
# - Add customer to special sales report
If you wish to run sales and core analysis > comparative reports > Territory/Selected customer/category then add the [#] here to ensure that the data will be collected.
m – (Lower Case) Multiple Invoice Copies
Multiple invoice copies are required at billing time. If this flag is added to this field, the functionality of the ME invoices field further down changes. In the ME invoices field, enter in the number of copies that are required in total. Each time an [I] invoice, [r] refund [c] payment or [t] voided payment type invoice is created, a duplicate invoice will print immediately following the original.
Use of this flag fundamentally changes the concept of the ME invoices field below. When this flag is set, no invoices are copied for use during 1. accounts receivable…> 5. month end processing…>4. create statements…> 5. invoice copies.
W - Warranty
This is a warranty customer. This option is only required if the module Service Dispatch is being used.
c – (Lower Case) Consignment Inventory Customer
This flag must be set to mark a customer as being one that holds consignment inventory. The consignment features will not work until this is set.
I – Prorated Customer
The presence of this flag will indicate that this customer is a cross province customer and thus subject to special taxation rules.
v – View Balances
If this feature is activated, the customer account balances shown during billing will not
be displayed.
- Overdue Control Flag
In the parameter file, you should have already indicated the default setting on whether an overdue status on the account will result in the accounts being placed on HOLD or COD. This field determines the number days overdue this specific account must be in order to activate either the HOLD or COD. [1]=30 days, [2]=60 days, [3]=90 days. If you wish to ignore the overdue day processing and manually place customers on HOLD or COD, use [0] or [9] in this field.
If you are going to use this feature, please be sure to advise AMS so that your End of Day processing can be configured to correctly update the customer record with the appropriate information.
If the default is to place the customer on COD, then cash sales to this customer will be permitted, but not charges to the account. However, if the default is to place the customer on HOLD, then only Return and Received on Account type transactions will be permitted.
Payments received in the office and applied to the customer account in 1. Accounts Receivable…> 4. transaction processing…>5. cash receipts processing will automatically update the COD/HOLD status on the customer record. This is the field called rating, which can be manually adjusted as long as this field is set to [0] or [9] for ignore.
- Sales Summary Number
The sales summary number is used for those customers who do not require individual Sales Analysis Reporting, perhaps due to volume or frequency of purchases.
In order to use this field, you must have first set up a customer record, using a customer number of less than 100. An example of the functionality of this field is when you have a number of clients of a similar nature, for example farmers. The sales for each individual customer may not be of significance, however when grouped together, the volume or value would be considerable. If you wish to have this customer’s sales merged with those of like types, enter the customer number of your summary account. This only affects sales reporting dollars. All accounting information belongs with the individual customer.
- Allow Contract pricing
Before a special or contract price is set-up in 4. sales desk control… > 7. ADMINISTRATION…> 2. CUSTOMER PRICING …> 3. contract/specials, the customer must be flagged as being permitted to have a contract price. If the customer is not permitted to have contract or special pricing, reply [N]. A special or contract price is different than the other pricing discounts, in that a contract or special is normally for a specific item or range of items within a category or product line and is also date driven.
- Global Discount type
This field could also be called discount group since the choices available for selection are set-up in 4. sales desk…> 7. ADMINISTRATION… > 1. DATA maintenance… > 4. discount LEVELS. A discount group is usually the most general pricing available. It is based on a discount or surcharge on either a specific or all categories for a specified price level. Each customer can then be placed into a specific group, using [tab] to locate the most appropriate one. All customers within that group will be charged the same price for any item within the category, unless a more specific pricing discount over-rides the group. (See the Sales Desk Control User Guide for further information on pricing).
- Prefer Quotation Via
Click the down arrow to open help window. Quotation preference are: E = Email; F= Fax; P=Print
- Credit Limit
This is the maximum amount of credit you wish to extend to this customer. If this is a COD customer or if you are not concerned with the amount this customer will owe at any one time, use [0] to indicate OPEN credit, that is – no limit. Once a customer has charged a sale to their account that takes them over their credit limit (a message will be displayed for the countermen), no further sales activity is permitted on the account until there is an available credit amount. This is displayed at the bottom of the billing screen as the AVA value. The office may raise the credit limit, or the customer may provide a payment to be processed through 1. accounts receivable… > 4. TRANSACTION PROCESSING …> 5. cash receipts processing. As soon as the cash receipts update is complete, further sales activity is again permitted.
- Rating
If the 9. SYSTEM UTILITIES…> 4. SALES DESK… > 2. Parameter File RESET > SCREEN 1 : system defaults field called cust credit check (fielD 19) is set to [Y], then this field will be automatically updated with each End of Day and Cash Receipts update to reflect the status of the account. This field works in conjunction with the field called overdue control flag.
If this customer is always a cash only customer, you may manually enter in [COD]. If this customer is no longer permitted to purchase from you for any reason, manually enter in [HOLD]. If you are manually entering in the rating of this customer, then you must set the field above called overdue control flag to either [0] or [9] for ignore, otherwise the overdue status may change and thus this field would be automatically updated.
This process is completely separate from that of the credit limit processing. It is possible for the customer to be both over their credit limit and on HOLD/COD because of their overdue status.
- Allow Prompt Pay Discount
If you wish to give this customer a discount for the early payment of invoices, enter [y]. If this customer is not to receive an early or prompt payment discount, enter [n].
- Max Number of Days
- Discount
These fields default to the information set-up in 9. SYSTEM UTILITIES… > 3. SYSTEM SETUP… >1. ACCOUNTS RECEIVABLE… > 1. SYSTEM parameterS (FIELD 36) and cannot be changed.
- Require Statement
Is this customer to receive a statement at month-end? Y OR N
- Service Charge
Is the customer to be charged a service charge on over-due amounts?
- M/E Invoice Copies
This field has two separate and distinct uses. Use of the [m] flag in the acct control flag above fundamentally changes the concept of this field.
It can be used exclusively during the accounts receivable > a/r month end > statements > invoice copies optional step to create an extra invoice copy to be sent with the statement. If that is the case, enter [1] here. In that instance, each invoice generated will have a copy added to a separate file for use during the month end processes.
It can also be used in conjunction with the [m] flag in the acct control flag field above. When that flag is present, the invoicing process will look to this field for the total number of invoice copies to print immediately following the printing of the original invoice. If an extra copy is required, enter [2] here, meaning that a total of 2 invoices will print at the time of sale, the original and 1 extra copy. Since the extra copy(s) have already been printed, no copy is added to the separate file for use at month end.
- Redirect To
If used, the customer number in this field represents the parent company for this customer. The customer may be a head office, or it may be the office of a buying association. This is different than having multiple ship-to addresses for the same customer. In that instance all sales dollars are reported to the same customer. In this situation the sales dollars belong to the individual customer, while the invoices are all charged to the parent or head office account and paid by them. If this situation applies, enter the customer number of the parent/head office account.
Customer Credit Control
Available from the any change prompt, customer credit control provides a summary view of a customer’s purchase and credit information for the current period, year to date and last year. Either while adding a new customer or editing/changing an existing customer, the customer credit control may be accessed by selecting the c)redit control at the any change prompt.
This information is for inquiry only and is updated automatically by the point of sale end of day, accounts receivable cash receipts update and accounts receivable transaction update.
The accounts receivable month end clears the Current Period values and the accounts receivable year-end clears the year to date values and moves them to last year.
Definitions:
Current Period, Year to Date, Last Year
Invoice amt Total of invoices processed through point of sale modules
No of invoice Total number of invoices processed through point of sale modules
Payment amount Total of all payments received through accounts receivable cash receipts and point of sale
modules
No of paymts Total number of payments received through cash receipts and point of sale
Cred.note amt Total of all credit notes processed through point of sale modules
No of cred.nts Total number of credit notes processed through point of sale modules
Debt.note amt Total of all transactions posted through accounts receivable transactions
No of debt.nts Total number of transactions posted through a/r transaction input.
Discounts amt Total of all discounts given through a/r cash receipts
No of discnts Total number of discounts given through a/r cash receipts.
Interest amt Total of all service charges applied as part of the a/r month end
No of int.chg Total number times service charges applied as part of the a/r month END.
Curr Year Largest, Last Year Largest
Inv amt Largest total invoice value for the period
Date Date of the largest invoice
Bal amt Largest outstanding balance for the period including future due amounts.
Date Date of the largest outstanding balance
Date of Last
Adjustmt Date of last accounts receivable transaction entry
Cust mnt Date of last change to the customer information
Interest Date of last service charge
Statement Date of last statement
Invoice Date of last invoice through point of sale modules
Cr note Date of last credit note through point of sale modules
Payment Date of last payment through a/r cash receipts or point of sale parts billing
Paymt amt Amount of the last payment
Total no of invoices paid Total number of invoices paid in the current year.
Last year average pay days Average days to receive payment of an invoice.
This is only applicable to Open Item customers
Customer Pricing Control
The second feature available at the any change prompt during customer maintenance (either add or change) is p)ricing. Selecting this option will display all discount structures associated with this particular customer. Industry type or global discounts are displayed first, followed by customer specific discounts.
The user may choose to select either d)iscounts or c)ontract pricing from this screen, and will be redirected to sales desk control > file maintenance > customer discount maintenance or sales desk control > file maintenance > Contract/special pricing maintenance in order to enter new discounts or contract/special pricing, alter existing discounts for this specific customer number, or delete un-necessary discounts. In all cases, the customer number during discount processing will default to the current customer.
tab set
The TAB SET function can be a useful tool in making repetitious changes to a single field or to multiple fields.
If you want to change the value in a field regardless of what the current value is, then enter in that field number. If you need to check the current value of the field prior to making the change, enter in the field number before and then the field you want to change. In other words, if you want to change field 32 and you want to see what the current value is first, enter in 31 [enter] and then 32 [enter]. After each field number is entered, press [enter]. After all the field numbers that require changing are entered, press [F1] to accept your choices.
Some field numbers will not be accessible to you for change due to their function within the software.
After acceptance of your field choices, you will be prompted for the customer number. Pressing [F7] will bring up the first record on file. You will be brought to the first field you requested. If there is a no change to be made to any of the fields on this record, reject with [F2] and request the next record with [F7]. If there is a change to this field, make it now and press [enter] to either move to the next requested field or to the any change prompt. Once at the any change prompt, if the changes made are correct, [F1] to accept, then [F7] to request the next record.
You may [F2] to exit at any time, either in the middle of a record (the changes will not take effect) or instead of pressing [F7] for the next record. Any changes that you’ve made and accepted with [F1] will be kept. You may start again at any time, but you will have to re-select your requested fields.
Shipping Address Maintenance
1.ACCOUNTS RECEIVABLE…>1. DATA MAINTENANCE…>2. SHIP TO CODES
- Customer
When the customer has more than one location to ship to, enter a code numeric location number and the address. The customer entered here must already exist in the customer file. If there is only the one location for shipping to this customer, nothing need be entered.
- Code
The default will always be the lowest location number, so it is recommended that the bill-to address from the customer record be entered as ship-to address number 1. At point of sale time, the ship to address may be selected if it is not the main location.
Enter the branch number or shipping location number
- Ship to
- Postal
Enter the address exactly as you wish it to appear on the invoice.
Parameter File Maintenance
- SYSTEM UTILITIES…>3. SYSTEM SETUP…>1. ACCOUNTS RECEIVABLE…>1.SYSTEM PARAMETERS
The parameter file is generally set-up by AMS personnel during the initial installation of the Accounts receivable system. It is advised that no changes to it take place after the initial options have been chosen without first checking with AMS.
- Aging period 1
- Aging period 2
- Aging period 3
- Aging period 4
These fields control how the Aged Detail Trial Balance is formatted, in this sample, invoices aged up to 31 days will appear under the title Current, invoices aged up to 61 days will appear under the title 30 days etc.
Summary Aged Totals
- Period 1
- Period 2
These fields control the ageing that will be used with the AR Month End > trial balance reports > aged summary trial balance reports.
- Statement Date
This field will show the last date that statements were run and updated during the month end procedures.
- Financial Period
This is the current GL period for Accounts Receivable and Invoicing. It is updated during the accounts receivable >AR month end > ar month end update procedure.
Service Charges
- Percentage
This percentage is used during accounts receivable > ar month end > service charge processing > CALCULATE service charge. This amount must be calculated to the annual compounded percentage. For example, 2% per month is 26.82% annually.
- Days
This is the number of days old an invoice will have to be before being considered part of the calculation for service charges.
- Next Number
This is a system-generated number and may not be changed. It is used to generate the invoice number associated with the service charge.
- G/L Account
When the service charges are created, they generate a dollar value that will be posted to the General Ledger account entered here.
- S/C min?
If there is a minimum service fee you charge that is to over-ride the calculated amount, enter Y and that amount.
- Months Overdue
If ageing by months (as opposed to days) enter the age the invoice must be before a service charge applies.
- Default Return Email Address
- Show Zero Balances
- Default A/R Type
Are the majority of your customers Balance Forward or Open item? Remember that this is only the default response and that you can alter it in the individual customer record.
If a customer is set to Balance Forward, during the AR Month End processes, the outstanding invoices are aged and then summarised into one summary total. Accounts Receivable > Cash receipts processing simply applies whatever monies are received to the outstanding summarised balance.
If a customer is set to Open Item, then each individual invoice is available for review in accounts Receivable > Customer Analysis. During accounts Receivable > cash receipts processing, payments are applied to specific invoices. A field called cash rec autopay appears later in this section to speed the process of paying those individual invoices.
- Age B/Fwd Credits
This field only applies to the processing of balance forward invoices. When a credit is issued, if this flag is set to [n], then the credit will be part of the current balance of the account. If this flag is set to [y], then the credit will act like a payment and reduce the oldest aged balance and thus the balance forward amount. It is important to note that if this is the case, sales reports for the period (perhaps used to calculate commissions) will not match the accounts receivable since the credit amount will have been applied to a prior period.
- Addr Pos (H/L)
When your statements print, the customer address may not fit exactly into the window in the envelope. [H] prints one line higher than [m], which prints one line higher than [L] and may assist you in a better fit.
- Payment History
Reply [y] if you wish to keep a history of all invoices that have been paid and retired through the accounts receivable > Cash Receipts process.
- Aging by Months
This response is usually [y]. The system will age invoices according to the number of days in a month. During a leap year, the number of days is automatically readjusted for you. If you respond [n], then the ageing of invoices is calculated on the average number of days in a month.
- Fiscal 01 = cal
This field connects you fiscal year with the calendar year. If your fiscal year begins in March, then fiscal 1 is equal to calendar [3], if the fiscal year begins in June, this field will be [6].
- Prompt Pay
- Prompt Pay Days
- Prompt Pay Disc
- P.pay if Overdue
- P.pay incl GST / 39. PST? / 40. FRT?
These fields control how (or if) prompt payments apply to your customer accounts. Indicate the number of days an invoice needs to be paid in before receiving the discount and the percentage of that discount. If the account is overdue, the p.pay if overdue flags whether the client would or would not receive a prompt payment discount on a particular invoice even if that particular invoice is paid within the prompt payment parameters. Normally, discounts do not include the GST or PST. However, if the discount is to be on the total of the invoice plus any freight that was added, reply [y] to the frt? field.
- Cash Receipt Sequence
If you have multiple locations for your installation, then the recommended reply to this flag will be [D], (date) since each location may be working with separate invoice numbering sequences. During accounts receivable > Cash receipts processing the invoices will be displayed in date order. Otherwise, [I] for invoice number sequencing is fine.
- Cash Receipt Autopay
- Default
These flags allow the accounts receivable > Cash receipts processing to partially imitate the speediness of processing payments for a balance forward customer. If the flag is set to [y], then the payment is automatically allocated to the oldest invoices until either all invoices are paid, or until the amount to allocate runs out. If there is not enough money to fully pay an invoice, it will be partially paid. An opportunity is given to alter the automatic allocation before acceptance. If this flag is set to [n], then the question apply to oldest is given as an option with each cash receipt.
- Default Overdue
For HOLD or COD purposes, at what age is an invoice considered overdue. [1] is 30 days, [2] is 60, etc. If [2] is the default, then the HOLD/COD status applies after the account goes into 60 days.
- Credit Hold Date
This is the date, either [s] for statement date or [t] for today’s date, to use when calculating whether or not an account is considered overdue. If option [s] is chosen (recommended), when the statements are printed, the hold or COD rating on the customer account will be removed automatically when payment is made. A report prints during the accounts receivable > Cash receipts processing > Cash receipts Update when the account has been paid to notify you that the hold / cod rating has been updated / removed.
If option [t] is chosen, then the HOLD/COD rating will float over the course of the month, since it would be possible to have the account be OK today, but overdue tomorrow.
- Check Holds
If the [s] option is chosen for the credit hold date field, then reply [y] to this field to have the HOLD/COD status checked and updated with Cash Receipts.
- Overdue Type
When the account is overdue, the account will be placed on HOLD or set to COD. This is a fundamental question that will affect all customers except those that have been set to ignore the overdue by setting the accounts receivable > File maintenance > customer maintenance customer record field for overdue control FLAG to [0] or [9]. When the customer is placed on HOLD, no sales activity is permitted except for Returns [r] and Payments on Account [$]. If the customer is set to COD however, the customer may still purchase product, but is not permitted to charge anything to their account.
- Allocate Invoice Number
- Next Invoice
Reserved for future use.
- Reserved Note Types
Customer notes are free-form notes that are date and time stamped during entry and then assigned to a particular type. A reserved note type is one that may not be changed or deleted until it has been removed from this field, although it is not necessary to have a reserved note type. In future releases of the software, reserved notes will be accessible with hot/function keys from inside various processes (example: invoicing / cash receipts etc.)
To begin using notes, determine the types of notes that may be helpful in working with customers, even if that means starting with a single type. As an example, a note type called NSF may be useful for office staff. Then, use the menu option accounts Receivable > file maintenance > customer notes parameter maintenance to add (example) a type [n] with a description of nsf. The singe character note type may be alphabetic or numeric. Once the note type is created, add it here to set it as a reserved type.
Payment Terms Maintenance
- ACCOUNTS RECEIVABLE…>1. DATA MAINTENANCE…>3. PAYMENT TERMS
You may offer different payment terms to certain customers; they can be set up here and entered to each individual customer record. The customer’s terms will print on both Invoices and Statements, however this is an informational field only, as all ageing in the system is done from the invoice date. No due dates are calculated.
Statement Text Maintenance
- SYSTEM UTILITIES…> 3. SYSTEM SETUP…> 4. SALES DESK…> 1. ACCOUNTS RECEIVABLE…> 5. DEFAULT STATEMENT TEXT
Any message entered to the GST, PST or FREIGHT fields on this screen will print with the associated dollar amount on the customer statement. The amounts are extracted for use during the sales desk control > sales desk month end procedures > extract taxes for ar statements process. Messages added for the taxes and prompt pay fields have no associated dollar values.
Any statement message can be altered during the accounts receivable > ar month end > Statements > Statement run (or blank paper statement) create option.
Salesman Maintenance
- ACCOUNTS RECEIVALBE…>1. DATA MAINTENANCE…> 4.SALESMAN
This option provides a means for tracking salesman sales figures. The salesman ID can be either numeric or alphanumeric. The daily figures will be updated to this record with each end of day process. The monthly figures are updated during accounts receivable > ar month end > sales summary monthly clear and the yearly figures are updated during the sales summary yearly clear.
VIP Customer Maintenance
- ACCOUNTS RECEIVABLE…> 1. DATA MAINTENANCE…> 5. VIP MASTER
A VIP customer is at once, the same and different from a cash or walk-in customer. VIP customers do not charge their purchases to an account; they are on a COD basis the same as any other cash customer. However, adding a repeat walk-in customer to a VIP list (database) allows you to track their purchases separately from cash sales and optionally set up special pricing.
Adding a new VIP customer is normally done through sales desk >invoicing by pressing [F11] at the customer number field to move over to the phone number field. The customer’s phone number may be found as a regular customer or an already existing VIP or in the AMS (Address Made Simple) database. If the customer is found in none of these places, then pressing [F11] again (in the phone number field) will allow you to enter in the VIP manually with this menu option. If a VIP customer already exists with the same phone number, the user is informed, but still allowed to add the second VIP. More details are offered in the Sales Desk User Guide.
Should you know prior to any sale being made that a particular customer is a VIP, then they may be added here. VIP records may also be ‘removed’ by changing the phone number to 000-000-0000.
VIP
- Last Name
- Given Name
The name must be entered entirely in CAPITAL letters.
- Address
- City
The city must be a valid city name and the correct spelling is important.
- Province
The provincial abbreviation must be one that is accepted by the federal government. (NU is the correct abbreviation for Nunavit).
- Postal
- Phone
- Work Number
- Cell Number
- Fax Number
Enter the personal information of the customer being added to the VIP database, exactly as you would wish to see it on an invoice or mailing label.
22.. Card Number
The card # field is available if you are using identifying cards for your VIPs. These are normally scanned cards, like Air Miles ®,
- PIN
Enter the personal identification number (PIN) for this VIP customer’s card.
- GST Lic #
- PST Lic #
Any character entered in either of these fields will cause the suppression of taxes at the time of sale, the same as with a regular accounts receivable customer.
- Contact
If there is another contact for this VIP, enter that name.
- Email Address
There are 40 spaces available for the entering of the VIP’s email address.
- Remarks
This is the same field as the regular customer record has. It will be displayed with the next sale on the billing screen.
- Industry
If this VIP is connected with one of the industry codes you have previously set-up, you may add them here. Sales dollars reported will include any sales made to this VIP customer.
- Direct Mail
If your business sends direct mail, a [y] here indicates that this customer will be included with the next mailing.
- Date Added
This date indicates the date that this customer was added to the VIP database. The default is for today’s date.
- Last Invoice
This is the date of the last sale made to this VIP customer.
- A/R Customer Number
The AR customer field is available if you have special pricing set up for an AR customer that you wish to also give to this specific VIP customer. Otherwise leave this field blank and pricing will be taken from the default pricing for the VIP customer number that has been set up in 9. SYSTEM UTILITIES…> 3. SYSTEM SETUP… > 4. SALES DESK… > 2. PARTS BILLING PARAMETERS (sCREEN1 : System defaults).
VIP Parameter Maintenance
- SYSTEM UTILITIES…>3. SYSTEM SETUP…>1. ACCOUNTS RECEIVABLE… > 2. VIP PARAMETERS
Since VIP customers are normally set up during invoicing, completion of the following fields will assist your users in setting up new VIP customers quickly.
- City
Enter your own city, as the majority of your VIP customers will likely come from the same area. The city must actually exist, and the correct spelling is important.
- Province
Enter your own province, in the format that is acceptable to the federal government.
- Area Code
Enter the area code.
- Next Customer
This field will be automatically updated with the addition of each new VIP customer and needs only be entered with the original setting up of this file.
- Prefix List
Develop a list of 5 prefixes to be used in the generation of new VIP customer numbers
- Force DIY Number
If this field is set to [y], then during sales desk > invoicing the use of the card will be mandatory.
- Validate Postal
Leave this field turned off [n] to allow US zip codes when setting up new VIP customers.
- 10 Digit Dialing
- Special Char in Name
- Allow A/R Create
- A/R Customer Template
- Current A/R Prefix
There are five prefixes available for use in generating new VIP customer numbers. Select the one that will be used as the default.
- Next A/R Customer
- A/R Prefix List
customer notes Parameters Maintenance
9. SYSTEM UTILITIES… > 3. SYSTEM SETUP… > 1. ACCOUNTS RECEIVABLE… > 3. NOTES PARAMETERS
The single character note type may be alphabetic or numeric and requires a description. Enter up to a total of 6 note types. As an example, a note type called NSF may be useful for office staff.
If this note is to be reserved, use the accounts receivable > file maintenance > 1. SYSTEM parameter field called resrvEd note types (FIELD 50). There is a limit of 3 reserved note types.
Loyalty Rewards Program
Loyalty Rewards
Definition
The new LOYALTY REWARDS program will allow you to offer and track point rewarded to customers for purchases made. This program can be for selected customers and products and the rewards value can be maintained by Category.
The new suite of programs is available through Sales Desk > Administration >
Loyalty Rewards
Loyalty Programs
- Assign a Program Code for customers to be included in the program
- Setup a Type Code which will be assigned to Customers included in the program such as “R”
- Add a Description for the program
- Default Redemption Rate for the program, points per dollar
- There is no automatic Redemption at this time
- Extra charges to be included in the value such as Taxes and Levies
- The initial default for this setting is “N”
- Default Statement Message

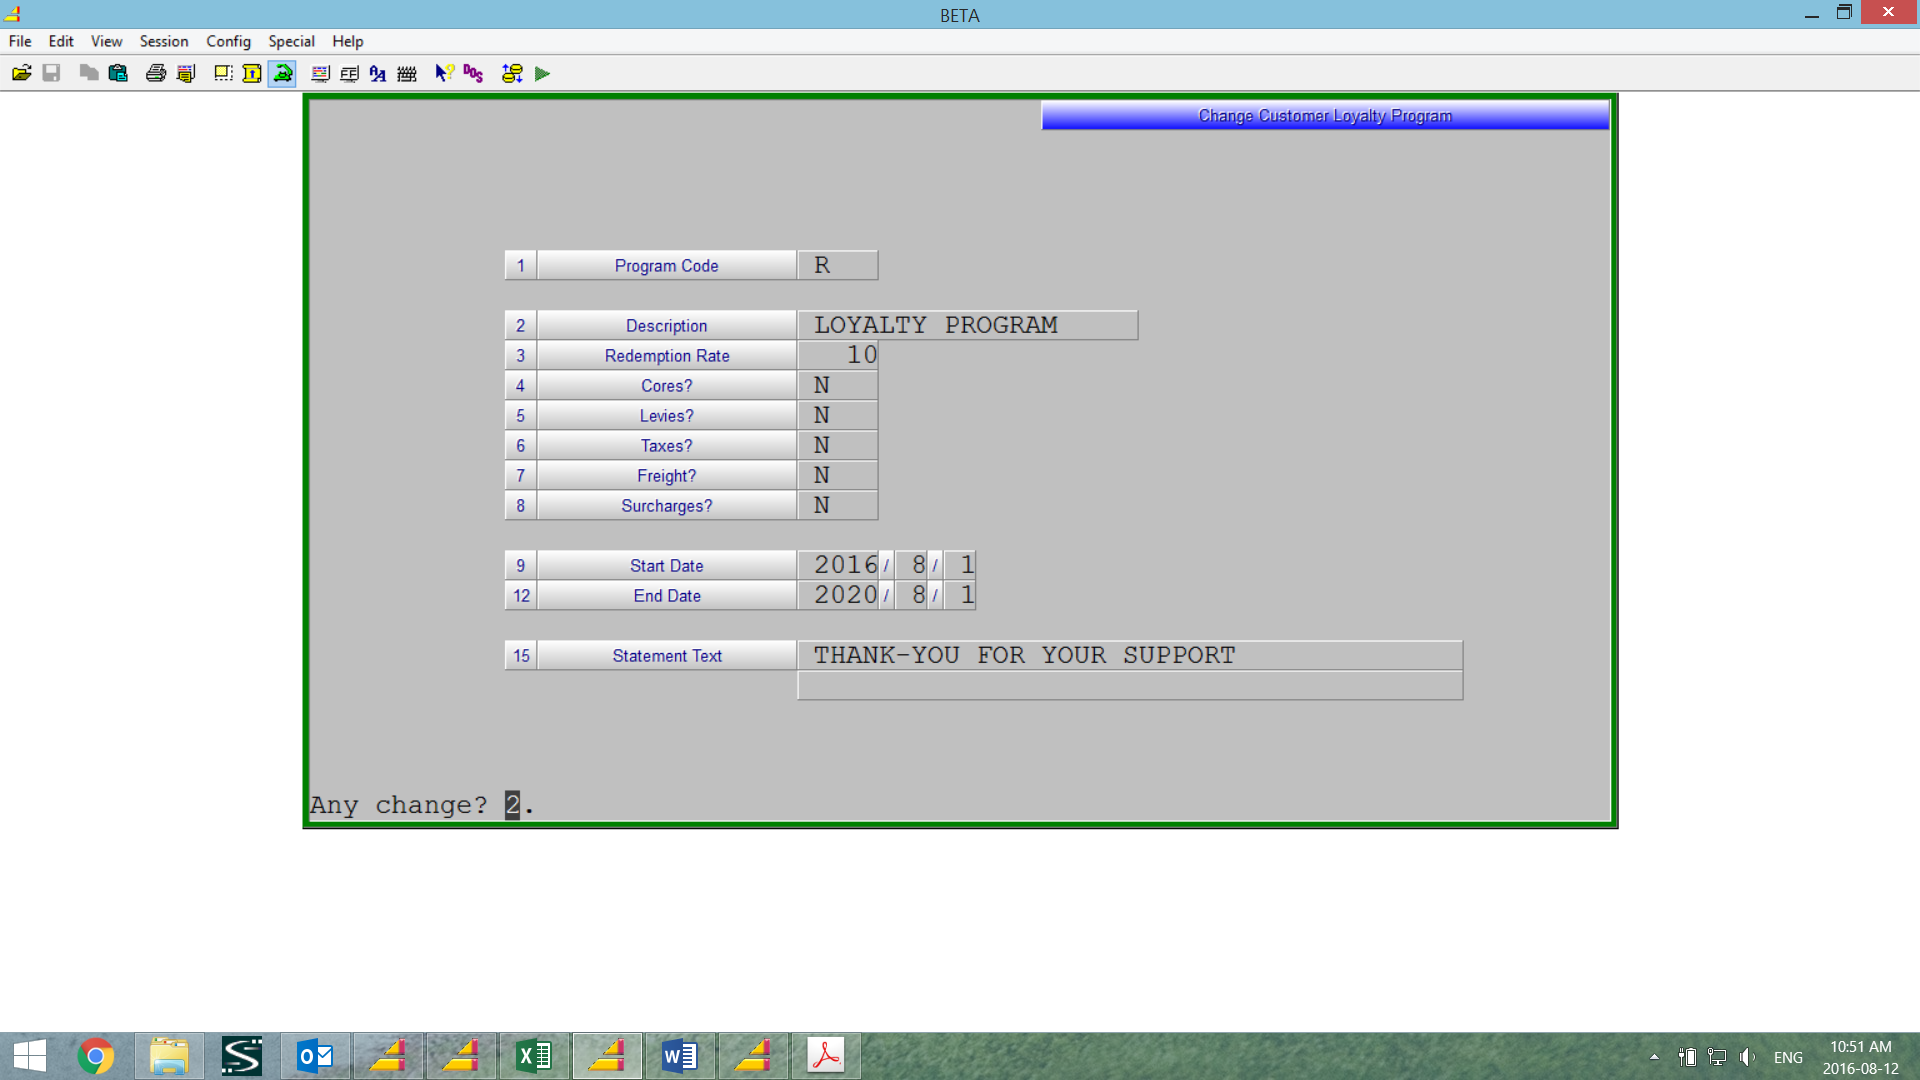
Loyalty Customers
- Add, Change or Delete Customers from a Loyalty Program
- You can assign a customer to multiple programs should you choose.

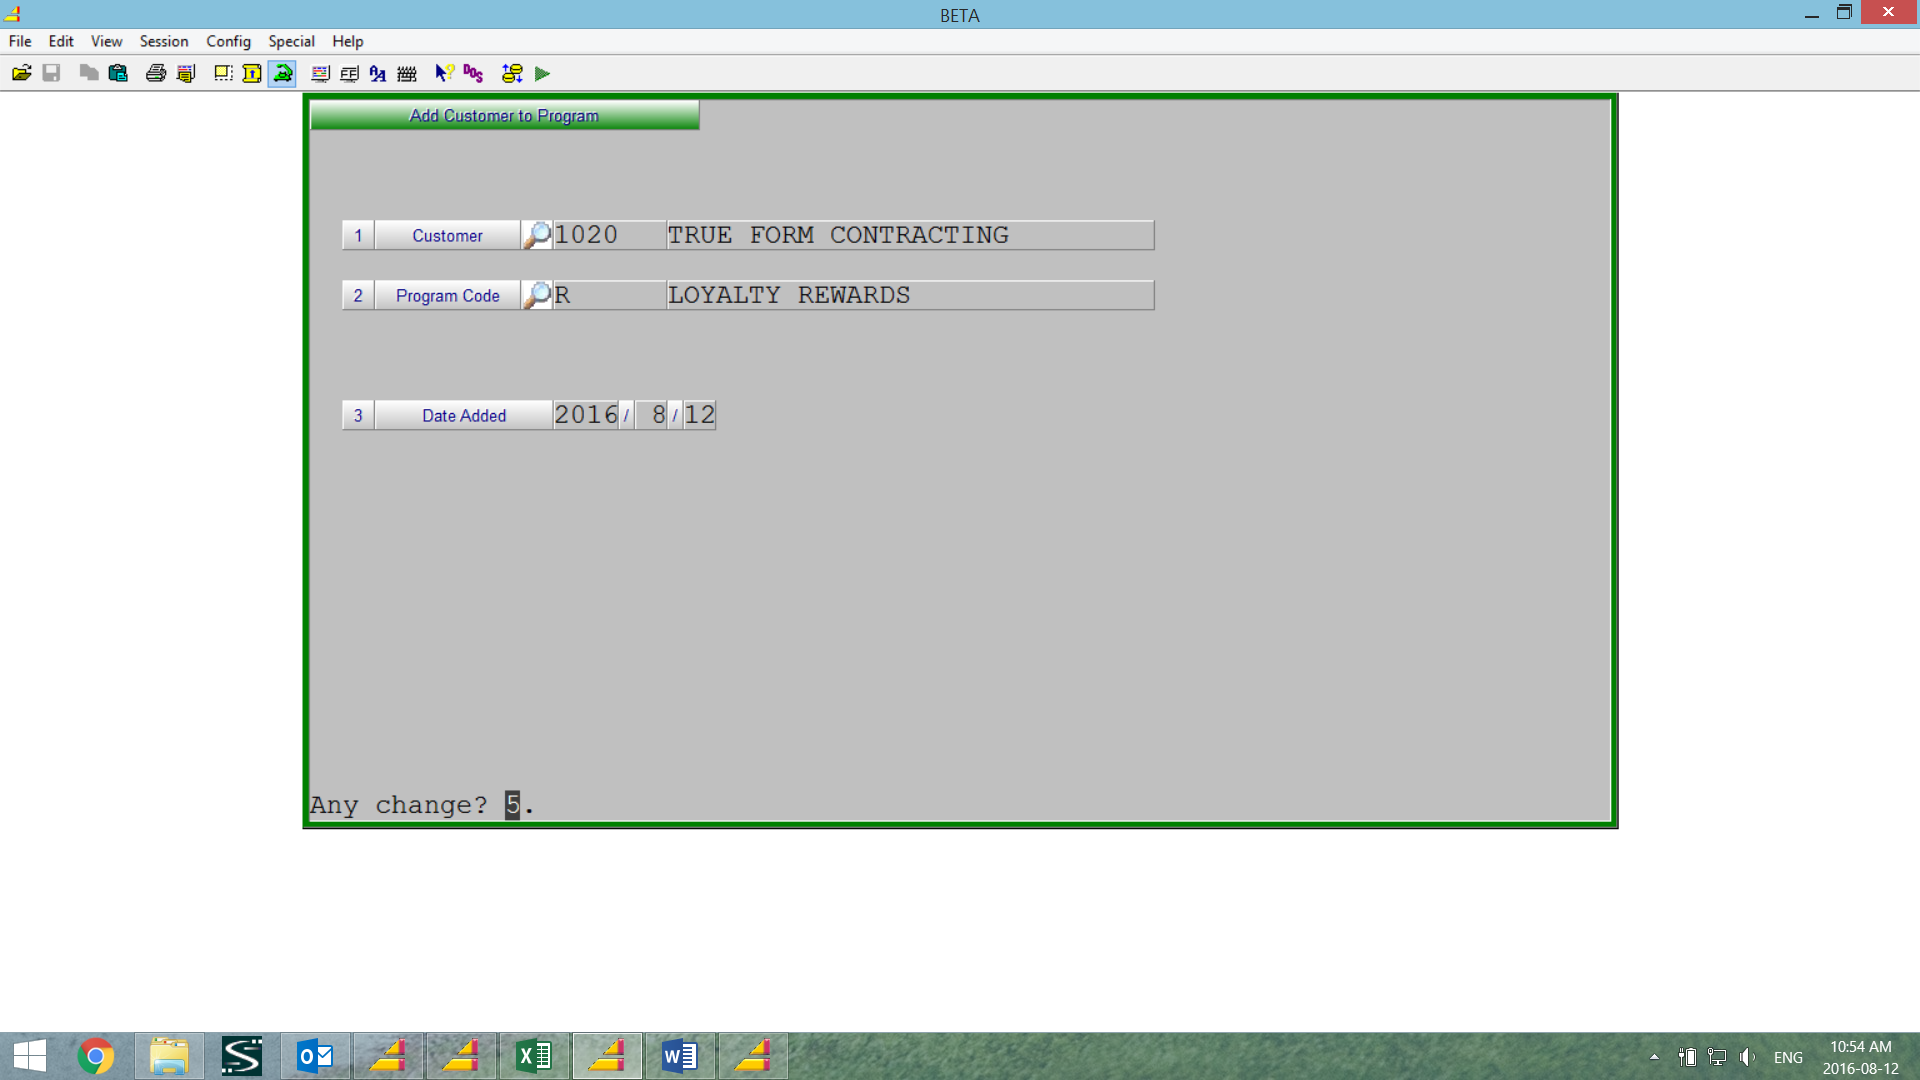
Loyalty Adjustment Codes
- Used to setup codes and descriptions of the various adjustment types required.
- Example RE = Redemption

- Example RE = Redemption
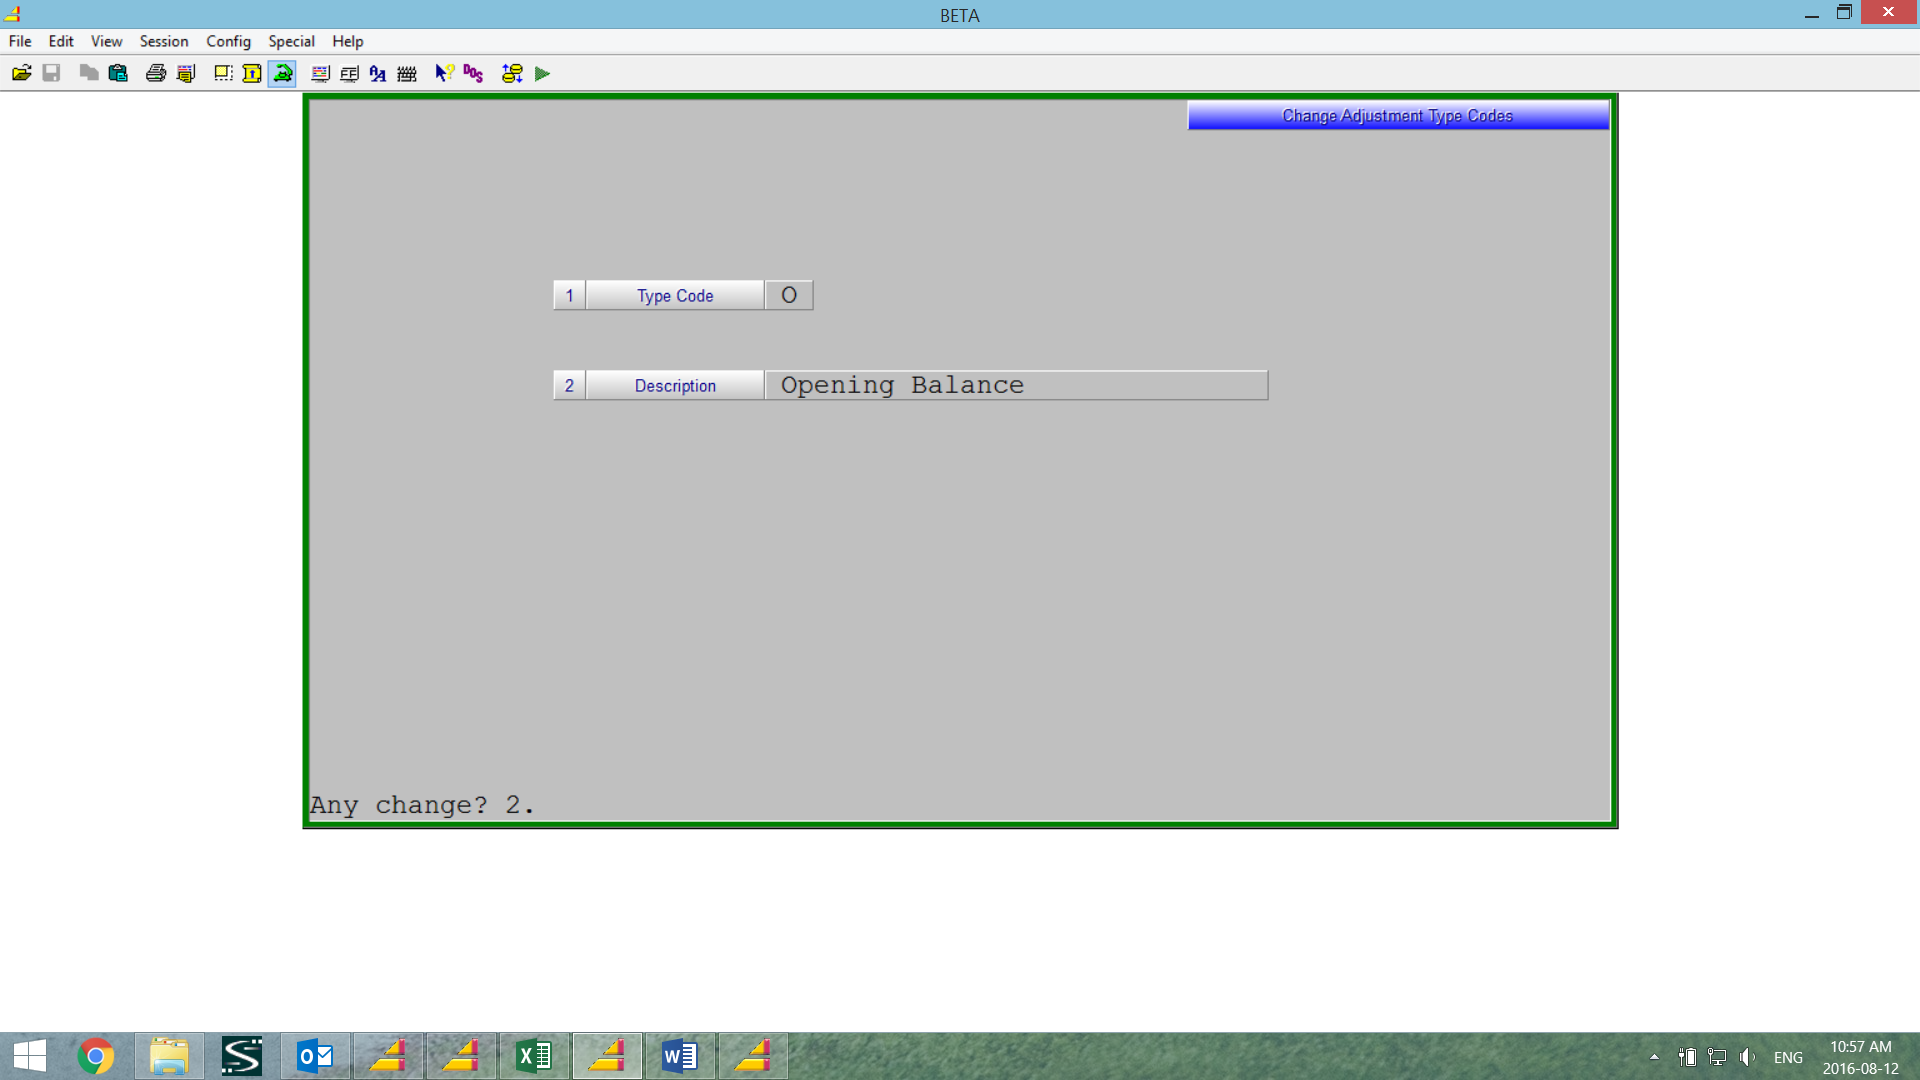
Loyalty Rates
- This is to assign the reward rates for various categories.
- Using an “All Category” entry could setup the default and then you could setup individual categories as exceptions.
- The Start and End Dates control the time that the Special Rate is in effect.
- The rate is the number of points earned per sales dollar.
- Only those extra charges set to Y for the program would be included in the sales total.
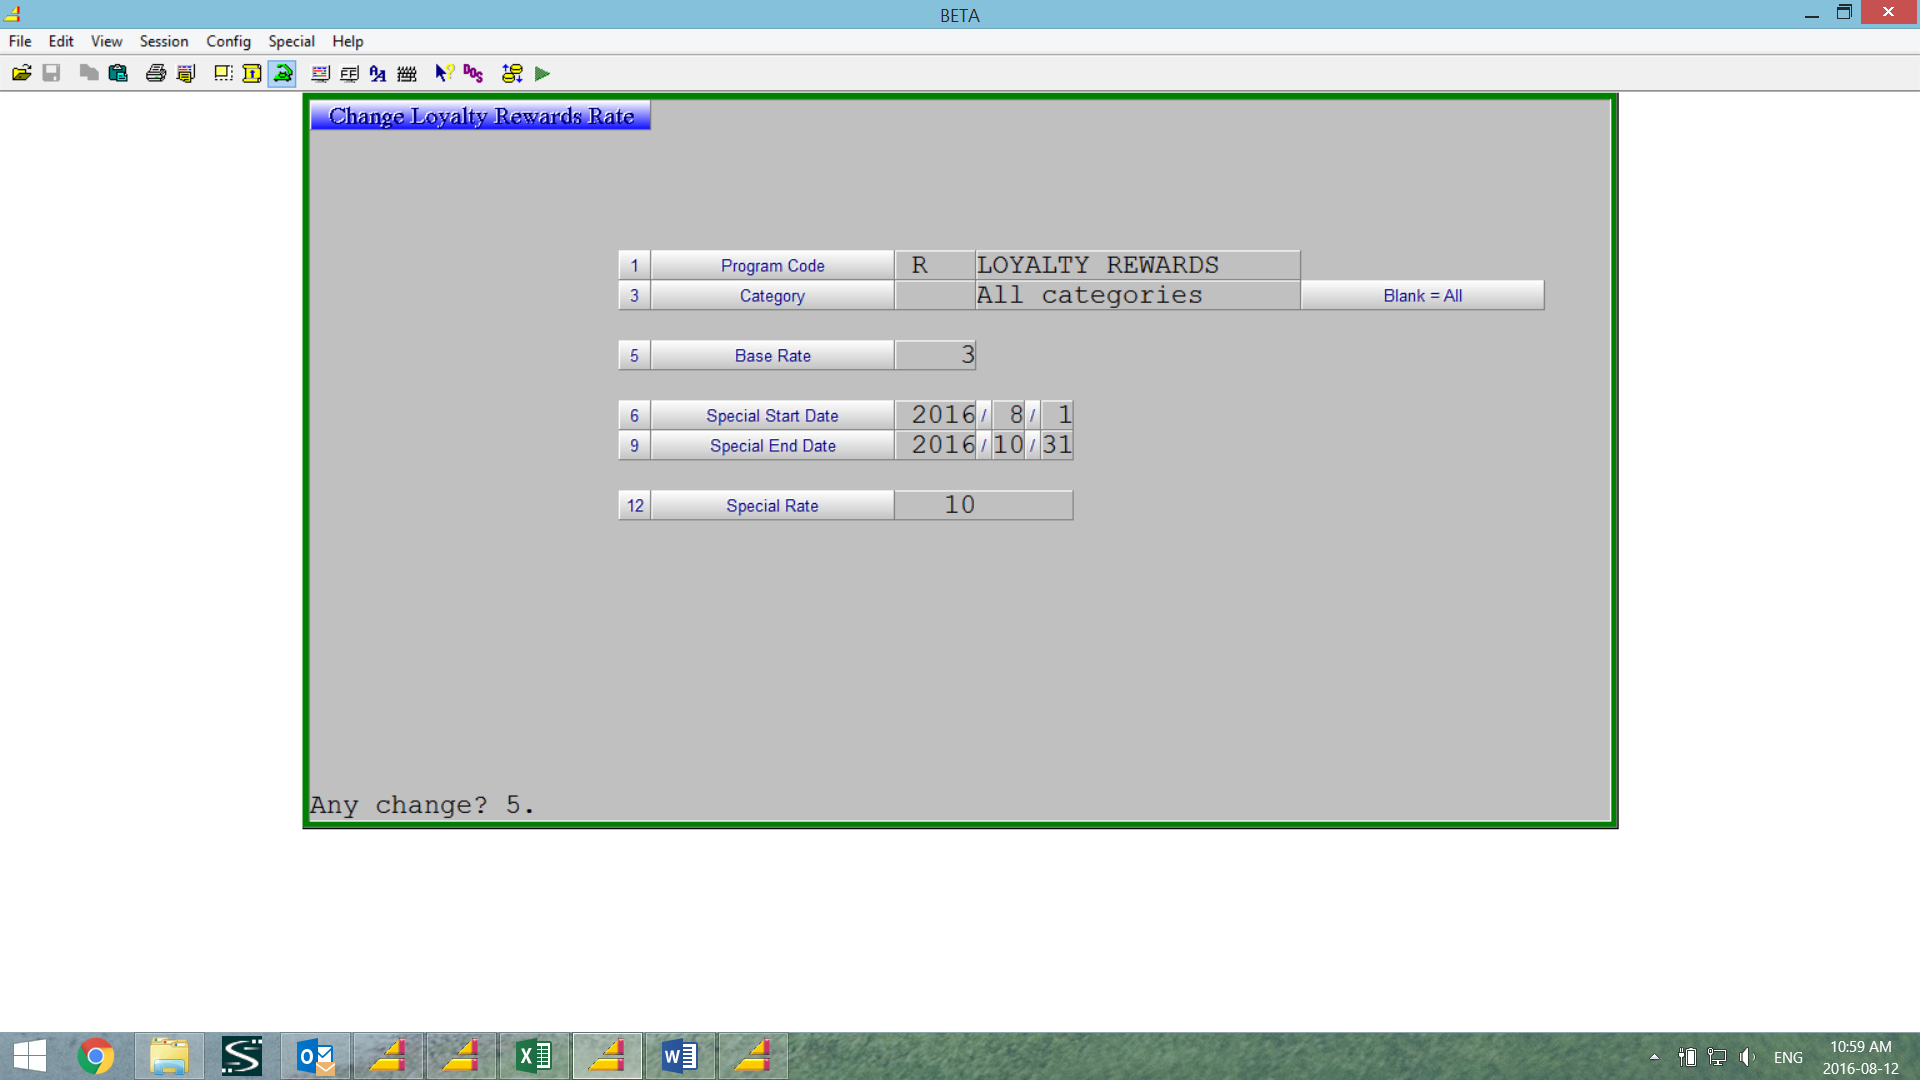
Loyalty Reward Adjustments
- To make adjustments to a customer total point not related to sales invoices
- Used to assign the initial start point and to adjust for point redemptions
Loyalty Rewards Inquiry
- View the current status of a customer’s Loyalty Rewards points and the activity
Loyalty Rewards Report
- A listing of the customer’s Loyalty Rewards point activity
Loyalty Rewards Statement
- Similar to a customers A/R statement showing their activity and balance.
- These Loyalty Reward statements can also be emailed to the customer.
Once the customers have been assigned to the program and the rates have been setup the point information can be built from invoice history from a start date if desired.
Invoicing
- When an invoice is generated for a customer included in the program their Loyalty Rewards will be updated when the invoice is completed and the current Loyalty Reward total can be printed on the invoice.
Move ROA Payment from one Customer to Another
(Note – this procedure has multiple steps so it is recommended that you do it only when you can run it from beginning to end uninterrupted.)
Accounts Receivable… à4. Transaction Processing… à1. Transaction Input à1. Add Transactions
- Enter the customer number that has the payment posted to it, and shouldn’t
- Enter 0 as the type (you are making a ‘fake’ invoice)
- Enter an invoice number
- Enter the same date that the payment was done
- Enter a reference if you wish
- Enter the amount of the payment – no sign, just the amount.
- Accept the entry with F1
- Enter your branch number (press ENTER will default) and an account number
- Enter the amount of the payment, no sign, just the amount.
- Accept the entry with F1
- Enter the customer number that should have the payment posted to it, but doesn’t
- Enter 0 as the type (you are making a ‘fake’ invoice)
- Enter an invoice number
- Enter the same date that the payment was done
- Enter a reference if you wish
- Enter the amount of the payment (WITH a sign – you MUST do this)
- Accept the entry with F1
- Enter your branch number (press ENTER will default) and the same account number you used in the steps above
- Enter the amount of the payment, (WITH a sign – you MUST do this)
- Update the entries to the customer accounts using the following process.
- Accounts Receivable… à 4. Transaction Processing… à 3. Transaction Update
If the customer account is a Balance Forward account, then you are done.
See following page for Open Item Account Completion Procedure
Setting Up Invoice Copies
COUNTERPOINT™ Provides a feature that allows you to set up the capture of a customers invoices for reprinting on Plain Paper at Month end. If there are customers set up with this feature, at the end of the statement run you will be asked to put plain paper on the printer and all invoices created during the statement period will be reprinted on Plain paper. This feature is turned on using the following procedure.
Bring up the customer A/R record in change mode using the following menu path
- Accounts Receivable…->1. Data Maintenance…->1.Customers
This will bring up the following screen.

The field that controls this feature is Field 56. As the prompt shows - entering a 1 in this field will cause the system to capture an image of all invoices done during the statement period for reprinting on plain paper after the completion of the statement printouts.
by entering a 2 in this field you can also cause the printer to produce 2 copies of EVERY invoice generated for this customer whenever they make a purchase.
If you wish to set up the multiple copies at time of purchase you must also set one of the fields in 36 to “M”.
Once set up WITH A “1” in Field 56 this customers invoices will be captured from this point forward for Month end plain paper reprinting.
Statements
If you have pre-printed statement forms, please use the statement run create option. If your statements are going to be printed on regular paper, please use the blank statement create option.
Statement Run – Create
1. ACCOUNTS RECEIVABLE > 5. MONTH END PROCESSING >4. CREATE STATEMENTS >1. STATEMENT RUN-CREATE
This option is for statements printing on special forms.
The statements must be created prior before the first end of day process for the new month, otherwise new charges will appear on the statements as future
- Starting Customer
- Ending Customer
The statements will be based on the starting and ending customer range entered here, and the Statement flag from the customer record in data file maintenance > Customer Maintenance. If the response to that flag was [N], then no statement will be created in this step.
- Statement Message
Enter any message that you wish to appear on all statements. If a default message was entered in accounts receivable > data maintenance > statement text maintenance then pressing [enter] here will default to that message.
- Show Prompt Pay
Use [y] if you are allowing prompt pay discounts and wish to notify the customer of the amount of the discount available to them.
- Prompt Pay Message
If you wish to show the value of any prompt pay discount on the statement, reply Y and then enter in the text that you want to appear on the statement next to the discount amount. If a default message was entered in accounts receivable > data maintenance > statement text maintenance then pressing [enter] here will default to that message.
- GST Message
If you wish to show the value of any GST associated with the charges on the statement, reply [Y] and then enter in the text that you want to appear on the statement next to the amount. If a default message was entered in accounts receivable > data maintenance > statement text maintenance then pressing [enter] here will default to that message.
- PST Message
If you wish to show the value of any PST associated with the charges on the statement, reply [Y] and then enter in the text that you want to appear on the statement next to the amount. If a default message was entered in accounts receivable > data maintenance > statement text maintenance then pressing [enter] here will default to that message.
- Freight Message
If you wish to show the value of any freight associated with the charges on the statement, reply [Y] and then enter in the text that you want to appear on the statement next to the amount. If a default message was entered in accounts receivable > data maintenance > statement text maintenance then pressing [enter] here will default to that message.
- Taxes Message
These fields will default to the values you previously entered in Accounts Receivable > File Maintenance > Statement Text Maintenance. You may change them here for this statement run.
- Only Overdues
You can further define the range of customers to include on this statement run. If you select this option, then only customers with overdue accounts will have a statement created for printing.
- Show Zeros
If you wish to print statements even for customers where the balance of the account is zero, then select this option. Customers with no activity and a zero balance are not included, only those with activity in the period.
- Show Credits
If you wish to print statements for customers where the balance of the account is negative, then select this option.
- Sequence
The statements can be created to print in customer number [n] or customer name [a] order.
Y(es) or N(o) to send electronic data for all customers having contact information set up customer master file EDI info.
- PRINT PAPER COPY ALSO
Offers the option to print hard copy Y(es) or N(o) for those getting their statement electronically. Customers not set up with EDI information will print hard copies.
- SHOW FUTURES
This option is to allow you to complete your accounts receivable month end after the first of the month and only print invoices from the previous month on the statement.
Statement Run – Align
1. ACCOUNTS RECEIVABLE > 5. MONTH END PROCESSING > 4. CREATE STATEMENTS > 2. STATEMENT RUN – ALIGN
Place your statement forms in the printer, and then use this option to test your alignment. Continue until the form is correctly aligned and then [Q]uit this function.
Statement Run – Print
1. ACCOUNTS RECEIVABLE > 5. MONTH END PROCESSING > 4. CREATE STATEMENTS > 3. STATEMENT RUN – PRINT
Before running this option, make sure that the alignment has been done. The statements will print according to the parameters you have set up in the Statement Run - Create (or blank paper statement create) option and when the statements have finished printing, the Statements Menu will re-display.
Blank Paper Statements – Create
1. ACCOUNTS RECEIVABLE > 5. MONTH END PROCESSING > 4. CREATE STATEMENTS > 4. BLANK PAPER - CREATE
If you have decided to use plain paper instead of pre-printed forms for your statements, then use this option in place of Accounts Receivable > AR Month End > Statements > Statement Run – Create, then continue with the steps for aligning and printing. The blank paper format is identical to the one that creates statement for pre-printed form, only this option will also print your company name and address, along with column headings.
The statements must be created prior before the first end of day process for the new month, otherwise new charges will appear on the statements as future
- starting customer
- ending customer
The statements will be based on the starting and ending customer range entered here, and the Statement flag from the customer record in data file maintenance > Customer Maintenance. If the response to that flag was [N], then no statement will be created in this step.
- Statement message
Enter any message that you wish to appear on all statements. If a default message was entered in accounts receivable > data maintenance > statement text maintenance then pressing [enter] here will default to that message.
- Show prompt pay
Use [y] if you are allowing prompt pay discounts and wish to notify the customer of the amount of the discount available to them.
- Prompt pay mess
If you wish to show the value of any prompt pay discount on the statement, reply Y and then enter in the text that you want to appear on the statement next to the discount amount. If a default message was entered in accounts receivable > data maintenance > statement text maintenance then pressing [enter] here will default to that message.
- GST message
If you wish to show the value of any GST associated with the charges on the statement, reply [Y] and then enter in the text that you want to appear on the statement next to the amount. If a default message was entered in accounts receivable > data maintenance > statement text maintenance then pressing [enter] here will default to that message.
- PST message
If you wish to show the value of any PST associated with the charges on the statement, reply [Y] and then enter in the text that you want to appear on the statement next to the amount. If a default message was entered in accounts receivable > data maintenance > statement text maintenance then pressing [enter] here will default to that message.
- Freight message
If you wish to show the value of any freight associated with the charges on the statement, reply [Y] and then enter in the text that you want to appear on the statement next to the amount. If a default message was entered in accounts receivable > data maintenance > statement text maintenance then pressing [enter] here will default to that message.
- Taxes message
These fields will default to the values you previously entered in Accounts Receivable > File Maintenance > Statement Text Maintenance. You may change them here for this statement run.
- Only overdues
You can further define the range of customers to include on this statement run. If you select this option, then only customers with overdue accounts will have a statement created for printing.
- Show zeros
If you wish to print statements even for customers where the balance of the account is zero, then select this option. Customers with no activity and a zero balance are not included, only those with activity in the period.
- Show credits
If you wish to print statements for customers where the balance of the account is negative, then select this option.
- SEQUENCE
The statements can be created to print in customer number [n] or customer name [a] order.
- SEND VIA FAX/EMAIL
Y(es) or N(o) to send electronic data for all customers having contact information set up customer master file EDI info.
- PRINT PAPER COPY ALSO
Offers the option to print hard copy Y(es) or N(o) for those getting their statement electronically. Customers not set up with EDI information will print hard copies.
- SHOW FUTURES
This option is to allow you to complete your accounts receivable month end after the first of the month and only print invoices from the previous month on the statement.
Transaction Processing
Transaction Input
- ACCOUNTS RECEIVABLE > 4. TRANSACTION PROCESSING > 1. TRANSACTION INPUT
Transaction process is used primarily to record charges or credits which do not affect inventory. These are normally service charges, rebates, PST adjustment and the recording of NSF payments. Any charge or credit to a customer that involves either the reduction or return of inventory should be completed through the appropriate billing module.
Sales reports will not reflect any charge or credit made through transaction processing to a customer.
Customer
Enter in the already existing customer number. If you don’t know what it is, you can use the Search function by pressing [TAB]. Then enter in either the entire customer name or a portion of the customer name followed by the []. Then select the line number of the customer you desire to return it to the customer number field.
Transaction Type
Enter the appropriate code for which type of transaction you wish to process for this customer, [0] invoice, [1] service charge, [2] credit memo.
Invoice Number
If you are entering an invoice or credit note not connected to an existing invoice, then enter in a unique number (there are no duplicates allowed). If you are entering a service charge [1], or a credit note [2] against an existing invoice/credit memo, then enter in the originating document/invoice number.
- Date
Today’s date is always the default, but you can over-ride this date if you need to. Remember that every entry after the first one will default the date to what was entered on the previous record.
- Reference
If there is a reference from the customer regarding this transaction, then enter it here.
- Amount
Enter in the amount of the transaction. Remember that the system already knows which sign (+ or -) the transaction should be dependant upon what type you selected. If you selected type [0] for invoices, you can make it a negative by typing in the amount with a [-]. If you are reversing a service charge using type [1], or issuing a credit to the customer using type [2], then the amount is not preceded by the [-] since the type already indicates that this is a reduction to the customer’s balance.
- GL Distributions
Enter in the account number(s) you wish to distribute the transaction to. You can have multiple lines of distribution. You can not complete this section and exit until the total of the distribution is equal to the amount from above. Tab to search functionality is available at the branch/account fields.
Enter in a full or partial name followed by the for the account search. If searching from the branch field, all accounts, regardless of location are displayed. If searching from the account field, only those accounts associated with the previously entered branch number will be displayed.
Transaction Edit List
- ACCOUNTS RECEIVABLE > 4. TRANSACTION PROCESSING > 2. TRANSACTION EDIT LIST
This (optional) program will create and print a Transaction Edit list of all transactions entered so that you can verify your entries before updating. A GL Summary Edit list will also print, which totals the amounts that will be posted to the General Ledger during the Update process.
When you press [Return] to begin, the date and times that the process completes each step will be displayed.
Transaction Update
1. ACCOUNTS RECEIVABLE > 4. TRANSACTION PROCESSING > 3. TRANSACTION UPDATE
The start of any Update program begins with an extra screen display to alert you to the fact that the Update has been selected. If you do not wish to continue, press [F2] to exit this screen and reply [N] to the next prompt. If you do wish to continue, then press [ENTER] to get to the next step:
As with the Transaction Edit, once you have replied [Y] that you want to start the update, the date and times of each step will be displayed upon completion of that step. You will receive a Transaction Journal and a GL Journal when all the steps are complete. If the update fails to complete properly, please note any error message on the screen and contact the Support Department at AMS. You will not be able to do another update until the problem is resolved.
APPLY Dating Terms
- ACCOUNTS RECEIVABLE > 4. TRANSACTION PROCESSING > 4. APPLY DATING TERMS
Enter in the already existing customer and invoice number with leading zeros if applicable. If a match is found, then the rest of the information for date, reference and amount will be displayed. You are asked to confirm that this is the correct invoice.
Use this screen to take the existing invoice and either spread the payment out over a period of time (called split terms or dated-out) or to advance the due date for the invoice as a whole. A ‘new’ invoice number will be assigned to each split using the originating invoice followed by -1, -2, -3 etc. The date to be entered for each split is the date that the payment is due and the amount of that payment needs to be entered as well. As soon as the amounts of each split total the originating invoice amount (when the ‘to allocate’ figure is 0.00), the system will automatically complete. Press [F1] to accept what you have done or enter in the line number to change the values.
Internally, the system will write a Credit Memo to the original invoice and create entries on the customer account for each of these split (dated out) invoices. A print out will be generated automatically identifying the original invoice and the new invoices.
If some of your invoices have been entered with dates for a future month, then they will not be picked up by the accounts receivable > ar month end > Balance Forward update process until the appropriate Month End.
Delivery Dispatch
Dispatching Invoices - Counterpoint.
Basic Usage Notes
- The jDispatch mobile application and dashboard integrate directly with Counterpoint to allow you to dispatch invoices for delivery and collect electronic signatures for proof of delivery.
- This document will review the 3 main menu options in the Counterpoint delivery module..
Adding Drivers
- Before any work can be done with jDispatch, you must ensure that you have set up at least 1 driver in the Counterpoint
- Log into the Counterpoint
- Take following menu path.
- Sales Desk > 7. Driver Dispatch > 2. Driver Maintenance
- Select option #1 - Add Driver
- Enter a code for the driver, such as their first name.
- Enter Their First & Last Name, as this will be how they are identified in the dashboard
- You can leave the contact number and vehicle blank if you wish.
- Once you have added a driver, or made any changes, you must then run option #4, extract driver info to update the information to the web.
Dispatching Invoices
- Dispatching invoices is done from the Invoice Dispatch menu option
- Sales Desk > 7. Driver Dispatch > 1. Invoice Dispatch
- To start, you can optionally display invoices for only a certain run by selecting the run number you want. Otherwise, press enter to view outstanding invoices for all runs.
- Then, select a driver who you want to assign the deliveries to
- Once the driver is selected, all invoices currently available for delivery are listed.
- Once the invoices are listed, you have numerous options to select which invoices to dispatch. You may:
- Click the invoice you wish to dispatch
- Key in the order number of the invoice to dispatch
- Scan the barcode on the invoice you wish to dispatch
- All scheduled deliveries will have a time in the Order Despatched
- You can un-select an invoice by clicking the invoice number again.
- To accept all deliveries, click the ‘close run’ button.
- Once accepting, you will be asked if you wish to print a delivery sheet. A delivery sheet is a summary listing of all invoices dispatched in this session.
- After selecting Y or N for the delivery sheet, all invoices are pushed out to the phone assigned to the driver you just selected. For more info on the mobile jDispatch application, please refer to the jDispatch mobile documentation.
Manually Confirming Invoices
- Confirming invoices without the mobile application is done from the Invoice Dispatch menu option
- Sales Desk > 7. Driver Dispatch > 1. Invoice Dispatch
- Enter a Run number or press Enter
- Enter a Driver code to have the invoices displayed.
- Click on the Action Mode button at the top of the screen to go to
- Click on the invoice number to be confirmed or enter the invoice number followed by Enter.
- All confirmed deliveries will have a time in the Received
- You can un-select an invoice by scrolling to it and pressing enter again
Cancelling/Retiring Invoices
- Cancelling invoices is done from the Invoice Dispatch menu option
- Sales Desk > 7. Driver Dispatch > 1. Invoice Dispatch
- Enter a Run number or press Enter
- Enter a Driver code to have the invoices displayed.
- Click on the Retire button at the top of the screen
- Click on the invoice number to be confirmed or enter the invoice number followed by Enter.
- The various reason codes for retiring the invoice will be displayed on the right of the Green Click on the appropriate description
- Once you accept the selections, cancellation notices are sent to the jDispatch mobile app and Dashboard. If the customer had multiple deliveries, the driver will be able to show them that the invoice was cancelled, and any signature they provide will not be assigned to the cancelled invoice.
Pulling Dispatched Invoices Back
- Recalling invoices for dispatch at a later time is done via the dispatch program
- Sales Desk > 7. Driver Dispatch > 1. Invoice Dispatch
- To start, you will need to select a run (or, enter for all runs), and a driver
- Once the run and driver are selected, Click the ‘Action Mode’ button until Despatching
- Click on the ‘Display Mode’ button until Despatched invoices is displayed.
- Once the invoices are listed, clicking on any of the invoices and accepting will present the question “already sent; reverse send?” Answering yes will bring the invoice back to the dispatch screen and remove it from the driver’s phone.
How-To Guides
How-to guides and FAQs are being migrated to our FirstCall knowledgebase @ https://firstcall.amscomp.com/kb
Inventory
Complete inventory guide for COUNTERPOINT
Bump All Price levels
1. You will want to update the pricing on all items. This can be done via the following menu path:
6. Inventory > 4. Pricing > 5. On-Line Price Changes > 3. All Categories - By %age
In this screen, you will want to enter in the 3% increase against all price levels. Similar to this:

This is assuming you aren't updating your cost. Once you've entered the last set of price level info, F1 will bring you to the 'any change' message and another F1 will begin the process.
2. The next step will be to set the pricing parameters so that your next wave of price updates won't revert back to old pricing matrices. This is accomplished via the following menu path:
6. Inventory > 4. Pricing > 1. Data Maintenance > 4. Reset Multipliers By %
In This screen you can opt to modify Stocked item parameters, Non-Stocked parameters or both. In this case, I assume that you would be bumping the sell prices on both, so the screen would look like this:
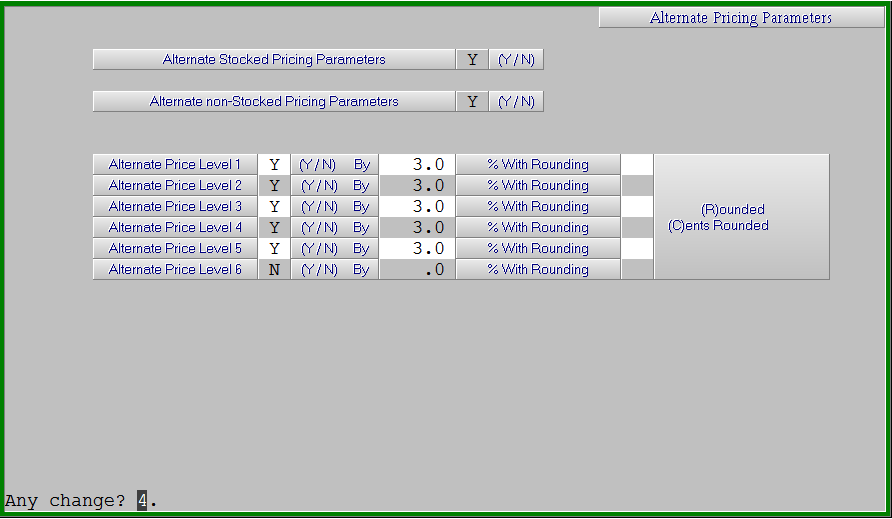
Again, assuming you are only applying this to sell prices, not cost.
Common Problems / Troubleshooting
WRONG QUANTITY RECEIVED
- This could be the result of an incorrect pur qty being set on the item.
ITEM NOT SHOWING ON SUGGESTED ORDER
- If this is a supplier based order, check that the supplier number is set on the item. If not, you can add a supplier en mass to a category via the Purchasing > 1. Data Maintenance > 6. Set Default Supplier Code option
ITEM IS NOT PRICING PROPERLY
- First thing to check would be the pricing parameters, and the discount level on the item
- Next, you may want to look at the qty per on the item
ERROR 23 SHOWS WHEN RUNNING REPORT ON CATEGORY
- You will want to run a Inventory > 1. Data Maintenance > 5. Utilities > 1. Category Resequence routine on the category. Suggestion is to use ‘C’ for chaining.
Concepts
INVENTORY vs PRICEBOOK ITEMS
- One of the most fundamental ideas within the inventory module of COUNTERPOINT is the idea of an inventory vs. pricebook item. In the system, there are two databases of items. The inventory items, which are accessible via the inventory master maintenance, and the pricebook items which are unavailable via inventory maintenance, but can be priced and sold from the invoice screen. An Inventory item has been added to inventory via the product maintenance screen and contains detailed information about the part, defining its category, pricing, purchasing vendor, etc. A pricebook item exists in a secondary database in which we only know the vendor, the item description and a single price. Pricebook items are most likely b rand new numbers, or uncommon special order items. These Pricebook items can be migrated to Inventory items at any time, and this allows us to properly price and describe an item when migrating it to inventory.
STOCKED vs NON-STOCKED ITEMS
- The second concept would be a stocked vs. non-stocked item. These items would be classified as inventory items that have been set to reorder, vs. inventory items that you do not reorder. We will discuss how this classification is set further in the document where we cover the many fields contained in the Inventory item database.
Deleting Categories
There are two options to delete a category. One essentially will just 'flag' a category as deleted, but the items within that category are still held on the system. The other option wipes all of the information (Category and Part) out of the system.
Flag Category For Delete
This will only mark the category as deleted. All parts will still exist, but the category/parts will not show in reporting.
- Navigate to 6. Inventory > 1. Data Maintenance > 1. Master Files > 1. Category Master
- Select the Delete Category option

- Enter the category you wish to delete and you will be prompted with the question Is this the right record? Press Y

- The category has now been flagged for delete. This means it will be hidden from reporting and physical counts.
Deleting Entire Category, Including Parts
This option deletes the entire category, parts and all
Before deleting all items, you should confirm that none of the items within the category are on order and that none are on packing slips.. This can cause an issue if a PO with these items is received at a later date. Also, it is recommended (but not required) that you do a physical count to remove all on hands for a proper paper trail
If a category has only been flagged for delete, it has not been removed from the system. Revisiting this menu and opting to change a category will allow you to 'un-flag' the category. If you decide, after flagging a category for delete, that you want to fully remove the data you will need to follow the 'Unflagging A Deleted Category' instructions
- Navigate to 9. System Utilities > 6. Inventory > 3. Entire Category Delete
- Enter the category you wish to delete and 'Y' to confirm it is the correct category

- You will then be presented with 3 additional questions.
- Absolutely Positive? - Press Y to proceed
- Any on packing slips? - Press N to proceed
- Any in purchasing? - Press N to proceed - There is one final confirmation presented. 'Y' will remove category. Press Y here to process the full delete of category and items

Unflagging A Deleted Category
- Navigate to 6. Inventory > 1. Data Maintenance > 1. Master Files > 1. Category Master
- Select the Change Category option.
- Enter the category you wish to delete and you will be prompted with the question MARKED 'DELETE'! IGNORE? Press Y to un-flag the category. Press F1 to accept your changes and the category will be reactivated.

Home Hardware Barcode Receiving
The barcode receiving process is designed to allow the receiving of Home Hardware shipments based on the invoices sent by Home hardware. This process checks that the item is on the Purchase Order and has been invoiced by Home Hardware and does not allow items to be received if they are not on a PO or invoiced.
Procedures
Barcode Receiving On Screen
The barcode receiving is found in the Home Hardware menu.
The screen starts at the barcode where items are to be scanned. Using the F3 key from the barcode field will allow the part to be entered by category and part number.
Each time a unit is scanned the quantity received will be incremented by 1 unit.
After the item is scanned it will show in the body of the screen.
If the purchase order no longer exists for the item a message will appear “no PO 99999”. Press enter to pass these messages. Items not found on a purchase order will need to be received manually.
If the item has not been invoiced by Home Hardware or it has been fully received, a message will appear “not in received file”, these items will also have to be received manually if they were not previously received.
To enter a quantity received rather than scanning an item multiple times press the TAB key after scanning the item and you will be positioned in the Qty received field. The quantity entered here is the additional quantity to be received.
When all scanning is complete press the Ctrl A key to accept from the barcode field.
A prompt will appear “Print Edit List”. This will provide you with an edit list of the PO’s being received.
The next prompt will be “PO’s OK to update?”. Answer “Y” to this prompt and then proceed to the PO Update option in the main menu, Purchasing à Purchase Order Receipts à PO Receipts Update.
Barcode Receiving RF Gun
The barcode receiving is found in the RF menu, “Receive HH PO”.
The screen starts at the barcode where items are to be scanned. Using the Ctrl C key from the barcode field will allow the part to be entered by category and part number.
Each time a unit is scanned the quantity received will be incremented by 1 unit.
After the item is scanned it will show in the body of the screen.
If the purchase order no longer exists for the item a message will appear “cant find PO 99999” and then a message will appear “could not receive all qty”. Press enter to pass these messages. Items not found on a purchase order will need to be received manually.
If the item has not been invoiced by Home Hardware or it has been fully received, a message will appear “not in received file”, these items will also have to be received manually if they were not previously received.
To enter a quantity received rather than scanning an item multiple times press the TAB key after scanning the item and you will be positioned in the Qty received field. The quantity entered here is the additional quantity to be received.
When all scanning is complete press the F1 key to accept from the barcode field.
A prompt will appear “Print Edit List”. This will provide you with an edit list of the PO’s being received.
The next prompt will be “PO’s OK to update?”. Answer “Y” to this prompt and then proceed to the PO Update option in the main menu, Purchasing à Purchase Order Receipts à PO Receipts Update.
Report of Items Invoiced But Not Received
A report has been provided to show all items invoiced by Home Hardware that have not yet been received in the system. This report is found in the Home Hardware menu “Items_Invoiced_Not_Recd_List”. This report will show items invoiced by Home Hardware that were not received. This should be used to verify your receiving and report errors. Once the receiving is compete the Receiving file should be purged using the option in the Home Hardware menu.
Inventory Counts
OPTIONAL COUNTERPOINT SETTINGS
- While there are many settings available within the Inventory Count Parameter screen, the following are those which allow you to tailor your count.
- Count variance threshold: This setting allows you to define a variance at which to be notified when doing counts. For example, a threshold of 10 will mean that any time a count is out by more than 10, the gun will prompt you with a beep, indicating that the variance is out by more than 10. The purpose is to try to help avoid any incorrect scans or keying errors.
-
Update Type (A/V): This setting is specific to worksheet based updates and indicates what type of update you wish to run on the inventory.
- An [A] type indicates updating an “Actual” value meaning that, when the update is run, it will update the onhand with the value entered on the worksheet. For example, if you entered an onhand of 5, your current onhand will be updated to 5, regardless of sales.
- A [V] type indicates a “Variance” update meaning that, when the update is run, it will update the onhand based on the difference of what you counted to what the system thought you had at the time the worksheet was printed. For example, if the sheet said you had 4 but you counted 5, the count update routine will simply add 1 to your current onhand.
- Ignore Zero On-Hand on Count Sheets: This option allows you to ignore any items that the system sees having a zero on-hand value.
- Ignore Reorder Allowed: This option allows you to not print “N” reorder items on worksheets.
COUNTING WITH THE RF GUN (RECOMMENDED)
Counting with the RF gun is the recommended method of updating inventory counts. This method allows for consistent, real-time updating of inventory quantities without the hassle of printed count sheets and manual entry of quantities. This allows you to count lines in chunks, without worrying about messing up counts on update.
Getting Started:
- Log in to the RF gun.
- Select Option 9 from the RF menu.
- The RF count routine requires a PIN before starting the program. This is the same as used for physical adjustments, etc. If you cannot remember your code please call AMS support.
- The count scan begins by asking whether you wish to use Autoscan or Not. Selecting “Y” for Autoscan indicates that you will scan each item individually. Selecting “N” for Autoscan indicates that you will scan an item and manually enter in a quantity.

- After you choose Y or N the cursor will move to the Bar Code field.
Scanning Product
These are the options from the Bar Code field
- Start scanning product
If you are in AUTOSCAN mode pressing the ENTER key will perform the same as a second or subsequent scan.(Add 1 to the Qty)
- CTL/r to change the Autoscan setting. A second CTL/r will leave the program
- CTL/t to view the last item scanned by the User ID (RF0 through RF5)
- CTL/c to enter a part number that cannot be scanned
- TAB (CTL/i) to manually enter the QTY when in Autoscan mode.
Error Messages & Notices/Prompts
- Record in Use - (Another user scanning same Part Number)
- Over Variance
- Y=Update Inventory as Counted
- N=DO NOT Update
- C= DO NOT update the count, BUT, keep the count in storage, assuming you will find more of the item elsewhere.
- CAUTION: No is the Default if only Enter is pressed)
- Scan Failed – To continue Input Y and Press Enter.
- When you see a number of these for a line, contact AMS so that we may contact the supplier to obtain a barcode file to update your system.
- Recent Scans screen – A secondary screen may pop up for items that the system sees that you have already scanned. You have two options here:
- (R)epl – Replace the last scan with the current quantity, and start over.
- (A)dd – Add the current quantity scanned to the previous count
Variance Report;
The variance report allows you to view or print how any user is progressing
- select the report by taking the following menu path from any workstation
-
Inventory / 6. RF Count Reporting / 6. Update RF Count Detail / 1. Update RF Count Detail
- Enter your PIN
- Enter the Login ID you wish to report on. Pressing Enter will select ALL.
- Press Enter at the Update option to Not update the permanent count history data.
- Select the type of report you want; A=All items scanned OR V=Variances only.
- The Report will display on the screen.
-
Inventory / 6. RF Count Reporting / 6. Update RF Count Detail / 1. Update RF Count Detail
Update Count History
Updating the count history tells the system that you have completed counting all of the items you planned on counting at this time. Failure to update the count history will mean that, when you scan any of the items you have counted, you will be prompted with the “Recent Scans” screen popping up constantly.
- Select the same program as for Variance reporting
- Select ALL user ID’s by pressing Enter
- Input U and press Enter
- Select the type of report you want; A=All items scanned OR V=Variances only.
- Accept the options selected at the “Any change?” prompt.
COUNTING WITH WORKSHEETS
Getting Started
- Log in to COUNTERPOINT with your regular “menu-based” login
- Navigate to Inventory > 6. Physical Inventory
Creating Count Files
There are several different methods for creating Count Files.
Count File Create ‑ All Categories
This program creates a Single count file of the entire inventory in the system at the current time. It creates a work file that allows the user to create and print Count Sheets and adjust the On‑hand counts. It does noT adjust the On‑hand quantities in the Product Master File until the Update is run.
To Create a Count File for the entire inventory select [2] from the Physical Inventory Menu and the program will create the count file. Upon completion the screen will display:
records extracted = 999999
press ENTER to continue
When printing count sheets, an entry is added to the CARDEX, labelled “Physical Count Reset” this is NOT an adjustment of inventory, but a reporting of how many items were on hand at the time the sheet was printed.
Create and Print the Physical Count Worksheets
Once you have created the count file, select Physical Count Worksheets.
- CATEGORY?
Simply press [ENTER] if you have created the count files with Count File Create ‑ All Categories using menu option [2]. It is not necessary to enter a category here.
-OR-
If you are re‑printing a specific category that had been created with Multi‑Category Count File Create (menu option 4) type that category code and press [ENTER]. When complete, move to the next step of printing the count sheets.
Multi‑Category Count File/Worksheet

This program creates individual work files for each category designated. This program is designed for those users who do cyclical counts or are "just checking" particular lines. It automatically creates the Physical Count Work Sheet print file.
When printing count sheets, an entry is added to the CARDEX, labelled “Physical Count Reset” this is NOT an adjustment of inventory, but a reporting of how many items were on hand at the time the sheet was printed.
To create and print individual work files, select option 4 from the Physical Inventory Menu and the following screen will display:
-
CATEGORY
- Enter the category code you wish to count and press [ENTER]. Enter another category code if required. You may continue to enter up to 20 codes for each Product Line (category) to be counted.
- When all required categories have been entered [f1] to accept, and then [F1] again at the any change prompt.
- The program will create the temporary count files and then create and print worksheets for those specific categories selected.
- Upon completion of all categories entered, pressing [ENTER] will prompt the worksheets to print.
-
NOTE: Work file CAT.TMP already exists - Do you wish to EXIT from this program?
- If this message displays, type [N] and [ENTER]. This is an advisory message that there is a temporary count file created already.
Physical Count Input

This program is used to enter the adjusted counts to inventory. It does not immediately adjust the Product Master file but allows the user to print an Edit List to check for input errors before Updating.
If the All Category Count file create menu option was used, reply [y] to the All categories work file question, otherwise answer [N].
- CATEGORY
- enter the specific category code or [enter] to start the input from the beginning of the count file
- STARTING LOCATION
- Enter the Bin Location for the first product on the count sheet, if there are no bin locations being used, press [ENTER], or to start the input with the first part number for the Count File, press [F7].
- STARTING PART NUMBER:
- Enter the starting part number or [Enter] to start at the beginning of the inventory or category. This will display the part entered and the next 17 numbers in sequence. Scroll through the inventory items making the necessary changes. Use the [E](xit)” to quit the count input process.
Any part numbers which are NOT in the Product File but have been noted on the Count Sheets should be entered to the Product Master File AFTER the Physical Count updates have been run.
Physical Count Edit List
This program creates and prints an Edit List to check for errors during Input before actually updating the new counts to the Product Master File.
- CATEGORY?
- Enter the category to be printed, or press [ENTER] only if the Count Files were created using Count File Create – All Categories.
- Variances only
- This option allows the edit list to show only those items where the quantity counted does not match the computer quantity.
NOTE: A Category cannot be accessed by more than one person at a time!
Physical Count Update
This program updates the entries made in the Physical Count Input program, either by Category or for the entire Inventory File depending on the method selected. The Physical Count Edit Lists should be printed and verified before the update is run. When the update is complete, it produces a Journal that shows the discrepancies between the System Count and the Actual Count.
The screen will list up to 126 of the available work files that are on the system. The default is [Y] to update. Make the necessary changes for which categories are NOT to be updated.
There must be NO BACKGROUND GROUPS running, no one using the Inventory Control system, no one in Invoicing, and ALL INPUT MUST BE COMPLETE before the update may be run. The Update will proceed and a Physical Count Journal will print upon successful completion.
Physical Count Reports – Print (Optional)
As many of the reports and worksheets created in the Physical Count Routines are deemed unnecessary, the user may select to print only those reports that are required.
Item Maintenance
PRODUCT MASTER MAINTENANCE
- Item maintenance can be accessed via menu path Inventory > 1. Data Maintenance > 1. Master Files > 1. Product Master

- In Order, the field definitions on this screen are:
- Category: Category under which this item is placed
- Part Number: The item’s part number
- Barcode: The main barcode associated with this part number. More on additional barcodes will come later.
- Description: This is the base description for the item. This description shows on the invoice and any associated reports. One note regarding this field – Combinations of double quotes and commas within a field can cause a .csv extract to believe the field to contain a delimiter and, as such, cause incorrect parsing when imported into excel.
- Expanded: This is an additional 40 characters used to describe the part, but is only ever shown on the invoice billing screen
- Substitute #: This item will be shown as a substitute in the billing screen whenever the item is keyed into an invoice. Substitutes operate in a chain, in that the system will keep checking the substitute of substitutes until it reaches the end of the chain, or it loops.
- Summary #: If present, all sales of the selected item will be posted to the substitute number. Good for instances of feet vs rolls, etc. Also used in scenarios of Feet vs. Rolls. In the Ft v Rolls scenario, this summary number can be used as a number to order from. For instance, if you have an item where you can break the pack to sell smaller units, like a roll (Part 123), you can set up a number broken pack item (Part 123FT), and have the broken pack item replenish itself from the summary number.
- Type: This indicates whether the item is a (P)art, or (L)abour.
- Link: This indicates what sequence the parts within this category are ordered.
- Class: A high level part classification that can be used to classify your parts for specials creation
- Sub-Class: A more granular part classification that can be used to classify your parts for specials creation
- On Hand: The number of items the system thinks you have on hand.
- Committed: Optionally, the number of items you have committed to stock transfers.
- On Order: The number of items you currently have on order from a supplier.
- Customer b/o: The number of items you currently have on back order invoices for customers
- Supplier b/o: The number of items currently on back order from a supplier
- Def o/h / Cores Out: The number of defective items you have on hand, and the number of outstanding cores still out.
- On RGM / Lost Sales: Counts for both the amount of this item on an RGM, and the number of lost sales logged against this item
- Manual Maximum: The Max level set to be optionally used when creating suggested orders that may contain this number.
- EOQ Vendor / Transfer: The Estimated Order Quantity for both direct (Vendor) and DC based (Transfer) purchases, calculated based on a preset number of turns.
- Auto Lock: Lock the order points on this item
- ROP Vendor / Transfer: The ReOrder Points for this item, when calculating based on sales, safety stock and lead time, both from the supplier (Vendor) or a DC (Transfer). In cases where purchasing does not utilize the auto calculate / turns procedures, the ROP Vendor acts as your Min value.
- First Receipt Date: The date of the first receipt of this item. Replaces date added, as some users will simply add all items as inventory items, so the date added becomes irrelevant.
- Last Sale Date: Date of the last sale of this item.
- Last Purchased: Last date that this item was put on order on a PO
- Quantity Per: This is the quantity by which this item is priced. When selling an item, the selling price will be divided by this quantity to determine the unit selling price.
- Type: This is a freeform text field, used in conjunction with the Pur Qty field to present the part in such a way that it reads properly on a printed PO. Examples are BOX (1 BOX of X), ROLL (1 ROLL of X), CASE (1 CASE of X), etc.
- Weight: The weight of the item.
- Pur Qty / Use on PO: Pur Qty is the quantity in which this item must be ordered. Any time an order is created, this item will be ordered in multiples of this number. The Use on PO field determines whether the actual order quantity sent to the supplier is divided by the Pur Qty. For example, if a supplier will only sell an item in boxes of 25, which they see as a single unit, but you see as 25 single items, you would set the Pur Qty to 25 and the Use on PO to Y. This would cause the system to order only 1 unit but, upon receipt, would put 25 into stock. Another scenario may be where a supplier requires you purchase an item in multiples of 6. You still need to order 6, but you must always order in multiples of 6. In this scenario, you would set the Pur Qty to 6 and the Use On PO to N. This will cause the item to only be ordered in multiples of 6.
- Lead time in days: Parameter to be used when calculating ROP for this item when using the modified purchasing model.
- Reorder: Reorder can be set to 1 of 4 things:
- N: Do not reorder
- Y: Reorder
- S: Summary: Reorder this number (using the Pur Qty) from the Summary number (Field 13). This causes 1 unit of Field 13 to be taken out of inventory, and the number of units in Pur Qty to be added to this item.
- K: Kit: Replenish one of this item and reduce inventory, optionally (see next field), on the items that make up this kit. See below for more info
- Ret Allow: This field defaults to Y, but allows you to disallow returns on an item.
- Kit Type: This field can have one of two options
- M: Manufactured Kit – This is a kit that is deemed to be an inventoried item. This means that you would receive this item into stock, and at that time the components that make up the kit have their inventory depleted as determined by the kit. Components of an M type kit cannot be substituted. Also, as it is an inventoried item, sales of a M kit are attributed to the kit itself.
- C: Counter Kit – This is a kit that does not have actual inventory, but is put together at the time of sale (ie. Oil Change Special Kit). Items can be substituted with this type of kit as well. At the time of sale of this item, the clerk can determine which components are making up this kit, and the sales of these items are attributed to their components.
- Price Break: A sales quantity price break that is to be applied to this item. For example: Buy 6, save 15%. More on this is available in the pricing manual handout.
- Bin Location: Bin in which this item is located if utilizing bins.
- Supplier #: Internal supplier code for this number. This is used when creating orders by supplier number, and must be set if creating orders in that fashion.
- Line Cd: The warehouse line code for the item. This is the code that will be submitted to the warehouse when sending order for this item. If it is blank, it will use the default which is set in the warehousing menu, under Jobber to A/S line code
- Ecat Vend: Override the ecat vendor which this item should be associated with
- Currency: The currency code associated with this number
- Price Levels 1-6: The first level of pricing of an item is the base price levels 1-6 listed on the item itself. These are the prices that are calculated based off of the configured pricing parameters and the pricing provided by AMS, or manually entered.
- Average Cost: The average cost of an item based on the number of units received and the cost at which they were received.
- Core Price: The selling price of the core of this item.
- Cost / Core: The base cost of the item prior to any upcharges put in via pricing parameters. Also, the core cost of the item.
- Discount Level: The pricing parameter that is to be used when calculating prices of the item. More on this in the pricebook manual
- ABC: Ranking of the item
- Tax Code | Duty % | Season: The Tax level to be charged on the item (Tax codes are defined in the Billing parameters maintenance, but 1 is the default, 0 would charge no tax). Season code is used for seasonal purchasing and can be calculated.
- Levy: Eco fee code associated with the item.
ADD/CHANGE/DELETE ITEM
- In the product master is where you would add an item. The most important things to determine when adding an item. Initial item setup really only requires the part number be added, but it is always suggested that you determine the proper price discount, base price, qty per, purchase quantity and order points. This will allow you to, at a minimum, properly purchase and sell the item going forward.
- Change & Delete options are also available. You must note whether an item in on hand, or on order before deleting it from the system.
BARCODES
- While there is a base barcode on the item itself, many times the barcode may not be available at the time of adding the item to inventory. If this is the case, a default AMS generated barcode will be created and associated with the part. In these scenarios, additional barcodes can be tied to the part via the Inventory > 1. Data Maintenance > 1. Master Files > 5. Alt Barcode screen.
- This screen will allow you to select a part number and then attach a new barcode to it. You may also select a quantity for the barcode to allow for box, case, pallet, etc barcodes that can be used when receiving or purchasing the part.
Kit Maintenance
The inventory system has been enhanced greatly with the introduction of Kit items. A kit is defined as either a counter kit: one that is created at the time of sale, or a manufactured kit, one that is created and placed on the shelf ready for sale. A counter kit has no inventory on hand, a manufactured kit does.
A kit item may belong to any category, or a separate category may be created for manufactured kits, if desired. There is no difference between a regular category record and one that is created for kit items.
Add the kit item
Identifying a kit item involves two steps. First, enter [k] (not displayed as an option) in the reorder field on the item record in inventory control à file maintenance à product master maintenance. Then differentiate the item as a counter [c] kit or a manufactured [m] kit in the kit type field directly below. The remainder of the fields may be set up as usual.
Attach components to the kit
Once the kit item has been created and [F1] accepted, the user is prompted with maintain kit definition? If [n], the function is complete and the user is able to add a new kit number. The kit definition will have to be set up at a later date using the change product menu option. If the response to maintain kit definition? Is [y], a secondary input screen is presented for entry. The category, part number, description and barcode are displayed, as well as the average cost and kit type. Changes are not permitted to these fields.
The user will enter the category/part number combination for each product that will be used in the manufacture of this new item and the quantity that will be used. If the kit type is [m], the default for the sub field will be [n] and may not be changed. If the kit type is [c], then the sub field is available for entry and may be either [y] or [n].
A sub refers to the user’s ability to substitute another item for the one listed in the kit definition at the time of sale. Since a manufactured [m] kit is created and assembled prior to sale, no substitutions are permitted. However, a counter [c] kit is assembled at the time of sale and by its nature, requires the ability to sub out items on the fly.
The hide field refers to whether or not to hide the component items on the printed invoice. If the items are hidden on the printed invoice, then only the kit item will appear as with a normal item. When the items are not hidden on the printed invoice, then the kit item is printed as usual, and the component items are listed underneath. No pricing information is printed for the component items.
Kit Master File Listing
A new report has been added to the inventory control à inventory reports à additional inventory reports menu, called Kit Master File Listing. The user enters a specific category, a category range or [enter] to default to all categories.
For each kit item, the 5 price levels and the associated GP % are printed, as well as the cost and core price. Then, the details of the components for the kits are presented with category / part number and description, the quantity required for each kit and the costs, unit, extended and core. Totals per kit are provided.
Inventory considerations
As stated previously, no inventory is held on hand for counter [c] kits. The components are subtracted from inventory at the time of the sale, just as if each individual item was sold separately.
Manufactured [m] kits, however are held on the shelf ready for sale and therefore must be received prior to being able to be sold. Increases in inventory levels for [m] type kit items are done through Purchase order à Purchase Order Receipts processing à rush receiving. As the inventory of the full good is increased, the inventory of the component goods is reduced.
Multiple Bin Locations
Multiple Bin Locations
There is now the option for setting up alternate bin locations for each item. Before proceeding, make sure that the flag to allow multiple bin locations (field # 45) has been set to [y] in SYSTEM UTILITIES > Systems Setup > Sales Desk > parts billing parameters > Screen 2.
Bin Location Maintenance
This option is used to set up, view a specific location or view all locations for a specified product. Deleting an alternate bin location is also available from this menu. This option is found in the menu inventory > Data Mantenance > Master Files > Bin Location Maintenance.
Bin Location maintenance can also be performed when in the Product Master maintenance by selecting “B(ins)”.
The Bin Type “R”, Retail, is used to identify product in the retail space of the store. Nightly reporting is available to indicate which retail products currently have zero available and need to be replenished from other locations.
The retail bin location can only be the primary location if it is the only location for the product and POS transactions will update the on hand in the Retail location.
Receiving and Stock Transfers will update the quantity on hand in the primary location which is the location shown on screen in Product Maintenance and Inquiry.
Any product with multiple bin locations and the Retail location that has a negative on hand quantity will have the Retail location adjusted up to zero and the primary adjusted down by the same quantity nightly.
Stock Relocation Adjustment
inventory > Data Mantenance > Inventory Adjustments > Stock Relocation Adjustment
Use this option to adjust the on-hand quantities for each alternate bin location. Enter the category and part number. All of the locations will be displayed. At the any change prompt, press enter to get to the quantity to adjusted by field. Enter the quantity (followed by a minus sign) that is to be moved to other locations. Then distribute that amount to the alternatives. The total field at the bottom must be 0 in order to [f1] accept the entry. Pressing enter after the accept will allow you to continue with further adjustments and “N” will exit to the menu
Stock Relocation Report
This will report all Retail Locations that have and On Hand Quantity of 0 or less which is to be used to replenish these locations. This report will be run automatically each night.
On Dock Purchase Orders
To flag a purchase order as On Dock use Purchasing > Purchase Order Receipts > On Dock Assignment. Enter the PO Number then confirm it is the correct PO, the first page of lines on the PO will be displayed and answer “Y” to create the Dock locations for this PO.
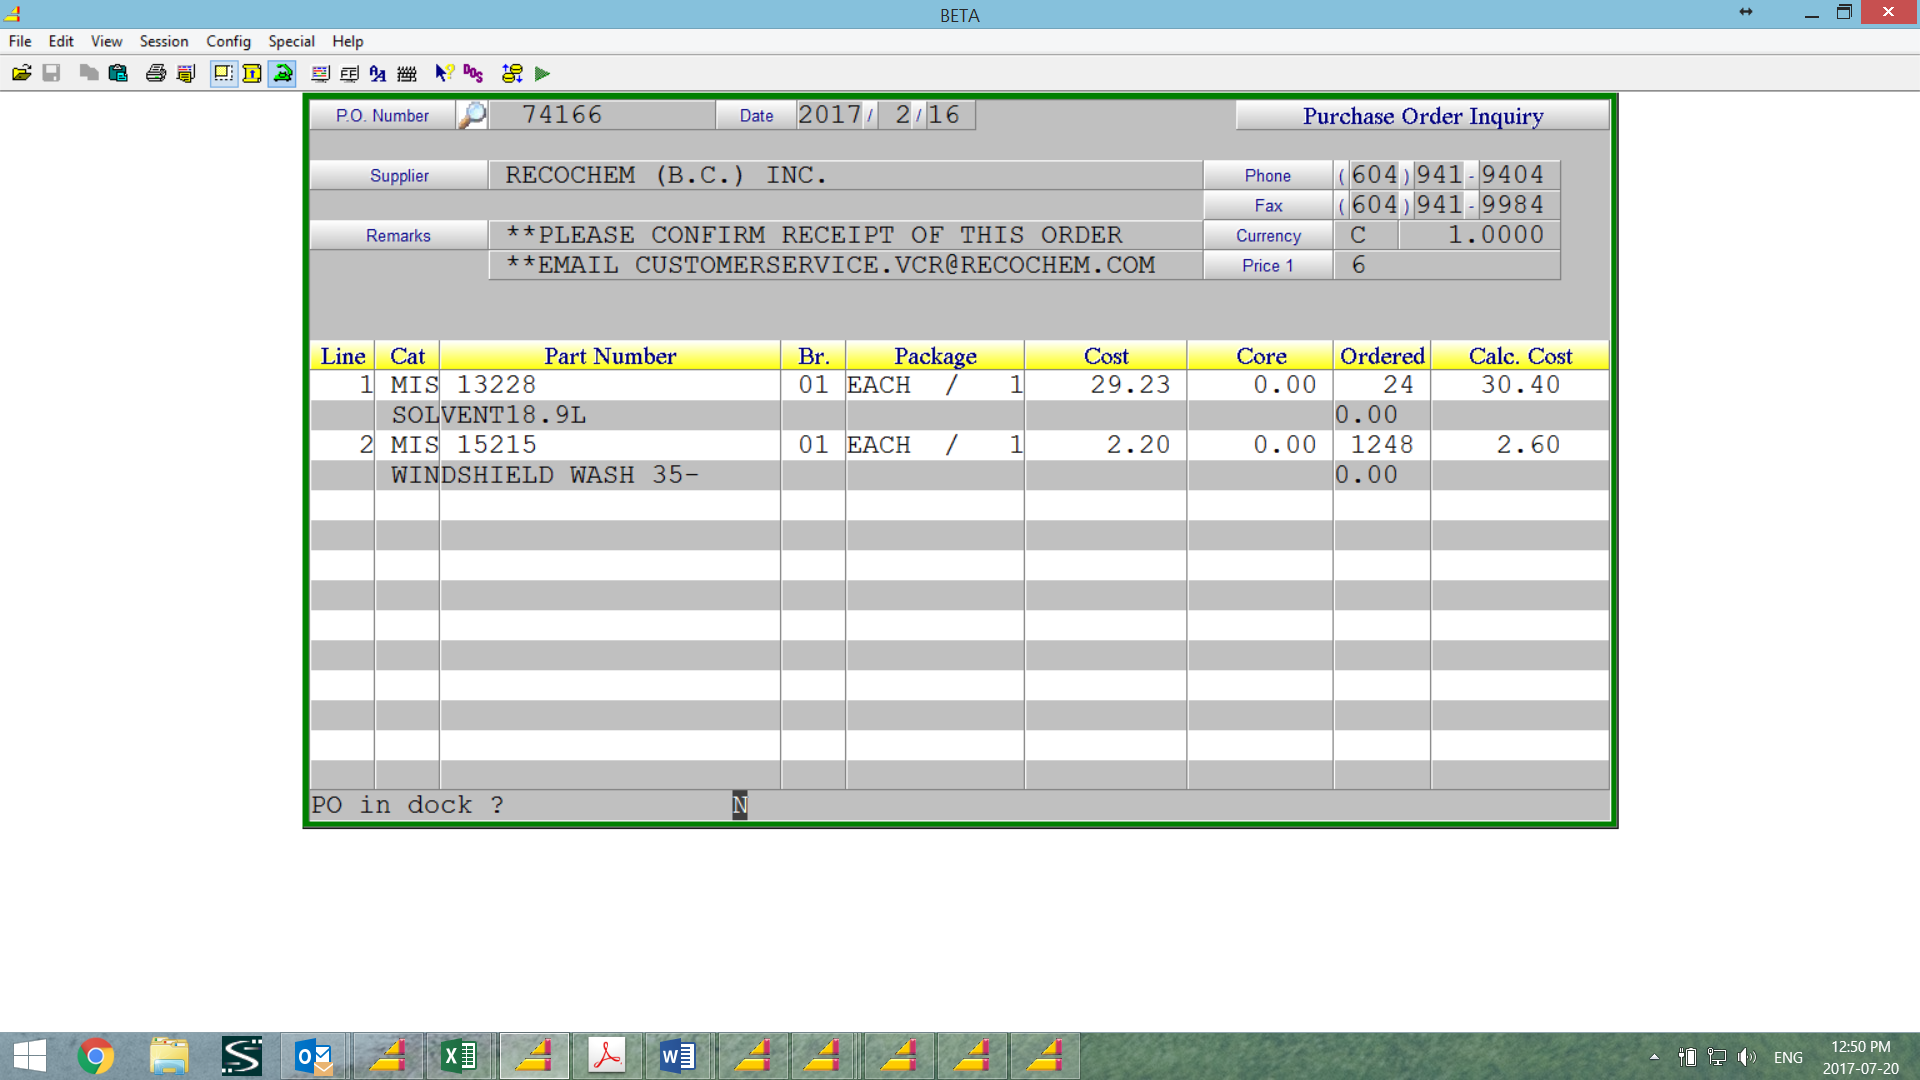
The Dock locations are automatically removed when the PO Receipts Update is completed for the PO.
P.O. Receipts Relocation Listing
Multiple bin location items are automatically received to the primary bin location as listed on the product master maintenance screen. This report provides the information necessary for the user to relocate the quantity received to different locations.
This report is Purchasing > Purchase Order Receipts > P.O. Rec. Relocation Listing
P.O. Receipts Relocation Adjustment
Similar to the Stock relocation adjustment, the user is able to move the recently received quantity from the primary (default) location to multiple locations.
P.O. Receipts Relocation Update
The adjustments made in the above step will be updated.
Alternatively the adjustments can be made using the Stock Relocation Adjustment described earlier in this document.
Inventory Adjustments
When entering Inventory Adjustments, inventory >
Data Mantenance > Inventory Adjustments > Stock Adjustments, if a part is assigned to multiple bin locations you will need to enter the quantities adjusted by bin location when completing the adjustment
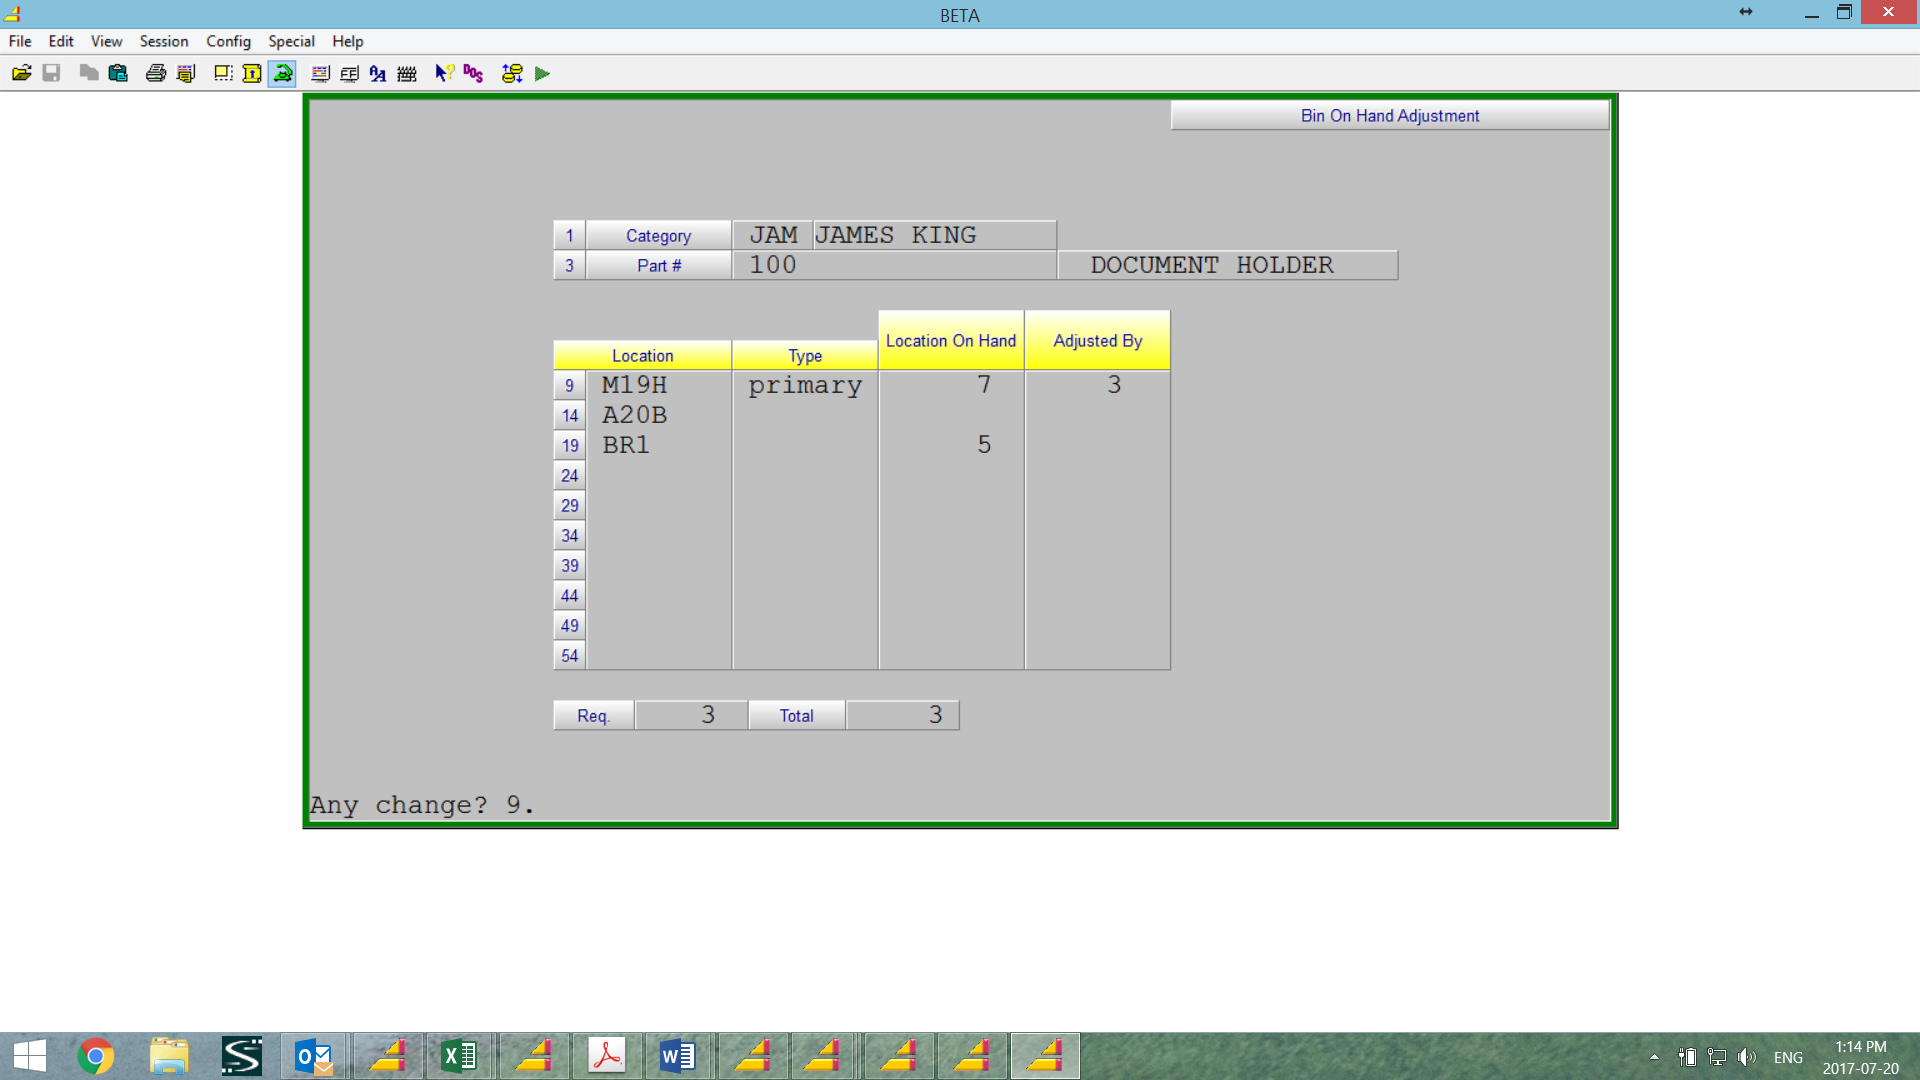
The default is to adjust the primary bin but you can change the quantities however the adjusted quantity for the bin locations must equal the total adjustment quantity.
This is the same procedures as used in the Stock Relocation Adjustment
Bin Location Lookup in Invoicing
Products with Multiple Bin Locations that have an on hand quantity will be identified on the invoice screen with a comment of “*MANY*” and products that have zero on hand but are included in an On Dock PO will have a comment of “*DOCK*”.
To check the available quantities for multiple bin locations within the invoicing screen press Shift F4 from the line Type field and you will be prompted for a line number to search. The bin location quantities for the selected part will be displayed in the Information Window. The sale of a product will always reduce the on hand quantity for the Retail bin location if one exists and if no retail location exists the Primary location will be adjusted.
All bin locations will be included on the printed invoice.
Pricing Guide
Overview
This document outlines the files and processes involved in updating and applying pricing to items and/or customers in the COUNTERPOINT ERP system. We will discuss the very basic fundamentals of pricing (stocked vs. non-stocked) down to some very specific utilities that can add significant dollars to your bottom line. This document will also define the various places where parameters need to be set up, the behind-the-scenes updating of prices and some common issues that can occur in the pricing module.
Supporting Files/Information
BILLING PARAMETERS
- Within your billing parameters is where a number of things are set up that cover how your system handles pricing.
- To access the billing parameters, you want to take menu path System Utilities > 3. System Setup > 4. Sales Desk > 2. Parts Billing Parameters. From here, there are a few options:
- Price Levels - Screen 1 – Fields 14/15/16: When AMS receives a price file, we will only load Cost, Core and up to 3 other price levels (Jobber/Dealer/List). Fields 14-16 define where these prices would be assigned in your system.
- Alternate List – Screen 3 – Field 52. This allows you to use a price other than price level 1 to show as list in the invoicing program.
- Allow price reductions – Screen 4 – Field 39: Setting this to an “N” will stop the price update routines from allowing price reductions. DO NOT RECOMMEND SETTING THIS OPTION!!!
- Remove zero priced items
- Update price multiplier codes – Screen 4 – Field 14 (Auto Update Discount Levels): When set to Y, AMS price updates will also update stocking items to have the same Price Multiplier code as what the system finds. If the system does not see a match, it will update space to the items.
- Allow non-stocked items to autoselect a category – Screen 1 – Field 17 (Use Part Index): When set to Y, this will cause all items in an AMS price file to no longer need a category forced in when selling the item in the invoice screen. Please note: This will NOT add the item to inventory. Only create the convenience of not having to force a category code.
CATEGORY FILE
- Category maintenance can be accessed via menu path Inventory > 1. Data Maintenance > 1. Master Files > 1. Category Master

- In order for pricing to properly update, a category MUST have a pricebook vendor, and that pricebook vendor MUST be the same as what we provide in the header of the price input file.
- An incorrect or wrong pricebook vendor will result in no prices updating.
- Notify AMS if you notice any duplicate codes
- Always ensure the proper buying group code (UNI/AS/BBW prefixes)
- Additionally, you must ensure that the correct catalogue vendor code is assigned to the category in order for proper pricing to show online on either the autoecat or nexpart catalogues. Please Note Fields 20 & 22 for the vendor codes
- Field 32 also enables Price Point pricing, which will be covered later.
Pricing the Item
PRICE PARAMETERS
- Many price files will only contain 1 or 2 prices, so when a price update runs, we utilize ‘pricing parameters’ to determine what the rest of the price levels should be. These parameters are split into two types: Stocking Parameters and Non-Stocking Parameters
- Price parameters allow you to set the rest of the 1-6 price levels in COUNTERPOINT based on percentage increases or decreases from a base price given to you via price file update.
- Note the concept of percentage increases. Many assume 1X or 2X pricing where, in our world that would be +100% or +200%.
- Pricing parameters are the lowest and most general level of price definition within COUNTERPOINT. Before we can set up discounts, contracts, specials, etc. Pricing parameters MUST be set up. This defines what prices are assigned to an item.
- When AMS sends out pricing files, we assign each file a price parameter code. Sometimes these codes are pre-defined by the price file provider, sometimes there are requests to break files out into various different groupings for your use.
- When it comes to pricing parameters though, there are a few things to note:
- There are two types of pricing parameters, Stocked and Non-Stocked. This allows you to mark-up product that you have to bring in differently than that which is on your shelf.
- There is a ‘Default’ price parameter that we always look for in case of no price parameter existing. This is a blank or space price parameter code.
- Non-Stocked parameters are always provided in the files AMS sends out. These codes MUST exist, or the system will attempt to use the blank/default price parameter.
- Stocking price parameters are assigned at your discretion. We may send a file defining a price parameter level of “X”, but if your stocking item declares the pricing parameter code for that item is “Y”, the system will assign “Y” pricing to the item
- While there are two files that are maintained, there is one main maintenance screen accessible in the COUNTERPOINT menu via Inventory > 4. Pricing > 1. Data Maintenance > 1.Price Multipliers

- However, you can also maintain JUST the non-stocked parameters via another program.
- Inventory > 4. Pricing > 1. Data Maintenance > 2. Non-Stocked Multipliers
- You can see in the image above, there are two sections: The top section is the stocking parameters and the lower is the non-stocking parameters.
- When setting up a price parameter, we always try to advise that you to set up a ‘blank’ or ‘space’ price level. This price level acts as a backup, or default parameter when the automated routines update price files.
- You then want to set your base price that you will work your parameters up/down from
- In the first line, ‘Becomes’ MUST be provided by us. For example, if you put Price 1 Becomes Price 6 in the first line, but all AMS delivers is List (Price 1), then the parameters will never work.
- Another thing to note is that, in some cases, your screen layout may be off and your cursor will look to be stuck in the yellow heading. If you notice this, please call AMS and have us rectify the issue. This can cause issues of you getting kicked out of the invoicing screen when billing a non-stocked number
- The field after the % sign is where you define ‘rounding’. This can either be (R) for Retail, or (C) to round up to the next penny. There is more info on Retail Rounding below
- You do not NEED to set up all of the prices, just the prices that you use in counterpoint.
- In the bottom section, the customer will usually just copy the parameters set in the top section, and they are even prompted to do so. However, they can manipulate it if they desire.
- If it is a very complicated category, where there are more non-stocked parameters than stocked, you may need to utilize the ‘Non-Stocked Parameter’ program.
- At the bottom of the pricing parameter screen, the default category MUST be properly set.
- An improper category here will result in bogus prices showing on the web, where the web is trying to price an item based on the parameters from the wrong category.
- Any parameters that are set up here must be additionally set up on the items in your inventory file as well via the Product Maintenance screen, available via menu path Inventory > 1. Data Maintenance > 1. Master Files > 1. Product Master. The screen looks like this:

- The ‘Discount Level’ field is where you would place your pricing parameter code.
- Additionally, if you enter an asterisk (*) in the discount level field, all price updates will be blocked. This locks all current pricing (except cost)
RETAIL ROUNDING
- When setting up pricing parameters, you have the option to assign ‘Retail Rounding’. Retail rounding is the concept of rounding up to pre-set cent values, ie. .49/.99.
- To set up retail rounding, you want to take menu path Inventory > 4. Pricing > 1. Data Maintenance > 5. Retail Rounding Parameters

- Retail rounding parameters are ‘stacked’, you define constantly rising ‘up to values’.
- You then define what items will be rounded to, based on their original price.
- In this example, all items up to 32.50 (and also above the price of the last parameter) will be rounded to the next $9.99. So, an item that is 30.15 will become 39.99. 35.89? 39.99.
Pricing Updates
UPDATE INQUIRIES
- To check when a price update happened, or what a price changed from, you can look at the price update inquiry found in Inventory > 4. Pricing > 2. Inquiries > 2. Price Changes Inquiry
- Select the source (S)tocked or (P)Line, a category and a part number.
- You will be presented with all of the most recent price updates, the price parameters used and the price the item changed from.

- To check a more summary version of when files updated, use Inventory > 4. Pricing > 2. Inquiries > 1. Price Update Log
AUTOMATIC UPDATES
- Each time AMS receives an update file, we are given an effective date for said pricing file. This file is sent out to customers with enough time to automatically update on the customer’s site on its effective date.
- All automatic price updates run at 3am on the effective date
- You can optionally also update pricing multiplier codes when running price updates by going to System Utilities > 3. System Setup > 4. Sales Desk > 2. Parts Billing Parameters., selecting Screen 4. Field 14 should read ‘Auto update Discount Levels’
- Setting this to “Y” will mean that, any AMS price update that is run will update all stocking items with the price multiplier level assigned to the file that is updating.
MANUAL UPDATES
- In cases where users decide against automatic updates, or when a user would like to re-update a file, the manual price update routine is available.
- To access the manual update routine, you would take menu path Inventory > 4. Pricing > 4. Update by Manufacturer
- This will present you with a screen listing all currently available updates on your system (Files are purged every 90 days).
- You can scroll through this list with the (N) key, or select a vendor with the (V) key. Once selecting a file, a small pre-processing routine runs to ensure validity of the file. As all files are checked before release, and emails sent to us in any cases where files ‘slip through’, there should be no issues and you only need to press F1 to pass through this screen
- Finally, you are presented with the price update screen:

- If the file has been updated, it will notify you. Simply pressing enter will pass by the message.
- The options of the manual update are, in order:
- Update stocking inventory - This allows you to choose whether to update your stocking items or not. Input is a Y/N option.
- Select Categories to Update - The categories listed here are the categories in your system with a matching vendor code in
ONLINE PRICE CHANGES
- If you have lines where AMS does not provide pricing, you have 3 options to update the prices manually.
- The online price change menu is found at Inventory > 4. Pricing > 5. Online Price Changes
- Within this menu, you have multiple options of how to manipulate your pricing
- By Category By Part: Scroll through the category part by part, changing the prices on each part individually
- By Category By %age. Utilizing percentages, similar to pricing parameters, change all or some of the parts within a category.
- All Categories – By %age. This option will update ALL parts in your inventory, utilizing percentage based changes much like the pricing parameters. THIS UPDATE IS NOT REVERSIBLE. ALWAYS BE SURE BEFORE RUNNING THIS OPTION!
By Category By Part

- Lets you select a category, the price levels you wish to manipulate, the sequence in which to scroll through the category, whether to update the price level (Y/N), and whether to use price parameters when updating prices.
- You then scroll through each item simply entering in the new price, if you select to use price parameters, all other prices are updated.
By Category By %age
- Looks much like the pricing parameter screen. Let you update pricing in a category by percentages.
- Select category, price multiplier level you wish to update (optionally), whether to update only blank prices, and whether to ignore any locked items.
- Prices are updated by price level. You select an increase/decrease for each price 1-6.
- Enter in the percentages you wish to update based on. These percentages are based on the pricing currently in the system.
Discounts For Point-Of-Sale
One thing to note in this section is that, discounts take president based on their specificity. So, the hierarchy for what discount will take effect (from highest precedent to lowest) is:
- Special (If Price is lower than calculated)
- Contract (If billing parameter is set. More in the contracts/specials section)
- Customer Discount By Category
- Industry Discount By Category
- Customer Discount (All Categories)
- Industry Discount (All Categories)
- List Price (Or alternate list price, if set in billing parameters as described in ‘Billing Parameters’ section)
Separate to all of those though, is Price Point Pricing, which is applied BEFORE any customer specific discounts or specials are applied.
INDUSTRY DISCOUNTS
- Customer discounts are discounts up/down from one of the 6 counterpoint prices that are applied to items based on a category and an industry group, which can be a grouping of many customers.
- To set up an industry discount, you take menu path: 4. Sales Desk > 8. Administration > 2. Customer Pricing > 2. Discount By Group

- You will need to create a group code, pick a category (or all categories), a discount or surcharge and then a price level (1-6) to base that discount/surcharge off of.
- Once the discount is set, all customers who apply to this new ‘Industry’ need to have this code assigned to them in the Customer master maintenance – Accounts Receivable > 1. Data Maintenance > 1. Customers

- Opt to change the customers you want, and add the new discount group code in to the ‘Discount Group’
CUSTOMER DISCOUNTS
- Customer discounts are discounts up/down from one of the 6 counterpoint prices that are applied to specific customers and categories, or a customer and all categories.
- To set up an industry discount, you take menu path: 4. Sales Desk > 8. Administration > 2. Customer Pricing > 2. Discount By Customer

- You will need to pick a customer to assign the discount to, pick a category (or all categories), a discount or surcharge and then a price level (1-6) to base that discount/surcharge off of.
CONTRACTS / SPECIALS
- Contracts & Specials are, essentially, the same thing. The difference only being who the pricing is assigned to. If the contract is assigned to a specific customer, or group of customers, it is deemed a ‘Contract’. If it is assigned to all customers, it is deemed a ‘Special’
- Contracts/Specials are accessed via the menu path Sales Desk > 8. Administration > 2. Customer Pricing > 3. Contract/Specials

- Contracts / Specials can be set up for:
- Single customer or all customers
- Singe category or all categories
- Single part or all parts
- Single Discount Level (Price parameter level) or all price parameter levels
- Only blank? Works in conjunction with the Discount level field to determine if you meant “All Discount Levels” or just meant to apply it to blank or ‘space’ discount levels.
- Single Discount Group (Industry Type) or all discount groups
- Single Class or all classes
- Single Subclass or all subclasses
- From there you select a start and end date for the contract/special and how you would like it priced.
- When pricing, special pricing can be set up one of these ways:
- A single net price. For example, the part will be sold at $9.99
- A discount/surcharge on a price level. For example, the part will be sold at price 5 -10%
- Based on a quantity price break code (more on price breaks below)
- Finally, you can elect to apply the contract/special to stocked AND non-stocked items.
PRICE POINT (VELOCITY) PRICING
- Another option to adjust selling prices is to apply Price Point Pricing. Price Point Pricing allows you to adjust the multipliers for an item based on its selling price.
- You can access the price point pricing maintenance screen via the menu path Inventory > 4. Pricing > 1. Data Maintenance > 3. Price Point Multipliers

- PLEASE NOTE: Before you can add price multipliers for a category, you must access the category master maintenance and set the price point pricing flag to “Y”. This is covered in the ‘CATEGORY FILE’ section of this document.
- In this example, for all items in the ALT category, there is a multiplier that applies for all items starting at $0.00, a multiplier that applies for all items starting at $50.00 and a multiplier that applies for all items starting at $300.00.
- When starting out, you first define the start price for which you want the multipliers to apply.
- Then, in the bottom section of the screen, you fill in the multipliers you want to apply for the items falling in to that range.
- These multipliers are applied BEFORE any customer discounts are applied.
- Retail rounding can also be applied to these multipliers.
- Also, you do NOT need to fill in all price levels. If you only wish to adjust specific price levels, ie Price level 1 & 3, only fill in multipliers for price levels 1 & 3.
QUANTITY PRICE BREAKS
- Quantity price breaks allow you to apply discounts to items based on how many of an item are sold. For example, if a customer buys 4 of an item, they get 10% off. If they buy 10, they get 15% off.
- Once a price break is set up for selling, they are activated by creating a special for an item, and using the newly created price break as a means to price the item.
- The quantity price break maintenance is accessed via menu path Sales Desk > 8. Administration > 2. Customer Pricing >7. Quantity Price Breaks

- When setting up a price break, the first thing you do is assign it a code.
- ‘S’ type breaks are for Selling, ‘P’ type breaks are meant for purchasing.
- From there, you pick the quantities and the discount the customer will get when buying that quantity.
- You would then create a special for the items you want to be on special in order for them to sell at that price. See the ‘Contracts/Specials’ section for more info.
- When a price break is set up, counter staff will be notified when selling applicable items with a message of “Next Break At ___”. This notifies them that the customer could get a discount if they buy X amount of the items.
- Also, on autoecat, customers will be notified of these price breaks with a message indicating “Buy X Save Y%”
Utilities
RESET MULTIPLIERS BY %
- Resetting the multipliers by a percentage allows you to update ALL price multipliers based on a percentage of what they currently are.
- This option is irreversible, so please ensure you are positive you want to do it.
- To access the reset multipliers by %age menu option, take menu path Inventory > 4. Pricing > 1. Data Maintenance > 4. Reset Multipliers By %

- The screen allows you to choose stocked, non-stocked or both types of multipliers.
- Then you simply put in the percentages you would like to go up or down from your current multipliers, for which ever price levels you wish to change. You do NOT need to put in all price levels.
UPDATE MULTIPLIERS
- This option lets you manually apply multipliers to a given category without running a price file.
- To access this option, take menu path Inventory > 4. Pricing > 1. Data Maintenance > 8. Update Multipliers

- To run the program, select a category (Or all categories, which is NOT recommended) and elect which prices you would like to run price multipliers on.
- The multipliers will run on CURRENT pricing in your inventory file.
DELETE PRICEBOOK VENDOR
- In some cases, you may want to remove old non-stocked pricing from your system. To do this, you can delete an old pricebook vendor
- Inventory > 4. Pricing > 1. Data Maintenance > 6. Delete Pricebook Vendor.
- The program only asks for a vendor code. This would be the pricebook vendor code found on your category.
Troubleshooting
COMMON PROBLEMS
- Prices Not Updating
- Check that the price book vendor on the category file is correct.
- Catalogue prices are wrong
- Check that the catalogue vendor on the category is correct.
- Unable to create price point pricing.
- Check that the price point pricing field is activated on the category record.
- Need to re-update a price file.
- Try the manual price update routine. Failing that, call AMS
- Want to map price multiplier codes to match a buying group.
- Update the ‘Auto update price levels’ option described in the ‘BILLING PARAMETERS’ section to a ‘Y’ (if it is not already)
- Manually run a the price update using the manual price update routine described in this document
- Update the ‘Auto update price levels’ option described in the ‘BILLING PARAMETERS’ section to a ‘N’ (if you don’t want this feature for ALL lines.)
Product Popularity Listing
As a normal part of working with your inventory there will be times when you need to understand the contribution to sales being made by the items within a line. Counterpoint provides a report specifically for this purpose. The report is accessed via the following menu path.
- Inventory…-> 7. Reporting…-> 2. Performance Reports…-> 2. Product Popularity
Which brings up the following screen.
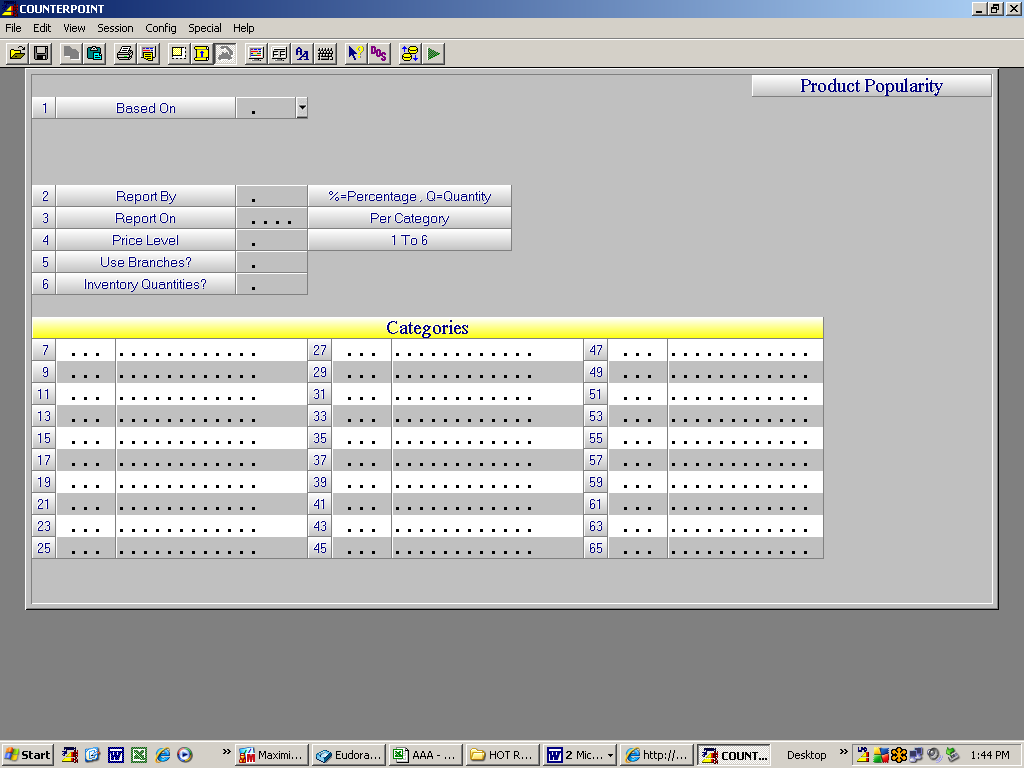
Enter data into fields as follows.
1 Based on – Click the drop down box arrow to see available options. Enter your choice as appropriate to your needs. Click the close button to close the popup.
2 Report By – Enter Enter % or Q as appropriate to your need.
3 Report On – Enter the number of parts you wish to see analyzed or hit [Enter] to see all parts in the line.
4 Price Level - Enter the Price level to be used in for reporting purposes.
5 Use Branches? – Enter Y if you wish to include branch sales in the computations on ranking. Enter N to compute based on your store only.
6 Inventory Quantities? – Enter Y to have report include On hand balances. Enter N to suppress printing of on Hands..
Fields 7 thru 65 – Enter categories you would like included in the printout
When you have entered all desired fields hit [F1] to run the program.
Report can be displayed on screen or printed out as appropriate to your intended usage.
Receiving Product
The purchasing module, specifically the receiving portion, is how all items will be brought in to inventory. There are two main methods of bringing product in, those items on a purchase order, and those items NOT on a purchase order. Regardless, for proper tracking of product, it is recommended that all product be introduced into the system.
OPTIONAL COUNTERPOINT SETTINGS
- In the PO receiving module, you have the option to run Automatic or Batch updates.
- Automatic updates will initiate the PO update routine every time you accept a PO for update, this means each PO is updated every time you finish receiving it
- Batch updates allow you to receive many purchase orders, and run a PO update once, updating any queued receiving’s since the last update.
PO RECEIVING WITH THE RF GUN (RECOMMENDED)
As long as barcodes are on all of the product, the recommended method of receiving product into inventory is via the RF gun. Even if there are no barcodes in the COUNTERPOINT system, the RF gun will allow you to add a barcode to an item when receiving
Getting Started:
- Log in to the RF gun.
- Select Option 3 from the RF menu.
- Once in the PO receiving menu, the program will list all of the outstanding Purchase orders on the system and will allow you to select one to be received.

- To select a P.O. simply select one of the three options, 0=PO, 3=NEXT and 9= QUIT.
- When you use option 0 you will be prompted to enter the PO number. The P.O. number to be received does not have to be displayed on the screen to enter the P.O. number.
- CTLR followed by R will take you back to the main menu.
Scanning Items In
- The first question to be answered is if you wish to use “Autoscan” Y or N.. The use of “Autoscan” prompts you to scan each item and it defaults the received quantity to 1 unit for each scan and then goes back to the barcode field for the next scan. Alternatively if “Autoscan” is turned off N you will be prompted for a quantity each time you scan an item. You will have to accept each entry with CTRL followed by A.

If you are using the “Autoscan” mode you can correct the quantity after the item is scanned by pressing Tab or CTRL I. After entering the new quantity press CTRL A at “Any change” to accept the entry
- You will then be placed in the barcode field. From here you can begin scanning items from the order
Pressing CTRL C at the barcode will place you in the part number field, in case an item’s barcode does not scan. Once you enter the part, the cursor will move to the Received field, where you can enter the quantity received.
- Once you have entered the quantity received and pressed CTRL A, the program will ask if you want to add a barcode for the item. Pressing Y will return you to the barcode field where you can enter in a new barcode for the item
- Once you are done scanning all items, Pressing CTRL A at the barcode will start the completion process where you will be asked if the editing is complete where the options are Y or N. If the editing is complete the next option is to print the edit list Y or N. If the edit list is printed. The next option is to flag the P.O. for update. When Y is used the PO will be flagged for update at your work station.
- You may continue scanning more PO’s or go to your workstation and perform the update process. Purchasing > 6. Purchase Order Receipt processing > 4. Purchase Order Update.
PO RECEIVING VIA THE MENU
When receiving large orders, or for orders where minimal changes are needed, it would be more expedient to receive the product via the COUNTERPOINT PO menu options.
Getting Started
- Log in to COUNTERPOINT with your regular “menu-based” login
- Navigate to Purchasing > 6. Purchase Order Receipts

PO Receipts Input
The PO Receipts Input is an onscreen program that allows you to quickly accept large orders that have minimal changes or discrepancies. The program allows bulk receipts and the ability to add products to an order at the time of receiving.
- Enter the PO Receipts Input menu option
- Enter the Purchase Order number that you wish to receive
- Your first option is to make a bulk decision on what to do with all numbers on the PO
- B(ackorder All) – Will set the status of each item on the PO to Backordered.
- C(ancel All) – Will set the status of each item on the PO to Cancelled.
- R(eceive All) – Will set the status of each item on the PO to Received.
- enter to receive by line # - Will leave all items untouched and allow you to receive line by line.
- Once you have made an initial decision, you will be allowed to pick lines to alter, or begin updating the received quantity.
- Pressing Shift/F6 from this point will allow you to add a new item to the PO
- On each line, the D column defines the disposition of the item.
- C – Indicates that the item is Completed, and will update when you trigger the PO to update.
- K – Indicates to Keep the item on the PO and do NOT update it when you trigger the PO to update
- Once all lines have been properly received, Press CTRL/A until the OK to update prompt appears.
- A Y will initiate an update of the PO
- An N will NOT update the PO, and keep the PO open, allowing you to make changes later.
RUSH RECEIVING VIA THE MENU
Rush receiving is meant to handle the receipt of items NOT on a purchase order. This can range from drop ship, to special order items. The use of rush receiving allows you to quickly add items to inventory without the creation of a purchase order.
Getting Started
- Log in to COUNTERPOINT with your regular “menu-based” login
- Navigate to Purchasing > 6. Purchase Order Receipts > 5. Rush Receiving

Receiving Product
- The rush receiving program requires a PIN be entered, if you are unsure what your PIN is, contact AMS.
- You begin by entering a packing slip or invoice number that came with the product. Anything can be entered here.
- Next you will enter the Category, Part Number and quantity received. The Vendor field is optional
- For pricing, you can enter a Jobber price (with a discount to get your cost), or enter your cost. Then enter a core and/or levy if necessary.
- NOTE: If the supplier for this item (or the supplier you entered) is set to update the cost to inventory, and the item is a stocked item, then the cost of the item will be updated when finalizing the receipt
- If the item is non-stocked, you will be presented with a listing of any sales that may have been made on this item and an option to add the item to inventory.
- When electing to add the item, you will be brought to the product maintenance screen and any pertinent info from the receiving screen will be brought over.
- NOTE: If the item has recently been sold, and this is a receiving to cover that sale, be cautious about adding the item. If the item is on a completed invoice, the system has no way of knowing that this receiving is in regards to that invoice, and adding it to inventory will falsely up your quantity on hand.
RUSH RECEIVING VIA THE RF GUN
Getting Started:
- Log in to the RF gun.
- Select Option 10 from the RF menu.

- The RF rush receiving routine requires a PIN before starting the program. This is the same as used for physical adjustments, etc. If you cannot remember your code please call AMS support.
- The receiving scan begins by asking whether you wish to use Autoscan or Not. Selecting “Y” for Autoscan indicates that you will scan each item individually. Selecting “N” for Autoscan indicates that you will scan an item and manually enter in a quantity.
- After you choose Y or N the cursor will move to the Bar Code field.
Receiving Product
- Scanning product from the barcode field will receive the item on to the rush receipt transaction.
- All defaults for an item will be accepted, and you should not need to do anything else on any of the items
- Once all items are scanned CTRL/A will accept the receiving, and you will be presented with an option to print your journal.
RF Count 'Cheat Sheet'
Getting Started
- Select Option 9 from the RF menu.
- The RF count routine requires a PIN before starting the program. This is the same as used for physical adjustments, etc. If you cannot remember your code please call AMS support.
- The count scan begins by asking whether you wish to use Autoscan or Not. After you choose Y or N the cursor will move to the Bar Code field.
Scanning Product
These are the options from the Bar Code field
-
- Start scanning product. If you are in AUTOSCAN mode pressing the ENTER key will perform the same as a second or subsequent scan.(Add 1 to the Qty)
- CTL/r to change the Autoscan setting. A second CTL/r will leave the program
- CTL/t to view the last item scanned by the User ID (RF0 through RF5)
- CTL/c to enter a part number that cannot be scanned
- TAB to manually enter the QTY when in Autoscan mode
Error MESSAGES
-
-
- Record in Use - (Another user scanning same Part Number)
- Over Variance – Y=Update Inventory as Counted, N=DO NOT Update (CAUTION: No is the Default if only Enter is pressed)
- Scan Failed – To continue Input Y and Press Enter.
-
Variance Report
To view or print how any user is progressing select the following menu path from any workstation;
6. Inventory / 6. RF Count Reporting / 6. Update RF Count Detail / 1. Update RF Count Detail
- Enter your PIN
- Enter the Login ID you wish to report on. Pressing Enter will select ALL.
- Press Enter at the Update option to Not update the permanent count history data.
select the type of report you want; A=All items scanned OR V=Variances only. - The Report will display on the screen.
Update Count History
Select the same program as for Variance reporting
- Select ALL user ID’s by pressing Enter
- Input U and press Enter
- Select the type of report you want; A=All items scanned OR V=Variances only.
- Accept the options selected at the “Any change?” prompt.
Stock Adjustments
For one-off changes to inventory, it is recommended that you use the Stock Adjustment routines. It is NOT recommended to use this option to do any type of inventory count, as the audit trail is not as verbose.
ADJUSTING INVENTORY VIA THE MENU
In the Inventory > File Maintenance > Product Master Maintenance options, the on-hand, committed and on-order quantities are audited fields and may not be changed. In order to alter the quantities outside of Invoicing, Purchasing or Physical Count functions, stock adjustments must be entered and updated.
Getting Started
- Log in to COUNTERPOINT with your regular “menu-based” login
- Navigate to Inventory > 1. Data Maintenance > 2. Inventory Adjustments > 1. Stock Adjustments

Adjusting Inventory
- Inventory Adjustments require a [PIN] when starting the program. While entering the [PIN] nothing will be displayed on the screen and you must press [ENTER] to complete the entry. If you do not have a PIN type [QUIT] to exit the function. PINs are assigned in sales desk controL > file maintenancE > counterman maintenance.
-
TYPE - Check the function of each type and choose the most appropriate one.
-
[3] allows you to add or reduce (using a -) the quantity of inventory from the existing quantity on file in Inventory ControL > File MaintenancE > Product Master Maintenance. The quantity will be increased or decreased by the quantity you enter in the [quantity] field.
- NOTE: This is the recommended and most common option used here.
- [5] allows you to decrease the quantity on hand for the part number while at the same time increasing the sales history.
-
[7] allows you to completely replace the current quantity on hand with whatever is entered.
- NOTE: This option should NOT be used to count entire categories or groups of numbers. Use the Physical count routines described above for these tasks.
-
INVOICE / REFERENCE
- These fields are skipped during processing within inventory control, but are used during purchasing à purchase order receipts processing à rush receiving, which utilizes the same screen layout.
-
CATEGORY / PART
- Enter the category and part number combination to be affected by this stock adjustment. If the category is not known, the field may be bypassed and the part number entered directly into the part field. When a match to the part number is located, the category will be automatically filled in and the user will be moved to the quantity field. Should the item in question exist in more than one category, the user will be presented with a list to select from.
-
ON HAND / ON ORDER / DEFECTIVE ON HAND
- When a match is found in the Product Master file, the information for these quantities will be displayed.
-
QUANTITY
- Enter the quantity either as a positive or as a negative (using the -) keeping the above rules in mind for each type of adjustment.
-
CUSTOMER NUMBER
- If recording a sale adjustment using type [5], enter in the associated customer number for the history records. If the adjustment type is either [3] or [7], the default vendor will be displayed from the product record.
- JOBBER PRICE / DISC. OFF JOBBER / COST
- This information is displayed for information’s sake, but may not be changed.
-
[3] allows you to add or reduce (using a -) the quantity of inventory from the existing quantity on file in Inventory ControL > File MaintenancE > Product Master Maintenance. The quantity will be increased or decreased by the quantity you enter in the [quantity] field.
- When the transaction is complete, the user will be asked whether or not to Print adjustment journal [y] will print the journal [n] will bypass the printed journal and [p] prints for this packing slip only (normally used for rush receiving)
- Adjustments to inventory levels through stock adjustments update to the General Ledger with the end of day Those entries are printed on the report called General Ledger Summary Edit list that is automatically printed at that time.
ADJUSTING INVENTORY ON THE RF GUN
Getting Started
- Log in to the RF gun.
- Select Option 5 for Stk Adjustment.
- The RF count routine requires a PIN before starting the program. This is the same as used for physical adjustments, etc. If you cannot remember your code please call AMS support.

Adjusting Inventory
- Scan the item in question and fill in the fields as necessary
-
TYPE - Check the function of each type and choose the most appropriate one.
-
[3] allows you to add or reduce (using a -) the quantity of inventory from the existing quantity on file in Inventory ControL > File MaintenancE > Product Master Maintenance. The quantity will be increased or decreased by the quantity you enter in the [quantity] field.
- NOTE: This is the recommended and most common option used here.
- [5] allows you to decrease the quantity on hand for the part number while at the same time increasing the sales history.
-
[7] allows you to completely replace the current quantity on hand with whatever is entered.
- NOTE: This option should NOT be used to count entire categories or groups of numbers. Use the Physical count routines described above for these tasks.
-
[3] allows you to add or reduce (using a -) the quantity of inventory from the existing quantity on file in Inventory ControL > File MaintenancE > Product Master Maintenance. The quantity will be increased or decreased by the quantity you enter in the [quantity] field.
-
QUANTITY
- Enter the quantity either as a positive or as a negative (using the -) keeping the above rules in mind for each type of adjustment.
- CUSTOMER NUMBER
If recording a sale adjustment using type [5], enter in the associated customer number for the history records. If the adjustment type is either [3] or [7], the default vendor will be displayed from the product record.
Stock Transfer Reconciliation
Basic Overview
This document outlines the recent discrepancy report and the new listing report that will print at your branch each night and how they relate to the reconciliation of inter-branch stock transfers, and the effort to try and catch on hand problems.
Packing Slip Confirmation Report
This report will print each night at each location, and is a listing of any unconfirmed Packing Slips & Stock Transfers sent from your location as of that night. Stock transfers will be identifiable by the customer they are assigned to with all stock transfers will be assigned to another branch.
Any stock transfers listed on this report are unconfirmed. If the stock transfer is over 24 hours old, it may be outstanding and should be reviewed with the contact at the receiving branch to ensure that the product was properly received. Any issues of product not being received, or quantities less than requested should be dealt with via the stock transfer confirmation so that the discrepancies can be properly recorded and presented back to the sending branch.
Stock Transfer Discrepancy Report
This report will also print each night at each location, and is a listing of any stock transfers that were confirmed by the receiving branch, but with discrepancies.
These discrepancies will need to be reviewed to ensure inventory levels are correct. If a stock transfer was requested, but the requested quantity was unavailable from your branch, this report will act as a trigger to go and review the on hand levels for that item. In the case where the system shows an on hand that is different than what is physically on the shelf, a stock adjustment should be made to correct the error.
If you know of an error that is not reported on the discrepancy report, you should review the Packing Slip Confirmation report to ensure that the transfer was, in fact, confirmed by the receiving branch.
Supporting Files/Information
BILLING PARAMETERS
- Within your billing parameters is where a number of things are set up that cover how your system handles inventory maintenance.
- To access the billing parameters, you want to take menu path System Utilities > 3. System Setup > 4. Sales Desk > 2. Parts Billing Parameters. From here, there are a few options:
- Retain Values in add? – Screen 2 – Field 34: When doing maintenance on multiple items, this will keep all of the values from the previous item as defaults on the next item added.
- Default Min/Max/ROP – Screen 2 – Fields 35/36/37: These values will be used as the default Min/Max/ROP on new items added to inventory.
- Auto Update Discount Levels – Screen 4 – Field 14: This option will update the discount level field of Inventory items to match those set by the supplier and/or AMS. This is a global setting, so you must be following, or be willing to follow, all of the discount structures provided by the supplier and/or AMS prior to setting this. Please call into AMS if you plan on changing this field, and have us review your current setup with you.
CATEGORY FILE
- Category maintenance can be accessed via menu path Inventory > 1. Data Maintenance > 1. Master Files > 1. Category Master
- In order to add an item to inventory within COUNTERPOINT an item must be classified within a category. So, if this is a new line that you are bringing it, this should be your first stop.
- To ensure pricing will move across when migrating items from pricebook to inventory status, the pricebook vendor (field 26) must be populated. This will also ensure that you get constant pricing updates in future.
- Additionally, you must ensure that the correct catalogue vendor code is assigned to the category in order for the item to show online on either the autoecat or nexpart catalogues. Please Note Fields 26 & 28 for the vendor codes
Transferring Parts
Transferring single items
The utilities used for transferring product at an item level from one number or category to another are found in the Inventory > 1. Data Maintenance > 5. Utilities menu
Product/Part # Transfer
6. Inventory > 1. Data Maintenance > 5. Utilities > 2. Product/Part # Transfer
This option takes your old number and moves it to a new number. Does not need to be within the same category. This should be used when creating a new number

- Enter the Category / Part of the item you wish to transfer
- Enter the Category / Part where you would like to transfer the part to
Product History Transfer
6. Inventory > 1. Data Maintenance > 5. Utilities > 3. Product History Transfer
This option takes only the history of an old number, and merges it with an existing number. No on hand information is transferred in this routine.

- Enter the OLD part number
- Enter the NEW part number
- Choose whether to append to or replace the history of the new part with the old part.
- Optionally change the description of the number you are transferring to
- Optionally change the alternative description
Transferring ranges of items
Before running any category based transfer routines, it is always suggested to run a category resequence
Inventory > 1. Data Maintenance > 5. Utilities > 1. Category Resequence
Category Transfer
9. System Utilities > 6. inventory > 4. Category Transfer
This utility should be used when moving all or part of a category to a NEW category. In this routine, the new category should not yet exist. You can, however, choose only a portion of the old category to move.
A stock status report can be very useful in determining the start and end of a category

- Enter the old category which you want to move product out of.
- Select the starting and ending part number for the range that you wish to move. If you are moving the entire category, you can press ENTER to default to start/end of the category.
- Enter the new category into which you want to move the product.
Category Merge
9. System Utilities > 6. Inventory > 4. Category Merge
This utility should be used when moving all or part of a category to an EXISTING category. This routine will add items to to the new category and merge the history of any duplicated items
A stock status report can be very useful in determining the start and end of a category

- Enter in the category you wish to add the parts to. (it should skip past field 3 (Part number)
- Enter the category you wish to move parts out of.
- Select the starting number you wish to move
- Select the ending number you wish to move
- Overwrite on dup? Y = replace any duplicates; N = merge any duplicates
Uploading Min/Max/Reorder
This document will outline the steps required to extract an inventory list, manipluate the Min/Max/Reorder in excel and then upload the values back in to COUNTERPOINT.
- Navigate through the menu to 6. Inventory > 1. Data Maintenance > 5. Utilities > 6. Inventory Item Extract

- Select your starting and ending categories
- A .csv file named pmdelim.csv will be placed on your Z: drive in html > b1
- Either use windows explorer to browse to the file, or open excel and open the file via excel
The file layout is as followsCagegory Part Description Branch Reorder Rank On Hand On Order Min Max Shelf Cost Purchase Qty SALES (13 columns) - Edit the Reorder/Min/Max Quantities in the excel spreadsheet as needed
DO NOT reorder the columns in the file. The upload works with a specific layout and this can cause serious issues with your inventory
- Save the file back to the Z drive under html > b1. Save the file as a "Comma Delimied (.csv)" file named pmload.csv
A reminder that the file contains all branches. Remember to remove any branches you do not want to update before you save the file
- To upload the infomation back in to COUNTERPOINT, navigate to 6. Inventory > 1. Data Maintenance > 5. Utilities > 7. Min/Max/Reorder Upload
The menu option starts the upload right away and there is no screen interaction.
Zero Category On-Hands
In Some cases, it becomes necessary to zero out the entire inventory within a category. The recommended way to do this so that you have a proper paper trail is to do a 'zero' physical inventory count. You can accomplish this by following these steps.
- Navigate to 6. Inventory > 6. Physical Inventory > 1. Parameters Maintenance

- Adjust field 2 Print On Hand (Y/N) to N. With this set to N, when you print an inventory count sheet, it will print a zero as the onhand in the inventory count file.
- Navigate to 6. Inventory > 6. Physical Inventory > 2. Count File Creates > 5. Multi-Cat. Count Worksheets
- Enter in the category you wish to zero on hands for

- Pres F1 to accept the category and F1 again when asked Any change? to create the count files
- When the print preview shows up, you can close the window without printing the count sheets
- Navigate to 6. Inventory > 6. Physical Inventory > 5. Count Update
- You will be presented with 2 different questions to confirm that you wish to update. Please answer them accordingly to proceed:
- Press RETURN to continue Y: Press the Enter key
- Are you sure?: Press Y - You will now see a screen with any outstanding count files. Press Enter to go into the list.
- Press N next to ALL categories you do not wish to update
This is VERY important. Updating old count files can severely throw out your counts on categories
- Ensure that the category you DO wish to update has a Y next to it.
- Press F1 to accept the changes to the list and F1 again to start processing the update.
- You will now be presented with a listing of all items whose onhand was zeroed out. This gives you a proper paper trail for inventory adjustment and financial purposes
Invoicing
How-to guides for the COUNTERPOINT invoicing screen
Adding Flyers to Invoicing
Overview
The promotions button on the Invoicing screen has the ability to allow the user to specify a currently running, or Future Dated flyer and have it available as a clickable item under the promotions button on the COUNTERPOINT Invoicing screen.
This also sets up attachment’s to be included with Customer A/R Statements
Setup
To do this the user must save the PDF document in the Z drive on their system under the HTML directory.
Once filed there they must identify the flyer by name using the Flyer Maintenance program.
The instructions below walk the user through the process of doing this.
Step 1
- Open the PDF Document on your PC with Adobe
- Click File – Save a Copy Navigate to My Computer select Z:\Flyer - and Click “Save”
Write down the name that you saved it under as you will need this for the next step.
Record Capitals and lower case exactly as this is important.
Step 2
Enter 1 – ADD FLYER
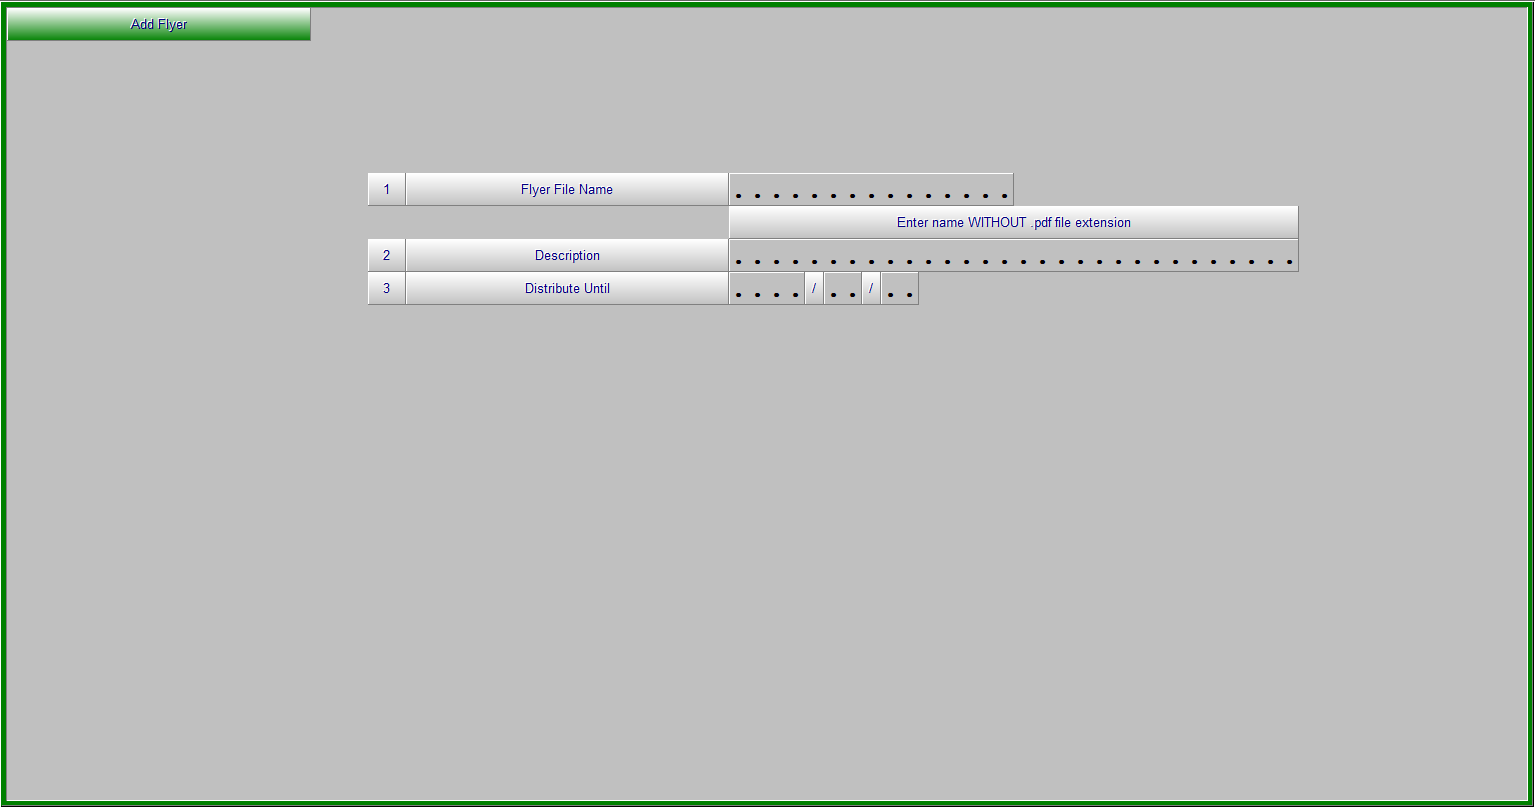
Fill in the fields as required.
When complete Hit F1-Accept.
Close the program.
Flyer should now be available as a clickable option under Promotions Button.
Bin Selection in Invoice
Definition
New feature when using Multiple Bin Locations and wanting to force the users to select the Bin Location that the product is going to be picked from in order to keep the on-hand quantities for each bin location accurate.
Processing
Billing Parameters
New option added to screen 5 of the Billing Parameters “Select Bin Loc. In Invoice” would need to be set to “Y
For Counter Kits where product is kept in multiple Bin Locations the parameter “18. Kit Detail Display” on screen 3 would also need to be set to Y
Invoicing
In the invoice screen the user will be prompted to select the bin location the product will be picked from after the quantity is entered. Bin locations are displayed in descending order based on quantity on hand. Dock locations are shown at the end of the list and cannot be selected, these are information only. A line number MUST be chosen.
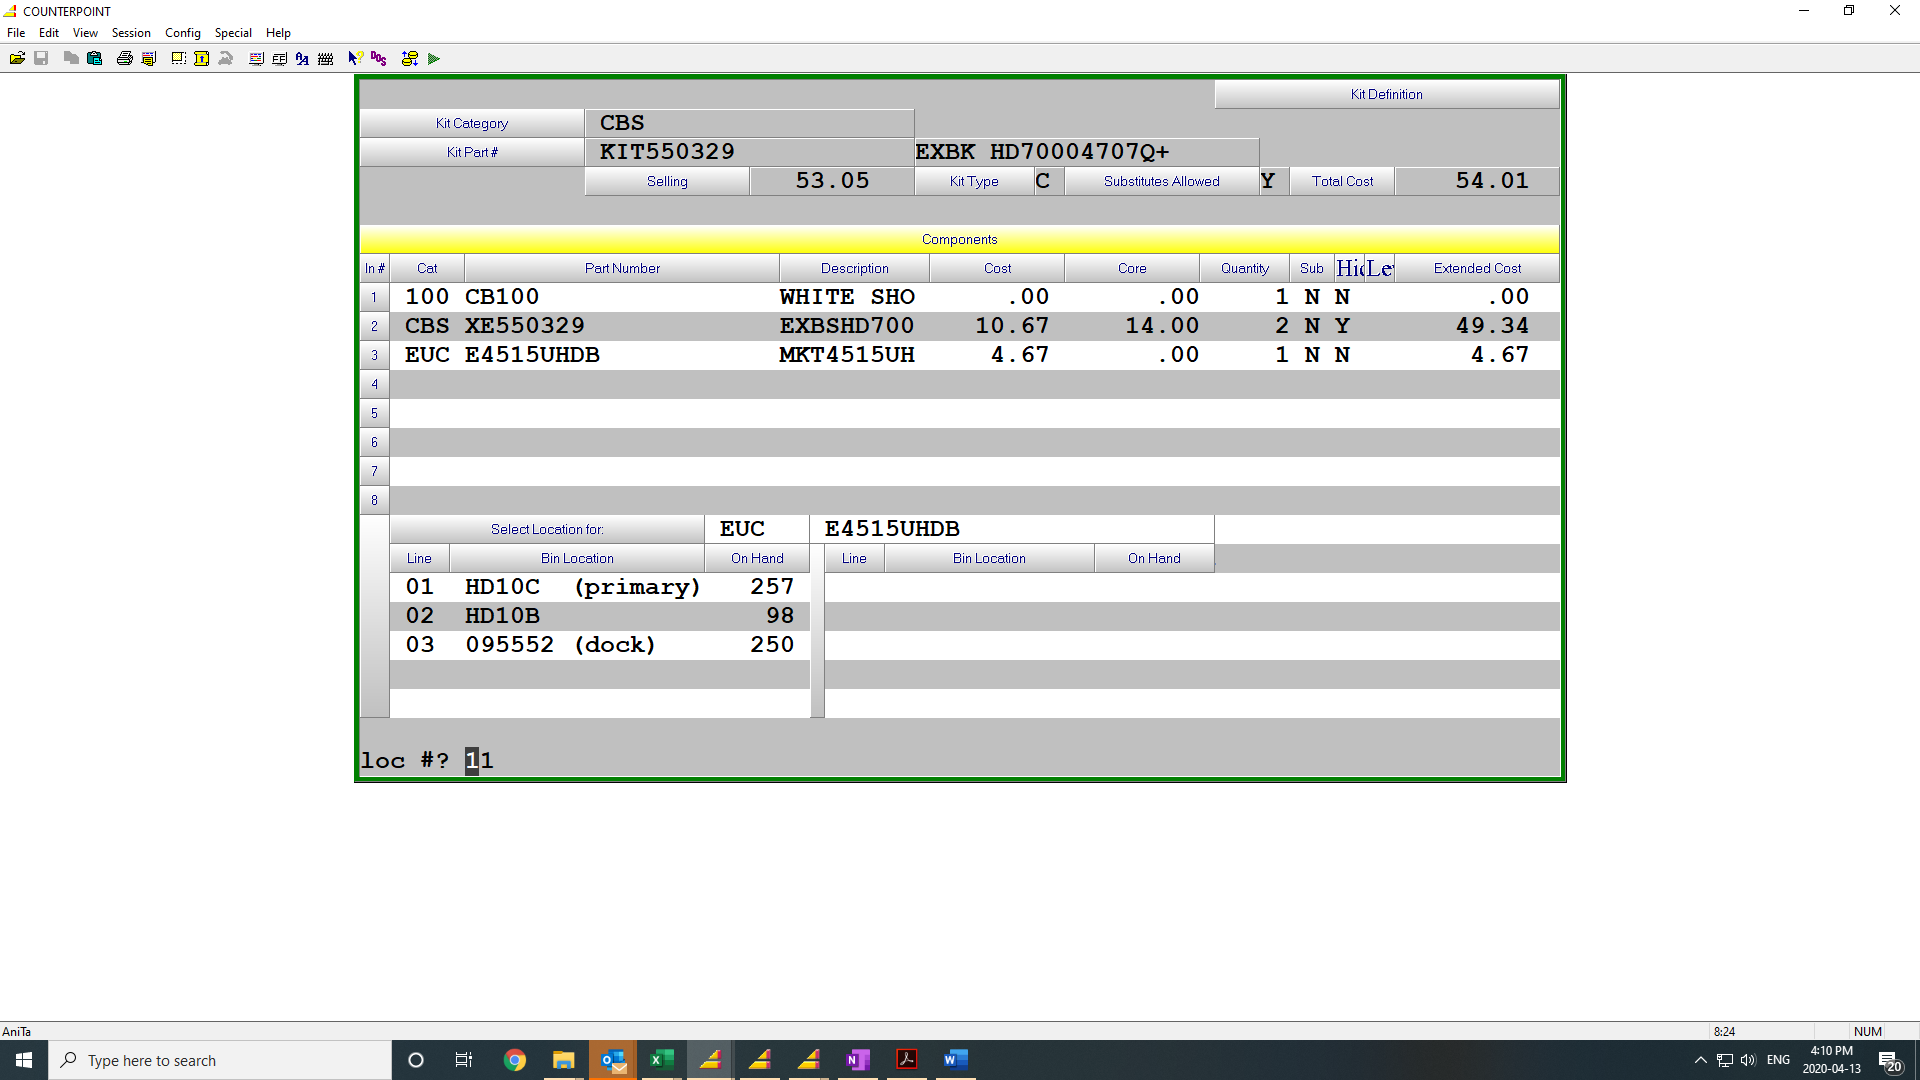
Only the Bin Location chosen will be printed on the invoice and the overall inventory of the part will be reduced and the quantity available in the chosen Bin Location.
Exceptions where this screen will not be displayed:
- If a part is only assigned to a single bin location
- If the quantity sold is greater than the quantity available is any single bin location
When selling a “C”ounter Kit the Kit components will be displayed on screen and if any of the components are located in multiple bin locations you will be prompted to select the Bin Location those parts will be pulled from. The components and the chosen Bin Locations will be printed on the invoice.
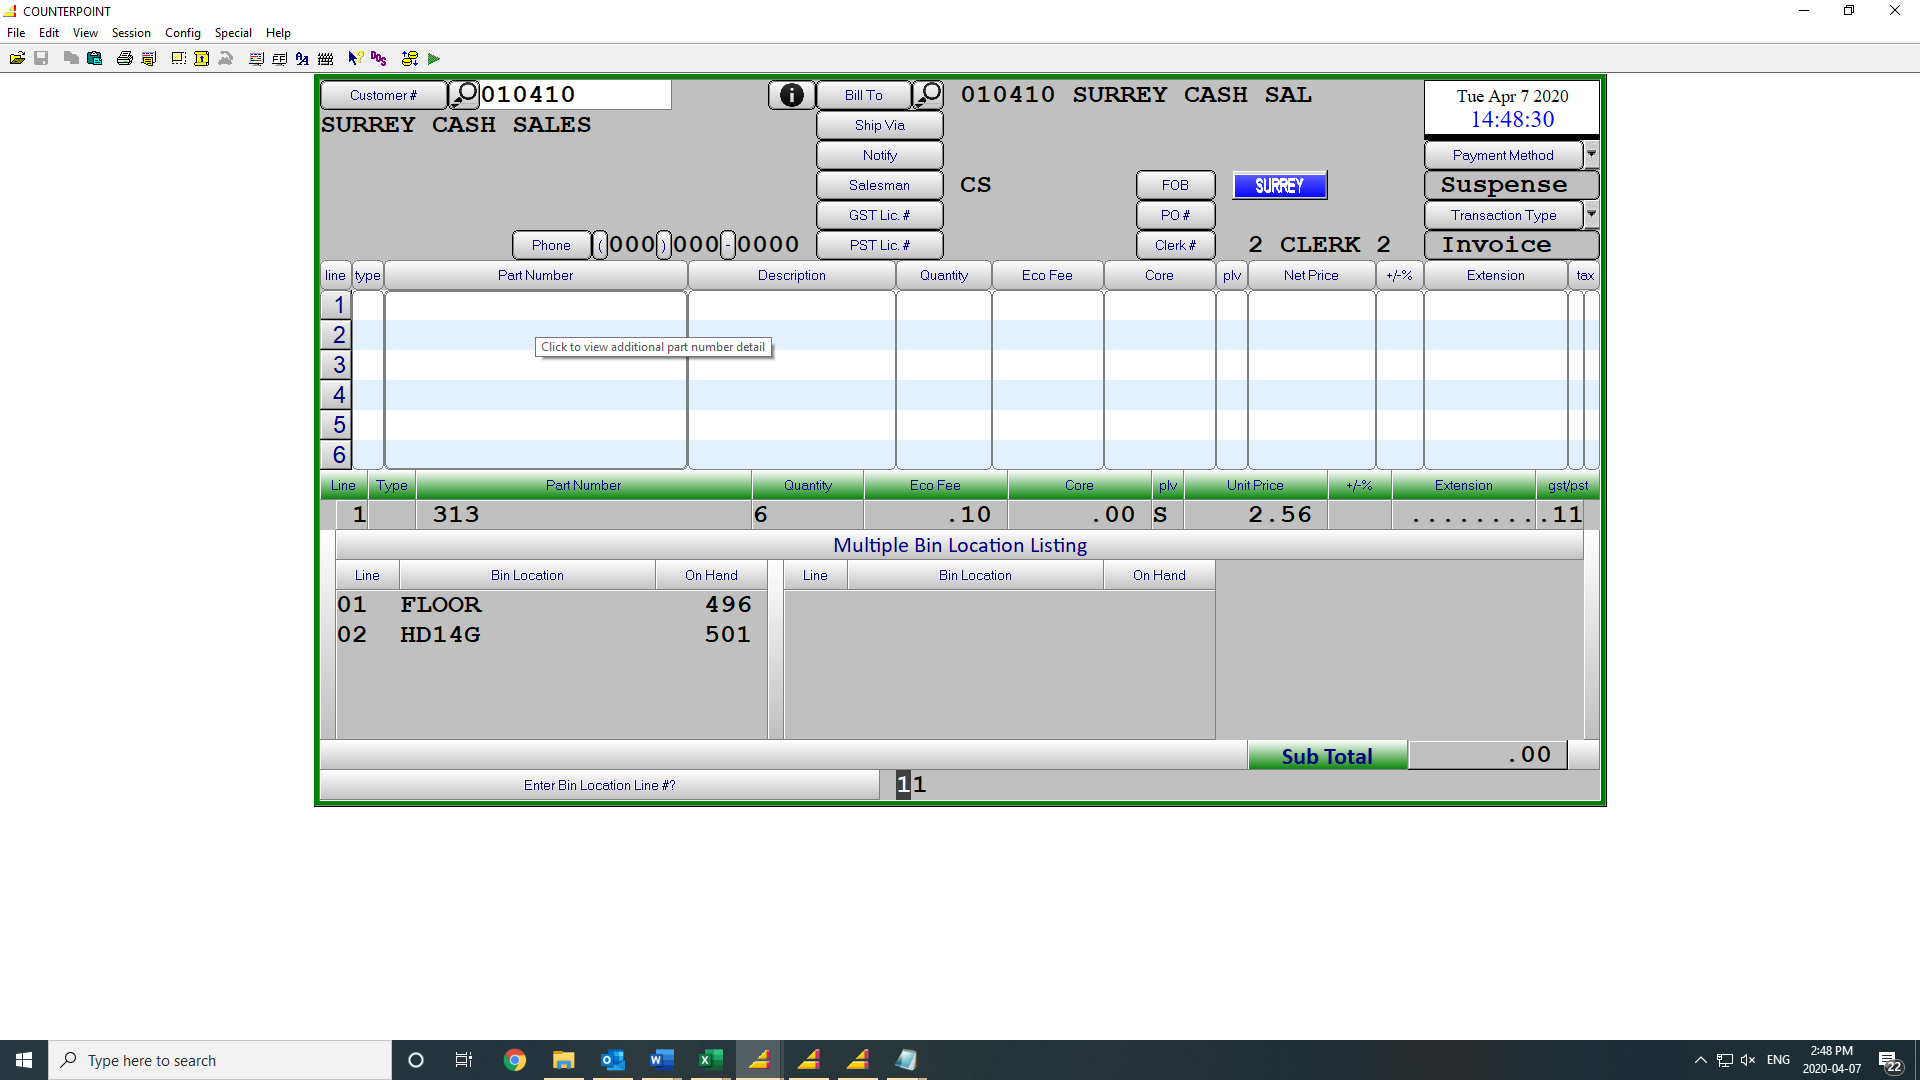
Invoice Print
The invoice print will only show the bin location selected for a part.
Exceptions:
- No one bin location had enough quantity to fulfil the order and all locations will be printed.
- Invoices created from backorder fulfilment will show the primary bin location
- Web orders will show the primary bin location.
- Automatic Transfers will show the primary bin location
Inventory Update
The on-hand quantity will be updated for the selected bin location.
The on-hand quantity will be updated for the Primary bin location:
- No one bin location had enough on hand
- Invoices created for back order fulfilment
- Web orders
- Automatic transfers
Customer History Part Search for Unknown Number
Occasionally you will get a customer asking for the same part as they ordered last Week/Month/Year etc. (Pick one). To compound the problem that will typically not know the part number. If they know the time frame of the purchase use the following procedure to locate the part number they ordered.
- From the Customer number field in the Invoicing screen hit Shift/[F1] which will launch the Invoice History Inquiry Program.
- Cursor will initially be in the Invoice number field, since we do not have that information hit [F3] twice to move the cursor to the Customer number field.
- Enter the Customer number of the customer making the request.
- Cursor will move to the bottom of the screen and request that you “Enter Start Date:” in the format YYYY/MM/DD. Enter the earliest date that you believe the sale would have been made. Optionally, if it is known, you can enter a PO number as well. If PO number is unknown hit enter.
- The screen will display the first invoice completed on or after the start date you entered.
- If that is not the correct invoice hit [F2] (Cancel) followed by [F7] (Next) to display the next invoice.
- Repeat the F2-F7 sequence until the correct invoice is located or you are ready to give up the hunt.
- Hit [F2] to cancel and return to the invoice screen.
Fleet Part Tracking
Fleet Tracking Setup
The Billing invoice screen has a built in Customer Fleet Part Tracking module. This module allows the counter staff to in affect build customer, unit, specific electronic catalogues. The creation of these catalogues can have a dramatic affect on the accuracy and speed with which counter staff can service parts requests on a customers fleet vehicles. The fleet part tracking is available from the LINE TYPE field on any invoice line while building an invoice by hitting Shift/[F10]. Doing so will launch the following screen.
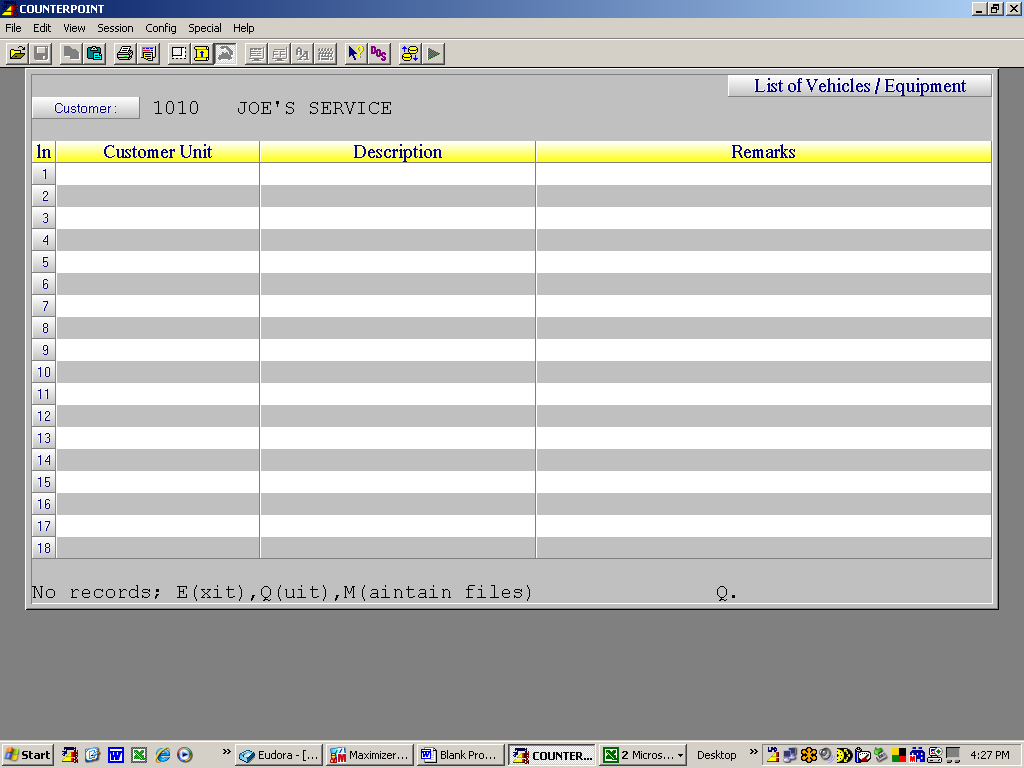
If this is the first time you have launched fleet part tracking on the system you will need to take the (M)aintain records option. Which will change the prompts at the bottom of the screen to read as follows.
“(E/P/G) Equipment, Parts , or Groups”
Again If this is the initial launch of Fleet Part Tracking take the (G)roups option. Which will bring up the Add Change Delete Screen. Select ADD which brings up the following screen.
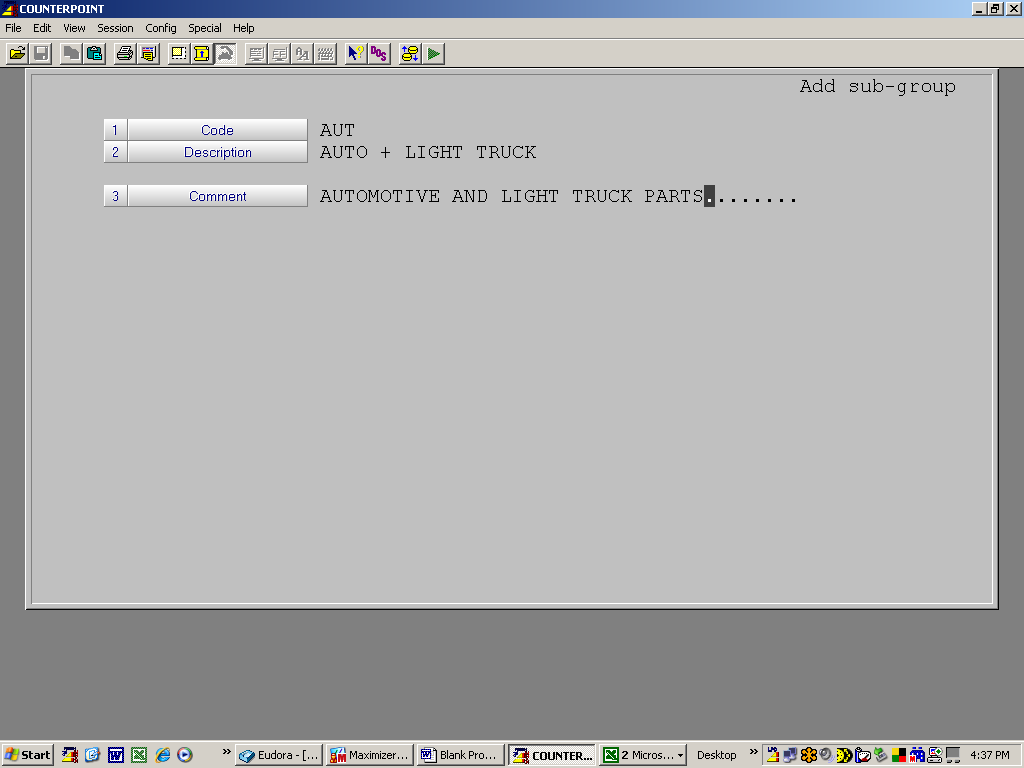
Sub Groups are required to support future reporting potential, so in this case you can make the subgroups very simplistic if you choose. For example if your operation sells HD parts and well as automotive and light truck you may want to set up only two sub groups being AUT and HD as shown below.
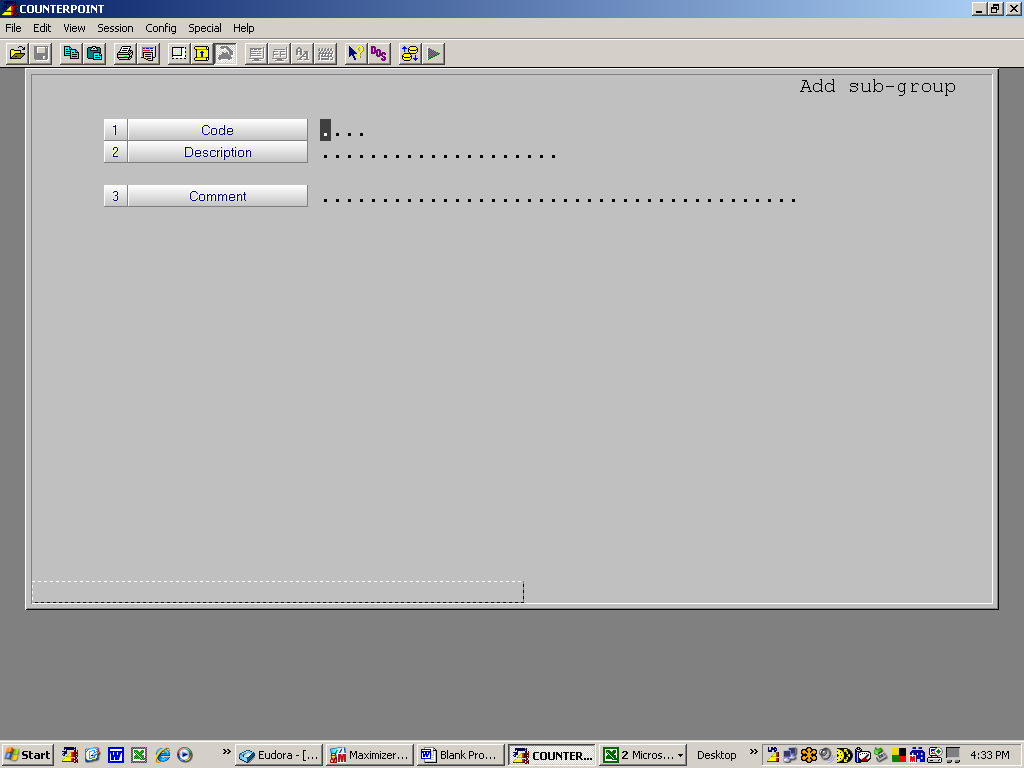

Once your groups are set up you will only need to return to this screen if you decide to change the basic groups that you set up. Upon Completion of the Groups Maintenance hit [F2] to exit this routine which will return you to the initial screen. As shown below.
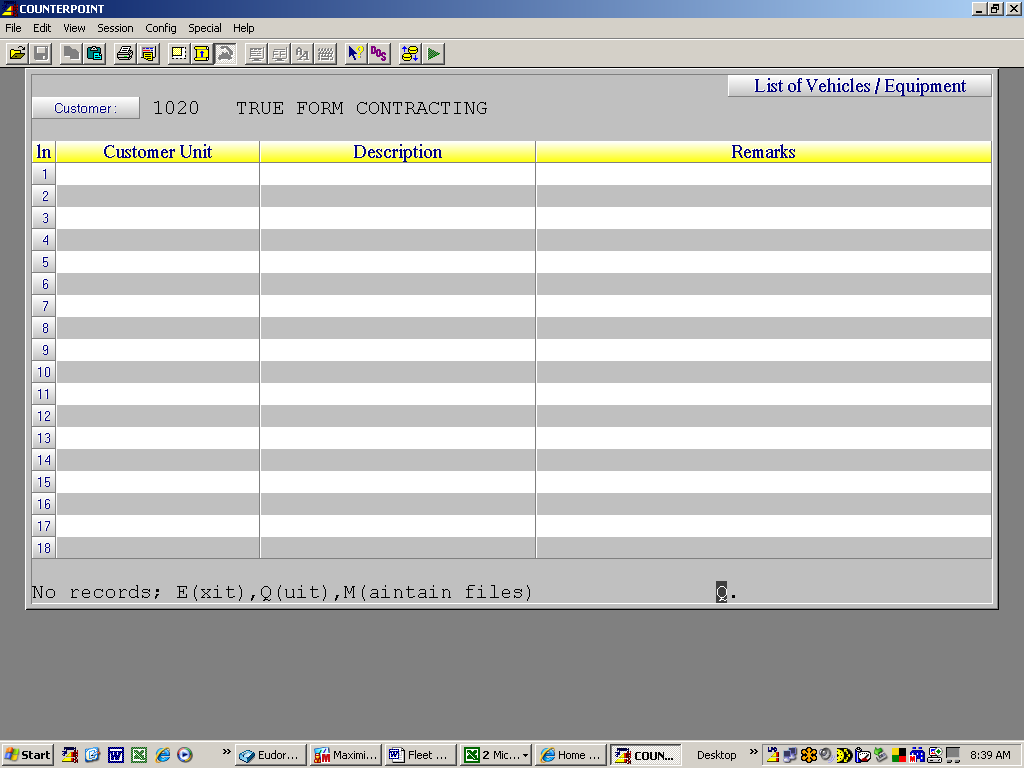
Note that the prompt at left bottom starts with “No Records” This is an indication that this customer, has not had any vehicles added to his fleet. In this case take the M(aintain Files) option then select The Equipment option which will bring up the Add/Change/Delete screen. Selecting Add brings up the following screen
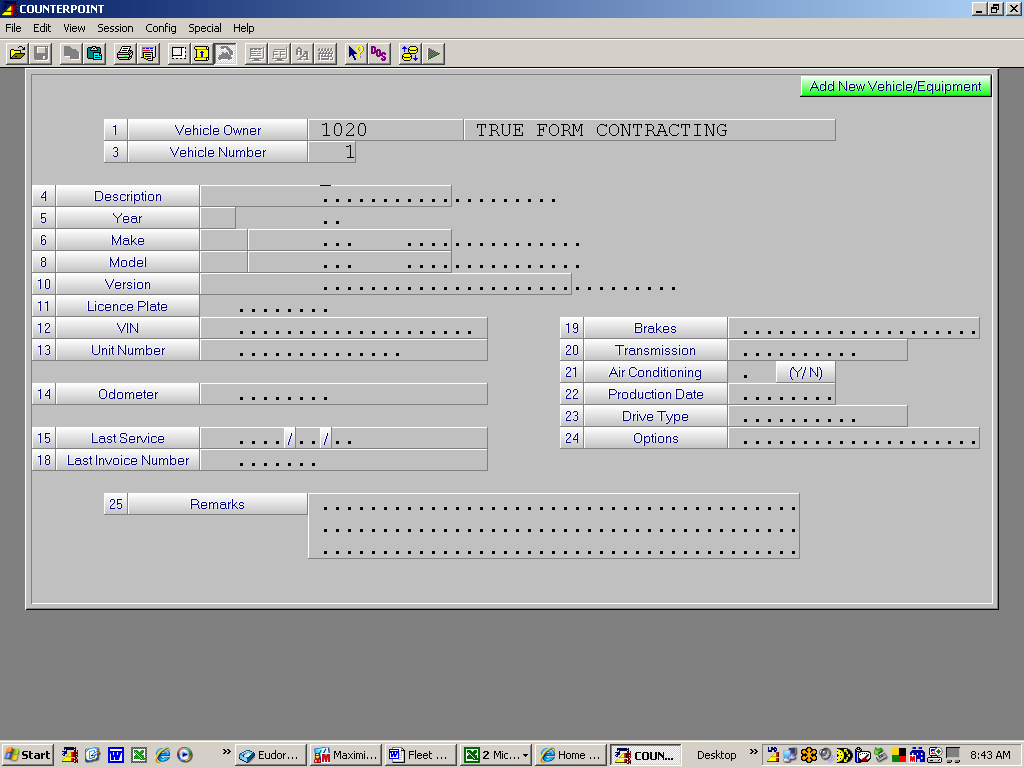
Enter Data as outlined below.
Description – Enter a meaningful description of this vehicle. Try to use the description that the customer will relate to as they will likely tell the counter staff that they are working on the “old red beast” or some other such internal name for this unit when they call in for parts.
Year – Yr of Vehicle.
Make – A three digit Alpha code for the make of the vehicle. Hit TAB to see a list of valid Car and Light Truck models. If the Unit is not automotive/light truck (ie a Heavy Duty or Construction vehicle) simply enter in the information required.
Model – A three digit Alpha code for the model of the vehicle. Hit TAB to see a list of valid options. If the Unit is not automotive/light truck (ie a Heavy Duty or Construction vehicle) simply enter in the information required.
License Plate, VIN, - Fill or leave blank as appropriate you your use
Unit Number – Typically a customer assigned number or name for this vehicle.
Odometer – Optional Enter if required. When field is accepted cursor to skip down to Remarks field.
Last Service, Last Invoice Number – These fields are system maintained from the repair shop module if it is used.
Fields 19 thru 14 - Reserved for Future use. No entry is required or possible in this screen.
When all fields are complete and you are happy with the results hit [F1] to add this vehicle to the customers fleet. If there are no other units to be added to this fleet, hit [F2] to exit the program. This will return you to the Fleet Vehicle list page.
Select M(aintain) and then select PartsList enter Add/Change/Delete as appropriate which will bring up the screen as shown on the following page.
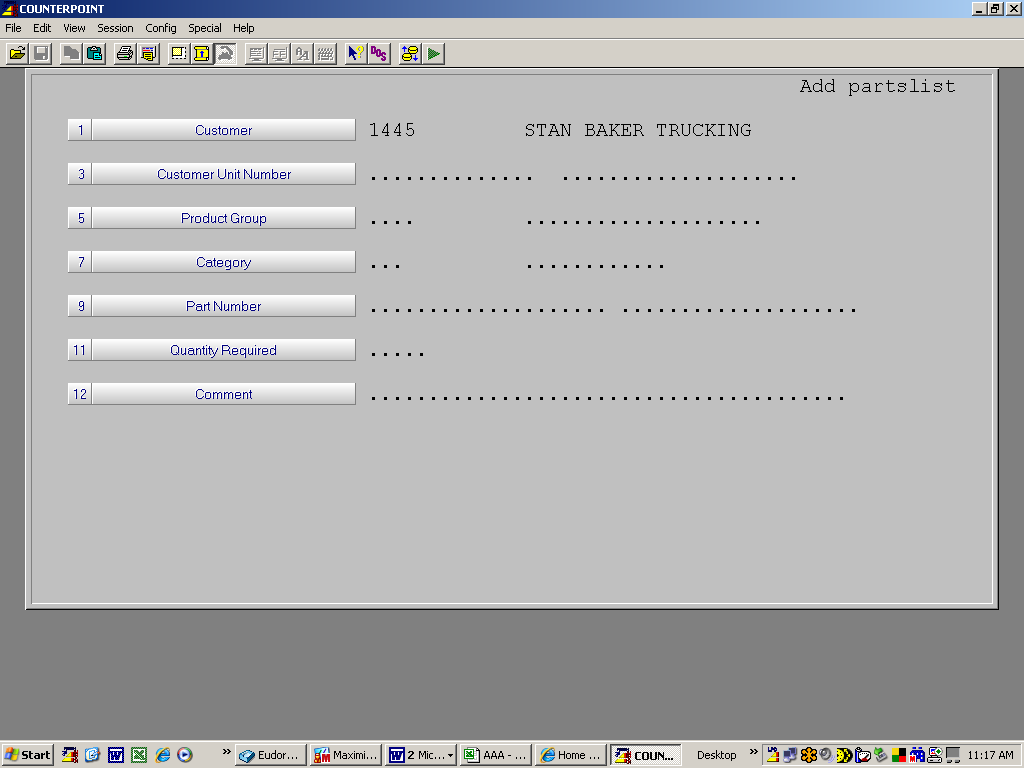
Enter Data as follows
Customer – Entered by the system.
Customer Unit Number – Enter the unit number or name that the part(s) you are about to enter will be used on.
Product Group – Enter the Product Group that the entered parts will have sales data captured under. (ie HD or AUT in this example)
Category – Cursor will skip this field and auto fill when you enter a part number. In the case where the part exists in more than one category you will need to select the correct category from the displayed options.
Part Number – Part number used on the specified vehicle.
Quantity Required – Enter the quantity required in this units use of the part.
Comment – Optional Enter a free form comment that will assist in ensuring this part is correctly chosen when the request comes in (ie “Used on the PTO for the hydraulic pump”) or something similar.
When you are happy with the screen hit [F1] to accept the entry.
Repeat for all other parts used on this Unit. When done hit [F2]
This completes the set up of a Unit and it associated parts.
Using The Fleet Part System Within COUNTERPOINT
When a customer calls in for parts and identifies that these are for a unit in his fleet proceed as follows.
1 Set up the invoice for the customer as normal (ie enter customer number PO if required and your customer number.
2 When the cursor is in the Line Type field hit Shift/[F10] which will bring up the customer fleet list similar to that shown below.
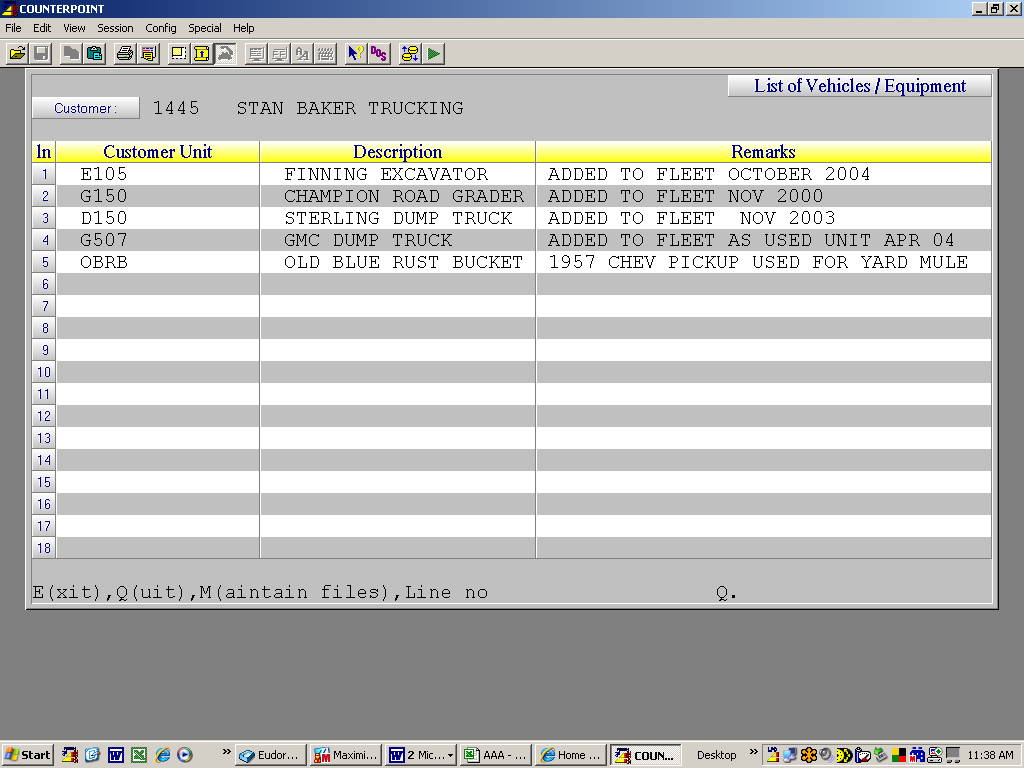
3 Select the appropriate unit as specified by the customer which will bring up the parts list. As shown below.
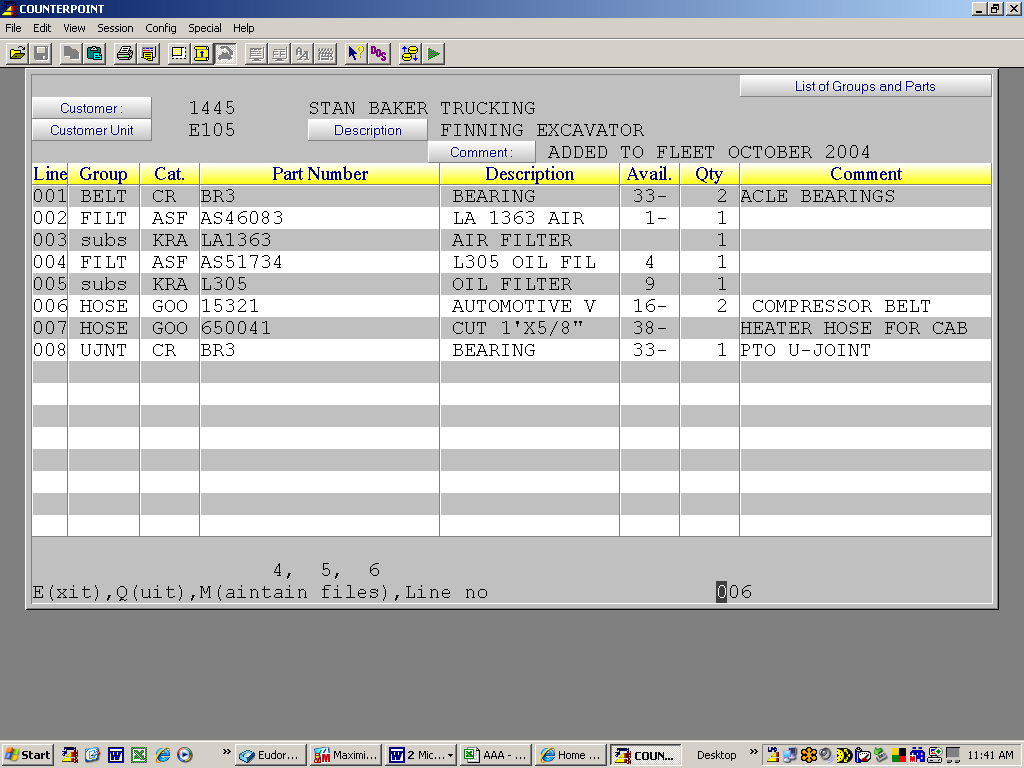
4 Enter line number(s) corresponding to the parts you need to sell. Note that as you select line numbers the program moves selected lines to the space just above the “Maintain files” line.
5 When you have selected all required parts hit “E” to exit the screen and move the parts in the quantities specified at the customers prices onto the invoice.
Notice that the parts list displays the quantity on hand and the quantity required for each part.
If you need to add, delete or change a part for this unit it can be done at this point by entering M to launch the maintain files routine.
General Charges & Deposit Handling
Definition
General charges are a new line type in the COUNTERPOINT invoicing program which allows you to include amounts on the invoice which do not impact inventory or apply standard comments to an invoice. The charges can be automatically applied to all transactions based on a percentage up to a maximum value or a set dollar amount. General charges can also be added to an invoice manually. This feature will also allow deposits to be added to Order transactions which will automatically reduce the amount owed when the order is completed and turned into an invoice.
Processing
General Charge Codes
The maintenance of General Charge Codes is found through System Utilities > System Setup > Sales Desk > General Charge Code Maintenance.
A maximum of two characters is used for the code. The description used will be put on the invoice when the code is used. The Type can be a $, % or C for a standard comment. The charge can either be setup as a percentage or as a dollar value. This is used for automatic charges and deposits. For manually added charges the value would be left at zero. If a percentage charge is to be capped at a certain value that would be entered in the maximum value. The tax codes are based on the values setup in the Billing Parameters. If levies are to be included in the calculation of an automatic charge this flag must be set to Y. Deposits are not to be set as an automatic charge. If the “enter text” setting is Y the user will be able to alter the comment which will be printed on the invoice. If the value is allowed to be changed or entered manually the “enter value” setting must be Y. In the case of a return the date range is also used to determine if an automatic charge should be refunded based on the original purchase date.
Customer Maintenance
Customers that are exempt from automatic general charges require a “G” be entered in one of the “account control flags” in the customer maintenance screen.
Invoicing
Any automatic charges will be added as the last line on an invoice when the body of the invoice is accepted. If new lines are added later, the value of the automatic charge will be adjusted to reflect the new total of the invoice. Should an automatic charge be adjusted manually it will not be altered if any other changes are made to the lines on the invoice.
To enter a general charge or standard comment manually use the new line type of “G”. This will display a list of up to 18 codes in the information window or you can use the TAB key to search additional codes
Deposit type codes may only be used on Order transactions.
Comment codes will have no value associated with them.
When taking a deposit for products that will be delivered at some future time you must use a transaction type of “O”rder. The items being purchased are to be added to the order as Backorder "B" linetype (Normally stocked items) or a Special Order "S" linetype (Non Stocked/Pickups) lines. When the items have been added enter a “G” line for the deposit and select the deposit code which has been setup. Providing the deposit code has been setup with a percentage the amount of deposit required will be shown on the screen. This can be changed if necessary providing the code has been setup to allow the value to be entered.
When recalling the order and turning it into an invoice the value of the deposit will automatically be reversed so the total owing will reflect the price of the items less the amounts previously received. If a customer returns to make additional deposits the original order must be recalled and the second deposit added to the order.
Customer Backorders
When a backorder is being fulfilled upon receipt of the product and an invoice is created the standard comments contained on lines 1 through 3 of the original transaction will be included on the fulfillment invoice.
Invoice Register
The total value of any Freight and General Charges will be shown on the invoice register in the relabelled column “Freight /Oth Chgs”.
Invoicing with Global Payments Terminals
To process a cash sale (paid by cash or credit card):
Always take the credit card first and cash last
- Create your invoice as normal
- If a charge customer decides to pay by cash or credit/debit you will need to change the customer on the invoice to your cash sale customer. When asked “recalculate pricing” the default is N.
- You cannot change the method of payment for a charge customer unless taking a deposit on account.
- Select F1 in Counterpoint for payment; this will bring you directly to the payment screen:

- Select F1 in Counterpoint to accept the amount owing. This amount will pass to the terminal
- Tap or insert the customer’s credit card, all credit card and payment information will feed back to Counterpoint
- The screen will go back to the invoice screen
-
If the customer would like to pay with multiple payment types:
- At the payment screen, select F3 in Counterpoint to change the value, then process the credit pmt
- Now the new balance owing appears on the same payment screen
You can do up to 3 payment types
- If the balance is paid by cash, enter “$” on the bottom of the screen (to the right of F11)
- If the card is swiped, a signature is required, a ‘signature capture’ screen will appear, customer is to sign on the signature pad
- If the card is declined, the message ‘declined’ will be on the terminal, select F1 to go back to the terminal to use another payment card
- If you start to pay a transaction paid by cash/credit/debit you must complete this prior to processing another cash sale on the same work station
To process a credit invoice on the customer’s credit/debit card:
- Create your credit as normal
- Select F1 in Counterpoint for refund, screen will go straight to the payment screen
- Select F1 in Counterpoint to accept the credit amount
- This amount will pass to the terminal
- You will need to enter the manager password (this will be provided in your go-live documentation)
- Tap or insert the customer’s credit card, all credit card and payment information will feed back to Counterpoint
The method of payment must be the same as the original invoice
- The screen will go back to the invoice screen
Daily refund limits per terminal per day: credit card $5,000, debit card $2,000, for refunds over those limits, please use a different terminal or call the help desk to put the credit through
To void an invoice that was processed on the customer’s credit/debit card:
- Select F11 in Counterpoint, this will reverse the transaction, including multiple payment types
- F11 Can also be used to void a transaction in the payment screen where no payment can be received because of insufficient funds.
To process a credit card payment on an invoice, card NOT present:
- Manually enter the credit card number in the terminal
- You will be asked if the card is present, you must answer ‘NO’ otherwise you will be prompted to get a customer signature after completing the card payment
The 3 digit CVV number is required (card verification value) on the back of the card (not required for a credit return)
You can bypass the other questions on the machine (order number, address, postal code) with the enter key
To process a deposit on order:
Use this function when you are taking a deposit for products that will be delivered at some future time
- When taking a deposit:
- Use transaction type ‘O’ (order)
- The items being purchased are to be added to the order as a Special Order (non stocked/pickups)
- When the items have been added, enter a ‘G’ line for the deposit
- Select DP (deposit on order)
- Take payment from customer
- When the product has been received and you are creating the invoice:
- Recall the order and turn it into an invoice
- The value of the deposit will automatically be reversed so the total owing will reflect the price of the items less the amounts previously received
- If the customer does not want the part anymore, you can void the invoice. The deposit is not refunded to the customer
- Recall the order and turn it into an invoice
When a customer makes a payment on account with a credit card:
do not use this method if customer is paying on account with a cheque
this will be a separate transaction from any current purchases
- From invoicing screen, enter Customer #
- Enter Clerk #
- Now you are at line type – select F4 – this will bring you to payment method
- – select the payment method
- Now you are at Transaction Type – enter ‘C’ for ‘Payment on Account’
- You are back to line type – enter ‘$’ – this brings up part # ‘Received on Account’
- Enter the amount of the payment, this will bring you to the payment screen
- An invoice will be generated
End of day procedures:
The units will automatically close every evening. The next morning you will see a tape of all of your transactions from the previous day. Please give to your designated person who will collect all the tapes and submit to Head Office.
Check your terminal in the morning. If the unit says “Out of Balance” please call Accounting.
If prompted by the Global terminal to call in for an authorization number:
Once you receive the authorization code, go to the main menu on the terminal and choose “Force”
Then choose “Credit” to complete the transaction with the authorization code
FYI
- All backorder fills on cash sales will produce an open order
- As always, once you are at the payment screen, and the customer would like to add to his order, you will need to process another invoice
- If the credit card is declined, and the customer says he will come back with another card, you can open another invoicing screen for your next sales, and keep that current invoice open until the customer comes back. It must be closed off before the end of the day
- If the Global terminal give you a message “call for authorization”, please call the help desk, they will give you an authorization number. Now you can finalize the payment on the Global terminal. This will leave you with an unfinished invoice, you can close the invoice as a cheque sale and advise Accounting.
Selling a Core
There may be ocassions when it is desired to sell a core to a customer. This is done by entering a “C” line type and entering “-1” (Negative 1) as a quantity. Because, in a core line, the quantity amount is automatically reversed from what you entered the end result is a core sale.
If you try this and it will not accept “-1” as a sale quantity it means that you need to change Field 72 Allow Core Sales in the Sales Parameter Maintenance, Screen 1 to a “Y” This program is accessed via menu path as follows.
- System Utilities… -> 3. System Setup… -> 4. Sales Desk… -> 2. Parts Billing Parameters -> Screen 1 – System Defaults
Suspense Payments with Payment Terminal
Payment Terminal – Semi-Integrated
Changes to invoicing related to Suspense Payment Type
- Cash Sale transaction defaults to payment method of Suspense
- Require a new Card Type of “S” to indicate proper GL Account
- Accept of cash transaction goes directly to payment screen without asking payment method
- Actions in the payment screen
- Accept will send invoice information to Payment terminal
- F3 allows change of the amount to go on a card or paid by cash
- F11 will void the transaction
- If no monies have been received both the invoice and credit will be posted to the Suspense Account
- $ will pay the remaining amount of the transaction by cash
- Charge Account cannot change the method of payment to card or cash
- Must change the Customer to the Cash Account
- This change offers the option to recalculate pricing
- The default is a parameterized value that can be set for Y or N
- Customer setup as COD and/or “$” defaults to S as method of payment
- These are treated the same as the Cash Account and will be pushed directly to the payment screen when the invoice is accepted
- Require a GL Account to use for the Suspense payment method
- The Invoice Register can be used to find any transactions posted with the “S” payment code
- Used to determine errors.
- All cash transactions are reported on the invoice register with the card type used by the customer. This is not entered by the sales clerk.
Updating Credit Hold Invoice
Overview
In instances where an online wholesale customer submits an order but is over their credit limit, a credit hold invoice is created. This is a suspended transaction with all of the items they have ordered, which can be released once they are back below their credit limit.
Receiving The Order
When the original order is submitted, a credit hold transaction will print. This will look much like a regular invoice, but will be marked as a 'Credit Hold Invoice' on the paper. It will also have a number in the 9,000,000 range.
Before releasing the credit hold invoice, you must bring the customer back down below their credit limit. To do this, you may increase their limit or receive a payment against the account.
Releasing the Invoice
To release a credit hold invoice, you will need to take the following menu path:
4. Sales Desk > 5. Transaction Queries > 7. Credit Hold Invoice Release
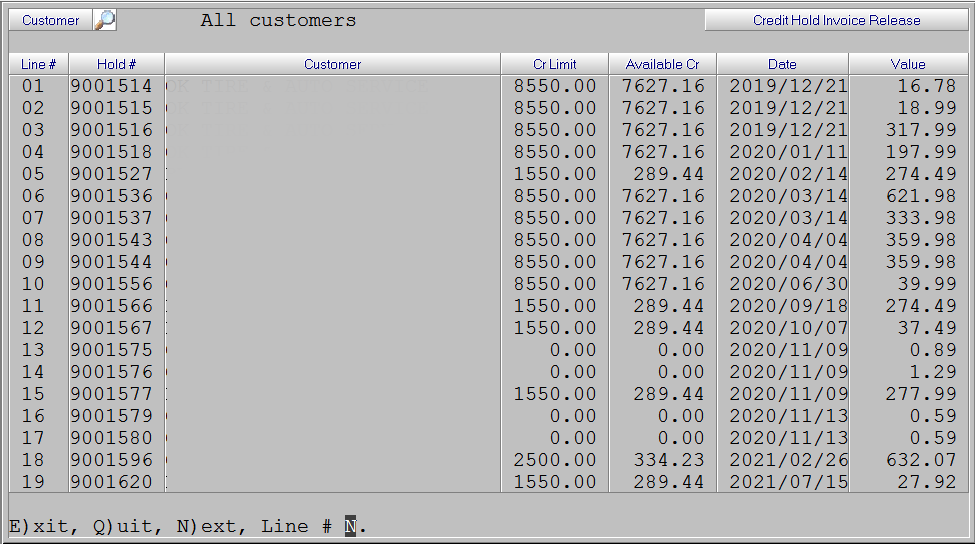
Once you have a listing of the invoices, selecting any line number will give you the option to take action against that respective invoice.

Your options are:
- D)etail - Show the invoice detail on screen
- R)elease - Try invoicing the transaction. Note that if the customer is still above their credit limit a new Credit Hold Invoice will be created
- C)lear - Remove the transaction from the listing. This will delete the transaction from the system completely.
Pricing
Customer Price List
COUNTERPOINT® provides the user with an ability to produce customer specific price lists for a line or range of lines, with customized column headers. This program is accessed via the following menu path.
6.Inventory…->7.Reporting…->4.Price Lists…->2.Customer Price List
Which brings up the following screen.
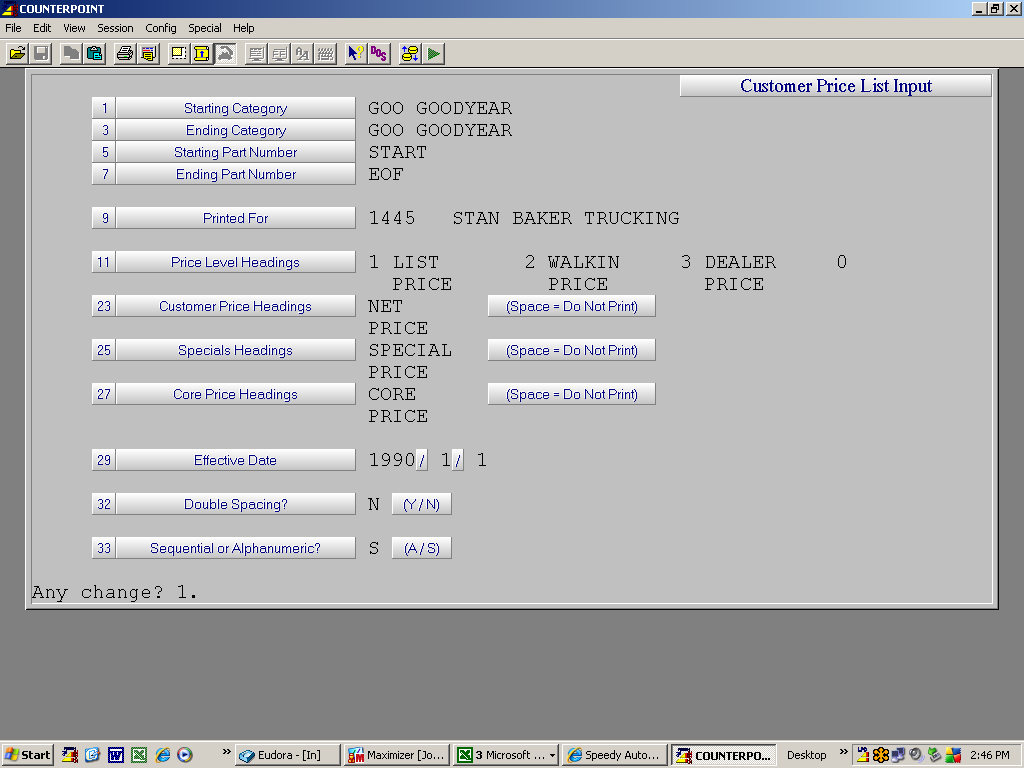
Complete the fields as follows.
1 Starting Category, 3 Ending Category – Enter the start and end category or hit enter in both fields to list all categories in your inventory.
5 Starting Part Number, 7 Ending Part Number – Enter the first and last number in the part range to be printed or hit enter in both fields for First and Last part numbers.
9 Printed For – Enter the customer that the Price list is to be printed for.
11 Price Level Headings – Enter up to four price levels and the description you would like the printout to show for each. Note if you leave the price level number as “0” no prices will show for that column on the report.
23 Customer Price Headings, 25 Specials Headings & 27 Core Price Headings – Leaving any of these three fields blank will suppress the printing of these columns on the report. Entering a column header in any of them will cause the column to be populated with prices under the header you specified.
29 Effective Date – Enter the Effective date of the price list.
32 Double Spacing (Y/N ) Enter response as appropriate to the list you intend to create.
33 Sequential and Alphanumeric (A/S) – Enter “A” if you require an Alphanumeric List or “S” of you require the printout to be in the same sequence as the computer stores its information.
When you are happy with the screen, hit [F1] to accept it and produce the report. The image below is a screen shot of the report produced by the setup screen entries shown above.

F.A.Q.
Question – I am told that a line is (or will be) changing from Jobber to Net pricing what do I need to do?
Answer – When a line changes its base price you need to make two changes on the price multipliers maintenance screen for all of the Price Discount Groups affected by the change.
1 – Open up each discount group and change field 40 Original to Price Level to reflect the new base price you will be receiving for this line (ie if a line that was jobber will now be receiving net price field 40 will need to be changed from price level 5 to price level 6)
2 - On all lines where you changed field 40 change at least the first multiplier line to reflect where the new base price will be found.
So in that case of a line that was Jobber less 35% but is now Net you will need to change the first multiplier line from;
Price 6 Becomes Price 5 + -35.00000%
To } - (Where 6 is Cost and 5 is Jobber)
Price 5 Becomes Price 6 + 55.00000%
If dollar value of your net price is the same as it was previously you will likely not need to change anything other than the first line since all other multipliers will typically build on the results of the first calculation. That said, review the other price level calculations to ensure that they remain valid in light of the new base level that you are receiving.
Question – I set up a new line in the system. Non Stock Prices show up properly, but stocking prices are all zeroes. What is causing this?
Answer – There are several things that can cause this. The most likely cuplrit is that you do not have a set of price multipliers set up for the Space Discount Group. Check this first.
If multipliers are present confirm that field 40 Original to Price Level is pointing to a base price level that will contain values other than zero in the price book.
Lastly if all of the above checks out correctly look at the items in Produce Master Maintenance – Change Mode. Specifically field 53 Discount Level. If it contains an “*” or a Discount Group code that does not exist you will need to correct this in order for the price multipliers to work.
Question – My Stocking Prices show up correctly but the Non Stock pricing is either non existant or all wrong. What should I look for?
Answer – The most likely culprit is the price multiplier set is looking at a wrong field as its base price. Use the following procedure to determine whats going on and how to fix it.
- Look up the sample part in the in the price book inquiry. Note what is in field 6 Price Level as this is the Product Discount Group that the system will use to determine the multiplier set to use.
- Go to the Multipliers Maintenance screen for the category in change mode. Enter as follows.
- Enter Space for the the stocking parameters discount group which will display the multiplier set for that discount group
- Hit F1 to accept the stocking multipliers as set up
- Answer N to copy stocked to non-stocked prompt.
- Answer N to the overwrite non-stocked? prompt.
- Answer Y to any change Non stocked?
- Cursor moves to Field 39 Discount Level – Enter the Discount Level identified in step 1 above.
- Review the displayed multipliers looking for the following
- An incorrect Original to Price Level in field 40
- Incorrect base price level being used in the multiplier specification lines.
- Incorrect multipliers set up in the field to the right of the “+” Sign.
When changes are completed accept the record and exit the program.
NOTE - If when you enter the Discount Level identified in step one the screen will not accept it you will need to back out and re-enter the program in Add mode in order to add the level. The easiest way to do this is to add it into Stocked and copy it to Non stocked by responding Y to the make Non Stocked the same? question .
- Remember that changing the multipliers of and in itself will not change the pricing
on stocked items. It will only result in changed pricing on Non-Stocked items since pricing on these is calculated on the fly as they are called up. When you change an existing set of Multipliers you will be asked Update Prices now? Responding Y will cause the program to update all Stocking items using the new multiplier set.
- There may be times when non stocked pricing will remain incorrect even after you have corrected the multipliers. When this happens try running the price file update manually as the previous set of multipliers may have clobbered the base price as the last update was run with incorrect multipliers.
Question – A price update has been processed but there are some stocked items that have incorrect pricing. – What might be causing this?
Answer – If this situation applies to only some of your stocking items the first thing to do is go into Product Master Maintenance in change mode, call up the item in question and look at what is entered in Field 53 – Discount Level. If this field points to a non existent or incorrect Discount Level correcting it and moving past the field will cause the pricing to be recalculated using the now correct multipliers. If the field contains an “*” it means that at some point in the past it was deemed appropriate to fix the pricing regardless of what new price changes come through the system. Replacing the “*” with the correct price level releases the item to recalculate prices as price changes come through.
Question – I changed the stocking multipliers on a line, but the prices have not changed. What’s wrong?
Answer – If you did not enter Y to the Update Prices Now? prompt at the end of the price multiplier maintenance acceptance process the system will not act on the multipliers until the next time there is a price update.
If you want to have the prices recalculated immediately you will need to return to Price Multiplier maintenance in Change mode, Change the fifth decimal place on any one field by incrementing it by 1. (eg. 35.00000 to 35.00001) This will not materially change the pricing but will trigger the Update Prices Now? Prompt which if you answer Y will result in the system running the new calculations against all of the stocked items within the category. Alternately you could also call AMS and request that we resend the price file(s) for the category which can then be run immediately or left to process automatically overnight should you so desire.
MSC / AMS Line Code to AMS Price Level - Lines 102 - 494
| Product Line | Line Description | AMS Product Code | Product Class | Product Code Description | Catalogue Vendor |
| 102 | VELVAC | A | 1002 | MIRRORS | VELVC |
| 102 | VELVAC | B | 1003 | FUEL SYSTEM HARDWARE | VELVC |
| 102 | VELVAC | C | 1004 | CAMERAS & VISION | VELVC |
| 102 | VELVAC | D | 0999 | MIRROR HARDWARE | VELVC |
| 102 | VELVAC | E | 1000 | AIR CYLINDERS | VELVC |
| 102 | VELVAC | F | 1001 | GAS CAPS | VELVC |
| 102 | VELVAC | G | 0998 | AIR ELECTRICAL CABLE | VELVC |
| 102 | VELVAC | H | 0997 | CABLE PLUG ASSEMBLY | VELVC |
| 102 | VELVAC | I | 0996 | AIR BRAKE HOSE | VELVC |
| 102 | VELVAC | J | 0993 | BACKUP ALARMS | VELVC |
| 102 | VELVAC | K | 0994 | ELECTRICAL PRODUCTS | VELVC |
| 102 | VELVAC | L | 0995 | RADIATOR CAPS | VELVC |
| 102 | VELVAC | M | 3601 | TUBING & FITTINGS | VELVC |
| 102 | VELVAC | N | 3602 | AIR BRAKE COMPONENTS | VELVC |
| 102 | VELVAC | O | 3603 | HOSE CLAMPS & HOSE MANAGEMENT | VELVC |
| 102 | VELVAC | P | 3604 | OIL CAPS | VELVC |
| 102 | VELVAC | Q | 3605 | SAFETY & COMPLIANCE | VELVC |
| 102 | VELVAC | R | 3606 | TOOLS & EQUIPMENT | VELVC |
| 104 | USMW HD | A | 3108 | HD WATER PUMP | USMOTW |
| 104 | USMW HD | B | 3109 | HD OIL PUMP | USMOTW |
| 104 | USMW HD | C | 3110 | HD FAN CLUTCH | USMOTW |
| 104 | USMW HD | D | 3111 | HD FUEL PUMP | USMOTW |
| 104 | USMW HD | E | 3112 | HD UNCLASSIFIED | USMOTW |
| 111 | CANTECH | A | 0024 | CLOTH/DUCT | CANTEC |
| 111 | CANTECH | B | 0025 | SHEATHING | CANTEC |
| 111 | CANTECH | C | 0026 | CARTON SEALING | CANTEC |
| 111 | CANTECH | D | 0027 | ELECTRICAL | CANTEC |
| 111 | CANTECH | E | 0028 | MASKING | CANTEC |
| 111 | CANTECH | F | 0029 | SPORTS ANCILLARY | CANTEC |
| 111 | CANTECH | G | 0030 | FOIL & FILAMENT | CANTEC |
| 111 | CANTECH | H | 0031 | DISPENSER | CANTEC |
| 111 | CANTECH | I | 0032 | OTHER | CANTEC |
| 112 | GENO INDUSTRIES | A | 3105 | ALL PRODUCTS | GENO |
| 123 | HENKEL / LOCTITE | A | 0049 | AAM -AFTERMARKET | LOCT |
| 123 | HENKEL / LOCTITE | B | 0050 | MRO - MAINTENCE | LOCT |
| 123 | HENKEL / LOCTITE | C | 0051 | IND - INDUSTRIAL | LOCT |
| 123 | HENKEL / LOCTITE | D | 0052 | EQUIPMENT | LOCT |
| 126 | WAI GLOBAL | A | 2373 | COMPONENTS | WAI |
| 126 | WAI GLOBAL | B | 2374 | ENGINE MGMNT | WAI |
| 126 | WAI GLOBAL | C | 2375 | AG & IND ALTERNATORS | WAI |
| 126 | WAI GLOBAL | D | 2376 | AG & IND STARTERS | WAI |
| 126 | WAI GLOBAL | E | 2377 | AUTOMOTIVE STARTERS | WAI |
| 126 | WAI GLOBAL | F | 2378 | AUTOMOTIVE ALTERNATORS | WAI |
| 126 | WAI GLOBAL | G | 2379 | WIPER LINKAGE | WAI |
| 126 | WAI GLOBAL | H | 2380 | HD STARTERS | WAI |
| 126 | WAI GLOBAL | I | 2381 | HD ALTERNATORS | WAI |
| 126 | WAI GLOBAL | J | 2382 | HI PERF STARTERS | WAI |
| 126 | WAI GLOBAL | K | 2383 | MARINE & OPE STARTERS | WAI |
| 126 | WAI GLOBAL | L | 2384 | MARINE & OPE ALTERNATORS | WAI |
| 126 | WAI GLOBAL | M | 2385 | POWERSPORT STARTERS | WAI |
| 126 | WAI GLOBAL | N | 2386 | DISTRIBUTORS | WAI |
| 126 | WAI GLOBAL | O | 2387 | TURBO CHARGERS | WAI |
| 126 | WAI GLOBAL | P | 2388 | HD WIPER MOTORS | WAI |
| 126 | WAI GLOBAL | Q | 2389 | POWERSPORT ALTERNATORS | WAI |
| 126 | WAI GLOBAL | R | 2390 | HI PERF ALTERNATORS | WAI |
| 126 | WAI GLOBAL | S | 2464 | AUTOMOTIVE WIPER MOTORS | WAI |
| 126 | WAI GLOBAL | T | 2465 | TRANSFER CASE MOTOR | WAI |
| 126 | WAI GLOBAL | U | 2463 | WASHER PUMPS | WAI |
| 127 | LEATHERMAN | A | 2346 | LEATHERMAN | LTHRMN |
| 127 | LEATHERMAN | B | 2347 | LED LENSER | LTHRMN |
| 129 | WHD | A | 0063 | BRASS | WHEAD |
| 129 | WHD | B | 0064 | AIR BRAKE TUBING | WHEAD |
| 129 | WHD | C | 0065 | AIR CHAMBER & HOSE | WHEAD |
| 130 | JUSTRITE | A | 2366 | SAFETY CABINETS | JUSTRT |
| 130 | JUSTRITE | B | 2367 | SAFETY CONTAINERS | JUSTRT |
| 130 | JUSTRITE | C | 2368 | ENVIRONMENTAL PRODUCTS | JUSTRT |
| 130 | JUSTRITE | D | 2369 | STORAGE AND SECURITY | JUSTRT |
| 130 | JUSTRITE | E | 2370 | SMOKING RECEPTICLES | JUSTRT |
| 130 | JUSTRITE | F | 2371 | DRUM EQUIPMENT | JUSTRT |
| 130 | JUSTRITE | G | 2372 | UTILITY PRODUCTS | JUSTRT |
| 131 | CLEARPLUS | A | 0074 | CONVENTIONAL BLADES | CLEARP |
| 131 | CLEARPLUS | B | 0075 | WINTER BLADES | CLEARP |
| 131 | CLEARPLUS | C | 0076 | REAR BLADES | CLEARP |
| 131 | CLEARPLUS | D | 0077 | BEAM BLADES | CLEARP |
| 131 | CLEARPLUS | E | 0078 | HYBRID BLADES | CLEARP |
| 131 | CLEARPLUS | F | 0079 | HEAVY DUTY BLADES | CLEARP |
| 131 | CLEARPLUS | G | 0080 | DISPLAYERS | CLEARP |
| 131 | CLEARPLUS | H | 0081 | ADAPTORS | CLEARP |
| 132 | MECHANIX WEAR | A | 0089 | CORE GLOVES | MECHNX |
| 132 | MECHANIX WEAR | B | 0090 | ORIGINAL SPECIALTY | MECHNX |
| 132 | MECHANIX WEAR | C | 0091 | MATERIAL 4X GLOVES | MECHNX |
| 132 | MECHANIX WEAR | D | 0092 | WOMENS GLOVES/ACCSSRY | MECHNX |
| 132 | MECHANIX WEAR | E | 0093 | DIY/TASK/SEASONAL GLOVES | MECHNX |
| 132 | MECHANIX WEAR | F | 0094 | COLD WEATHER GLOVES | MECHNX |
| 132 | MECHANIX WEAR | G | 0095 | LEATHER GLOVES | MECHNX |
| 132 | MECHANIX WEAR | H | 0096 | HI VIZ/SAFETY GLOVES | MECHNX |
| 133 | US CHEMICAL | A | 2452 | FILLERS PUTTIES | USCHEM |
| 133 | US CHEMICAL | B | 2453 | REPAIR PRODUCTS | USCHEM |
| 133 | US CHEMICAL | C | 2454 | ACCESSORY PRODUCTS | USCHEM |
| 133 | US CHEMICAL | D | 2455 | MASKING PRODUCTS | USCHEM |
| 133 | US CHEMICAL | E | 2456 | MIXING PAILS & CANS | USCHEM |
| 133 | US CHEMICAL | F | 2457 | USC PAINTS & COATINGS | USCHEM |
| 133 | US CHEMICAL | G | 2458 | OMI-CRON PAINTS COAT | USCHEM |
| 133 | US CHEMICAL | H | 2459 | EASYWORK PAINTS COAT | USCHEM |
| 133 | US CHEMICAL | I | 2460 | MORTON PAINTS COATING | USCHEM |
| 133 | US CHEMICAL | J | 2461 | SPRAYMAX | USCHEM |
| 133 | US CHEMICAL | K | 2567 | ABRASIVES | USCHEM |
| 134 | ANCO | A | 2404 | CONTOUR BLADE | ANCO |
| 134 | ANCO | B | 2405 | TRANSFORM HYBRID BLADE | ANCO |
| 134 | ANCO | C | 2406 | PROFILE BLADE | ANCO |
| 134 | ANCO | D | 2407 | AREOVANTAGE BLADE | ANCO |
| 134 | ANCO | E | 2408 | 31-SERIES BLADE | ANCO |
| 134 | ANCO | F | 2409 | WINTER BLADE | ANCO |
| 134 | ANCO | G | 2410 | REAR BLADE | ANCO |
| 134 | ANCO | H | 2411 | PROFILE BLADE SHOP PK | ANCO |
| 134 | ANCO | I | 2412 | RAINY DAY | ANCO |
| 134 | ANCO | J | 2413 | REFILLS | ANCO |
| 134 | ANCO | K | 2414 | WIPER ARMS | ANCO |
| 134 | ANCO | L | 2415 | HEAVY DUTY | ANCO |
| 134 | ANCO | M | 2416 | WASHER PUMPS | ANCO |
| 134 | ANCO | N | 2417 | REMAINING | ANCO |
| 135 | LENOX | A | 2398 | HAND TOOLS | LENOX |
| 135 | LENOX | B | 2399 | HOLE SAWS | LENOX |
| 135 | LENOX | C | 2400 | JIG SAW BLADES | LENOX |
| 135 | LENOX | D | 2401 | METAL & WOOD DRILLING | LENOX |
| 135 | LENOX | E | 2402 | RECIPROCATING | LENOX |
| 135 | LENOX | F | 2403 | UNCLASSIFIED | LENOX |
| 137 | EDGE EYEWEAR | A | 2418 | GLASSES | EDGEYE |
| 137 | EDGE EYEWEAR | B | 2532 | ACCESSORIES | EDGEYE |
| 139 | PRIME WIRE AND CABLE | A | 0100 | INDOOR EXT CORDS | PRMWIR |
| 139 | PRIME WIRE AND CABLE | B | 0101 | OUTDOOR EXT CORDS | PRMWIR |
| 139 | PRIME WIRE AND CABLE | C | 0102 | UTILITY EXT CORDS | PRMWIR |
| 139 | PRIME WIRE AND CABLE | D | 0103 | ELECT ADAPTERS/SHOCKSAFE | PRMWIR |
| 139 | PRIME WIRE AND CABLE | E | 0104 | MULTI-OUTLET/SURGE PROTECTORS | PRMWIR |
| 139 | PRIME WIRE AND CABLE | F | 0105 | BULK WIRE/WIRING PRODS | PRMWIR |
| 139 | PRIME WIRE AND CABLE | G | 0106 | LIGHTING PRODUCTS | PRMWIR |
| 139 | PRIME WIRE AND CABLE | H | 0107 | HOLIDAY/TIMERS/REMOTES | PRMWIR |
| 140 | GROUP BBH | A | 0111 | BULK GLOVES | GROUPE |
| 140 | GROUP BBH | B | 0112 | WINTER RETAIL GLOVES | GROUPE |
| 140 | GROUP BBH | C | 0113 | RETAIL GLOVES | GROUPE |
| 140 | GROUP BBH | D | 0114 | NON-STOCKING ITEMS | GROUPE |
| 140 | GROUP BBH | E | 0115 | ROPE | GROUPE |
| 141 | WESTAR | A | 2431 | DOMESTIC AIR SUSPENSION | WESTAR |
| 141 | WESTAR | B | 2432 | DOMESTIC DRIVE SHAFT SUPPORTS | WESTAR |
| 141 | WESTAR | C | 2433 | DOMESTIC MOUNTS | WESTAR |
| 141 | WESTAR | D | 2434 | DOMESTIC STRUT MOUNTS | WESTAR |
| 141 | WESTAR | E | 2435 | IMPORT AIR SUSPENSION | WESTAR |
| 141 | WESTAR | F | 2436 | IMPORT DRIVE SHAFT SUPPORTS | WESTAR |
| 141 | WESTAR | G | 2437 | IMPORT MOUNTS | WESTAR |
| 141 | WESTAR | H | 2438 | IMPORT STRUT MOUNTS | WESTAR |
| 142 | OTC/BOSCH | A | 0126 | OTC TOOLS | BOSCH |
| 142 | OTC/BOSCH | B | 0127 | OTC DIAGNOSTIC | BOSCH |
| 142 | OTC/BOSCH | C | 0128 | OTC EQUPIMENT | BOSCH |
| 142 | OTC/BOSCH | D | 0129 | ROBINAIR | BOSCH |
| 142 | OTC/BOSCH | E | 0130 | TIF | BOSCH |
| 142 | OTC/BOSCH | F | 0131 | BOSCH DIAGNOSTIC | BOSCH |
| 142 | OTC/BOSCH | G | 0132 | BOSCH WHEEL SERVICE | BOSCH |
| 142 | OTC/BOSCH | H | 0133 | REPLACEMENT PARTS | BOSCH |
| 142 | OTC/BOSCH | I | 0134 | BOSCH GAUGES | BOSCH |
| 143 | EMPACK | A | 2419 | AUTO MAINTENANCE | BLIEMP |
| 143 | EMPACK | B | 2420 | AUTO APPEARANCE | BLIEMP |
| 143 | EMPACK | C | 2421 | INDUSTRIAL AUTO | BLIEMP |
| 143 | EMPACK | D | 2422 | AUTO REFRIGERANTS | BLIEMP |
| 143 | EMPACK | E | 2423 | COMPUTER MAINTENANCE | BLIEMP |
| 143 | EMPACK | F | 2424 | GERM BUSTER | BLIEMP |
| 143 | EMPACK | G | 2425 | SIGNAL AIR HORNS | BLIEMP |
| 143 | EMPACK | H | 2426 | SHOE & BOOT CARE | BLIEMP |
| 143 | EMPACK | I | 2427 | PESTICIDES | BLIEMP |
| 143 | EMPACK | J | 2428 | INSECT REPELLENTS | BLIEMP |
| 143 | EMPACK | K | 2429 | SUN CARE | BLIEMP |
| 144 | TYC GENERA | A | 2439 | HEADLAMP DOMESTIC | TYC |
| 144 | TYC GENERA | B | 2440 | OTHERLAMP DOMESTIC | TYC |
| 144 | TYC GENERA | C | 2441 | TAILLAMP DOMESTIC | TYC |
| 144 | TYC GENERA | D | 2442 | MIRROR DOMESTIC | TYC |
| 144 | TYC GENERA | E | 2443 | BLOWER DOMESTIC | TYC |
| 144 | TYC GENERA | F | 2444 | CABIN AIR FLTR DOMESTIC | TYC |
| 144 | TYC GENERA | G | 2445 | HEADLAMP IMPORT | TYC |
| 144 | TYC GENERA | H | 2446 | OTHERLAMP IMPORT | TYC |
| 144 | TYC GENERA | I | 2447 | TAILLAMP IMPORT | TYC |
| 144 | TYC GENERA | J | 2448 | MIRROR IMPORT | TYC |
| 144 | TYC GENERA | K | 2449 | BLOWER IMPORT | TYC |
| 144 | TYC GENERA | L | 2450 | CABIN AIR FLTR IMPORT | TYC |
| 144 | TYC GENERA | M | 2488 | RADIATORS DOMESTIC | TYC |
| 144 | TYC GENERA | N | 2489 | RADIATORS IMPORT | TYC |
| 144 | TYC GENERA | O | 2545 | NSF TAIL LAMPS | TYC |
| 144 | TYC GENERA | P | 2546 | NSF OTHER LAMPS | TYC |
| 144 | TYC GENERA | Q | 2547 | NSF HEAD LAMPS | TYC |
| 144 | TYC GENERA | R | 2548 | CAPA TAIL LAMPS | TYC |
| 144 | TYC GENERA | S | 2549 | CAPA OTHER LAMPS | TYC |
| 144 | TYC GENERA | T | 2550 | CAPA HEAD LAMPS | TYC |
| 144 | TYC GENERA | U | 3075 | CONDENSERS DOMESTIC | TYC |
| 144 | TYC GENERA | V | 3076 | CONDENSERS IMPORT | TYC |
| 151 | RAPID FIX | A | 2451 | RAPID FIX | RAPIDF |
| 151 | RAPID FIX | B | 2877 | PREVAL SPRAYERS | RAPIDF |
| 156 | SEAL ALL | A | 0154 | SEAL ALL - ALL PRODUCTS | SEALAL |
| 157 | UVIEW PRODUCTS | A | 0164 | MIST | UVIEW |
| 157 | UVIEW PRODUCTS | B | 0165 | DYES | UVIEW |
| 157 | UVIEW PRODUCTS | C | 0166 | A/C | UVIEW |
| 157 | UVIEW PRODUCTS | D | 0167 | DTRGNT/SRVCE KITS/ACCESS | UVIEW |
| 157 | UVIEW PRODUCTS | E | 0168 | LIGHTING | UVIEW |
| 157 | UVIEW PRODUCTS | F | 0169 | LEAK DETECTION | UVIEW |
| 157 | UVIEW PRODUCTS | G | 0170 | MOTORVAC - EQUIPMENT | UVIEW |
| 157 | UVIEW PRODUCTS | H | 0171 | COOLING SYS/CAR AIR QUALITY | UVIEW |
| 157 | UVIEW PRODUCTS | I | 0172 | UNCLASSIFIED | UVIEW |
| 158 | MGM BRAKES | A | 2490 | BRAKES | MGMBRK |
| 158 | MGM BRAKES | B | 2491 | PARTS | MGMBRK |
| 158 | MGM BRAKES | C | 2492 | E-STROKE | MGMBRK |
| 159 | ATP | A | 0177 | TRANSMISSION FILTERS | ATP |
| 159 | ATP | B | 0178 | CABIN FILTERS | ATP |
| 159 | ATP | C | 0179 | CHEMICALS | ATP |
| 159 | ATP | D | 0180 | UNCLASSIFIED | ATP |
| 159 | ATP | E | 0181 | EXH MANIFOLD | ATP |
| 161 | AUTOSOL | A | 0189 | AUTOCARE | AUTOSO |
| 161 | AUTOSOL | B | 0190 | HOUSEWARES | AUTOSO |
| 161 | AUTOSOL | C | 0191 | INDUSTRIAL | AUTOSO |
| 161 | AUTOSOL | D | 0192 | MARINE | AUTOSO |
| 161 | AUTOSOL | E | 0193 | MOTORCYCLE | AUTOSO |
| 162 | RONSON | A | 2504 | ALL PRODUCTS | RONSON |
| 163 | COLE HERSEE | A | 0199 | STOCKING ITEMS | COLE |
| 163 | COLE HERSEE | B | 0200 | NON STOCK ITEMS | COLE |
| 165 | DICON GLOBAL - FIRST ALERT | H | 2543 | FIRST ALERT | DICONG |
| 165 | DICON GLOBAL - FIRST ALERT | I | 2544 | GLOVES | DICONG |
| 167 | CURT MANUFACTURING | A | 2466 | ACCESSORY | CURTMA |
| 167 | CURT MANUFACTURING | B | 2467 | BALL MOUNT | CURTMA |
| 167 | CURT MANUFACTURING | C | 2468 | CARGO MANAGEMENT | CURTMA |
| 167 | CURT MANUFACTURING | D | 2469 | ELECTRICAL | CURTMA |
| 167 | CURT MANUFACTURING | E | 2470 | FIFTH WHEEL | CURTMA |
| 167 | CURT MANUFACTURING | F | 2471 | GOOSENECK | CURTMA |
| 167 | CURT MANUFACTURING | G | 2472 | RECEIVER HITCH | CURTMA |
| 167 | CURT MANUFACTURING | H | 2473 | SPECIALIZED TOWING | CURTMA |
| 167 | CURT MANUFACTURING | I | 2474 | TRAILER BALL | CURTMA |
| 169 | COLSON | A | 0202 | CASTER | COLSON |
| 170 | MONROE COMMERCIAL | A | 2493 | GAS-MAGNEM 60 SHOCK | MONROE |
| 170 | MONROE COMMERCIAL | B | 2494 | GAS-MAGNEM 65 SHOCK | MONROE |
| 170 | MONROE COMMERCIAL | C | 2495 | MAGNEM 70 SHOCK | MONROE |
| 170 | MONROE COMMERCIAL | D | 2496 | GAS-MAGNEM CAB SHOCK | MONROE |
| 170 | MONROE COMMERCIAL | E | 2497 | GAS-MAGNEM RV SHOCK | MONROE |
| 170 | MONROE COMMERCIAL | F | 3140 | HD TIE RODS | MONROE |
| 170 | MONROE COMMERCIAL | G | 3141 | HD DRAG LINKS | MONROE |
| 170 | MONROE COMMERCIAL | H | 3142 | HD TRACK BARS | MONROE |
| 170 | MONROE COMMERCIAL | I | 3143 | HD BUSHING | MONROE |
| 170 | MONROE COMMERCIAL | J | 3144 | KING PIN SETS | MONROE |
| 171 | PELICAN | A | 2500 | CASE | PELICA |
| 171 | PELICAN | B | 2501 | CASE ACCESSORIES | PELICA |
| 171 | PELICAN | C | 2502 | LIGHT | PELICA |
| 171 | PELICAN | D | 2503 | LIGHT ACCESSORIES | PELICA |
| 173 | MCGARD | A | 2568 | AUTOMOTIVE | MCGARD |
| 173 | MCGARD | B | 2569 | HEAVY DUTY | MCGARD |
| 176 | SHARK WELDING | A | 2522 | ABRASIVES | SHARKI |
| 176 | SHARK WELDING | B | 2523 | ACCESSORIES | SHARKI |
| 176 | SHARK WELDING | C | 2524 | ROD & WIRE | SHARKI |
| 176 | SHARK WELDING | D | 2525 | SAFETY | SHARKI |
| 176 | SHARK WELDING | E | 2526 | CUTTING KITS | SHARKI |
| 176 | SHARK WELDING | F | 2527 | WELDERS | SHARKI |
| 176 | SHARK WELDING | G | 2528 | DISPLAYS | SHARKI |
| 176 | SHARK WELDING | H | 2529 | WIRE BRUSHES | SHARKI |
| 176 | SHARK WELDING | I | 2530 | TIP & NOZZLES | SHARKI |
| 176 | SHARK WELDING | J | 2588 | CARBIDE | SHARKI |
| 176 | SHARK WELDING | K | 1063 | BRAKE LATHE | SHARKI |
| 177 | MOTHERS | A | 0221 | PAINT CARE | MOTHER |
| 177 | MOTHERS | B | 0220 | INTERIOR | MOTHER |
| 177 | MOTHERS | C | 0219 | WHEEL AND TIRE | MOTHER |
| 177 | MOTHERS | D | 0218 | SPECIALTY | MOTHER |
| 177 | MOTHERS | E | 0217 | MARINE | MOTHER |
| 179 | PIAA - VALEO SERVICE USA & CANADA | A | 2551 | BULBS | PIAA |
| 179 | PIAA - VALEO SERVICE USA & CANADA | B | 2552 | LAMP KITS | PIAA |
| 179 | PIAA - VALEO SERVICE USA & CANADA | C | 2553 | POWERSPORT | PIAA |
| 179 | PIAA - VALEO SERVICE USA & CANADA | D | 2554 | SERVICE PARTS | PIAA |
| 179 | PIAA - VALEO SERVICE USA & CANADA | E | 2555 | ACCESSORIES | PIAA |
| 179 | PIAA - VALEO SERVICE USA & CANADA | F | 3556 | SERIES BLADE | VALEO |
| 179 | PIAA - VALEO SERVICE USA & CANADA | G | 3557 | BEAM & CANOPY BLADES | VALEO |
| 179 | PIAA - VALEO SERVICE USA & CANADA | H | 3558 | HD & HYBRID BLADES | VALEO |
| 179 | PIAA - VALEO SERVICE USA & CANADA | I | 3559 | REAR BLADES | VALEO |
| 179 | PIAA - VALEO SERVICE USA & CANADA | J | 3560 | SILENCIO & VISIO BLADES | VALEO |
| 179 | PIAA - VALEO SERVICE USA & CANADA | K | 3561 | TRADITIONAL BLADES | VALEO |
| 179 | PIAA - VALEO SERVICE USA & CANADA | L | 3562 | WIPER MOTORS | VALEO |
| 179 | PIAA - VALEO SERVICE USA & CANADA | M | 3563 | SILICONE WIPERS | VALEO |
| 179 | PIAA - VALEO SERVICE USA & CANADA | N | 3564 | BRAKING | VALEO |
| 179 | PIAA - VALEO SERVICE USA & CANADA | O | 3565 | COOLING AND HVAC | VALEO |
| 179 | PIAA - VALEO SERVICE USA & CANADA | P | 3566 | SENSORS AND SWITCHES | VALEO |
| 179 | PIAA - VALEO SERVICE USA & CANADA | Q | 3567 | ELECTRICAL SYSTEMS | VALEO |
| 179 | PIAA - VALEO SERVICE USA & CANADA | R | 3568 | FILTRATION | VALEO |
| 179 | PIAA - VALEO SERVICE USA & CANADA | S | 3569 | CLUTCH HYDRAULICS | VALEO |
| 179 | PIAA - VALEO SERVICE USA & CANADA | T | 3570 | TRANSMISSION COMPONENTS | VALEO |
| 182 | IDEAL TRIDON | A | 2589 | FLEX GEAR | IDLCLM |
| 182 | IDEAL TRIDON | B | 2590 | HY-GEAR | IDLCLM |
| 182 | IDEAL TRIDON | C | 2591 | MICRO-GEAR | IDLCLM |
| 182 | IDEAL TRIDON | D | 2592 | LINED | IDLCLM |
| 182 | IDEAL TRIDON | E | 2593 | FUEL INJECTION | IDLCLM |
| 182 | IDEAL TRIDON | F | 2594 | COMBO HEX | IDLCLM |
| 182 | IDEAL TRIDON | G | 2595 | POWER GEAR | IDLCLM |
| 182 | IDEAL TRIDON | H | 2596 | T-BOLT | IDLCLM |
| 182 | IDEAL TRIDON | I | 2597 | T-BOLT CHANNEL BRIDGE | IDLCLM |
| 182 | IDEAL TRIDON | J | 2598 | TURN-KEY | IDLCLM |
| 182 | IDEAL TRIDON | K | 2539 | SMART SEAL CLAMPS | IDLCLM |
| 182 | IDEAL TRIDON | L | 2540 | BANDS AND BUCKLES | IDLCLM |
| 183 | FLEETSPEC | A | 2556 | SLACK ADJUSTERS | FLEETS |
| 183 | FLEETSPEC | B | 2557 | AIR DRIVERS | FLEETS |
| 183 | FLEETSPEC | C | 2558 | AIR BRAKE SYSTM VALVE | FLEETS |
| 183 | FLEETSPEC | D | 2559 | ANTI-LCK BRK SYSTM | FLEETS |
| 183 | FLEETSPEC | E | 2560 | SUSPENSION AIR VALVES | FLEETS |
| 183 | FLEETSPEC | F | 2561 | MISC AIR VALVES | FLEETS |
| 183 | FLEETSPEC | G | 2562 | ELECTRIC ACCESSORIES | FLEETS |
| 183 | FLEETSPEC | H | 2563 | TRUCK $ TRAILER ACCESSORIES | FLEETS |
| 184 | 31 INC. | A | 0229 | LUG NUTS | INC31 |
| 184 | 31 INC. | B | 0230 | SERVICE TOOLS | INC31 |
| 184 | 31 INC. | C | 0231 | WHEEL BALANCE | INC31 |
| 184 | 31 INC. | D | 0233 | SHOP EQUIPMENT | INC31 |
| 184 | 31 INC. | E | 0234 | SUPPLIES | INC31 |
| 184 | 31 INC. | F | 0235 | TIRE REPAIR | INC31 |
| 184 | 31 INC. | G | 0236 | TPMS | INC31 |
| 184 | 31 INC. | H | 0237 | DISPLAY/INFO | INC31 |
| 185 | RALSTON | A | 0242 | BULK BAGS | RALSTN |
| 185 | RALSTON | B | 0243 | BULK FILM | RALSTN |
| 185 | RALSTON | C | 0244 | BIOSAK | RALSTN |
| 185 | RALSTON | D | 0245 | SUPERSAK | RALSTN |
| 185 | RALSTON | E | 0246 | RETAIL FILM | RALSTN |
| 190 | IMPERIAL OIL | A | 0253 | MOTOR OIL | IMPER |
| 190 | IMPERIAL OIL | B | 0254 | GREASE | IMPER |
| 190 | IMPERIAL OIL | C | 0255 | GEAR OIL | IMPER |
| 190 | IMPERIAL OIL | D | 0256 | HYDRAULIC OIL | IMPER |
| 190 | IMPERIAL OIL | E | 0257 | OTHER | IMPER |
| 192 | GMB | A | 2576 | WATER PUMPS | GMB |
| 192 | GMB | B | 2869 | FAN CLUTCHES | GMB |
| 193 | MCSWEENEYS | A | 2574 | JERKY | MCSWEN |
| 193 | MCSWEENEYS | B | 2599 | PEPPERONI STICKS | MCSWEN |
| 193 | MCSWEENEYS | C | 2600 | STRIPS | MCSWEN |
| 193 | MCSWEENEYS | D | 2601 | NUGGETS | MCSWEN |
| 193 | MCSWEENEYS | E | 2602 | BARS & BIG SEEDS | MCSWEN |
| 197 | BOB DALE GLOVES | A | 2925 | APPAREL | BOBDAL |
| 197 | BOB DALE GLOVES | B | 2926 | LIGHT DUTY | BOBDAL |
| 197 | BOB DALE GLOVES | C | 2927 | DRIVERS | BOBDAL |
| 197 | BOB DALE GLOVES | D | 2928 | FITTERS | BOBDAL |
| 197 | BOB DALE GLOVES | E | 2929 | SEAMLESS POLYMER | BOBDAL |
| 197 | BOB DALE GLOVES | F | 2930 | WELDING | BOBDAL |
| 199 | INCOM MANUFACTURING GROUP | A | 2577 | GRIT TAPES | INCOM |
| 199 | INCOM MANUFACTURING GROUP | B | 2578 | REFLECTIVE TAPES | INCOM |
| 199 | INCOM MANUFACTURING GROUP | C | 2579 | SPECIALTY TAPES | INCOM |
| 199 | INCOM MANUFACTURING GROUP | D | 2580 | DRIVEWAY MARKERS | INCOM |
| 199 | INCOM MANUFACTURING GROUP | E | 2581 | MARINE | INCOM |
| 199 | INCOM MANUFACTURING GROUP | F | 2582 | RV LESUIRE | INCOM |
| 199 | INCOM MANUFACTURING GROUP | G | 3077 | SAFETY | INCOM |
| 201 | MAHLE | A | 3130 | AIR FILTER | MAHLE |
| 201 | MAHLE | B | 3131 | CABIN AIR FILTER | MAHLE |
| 201 | MAHLE | C | 3132 | FUEL FILTER | MAHLE |
| 201 | MAHLE | D | 3133 | OIL FILTER | MAHLE |
| 201 | MAHLE | E | 3134 | OTHER FILTER | MAHLE |
| 201 | MAHLE | F | 3135 | ENGINE | MAHLE |
| 201 | MAHLE | G | 3137 | GASKETS | MAHLE |
| 201 | MAHLE | H | 3138 | THERMOSTAT | MAHLE |
| 201 | MAHLE | I | 3139 | TURBOCHARGER | MAHLE |
| 201 | MAHLE | J | 3129 | THERMAL | MAHLE |
| 202 | BAFFIN | A | 2575 | HEX FLEX & CONTRACTOR | BAFFIN |
| 202 | BAFFIN | B | 2583 | APPAREL | BAFFIN |
| 202 | BAFFIN | C | 2584 | INDUSTRIAL | BAFFIN |
| 202 | BAFFIN | E | 2586 | OTHER | BAFFIN |
| 202 | BAFFIN | F | 2587 | OUTDOOR | BAFFIN |
| 207 | FAIRVIEW | A | 3145 | AIR BRAKE | FAIR |
| 207 | FAIRVIEW | B | 3146 | BARBED FITTINGS | FAIR |
| 207 | FAIRVIEW | C | 3147 | CLAMPS | FAIR |
| 207 | FAIRVIEW | D | 3148 | COMPRESSION FITTINGS | FAIR |
| 207 | FAIRVIEW | E | 3149 | FLARED FITTINGS | FAIR |
| 207 | FAIRVIEW | F | 3150 | PIPE FITTINGS | FAIR |
| 207 | FAIRVIEW | G | 3151 | QUICK CONNECTS | FAIR |
| 207 | FAIRVIEW | H | 3152 | TUBING | FAIR |
| 207 | FAIRVIEW | I | 3153 | VALVES | FAIR |
| 207 | FAIRVIEW | J | 3154 | ADAPTERS | FAIR |
| 207 | FAIRVIEW | K | 3155 | GREASE FITTINGS | FAIR |
| 207 | FAIRVIEW | L | 3156 | HOSE & FITTINGS | FAIR |
| 207 | FAIRVIEW | M | 3157 | WATER HOSE & FITTINGS | FAIR |
| 207 | FAIRVIEW | N | 3158 | GAUGES | FAIR |
| 207 | FAIRVIEW | O | 3159 | DISPLAYS | FAIR |
| 207 | FAIRVIEW | P | 3160 | TOOLS | FAIR |
| 210 | RUSTOLEUM | A | 2603 | PAINT/PRIMER | RUSTOL |
| 210 | RUSTOLEUM | B | 2604 | SPRAY PAINT | RUSTOL |
| 210 | RUSTOLEUM | C | 2605 | COATING | RUSTOL |
| 210 | RUSTOLEUM | D | 2613 | FINISH | RUSTOL |
| 210 | RUSTOLEUM | E | 2565 | STAIN AND TINT | RUSTOL |
| 210 | RUSTOLEUM | F | 2933 | STRIPPER/REMOVER | RUSTOL |
| 210 | RUSTOLEUM | G | 2934 | THINNER | RUSTOL |
| 210 | RUSTOLEUM | H | 2935 | SEALANT/FILLER | RUSTOL |
| 210 | RUSTOLEUM | I | 2936 | ACTIVATOR | RUSTOL |
| 210 | RUSTOLEUM | J | 2937 | ACCELERATOR | RUSTOL |
| 210 | RUSTOLEUM | K | 2938 | ANTI-SLIP PRODUCTS | RUSTOL |
| 210 | RUSTOLEUM | L | 2939 | CLEANER AND DEGREASER | RUSTOL |
| 210 | RUSTOLEUM | M | 2964 | MOLD CONTROL | RUSTOL |
| 210 | RUSTOLEUM | N | 2965 | LUBRICATION | RUSTOL |
| 210 | RUSTOLEUM | O | 2967 | PATCHING | RUSTOL |
| 210 | RUSTOLEUM | P | 2968 | WOOD CARE PRODUCTS | RUSTOL |
| 210 | RUSTOLEUM | Q | 2969 | KITS/PROJECTS | RUSTOL |
| 210 | RUSTOLEUM | R | 2970 | ACCESSORIES | RUSTOL |
| 210 | RUSTOLEUM | S | 2971 | ABRASIVES | RUSTOL |
| 216 | MOOG | A | 2617 | BALL JOINT | MOOG |
| 216 | MOOG | B | 2618 | BUSHING OR LINK KIT | MOOG |
| 216 | MOOG | C | 2619 | COIL SPRINGS | MOOG |
| 216 | MOOG | D | 2620 | PREMIUM CONTROL ARM | MOOG |
| 216 | MOOG | E | 2621 | IDLER OR PITMAN ARM | MOOG |
| 216 | MOOG | F | 2622 | KNUCKLE ASSEMBLY | MOOG |
| 216 | MOOG | G | 2623 | TIE ROD | MOOG |
| 216 | MOOG | H | 2624 | UNCLASSIFIED | MOOG |
| 216 | MOOG | I | 2616 | R SERIES CONTROL ARM | MOOG |
| 217 | FIRESTONE | A | 0291 | COIL-RITE | FSTONE |
| 217 | FIRESTONE | B | 0292 | LEVEL-RITE | FSTONE |
| 217 | FIRESTONE | C | 0293 | RIDE-RITE | FSTONE |
| 217 | FIRESTONE | D | 0294 | SPORT-RITE | FSTONE |
| 217 | FIRESTONE | E | 0295 | WORK-RITE | FSTONE |
| 217 | FIRESTONE | F | 0296 | PARTS | FSTONE |
| 217 | FIRESTONE | G | 0297 | AIR-RITE | FSTONE |
| 217 | FIRESTONE | H | 0298 | AIR-COMMAND | FSTONE |
| 218 | GORILLA GLUE | A | 2680 | GORILLA GLUE | GORILL |
| 218 | GORILLA GLUE | B | 2681 | GORILLA TAPE | GORILL |
| 218 | GORILLA GLUE | C | 2682 | O'KEEFFE'S | GORILL |
| 218 | GORILLA GLUE | D | 2683 | SEALANT | GORILL |
| 220 | INTEREX INDUSTRIES LTD | A | 2800 | ICE CLEATS | INTERX |
| 220 | INTEREX INDUSTRIES LTD | B | 2801 | CARE PLUS | INTERX |
| 220 | INTEREX INDUSTRIES LTD | C | 2802 | DRYGUY | INTERX |
| 220 | INTEREX INDUSTRIES LTD | D | 2803 | GRANGERS | INTERX |
| 220 | INTEREX INDUSTRIES LTD | E | 2804 | OUTDOOR ELEMENT | INTERX |
| 220 | INTEREX INDUSTRIES LTD | F | 2805 | STABIL | INTERX |
| 220 | INTEREX INDUSTRIES LTD | G | 2806 | YAKTRAX | INTERX |
| 220 | INTEREX INDUSTRIES LTD | H | 2807 | VESTA | INTERX |
| 220 | INTEREX INDUSTRIES LTD | I | 2808 | ALL GOOD | INTERX |
| 224 | CRP INDUSTRIES | A | 0224 | HYDRAULIC FLUID | CRP |
| 224 | CRP INDUSTRIES | B | 0225 | ANTIFREEZE | CRP |
| 224 | CRP INDUSTRIES | C | 0226 | BRAKE FLUID | CRP |
| 224 | CRP INDUSTRIES | D | 0227 | TRANSMISSION FLUID | CRP |
| 224 | CRP INDUSTRIES | E | 0228 | MOTOR OIL | CRP |
| 224 | CRP INDUSTRIES | F | 3440 | COOLING | CRP |
| 224 | CRP INDUSTRIES | G | 3441 | CHASSIS/MOUNTS | CRP |
| 224 | CRP INDUSTRIES | H | 3442 | POWER STEERING HOSES | CRP |
| 224 | CRP INDUSTRIES | I | 3443 | AIR BREATHERS | CRP |
| 224 | CRP INDUSTRIES | J | 3444 | FLUID TANKS | CRP |
| 224 | CRP INDUSTRIES | K | 3445 | BOOT KITS | CRP |
| 224 | CRP INDUSTRIES | L | 3446 | HARDWARE | CRP |
| 224 | CRP INDUSTRIES | M | 3447 | WATER PUMPS | CRP |
| 224 | CRP INDUSTRIES | N | 3448 | OIL PANS | CRP |
| 224 | CRP INDUSTRIES | O | 3449 | TURBO/HOSES | CRP |
| 224 | CRP INDUSTRIES | P | 3450 | CAPS | CRP |
| 224 | CRP INDUSTRIES | Q | 3451 | SWITCHES/SENSORS | CRP |
| 224 | CRP INDUSTRIES | R | 3452 | AIR CONDITIONING | CRP |
| 224 | CRP INDUSTRIES | S | 3453 | TRANSMISSION FILTERS | CRP |
| 224 | CRP INDUSTRIES | T | 3454 | TRANSFER CASE | CRP |
| 224 | CRP INDUSTRIES | U | 3455 | EXHAUST | CRP |
| 224 | CRP INDUSTRIES | V | 3456 | BELTS/CHAINS | CRP |
| 224 | CRP INDUSTRIES | W | 3457 | VALVE COVERS | CRP |
| 224 | CRP INDUSTRIES | Y | 3458 | BRAKE VACUUM PUMPS | CRP |
| 224 | CRP INDUSTRIES | Z | 3459 | FILTER ACCESSORIES | CRP |
| 224 | CRP INDUSTRIES | 1 | 3460 | FUEL INJECTION | CRP |
| 224 | CRP INDUSTRIES | 2 | 3461 | WHEEL BEARINGS | CRP |
| 224 | CRP INDUSTRIES | 3 | 3462 | REIN FLUIDS | CRP |
| 224 | CRP INDUSTRIES | 4 | 3463 | HIGH PRESSURE PUMPS | CRP |
| 224 | CRP INDUSTRIES | 5 | 3464 | STEERING GEAR | CRP |
| 224 | CRP INDUSTRIES | 6 | 3465 | STEERING PUMPS/PULLEYS | CRP |
| 224 | CRP INDUSTRIES | 7 | 3466 | RACK AND PINION | CRP |
| 226 | BALDWIN | A | 2628 | AIR FILTERS | BALD |
| 226 | BALDWIN | B | 2629 | HYDRAULIC FILTERS | BALD |
| 226 | BALDWIN | C | 2630 | FUEL FILTERS | BALD |
| 226 | BALDWIN | D | 2631 | LUBE FILTERS | BALD |
| 226 | BALDWIN | E | 2632 | TRANSMISSION FILTERS | BALD |
| 226 | BALDWIN | F | 2633 | UNCLASSIFIED | BALD |
| 226 | BALDWIN | G | 2634 | DAHL | BALD |
| 226 | BALDWIN | H | 2635 | STANADYNE | BALD |
| 226 | BALDWIN | I | 2810 | AUTO ENGINE AIR FILTERS | BALD |
| 226 | BALDWIN | J | 2811 | AUTO TRANS FILTERS | BALD |
| 226 | BALDWIN | K | 2812 | AUTO FUEL FILTERS | BALD |
| 226 | BALDWIN | L | 2813 | AUTO LUBE FILTERS | BALD |
| 226 | BALDWIN | M | 2814 | VIP | BALD |
| 226 | BALDWIN | N | 2815 | AUTO CABIN AIR FILTER | BALD |
| 233 | MASTERLOCK | A | 0346 | AUTOMOTIVE AND PADLOCK | MSTLCK |
| 233 | MASTERLOCK | B | 0347 | DOOR HARDWARE | MSTLCK |
| 235 | KROWN | A | 1360 | CLEANING PRODUCTS | KROWN |
| 235 | KROWN | B | 1361 | AEROSOL PRODUCTS | KROWN |
| 235 | KROWN | C | 1362 | ACCESSORIES | KROWN |
| 236 | TIMKEN | A | 0358 | HD BEARINGS (and Med Duty) | TIM |
| 236 | TIMKEN | B | 0359 | HD HUB UNIT (and Med Duty) | TIM |
| 236 | TIMKEN | C | 0360 | HD SEALS (and Med Duty) | TIM |
| 236 | TIMKEN | D | 0361 | AG BEARINGS | TIM |
| 236 | TIMKEN | E | 0362 | AG HUB UNIT | TIM |
| 236 | TIMKEN | F | 0363 | AG SEALS | TIM |
| 236 | TIMKEN | G | 0364 | SLEEVES | TIM |
| 236 | TIMKEN | H | 0365 | REBUILD KITS | TIM |
| 236 | TIMKEN | I | 0366 | GREASE | TIM |
| 236 | TIMKEN | J | 0367 | TOOLS | TIM |
| 236 | TIMKEN | K | 0368 | HARDWARE | TIM |
| 236 | TIMKEN | L | 0369 | BEARINGS | TIM |
| 236 | TIMKEN | M | 0370 | HUB UNIT | TIM |
| 236 | TIMKEN | N | 0371 | SEALS | TIM |
| 237 | FLEXFAB | A | 1375 | COOLANT HOSE | FLXFAB |
| 237 | FLEXFAB | B | 1376 | HEATER HOSE | FLXFAB |
| 237 | FLEXFAB | C | 1377 | OTHER HOSE & TUBING | FLXFAB |
| 237 | FLEXFAB | D | 1378 | CONNECTORS & ELBOWS | FLXFAB |
| 237 | FLEXFAB | E | 1379 | REDUCERS | FLXFAB |
| 237 | FLEXFAB | F | 1380 | CLAMPS | FLXFAB |
| 237 | FLEXFAB | G | 1381 | SLEEVES | FLXFAB |
| 239 | FLEX SEAL | A | 2850 | SPRAYS | FLEXSE |
| 239 | FLEX SEAL | B | 2851 | LIQUID | FLEXSE |
| 239 | FLEX SEAL | C | 2852 | PASTE | FLEXSE |
| 239 | FLEX SEAL | D | 2853 | GLUE | FLEXSE |
| 239 | FLEX SEAL | E | 2854 | TAPE | FLEXSE |
| 239 | FLEX SEAL | F | 2855 | REPAIR KIT | FLEXSE |
| 239 | FLEX SEAL | G | 2856 | FLOOD PROTECTION | FLEXSE |
| 239 | FLEX SEAL | H | 2857 | DISPLAY TOWERS | FLEXSE |
| 240 | NRS BRAKES | A | 0239 | FMSI Z NUMBERS | NRSBRK |
| 240 | NRS BRAKES | B | 0240 | GALVANIZED BRAKE PADS | NRSBRK |
| 242 | AIR QUALITEE | A | 1194 | CABIN FILTER | AIRQUA |
| 242 | AIR QUALITEE | B | 1195 | CARBON CABN FILTER | AIRQUA |
| 245 | MARATHON SYSTEMS INC. | A | 0156 | BRAKE SHOES | MARATH |
| 245 | MARATHON SYSTEMS INC. | B | 0157 | SHOCK ABSORBERS | MARATH |
| 245 | MARATHON SYSTEMS INC. | C | 0158 | BRAKES PADS | MARATH |
| 245 | MARATHON SYSTEMS INC. | D | 0159 | ROTORS | MARATH |
| 245 | MARATHON SYSTEMS INC. | E | 0160 | CALIPERS | MARATH |
| 249 | DUSTBANE | A | 2019 | ALL PURPOSE CLEANERS | DUSTBA |
| 249 | DUSTBANE | B | 2020 | DEGREASERS | DUSTBA |
| 249 | DUSTBANE | C | 2021 | FLOOR CARE | DUSTBA |
| 249 | DUSTBANE | D | 2022 | HAND CLEANERS | DUSTBA |
| 249 | DUSTBANE | E | 2023 | GEN PURP DISINFECTANTS | DUSTBA |
| 249 | DUSTBANE | F | 2024 | ODOR CONTOL/NEUTRALIZERS | DUSTBA |
| 249 | DUSTBANE | G | 2025 | SPECIALY CLEANERS AND MAINTAINERS | DUSTBA |
| 249 | DUSTBANE | H | 2026 | WASHROOM CARE | DUSTBA |
| 249 | DUSTBANE | I | 2027 | DISPENSING SYSTEMS | DUSTBA |
| 249 | DUSTBANE | J | 2028 | EQUIPMENT | DUSTBA |
| 249 | DUSTBANE | K | 2049 | PARTS AND ACCESSORIES | DUSTBA |
| 249 | DUSTBANE | L | 2018 | LARGE EQUIPMENT | DUSTBA |
| 251 | TUNDRA INTERNATIONAL | A | 3250 | 12V INVERTERS | TUNDRA |
| 251 | TUNDRA INTERNATIONAL | B | 3251 | 24V INVERTERS | TUNDRA |
| 251 | TUNDRA INTERNATIONAL | C | 3252 | APPLIANCE | TUNDRA |
| 251 | TUNDRA INTERNATIONAL | D | 3253 | BATTERY CHARGERS | TUNDRA |
| 251 | TUNDRA INTERNATIONAL | E | 3254 | POWER OUTLETS | TUNDRA |
| 251 | TUNDRA INTERNATIONAL | F | 3255 | SPARE PARTS | TUNDRA |
| 251 | TUNDRA INTERNATIONAL | G | 3256 | WIRING KITS | TUNDRA |
| 251 | TUNDRA INTERNATIONAL | H | 3257 | CONVERSION HARNESS | TUNDRA |
| 256 | PRESTONE | A | 0250 | ANTIFREEZE | PRESTN |
| 256 | PRESTONE | B | 0251 | PERFORMANCE CHEMICAL | PRESTN |
| 258 | EXCALIBUR | A | 1250 | METRIC THREAD REPAIR KITS | EXCAL |
| 258 | EXCALIBUR | B | 1251 | UNC THREAD REPAIR KITS | EXCAL |
| 258 | EXCALIBUR | C | 1252 | UNF THREAD REPAIR KITS | EXCAL |
| 258 | EXCALIBUR | D | 1253 | METRIC THREAD REPAIR INSERTS | EXCAL |
| 258 | EXCALIBUR | E | 1254 | UNC THREAD REPAIR INSERTS | EXCAL |
| 258 | EXCALIBUR | F | 1255 | SPARK PLUG THREAD REPAIR | EXCAL |
| 258 | EXCALIBUR | G | 1256 | TOOLS | EXCAL |
| 258 | EXCALIBUR | H | 1257 | RIVETS | EXCAL |
| 268 | LEISURE PRODUCTS CANADA | A | 0568 | ALL PRODUCTS | LEISUR |
| 271 | PRIMELINE | A | 1997 | FLASHLIGHTS | PRMLIN |
| 271 | PRIMELINE | B | 1990 | WORKLIGHTS | PRMLIN |
| 271 | PRIMELINE | C | 1989 | BATTERY | PRMLIN |
| 271 | PRIMELINE | D | 1988 | TOOLS | PRMLIN |
| 271 | PRIMELINE | E | 1987 | TORCHES | PRMLIN |
| 277 | CATCHMASTER | A | 0275 | INSECT | CTCHMS |
| 277 | CATCHMASTER | B | 0276 | MECHANICAL | CTCHMS |
| 277 | CATCHMASTER | C | 0277 | GLUE | CTCHMS |
| 277 | CATCHMASTER | D | 0274 | VECTOR | CTCHMS |
| 278 | WEGMANN | A | 1880 | BALANCING COMPOUND | WEGMAN |
| 279 | IRONTITE | A | 0382 | ADDITIVES | IRONTI |
| 280 | OLFA | A | 0392 | KNIVES | OLFA |
| 280 | OLFA | B | 0393 | BLADES | OLFA |
| 280 | OLFA | C | 0394 | ACCESSORIES | OLFA |
| 282 | AMEREX | A | 2820 | DRY CHEMICALS | AMEREX |
| 282 | AMEREX | B | 2821 | WET CHEMICALS | AMEREX |
| 282 | AMEREX | C | 2822 | OTHER | AMEREX |
| 282 | AMEREX | D | 2823 | ACCESSORIES | AMEREX |
| 284 | PRESTOLITE ELECTRIC INC | A | 2943 | STARTER | PRESTO |
| 284 | PRESTOLITE ELECTRIC INC | B | 2944 | ALTERNATOR | PRESTO |
| 284 | PRESTOLITE ELECTRIC INC | C | 2945 | PARTS | PRESTO |
| 286 | CAR-FRESHNER | A | 0403 | ALL OTHER PRODUCTS | CARFSH |
| 286 | CAR-FRESHNER | B | 0404 | TRADITIONAL LITTLE TREES | CARFSH |
| 288 | SPECTRA PREMIUM | A | 0415 | HEATER CORE | COULT |
| 288 | SPECTRA PREMIUM | B | 0416 | RADIATOR | COULT |
| 288 | SPECTRA PREMIUM | C | 0417 | INDUSTRIAL RADIATOR | COULT |
| 288 | SPECTRA PREMIUM | D | 0418 | CONDENSER | COULT |
| 288 | SPECTRA PREMIUM | E | 0419 | OIL PANS | COULT |
| 288 | SPECTRA PREMIUM | F | 0420 | FILLER NECKS | COULT |
| 288 | SPECTRA PREMIUM | G | 0421 | ACCUMULATOR | COULT |
| 288 | SPECTRA PREMIUM | H | 0422 | CHARGE AIR COOLER | COULT |
| 288 | SPECTRA PREMIUM | I | 0423 | COMPRESSOR | COULT |
| 288 | SPECTRA PREMIUM | J | 0424 | EVAPORATOR | COULT |
| 288 | SPECTRA PREMIUM | K | 0425 | FUEL TANK ASSEMBLY | COULT |
| 288 | SPECTRA PREMIUM | L | 0426 | GAS TANK | COULT |
| 288 | SPECTRA PREMIUM | M | 0427 | INDUSTRIAL CONDENSOR | COULT |
| 288 | SPECTRA PREMIUM | N | 0428 | SENDING UNIT | COULT |
| 288 | SPECTRA PREMIUM | O | 0429 | LOCK RING KIT | COULT |
| 288 | SPECTRA PREMIUM | P | 0430 | STRAPS | COULT |
| 288 | SPECTRA PREMIUM | Q | 0431 | CLASSIC INJECTION FUEL TANK | COULT |
| 288 | SPECTRA PREMIUM | R | 0432 | FUEL PUMP ACCESSORIES | COULT |
| 288 | SPECTRA PREMIUM | S | 0433 | FUEL MODULES | COULT |
| 288 | SPECTRA PREMIUM | T | 0434 | MECHANICAL FUEL PUMPS | COULT |
| 288 | SPECTRA PREMIUM | U | 0435 | FUEL PUMPS | COULT |
| 288 | SPECTRA PREMIUM | V | 0436 | MASS AIR FLOW SENSORS | COULT |
| 288 | SPECTRA PREMIUM | W | 0437 | DEF FITTINGS | COULT |
| 288 | SPECTRA PREMIUM | 1 | 0410 | HD CHARGE AIR COOLER | COULT |
| 288 | SPECTRA PREMIUM | 2 | 0411 | HD HEATER CORE | COULT |
| 288 | SPECTRA PREMIUM | 3 | 0412 | HD OIL PANS | COULT |
| 288 | SPECTRA PREMIUM | 4 | 0413 | HD SENDING UNITS | COULT |
| 288 | SPECTRA PREMIUM | 5 | 0414 | HD STRAPS | COULT |
| 290 | CHAMPION | A | 0442 | SMALL ENGINE | CHAMP |
| 290 | CHAMPION | B | 0443 | AUTOMOTIVE | CHAMP |
| 290 | CHAMPION | C | 0444 | GLOW PLUGS | CHAMP |
| 290 | CHAMPION | D | 0445 | RACING | CHAMP |
| 290 | CHAMPION | E | 0564 | INDUSTRIAL & AGRICULTURE | CHAMP |
| 290 | CHAMPION | F | 0565 | TRUCK PLUGS | CHAMP |
| 290 | CHAMPION | G | 0566 | SERVICE SHOP PACKS | CHAMP |
| 290 | CHAMPION | H | 0567 | PARTS/ASSRT/DISPLAY | CHAMP |
| 291 | ALTE-REGO | A | 1519 | PLASTIC COVERS | ALTERE |
| 296 | INNOVA | A | 0944 | ELECTRICAL TESTERS | INNOVA |
| 296 | INNOVA | B | 0945 | MECHANICAL TESTERS | INNOVA |
| 296 | INNOVA | C | 0946 | OBD1 TOOLS | INNOVA |
| 296 | INNOVA | D | 0947 | OBD2 TOOLS | INNOVA |
| 296 | INNOVA | E | 0948 | INSPECTION CAMERA | INNOVA |
| 296 | INNOVA | F | 0949 | TIMING LIGHTS | INNOVA |
| 299 | SEA FOAM | A | 0466 | SEA FOAM | SEAFOA |
| 299 | SEA FOAM | B | 0467 | BUGS B GONE | SEAFOA |
| 300 | GUNITE | A | 1357 | SLACK ADJUSTERS | GUNITE |
| 300 | GUNITE | B | 1358 | ACCESSORIES | GUNITE |
| 303 | CLIPLIGHT | A | 0477 | LIGHTS | CLIP |
| 303 | CLIPLIGHT | B | 0478 | A/C | CLIP |
| 303 | CLIPLIGHT | C | 0479 | PARTS/TOOLS | CLIP |
| 305 | CRC | A | 0488 | BRAKLEEN | CRC |
| 305 | CRC | B | 0489 | AUTOMOTIVE/MARINE | CRC |
| 305 | CRC | C | 0490 | INDUSTRIAL | CRC |
| 307 | KOYO CANADA INC. | A | 2940 | BALL BEARING | KOYOCA |
| 307 | KOYO CANADA INC. | B | 2941 | TAPER ROLLER BEARINGS | KOYOCA |
| 307 | KOYO CANADA INC. | C | 2954 | NEEDLE BEARING-YOKE | KOYOCA |
| 307 | KOYO CANADA INC. | D | 2955 | NEEDLE BEARING-STUD | KOYOCA |
| 308 | RISLONE (BAR'S PRODUCTS) | A | 0500 | LEAK STOP | RISLON |
| 308 | RISLONE | B | 0501 | ADDITIVE | RISLON |
| 308 | RISLONE | C | 0502 | MULTI USE | RISLON |
| 308 | RISLONE | D | 0503 | CLEANER | RISLON |
| 309 | CONTITECH AIR SPRINGS | A | 2095 | AIR SPRINGS | CONTI |
| 309 | CONTITECH AIR SPRINGS | B | 2096 | PRIME-RIDE | CONTI |
| 310 | FEDPRO | A | 0310 | WIPES | FEDPRO |
| 310 | FEDPRO | B | 0309 | SEALANTS | FEDPRO |
| 311 | VOLTSAFE | A | 3046 | MAG BLOCK HTR CORD | VOLTSA |
| 320 | AUTOLITE | G | 0511 | AUTOLITE GLOW PLUGS | AUT |
| 320 | AUTOLITE | P | 0512 | AUTOLITE PLAT. SPARK PLUGS | AUT |
| 320 | AUTOLITE | R | 0513 | AUTOLITE RACING SPARK PLUGS | AUT |
| 320 | AUTOLITE | S | 0514 | AUTOLITE SPARK PLUGS | AUT |
| 327 | FBS DISTRIBUTION | A | 1300 | SPRAYERS | FBSINV |
| 327 | FBS DISTRIBUTION | B | 1301 | TAPES | FBSINV |
| 327 | FBS DISTRIBUTION | C | 1302 | PPE | FBSINV |
| 327 | FBS DISTRIBUTION | D | 1303 | ACCESSORIES | FBSINV |
| 325 | PRO FORM PRODUCTS | A | 3107 | SURFACE PREPARATION | PROFOR |
| 325 | PRO FORM PRODUCTS | B | 3091 | ACCESSORIES | PROFOR |
| 325 | PRO FORM PRODUCTS | C | 3092 | COATINGS | PROFOR |
| 325 | PRO FORM PRODUCTS | D | 3093 | PAINT RELATED PRODUCTS | PROFOR |
| 325 | PRO FORM PRODUCTS | E | 3094 | REPAIR PRODUCTS | PROFOR |
| 325 | PRO FORM PRODUCTS | F | 3099 | SOLVENTS | PROFOR |
| 332 | FORNEY INDUSTRIES | A | 3095 | WELDING | FORNEY |
| 332 | FORNEY INDUSTRIES | B | 3096 | SHOP TOOLS | FORNEY |
| 332 | FORNEY INDUSTRIES | C | 3097 | ABRASIVES | FORNEY |
| 332 | FORNEY INDUSTRIES | D | 3098 | SAFETY | FORNEY |
| 333 | SCHRADER TPMS SOLUTIONS | A | 3048 | PROGRAMMABLE SENSOR | SCHRA |
| 333 | SCHRADER TPMS SOLUTIONS | B | 3049 | SENSOR | SCHRA |
| 333 | SCHRADER TPMS SOLUTIONS | C | 3050 | SERVICE KIT-PART | SCHRA |
| 333 | SCHRADER TPMS SOLUTIONS | D | 3051 | TOOL | SCHRA |
| 333 | SCHRADER TPMS SOLUTIONS | E | 3052 | HD TPMS | SCHRA |
| 335 | PHILIPS LUMILEDS | A | 2975 | LED | PHILIPS OR AS335 |
| 335 | PHILIPS LUMILEDS | B | 2976 | MINI | PHILIPS OR AS335 |
| 335 | PHILIPS LUMILEDS | C | 2977 | FOG | PHILIPS OR AS335 |
| 335 | PHILIPS LUMILEDS | D | 2978 | HEADLAMP | PHILIPS OR AS335 |
| 335 | PHILIPS LUMILEDS | E | 2979 | SEALED BEAM | PHILIPS OR AS335 |
| 335 | PHILIPS LUMILEDS | F | 2980 | HID | PHILIPS OR AS335 |
| 335 | PHILIPS LUMILEDS | G | 2981 | OTHER | PHILIPS OR AS335 |
| 335 | PHILIPS LUMILEDS | H | 2982 | COMMERCIAL PACK | PHILIPS OR AS335 |
| 340 | DINEX EMISSION, INC | A | 3400 | EXHAUST CLAMP | DINEX |
| 340 | DINEX EMISSION, INC | B | 3401 | PARTS & ACCESSORIES | DINEX |
| 340 | DINEX EMISSION, INC | C | 3402 | DEF INJECTOR/DOSER | DINEX |
| 340 | DINEX EMISSION, INC | D | 3403 | DOC FILTERS | DINEX |
| 340 | DINEX EMISSION, INC | E | 3404 | DPF | DINEX |
| 340 | DINEX EMISSION, INC | F | 3405 | FLEX PIPE | DINEX |
| 340 | DINEX EMISSION, INC | G | 3406 | EXHAUST GASKET | DINEX |
| 340 | DINEX EMISSION, INC | H | 3407 | NOX SENSOR | DINEX |
| 340 | DINEX EMISSION, INC | I | 3408 | ONEBOX KIT | DINEX |
| 340 | DINEX EMISSION, INC | J | 3409 | EXHAUST PIPE | DINEX |
| 340 | DINEX EMISSION, INC | K | 3410 | EXHAUST BELLOW | DINEX |
| 340 | DINEX EMISSION, INC | L | 3411 | PRESSURE SENSOR | DINEX |
| 340 | DINEX EMISSION, INC | M | 3412 | SCR | DINEX |
| 340 | DINEX EMISSION, INC | N | 3413 | TEMP SENSOR | DINEX |
| 340 | DINEX EMISSION, INC | O | 3414 | EXHAUST FITTING | DINEX |
| 342 | AUTOCHEM | A | 0342 | POR 15 | AUTOCH |
| 342 | AUTOCHEM | B | 0343 | PAINT CARE | AUTOCH |
| 342 | AUTOCHEM | C | 0341 | INTERIOR | AUTOCH |
| 342 | AUTOCHEM | D | 0340 | WHEEL AND TIRE | AUTOCH |
| 342 | AUTOCHEM | E | 0339 | SPECIALTY | AUTOCH |
| 343 | AVM INDUSTRIES (STRONGARM) | A | 2078 | APPLICATION SPECIFIC LIFT SUPPORTS | SARM |
| 343 | AVM INDUSTRIES (STRONGARM) | B | 2092 | UNIVERSAL | SARM |
| 344 | TUFF ROPE | A | 0570 | TWINE | TUFFRP |
| 344 | TUFF ROPE | B | 0571 | BRAIDED ROPE | TUFFRP |
| 344 | TUFF ROPE | C | 0572 | TWISTED ROPE | TUFFRP |
| 344 | TUFF ROPE | D | 0573 | PARACORD | TUFFRP |
| 344 | TUFF ROPE | E | 0574 | UTILITY ASSORT | TUFFRP |
| 345 | LUCAS OIL | A | 0546 | ENGINE OIL ADDITIVES | LUCAS |
| 345 | LUCAS OIL | B | 0547 | FUEL TREATMENTS | LUCAS |
| 345 | LUCAS OIL | C | 0548 | PROBLEM SOLVERS & UTILITY LUBRICANTS | LUCAS |
| 345 | LUCAS OIL | D | 0549 | GREASE | LUCAS |
| 345 | LUCAS OIL | E | 0550 | GEAR OIL | LUCAS |
| 345 | LUCAS OIL | F | 0551 | TRANSMISSION OILS | LUCAS |
| 345 | LUCAS OIL | G | 0552 | MOTOR OIL | LUCAS |
| 345 | LUCAS OIL | H | 0553 | REMAINDER | LUCAS |
| 345 | LUCAS OIL | I | 0541 | CAR CARE | LUCAS |
| 345 | LUCAS OIL | J | 0542 | MARINE | LUCAS |
| 345 | LUCAS OIL | K | 0543 | MOTORCYCLE | LUCAS |
| 345 | LUCAS OIL | L | 0544 | RACING | LUCAS |
| 345 | LUCAS OIL | M | 0545 | HYDRAULIC | LUCAS |
| 348 | EVERCO HD SMP | A | 3116 | COMPRESSOR | EVERCO |
| 348 | EVERCO HD SMP | B | 3117 | OEM COMPRESSOR | EVERCO |
| 348 | EVERCO HD SMP | C | 3118 | BLOWER MOTOR | EVERCO |
| 348 | EVERCO HD SMP | D | 3119 | FILTER DRYER | EVERCO |
| 348 | EVERCO HD SMP | E | 3120 | EVAPORATOR CORE | EVERCO |
| 348 | EVERCO HD SMP | F | 3121 | UNCLASSIFIED | EVERCO |
| 354 | EiKO | A | 0557 | INCANDESCENT | EIKO |
| 354 | EiKO | B | 0558 | FLUORESCENT | EIKO |
| 354 | EiKO | C | 0559 | HALOGEN | EIKO |
| 354 | EiKO | D | 0560 | HALIDE | EIKO |
| 354 | EiKO | E | 0561 | LED | EIKO |
| 354 | EiKO | F | 0562 | OTHER | EIKO |
| 354 | EiKO | G | 0563 | AUTOMOTIVE | EIKO |
| 356 | CENTRIC PARTS | A | 2890 | PADS | CENTRIC |
| 356 | CENTRIC PARTS | B | 2891 | DISCS | CENTRIC |
| 356 | CENTRIC PARTS | C | 2892 | SHOES | CENTRIC |
| 356 | CENTRIC PARTS | D | 2893 | DRUMS | CENTRIC |
| 356 | CENTRIC PARTS | E | 2894 | CALIPERS | CENTRIC |
| 356 | CENTRIC PARTS | F | 2895 | HYDRAULICS | CENTRIC |
| 356 | CENTRIC PARTS | G | 2896 | HARDWARE | CENTRIC |
| 356 | CENTRIC PARTS | H | 2897 | HUBS/BEARINGS/SEALS | CENTRIC |
| 360 | SKF (CR) | A | 0579 | SEALS | CRI |
| 360 | SKF (CR) | B | 0580 | HUB BEARINGS | CRI |
| 360 | SKF (CR) | C | 0581 | MISC BEARINGS | CRI |
| 360 | SKF (CR) | D | 0582 | HD SCOTSEALS | CRI |
| 360 | SKF (CR) | E | 0583 | HD ROLLER BEARINGS | CRI |
| 360 | SKF (CR) | F | 0584 | HD ALL MAKES/DRYERS | CRI |
| 360 | SKF (CR) | G | 0577 | MISCELLANEOUS | CRI |
| 363 | PWR STEER | A | 0007 | RACK | PWRSTR |
| 363 | PWR STEER | B | 0008 | PUMP | PWRSTR |
| 363 | PWR STEER | C | 0009 | GEAR | PWRSTR |
| 364 | SHOP-VAC | A | 2735 | INDUSTRIAL | SHPVAC |
| 364 | SHOP-VAC | B | 2736 | CONSUMER | SHPVAC |
| 364 | SHOP-VAC | C | 2737 | ACCESSORIES | SHPVAC |
| 365 | WALTER | A | 1661 | CUTTING | WALTER |
| 365 | WALTER | B | 1662 | GRINDING | WALTER |
| 365 | WALTER | C | 1663 | BLENDING | WALTER |
| 365 | WALTER | D | 1664 | SANDING | WALTER |
| 365 | WALTER | E | 1665 | FINISHING | WALTER |
| 365 | WALTER | F | 1666 | BRUSHING | WALTER |
| 365 | WALTER | G | 1667 | TOOLING | WALTER |
| 365 | WALTER | H | 1668 | POWER TOOLS | WALTER |
| 365 | WALTER | I | 1669 | PRE/POST WELDING | WALTER |
| 365 | WALTER | J | 1670 | MRO CHEM/BIOCIRCLE | WALTER |
| 365 | WALTER | K | 1671 | ACCESSORIES | WALTER |
| 365 | WALTER | L | 1672 | ALL STEEL | WALTER |
| 365 | WALTER | M | 1673 | ARCONE | WALTER |
| 365 | WALTER | N | 1674 | TRIUMPH | WALTER |
| 365 | WALTER | O | 1675 | DRILLCO | WALTER |
| 366 | MILWAUKEE | A | 2900 | ACCESSORIES ABRASIVES | MILWAK |
| 366 | MILWAUKEE | B | 2901 | ACCESSORIES DRILLING & DRIVING | MILWAK |
| 366 | MILWAUKEE | C | 2902 | ACCESSORIES LINEAR EDGE | MILWAK |
| 366 | MILWAUKEE | D | 2903 | ACCESSORIES MAS-CON | MILWAK |
| 366 | MILWAUKEE | E | 2904 | ACCESSORIES OSCILLATING | MILWAK |
| 366 | MILWAUKEE | F | 2905 | HAND TOOLS | MILWAK |
| 366 | MILWAUKEE | G | 2906 | LAYOUT | MILWAK |
| 366 | MILWAUKEE | H | 2907 | PERSONAL PROTECTIVE EQUIPMENT | MILWAK |
| 366 | MILWAUKEE | I | 2908 | PACKOUT SYSTEM | MILWAK |
| 366 | MILWAUKEE | J | 3030 | TOOLS CORDED | MILWAK |
| 366 | MILWAUKEE | K | 3031 | M12 BARE TOOLS | MILWAK |
| 366 | MILWAUKEE | L | 3032 | M18 BARE TOOLS | MILWAK |
| 366 | MILWAUKEE | M | 3033 | MX BARE TOOLS | MILWAK |
| 366 | MILWAUKEE | N | 3034 | M12 BATTERY/CHARGER | MILWAK |
| 366 | MILWAUKEE | O | 3035 | TOOLS PARTS | MILWAK |
| 366 | MILWAUKEE | P | 3036 | M12 HEATED GEAR | MILWAK |
| 366 | MILWAUKEE | Q | 3037 | CLOTHING AND APPAREL | MILWAK |
| 366 | MILWAUKEE | R | 3038 | M12 TOOL KITS | MILWAK |
| 366 | MILWAUKEE | S | 3039 | M18 BATTERY/CHARGER | MILWAK |
| 366 | MILWAUKEE | T | 2909 | MX TOOL KITS | MILWAK |
| 366 | MILWAUKEE | U | 3029 | M18 TOOL KITS | MILWAK |
| 366 | MILWAUKEE | V | 2898 | MX BATTERY/CHARGER | MILWAK |
| 366 | MILWAUKEE | W | 2899 | LINEAR EDGE | MILWAK |
| 371 | LISLE CORPORATION | A | 0950 | SPECIALTY TOOLS | LISLE |
| 371 | LISLE CORPORATION | B | 0951 | LUBE/ TIRE PRODUCTS | LISLE |
| 373 | BRABER EQUIPMENT LTD | A | 0373 | OTHER | BRABER |
| 373 | BRABER EQUIPMENT LTD | B | 0374 | HYDRAULIC | BRABER |
| 373 | BRABER EQUIPMENT LTD | C | 0375 | PTO | BRABER |
| 373 | BRABER EQUIPMENT LTD | D | 0376 | FARM EQUIPMENT | BRABER |
| 373 | BRABER EQUIPMENT LTD | E | 0377 | PUMPS | BRABER |
| 373 | BRABER EQUIPMENT LTD | F | 0378 | VALVES | BRABER |
| 373 | BRABER EQUIPMENT LTD | G | 0379 | POWER PRODUCTS | BRABER |
| 373 | BRABER EQUIPMENT LTD | H | 0380 | TOOLS | BRABER |
| 373 | BRABER EQUIPMENT LTD | I | 0381 | GAUGES | BRABER |
| 373 | BRABER EQUIPMENT LTD | K | 0383 | REPLACEMENT PARTS | BRABER |
| 373 | BRABER EQUIPMENT LTD | L | 0384 | ROAD SAFETY | BRABER |
| 373 | BRABER EQUIPMENT LTD | M | 0385 | SPROCKETS | BRABER |
| 373 | BRABER EQUIPMENT LTD | N | 0386 | HARDWARE | BRABER |
| 373 | BRABER EQUIPMENT LTD | O | 0387 | TRAILER AND FENCE | BRABER |
| 374 | BE PRESSURE | A | 2640 | POWER WASHERS | BEPRES |
| 374 | BE PRESSURE | B | 2641 | GENERATORS | BEPRES |
| 374 | BE PRESSURE | C | 2642 | LIQUID TRANSFER PUMPS | BEPRES |
| 374 | BE PRESSURE | D | 2643 | AIR COMPRESSORS | BEPRES |
| 374 | BE PRESSURE | E | 2644 | PARTS AND ACCESSORIES | BEPRES |
| 374 | BE PRESSURE | F | 2645 | FANS | BEPRES |
| 374 | BE PRESSURE | G | 2638 | AG SPRAYERS | BEPRES |
| 374 | BE PRESSURE | H | 2639 | INDUSTRIAL AIR TOOLS | BEPRES |
| 375 | WORTHINGTON | A | 2283 | FUEL | WORTHI |
| 375 | WORTHINGTON | B | 2284 | KITS | WORTHI |
| 375 | WORTHINGTON | C | 2285 | TORCHES | WORTHI |
| 375 | WORTHINGTON | D | 2286 | BUTANE | WORTHI |
| 375 | WORTHINGTON | E | 2287 | UNCLASSIFIED | WORTHI |
| 378 | DYNALINE | A | 0610 | MERCHANDISERS (M) | DYNA |
| 378 | DYNALINE | B | 0611 | ASSORTMENTS (A) | DYNA |
| 378 | DYNALINE | C | 0612 | LUBRICATION © | DYNA |
| 378 | DYNALINE | D | 0613 | TRAILER & TOWING (T) | DYNA |
| 378 | DYNALINE | E | 0614 | CARGO CONTROL (C) | DYNA |
| 378 | DYNALINE | F | 0615 | FASTENERS (F) | DYNA |
| 378 | DYNALINE | G | 0616 | GENERAL HARDWARE (GH) | DYNA |
| 378 | DYNALINE | H | 0617 | CHAIN & WIRE ROPE (CW) | DYNA |
| 378 | DYNALINE | I | 0618 | FARM HARDWARE (FH) | DYNA |
| 378 | DYNALINE | J | 0619 | MATERIAL HANDLING (MH) | DYNA |
| 378 | DYNALINE | K | 0620 | HAND TOOLS | DYNA |
| 378 | DYNALINE | L | 0621 | COMMODITY ITEM - NET | DYNA |
| 378 | DYNALINE | M | 0622 | RED TOOL CACHE | DYNA |
| 378 | DYNALINE | N | 0623 | BLUE TOOL CACHE | DYNA |
| 378 | DYNALINE | O | 0624 | BLACK TOOL CACHE | DYNA |
| 378 | DYNALINE | P | 0625 | CHORE EQUIPMENT | DYNA |
| 387 | CHICAGO PHEUMATIC | A | 1980 | INDUSTRIAL TOOLS | CHICAG |
| 387 | CHICAGO PHEUMATIC | B | 1981 | VEHICLE SERVICE & MRO | CHICAG |
| 387 | CHICAGO PHEUMATIC | C | 1982 | CORDLESS TOOLS | CHICAG |
| 387 | CHICAGO PHEUMATIC | D | 1983 | WORK SHOP EQUIPMENT | CHICAG |
| 387 | CHICAGO PHEUMATIC | E | 1984 | PARTS & ACCESSORIES | CHICAG |
| 388 | KEN-TOOL | A | 0678 | OTHER | KEN |
| 388 | KEN-TOOL | B | 0679 | BEAD | KEN |
| 388 | KEN-TOOL | C | 0680 | TIRE | KEN |
| 388 | KEN-TOOL | D | 0681 | WRENCH | KEN |
| 388 | KEN-TOOL | E | 0682 | HAMMER | KEN |
| 388 | KEN-TOOL | F | 0683 | VISE | KEN |
| 389 | SUPERZILLA | A | 1756 | SUPERZILLA | SUPERZ |
| 389 | SUPERZILLA | B | 1757 | GUNZILLA | SUPERZ |
| 390 | MONEYSWORTH & BEST | A | 2946 | LACES | MONEYS |
| 390 | MONEYSWORTH & BEST | B | 2947 | INSOLE | MONEYS |
| 390 | MONEYSWORTH & BEST | C | 2948 | SHOE & BOOT CARE | MONEYS |
| 390 | MONEYSWORTH & BEST | D | 2949 | SHOE ACCESSORIES | MONEYS |
| 393 | AISIN AFTERMARKET & SERVICE OF AMERICA | A | 3377 | CLUTCH KIT & ACCESSORIES | AISIN |
| 393 | AISIN AFTERMARKET & SERVICE OF AMERICA | B | 3378 | COOLING | AISIN |
| 393 | AISIN AFTERMARKET & SERVICE OF AMERICA | C | 3379 | ACTUATORS & ACCESSORIES | AISIN |
| 393 | AISIN AFTERMARKET & SERVICE OF AMERICA | D | 3380 | THERMOSTATS & GASKETS | AISIN |
| 393 | AISIN AFTERMARKET & SERVICE OF AMERICA | E | 3381 | TIMING CHAINS & KITS | AISIN |
| 393 | AISIN AFTERMARKET & SERVICE OF AMERICA | F | 3382 | DRIVETRAIN | AISIN |
| 393 | AISIN AFTERMARKET & SERVICE OF AMERICA | G | 3383 | OIL PUMPS & VALVES | AISIN |
| 393 | AISIN AFTERMARKET & SERVICE OF AMERICA | H | 3384 | SENSORS | AISIN |
| 393 | AISIN AFTERMARKET & SERVICE OF AMERICA | I | 3385 | POWER STEERING | AISIN |
| 393 | AISIN AFTERMARKET & SERVICE OF AMERICA | J | 3386 | THROTTLE BODY | AISIN |
| 393 | AISIN AFTERMARKET & SERVICE OF AMERICA | K | 3387 | TIMING BELTS & KITS | AISIN |
| 393 | AISIN AFTERMARKET & SERVICE OF AMERICA | L | 3388 | WATER PUMPS | AISIN |
| 393 | AISIN AFTERMARKET & SERVICE OF AMERICA | M | 3389 | WINDOW REGULATORS & MOTORS | AISIN |
| 393 | AISIN AFTERMARKET & SERVICE OF AMERICA | N | 3390 | OTHER CHEM & FLUIDS | AISIN |
| 393 | AISIN AFTERMARKET & SERVICE OF AMERICA | O | 3391 | TOOLS & ACCESSORIES | AISIN |
| 393 | AISIN AFTERMARKET & SERVICE OF AMERICA | P | 3392 | COOLANT | AISIN |
| 393 | AISIN AFTERMARKET & SERVICE OF AMERICA | Q | 3393 | AUTO & CVT FLUIDS | AISIN |
| 393 | AISIN AFTERMARKET & SERVICE OF AMERICA | R | 3394 | BRAKE ROTORS | AISIN |
| 393 | AISIN AFTERMARKET & SERVICE OF AMERICA | S | 3395 | BRAKE PADS | AISIN |
| 393 | AISIN AFTERMARKET & SERVICE OF AMERICA | T | 3396 | BRAKE CALIPER | AISIN |
| 393 | AISIN AFTERMARKET & SERVICE OF AMERICA | U | 3397 | BRAKE MASTER CYLINDER | AISIN |
| 393 | AISIN AFTERMARKET & SERVICE OF AMERICA | V | 3398 | WHEEL CYLINDERS | AISIN |
| 393 | AISIN AFTERMARKET & SERVICE OF AMERICA | W | 3399 | BRAKE BOOSTERS & ACTUATORS | AISIN |
| 395 | VICTOR TECHNOLOGIES | A | 0689 | ARCAIR | VICTOR |
| 395 | VICTOR TECHNOLOGIES | B | 0690 | STOODY | VICTOR |
| 395 | VICTOR TECHNOLOGIES | C | 0691 | THERMAL ARC | VICTOR |
| 395 | VICTOR TECHNOLOGIES | D | 0692 | THERMAL DYNAMICS | VICTOR |
| 395 | VICTOR TECHNOLOGIES | E | 0693 | TURBO TORCH | VICTOR |
| 395 | VICTOR TECHNOLOGIES | F | 0694 | TWECO | VICTOR |
| 395 | VICTOR TECHNOLOGIES | G | 0695 | VICTOR | VICTOR |
| 395 | VICTOR TECHNOLOGIES | H | 0696 | UNCLASSIFIED | VICTOR |
| 395 | VICTOR TECHNOLOGIES | I | 0697 | EQUIPMENT | VICTOR |
| 395 | VICTOR TECHNOLOGIES | J | 0698 | FIREPOWER | VICTOR |
| 399 | NORTH SAFETY | A | 0706 | HEAD PROTECTION | NORTH |
| 399 | NORTH SAFETY | B | 0707 | EYE & FACE PROTECTION | NORTH |
| 399 | NORTH SAFETY | C | 0708 | HEARING PROTECTION | NORTH |
| 399 | NORTH SAFETY | D | 0709 | RESPIRATORY PROTECTION | NORTH |
| 399 | NORTH SAFETY | E | 0710 | WELDING PROTECTION | NORTH |
| 399 | NORTH SAFETY | F | 0711 | FALL PROTECTION-FULL LINE | NORTH |
| 399 | NORTH SAFETY | G | 0712 | FALL PROTECTION-DURABILT | NORTH |
| 399 | NORTH SAFETY | H | 0713 | FALL PROTECTION-ENGINEERED SYS | NORTH |
| 399 | NORTH SAFETY | I | 0714 | FIRST AID PRODUCTS | NORTH |
| 399 | NORTH SAFETY | J | 0715 | HAND PROTECTION | NORTH |
| 399 | NORTH SAFETY | K | 0716 | PROTECTIVE CLOTHING | NORTH |
| 399 | NORTH SAFETY | L | 0717 | PROTECTIVE FOOTWEAR | NORTH |
| 399 | NORTH SAFETY | M | 0718 | TRAFFIC SAFETY PRODUCTS | NORTH |
| 399 | NORTH SAFETY | N | 0719 | IN-STOCK EXPRESS | NORTH |
| 399 | NORTH SAFETY | O | 0720 | SIGNS | NORTH |
| 399 | NORTH SAFETY | P | 0721 | LOCKOUT & TAGOUT | NORTH |
| 399 | NORTH SAFETY | Q | 0722 | CONSUMER PRODUCTS | NORTH |
| 399 | NORTH SAFETY | R | 0723 | MERCHANDISERS | NORTH |
| 399 | NORTH SAFETY | S | 0724 | SPECIAL ORDER ITEM | NORTH |
| 401 | MOTORAD | A | 0800 | THERMOSTATS | MOTRAD |
| 401 | MOTORAD | B | 0801 | CAPS | MOTRAD |
| 401 | MOTORAD | C | 0802 | OTHER | MOTRAD |
| 401 | MOTORAD | D | 0803 | GASKETS AND SEALS | MOTRAD |
| 401 | MOTORAD | E | 0804 | INTGRTD THRM ASSEMBLY | MOTRAD |
| 401 | MOTORAD | F | 0805 | HD THERMOSTATS | MOTRAD |
| 401 | MOTORAD | G | 0806 | HD INTGRTD THRM ASSY | MOTRAD |
| 403 | STERLING INTERNATIONAL - RESCUE | A | 1213 | FLY/FRUIT FLY | RESCUE |
| 403 | STERLING INTERNATIONAL - RESCUE | B | 1214 | YELLOWJACKET | RESCUE |
| 403 | STERLING INTERNATIONAL - RESCUE | C | 1215 | OTHER | RESCUE |
| 404 | PARKER HANNIFIN CANADA - RACOR | A | 2950 | FUEL FILTER/SEPARATOR | RACOR |
| 404 | PARKER HANNIFIN CANADA - RACOR | B | 2951 | REPLACEMENT ELEMENT | RACOR |
| 404 | PARKER HANNIFIN CANADA - RACOR | C | 2952 | SPIN-ON ELEMENT | RACOR |
| 404 | PARKER HANNIFIN CANADA - RACOR | D | 2953 | PAR-FIT ELEMENT | RACOR |
| 406 | GEOTEC - U-QUALITY | A | 3115 | BRAKE CALIPERS | UQUALI |
| 406 | GEOTEC - U-QUALITY | B | 3114 | DRUMS / ROTORS | UQUALI |
| 406 | GEOTEC - U-QUALITY | C | 3113 | PAINT HAT DRUM ROTOR | UQUALI |
| 414 | DELCO REMY | A | 0642 | ALTERNATOR | REMY |
| 414 | DELCO REMY | B | 0643 | STARTER | REMY |
| 414 | DELCO REMY | C | 0644 | PARTS | REMY |
| 414 | DELCO REMY | D | 0645 | SOLENOID | REMY |
| 415 | DORMAN PRODUCTS, INC. | A | 0757 | EXHAUST/INTAKE MANFLD | RBINC |
| 415 | DORMAN PRODUCTS, INC. | B | 0758 | RAD FAN SSM/PS PULLEY | RBINC |
| 415 | DORMAN PRODUCTS, INC. | C | 0759 | FLUID LINES | RBINC |
| 415 | DORMAN PRODUCTS, INC. | D | 0760 | DORMAN - HELP | RBINC |
| 415 | DORMAN PRODUCTS, INC. | E | 0761 | DORMAN - OE SOLUTIONS | RBINC |
| 415 | DORMAN PRODUCTS, INC. | F | 0762 | DORMAN - AUTOGRADE | RBINC |
| 415 | DORMAN PRODUCTS, INC. | G | 0763 | DORMAN - TECHOICE | RBINC |
| 415 | DORMAN PRODUCTS, INC. | H | 0764 | DORMAN - HD SOLUTIONS | RBINC |
| 415 | DORMAN PRODUCTS, INC. | I | 0765 | CONDUCT-TITE & MISC | RBINC |
| 415 | DORMAN PRODUCTS, INC. | J | 0766 | WINDOW LIFT PRODUCTS | RBINC |
| 415 | DORMAN PRODUCTS, INC. | K | 0767 | LIGHT ASSEMBLY | RBINC |
| 415 | DORMAN PRODUCTS, INC. | L | 0768 | MIRRORS | RBINC |
| 415 | DORMAN PRODUCTS, INC. | M | 0746 | BLEEDER SCREWS | RBINC |
| 415 | DORMAN PRODUCTS, INC. | N | 0747 | BRAKE CABLE | RBINC |
| 415 | DORMAN PRODUCTS, INC. | O | 0748 | BRAKE HARDWARE | RBINC |
| 415 | DORMAN PRODUCTS, INC. | P | 0749 | BRAKE HOSE | RBINC |
| 415 | DORMAN PRODUCTS, INC. | Q | 0750 | BRAKE MASTER CYLINDER | RBINC |
| 415 | DORMAN PRODUCTS, INC. | R | 0751 | CALIPER HARDWARE | RBINC |
| 415 | DORMAN PRODUCTS, INC. | S | 0752 | CLUTCH HYDRAULICS | RBINC |
| 415 | DORMAN PRODUCTS, INC. | T | 0753 | DISC BRAKE HARDWARE | RBINC |
| 415 | DORMAN PRODUCTS, INC. | U | 0754 | DRUM BRAKE HARDWARE | RBINC |
| 415 | DORMAN PRODUCTS, INC. | V | 0755 | PARKING BRAKE HARDWARE | RBINC |
| 415 | DORMAN PRODUCTS, INC. | W | 0756 | WEAR SENSORS | RBINC |
| 415 | DORMAN PRODUCTS, INC. | Y | 0769 | DORMAN FIRST STOP | RBINC |
| 419 | PSIUSI USA INC. | A | 3125 | DEF | PSIUSI |
| 419 | PSIUSI USA INC. | B | 3126 | GREASE | PSIUSI |
| 419 | PSIUSI USA INC. | C | 3127 | OIL | PSIUSI |
| 419 | PSIUSI USA INC. | D | 3128 | FUEL | PSIUSI |
| 419 | PSIUSI USA INC. | E | 3124 | MANAGEMENT SYSTEMS | PSIUSI |
| 421 | HAMSAR | A | 0779 | ACCESSORIES/AUX LIGHTS | HAMSAR |
| 421 | HAMSAR | B | 0780 | BULBS | HAMSAR |
| 421 | HAMSAR | C | 0781 | ELECTRONIC PRODUCTS | HAMSAR |
| 421 | HAMSAR | D | 0782 | FLASHLIGHTS | HAMSAR |
| 421 | HAMSAR | E | 0783 | FORWARD LIGHTING | HAMSAR |
| 421 | HAMSAR | F | 0784 | REAR LIGHTING | HAMSAR |
| 421 | HAMSAR | G | 0785 | WARNING & SAFETY | HAMSAR |
| 421 | HAMSAR | H | 0786 | WORK LIGHTS | HAMSAR |
| 429 | HOPKINS CANADA | A | 1151 | SQUEEGEES/MAINTENANCE | HOPKIN |
| 429 | HOPKINS CANADA | B | 1152 | SNOW AND ICE | HOPKIN |
| 429 | HOPKINS CANADA | C | 1153 | AUTO INTERIOR ACC | HOPKIN |
| 429 | HOPKINS CANADA | D | 1154 | FUNNEL/FUEL ACC | HOPKIN |
| 432 | EZ RED | A | 0815 | ALL PRODUCTS | EZREDT |
| 435 | SHERWIN-WILLIAMS | A | 0825 | DUPLI-COLOR - AUTOMOTIVE | SHWILL |
| 435 | SHERWIN-WILLIAMS | B | 0826 | KRYLON - AUTOMOTIVE | SHWILL |
| 435 | SHERWIN-WILLIAMS | C | 0827 | VHT - AUTOMOTIVE | SHWILL |
| 435 | SHERWIN-WILLIAMS | D | 0828 | TRI-FLOW - AUTOMOTIVE | SHWILL |
| 435 | SHERWIN-WILLIAMS | E | 0829 | KRYLON - INDUSTRIAL | SHWILL |
| 435 | SHERWIN-WILLIAMS | F | 0830 | DUPLI-COLOR - INDUSTRIAL | SHWILL |
| 435 | SHERWIN-WILLIAMS | H | 0832 | SPRAYON - INDUSTRIAL | SHWILL |
| 435 | SHERWIN-WILLIAMS | I | 0833 | WHITE LIGHTNING - INDUSTRIAL | SHWILL |
| 435 | SHERWIN-WILLIAMS | J | 0834 | RUBBERSET - INDUSTRIAL | SHWILL |
| 435 | SHERWIN-WILLIAMS | K | 0835 | TRI-FLOW - INDUSTRIAL | SHWILL |
| 435 | SHERWIN-WILLIAMS | L | 0836 | OTHER PRODUCTS - AUTOMOTIVE | SHWILL |
| 435 | SHERWIN-WILLIAMS | M | 0837 | OTHER PRODUCTS - INDUSTRIAL | SHWILL |
| 435 | SHERWIN-WILLIAMS | N | 0839 | PURDY | SHWILL |
| 436 | FOUR SEASONS | A | 0848 | FAN CLUTCHES | 4SEA |
| 436 | FOUR SEASONS | B | 0849 | COMPRESSORS | 4SEA |
| 436 | FOUR SEASONS | C | 0850 | HOSE ASSEMBLIES | 4SEA |
| 436 | FOUR SEASONS | D | 0851 | ACCUMULATORS&FILTER DRIERS | 4SEA |
| 436 | FOUR SEASONS | E | 0852 | MOTORS | 4SEA |
| 436 | FOUR SEASONS | F | 0853 | ENGINE COOLING | 4SEA |
| 436 | FOUR SEASONS | G | 0854 | SWITCHES & RELAYS | 4SEA |
| 436 | FOUR SEASONS | H | 0855 | PULLEYS | 4SEA |
| 436 | FOUR SEASONS | I | 0856 | EVAPORATORS | 4SEA |
| 436 | FOUR SEASONS | J | 0857 | OTHER | 4SEA |
| 437 | MEVOTECH | A | 2606 | BOOT KITS | MEVO |
| 437 | MEVOTECH | B | 2607 | ACCESSORIES | MEVO |
| 437 | MEVOTECH | C | 2608 | BALL JOINT | MEVO |
| 437 | MEVOTECH | D | 2609 | BUSHING OR LINK KIT | MEVO |
| 437 | MEVOTECH | E | 2610 | IDLER OR PITMAN ARM | MEVO |
| 437 | MEVOTECH | F | 2611 | TIE ROD | MEVO |
| 437 | MEVOTECH | G | 2612 | UNCLASSIFIED | MEVO |
| 437 | MEVOTECH | H | 1390 | OG TIE ROD | MEVO |
| 437 | MEVOTECH | I | 1391 | OG BALL JOINT | MEVO |
| 437 | MEVOTECH | J | 1392 | OG BUSHING OR LINK KIT | MEVO |
| 437 | MEVOTECH | K | 1393 | OG IDLER OR PITMAN ARM | MEVO |
| 437 | MEVOTECH | L | 1394 | OG CONTROL ARMS | MEVO |
| 437 | MEVOTECH | M | 1395 | OG ALL THE REST | MEVO |
| 437 | MEVOTECH | N | 1396 | CONTROL ARMS | MEVO |
| 437 | MEVOTECH | O | 1875 | TTX CONTROL ARMS | MEVO |
| 437 | MEVOTECH | P | 1876 | TTX BALL JOINT | MEVO |
| 437 | MEVOTECH | Q | 1877 | TTX BUSHING OR LINK KIT | MEVO |
| 437 | MEVOTECH | R | 1878 | TTX IDLER OR PITMAN ARM | MEVO |
| 437 | MEVOTECH | S | 1879 | TTX TIE ROD | MEVO |
| 438 | SOUTHWIRE | A | 0858 | WOBBLELIGHT | SOUTHW |
| 438 | SOUTHWIRE | B | 0585 | DEFENDER | SOUTHW |
| 438 | SOUTHWIRE | C | 0586 | WORK LIGHT | SOUTHW |
| 438 | SOUTHWIRE | D | 0587 | EMERG/HAZARD | SOUTHW |
| 438 | SOUTHWIRE | E | 0588 | ACCESSORIES | SOUTHW |
| 438 | SOUTHWIRE | F | 0589 | REPLACEMENT PARTS | SOUTHW |
| 438 | SOUTHWIRE | G | 0590 | OUTDOOR EXT CORDS | SOUTHW |
| 438 | SOUTHWIRE | P | 0599 | SURGE PROTECTOR / OUTLET | SOUTHW |
| 442 | APEX TOOL | A | 0868 | APEX | APEXTL |
| 442 | APEX TOOL | B | 0869 | CRESCENT | APEXTL |
| 442 | APEX TOOL | C | 0870 | DIAMOND | APEXTL |
| 442 | APEX TOOL | D | 0871 | EREM | APEXTL |
| 442 | APEX TOOL | E | 0872 | HK PORTER | APEXTL |
| 442 | APEX TOOL | F | 0873 | KAHNETICS | APEXTL |
| 442 | APEX TOOL | G | 0874 | LUFKIN | APEXTL |
| 442 | APEX TOOL | H | 0875 | NICHOLSON FILE | APEXTL |
| 442 | APEX TOOL | I | 0876 | NICHOLSON SAW | APEXTL |
| 442 | APEX TOOL | J | 0877 | PLUMB | APEXTL |
| 442 | APEX TOOL | K | 0878 | WELLER ELECTRIC | APEXTL |
| 442 | APEX TOOL | L | 0879 | WIRE WRAP | APEXTL |
| 442 | APEX TOOL | M | 0880 | WISS | APEXTL |
| 442 | APEX TOOL | N | 0881 | XCELITE | APEXTL |
| 442 | APEX TOOL | O | 0882 | SPECIALTY TOOLS | APEXTL |
| 442 | APEX TOOL | P | 0883 | CAMPBELL CHAIN | APEXTL |
| 442 | APEX TOOL | Q | 0884 | ALLEN | APEXTL |
| 442 | APEX TOOL | R | 0885 | ARMSTRONG | APEXTL |
| 442 | APEX TOOL | S | 0886 | GEARWRENCH | APEXTL |
| 442 | APEX TOOL | T | 0887 | JACOBS | APEXTL |
| 442 | APEX TOOL | U | 0888 | KD - SELLOUT | APEXTL |
| 442 | APEX TOOL | V | 0889 | JOBOX | APEXTL |
| 442 | APEX TOOL | W | 0890 | GEARWRENCH LIFT | APEXTL |
| 447 | ERICKSON | A | 0892 | BUNGEY | ERICKSN |
| 447 | ERICKSON | B | 0893 | STRAPS | ERICKSN |
| 447 | ERICKSON | C | 0894 | TARPS | ERICKSN |
| 447 | ERICKSON | D | 0895 | ACCESSORIES/OTHER | ERICKSN |
| 447 | ERICKSON | E | 0896 | WINCHES | ERICKSN |
| 448 | WIPECO | A | 0905 | WIPING CLOTHS | WIPECO |
| 448 | WIPECO | B | 0906 | MICROFIBER | WIPECO |
| 448 | WIPECO | C | 0907 | TERRY & SHOP TOWELS | WIPECO |
| 448 | WIPECO | D | 0908 | AUTO SUNDRIES | WIPECO |
| 448 | WIPECO | E | 0909 | PAINT & STAIN SUNDRIES | WIPECO |
| 448 | WIPECO | F | 0910 | INACTIVE | WIPECO |
| 449 | PIP CANADA LTD | A | 2885 | GLOVES | PIPCAN |
| 449 | PIP CANADA LTD | B | 2886 | FIRST AID | PIPCAN |
| 449 | PIP CANADA LTD | C | 2883 | ARM PROTECTION | PIPCAN |
| 449 | PIP CANADA LTD | D | 2884 | PROTECTIVE CLOTHING | PIPCAN |
| 449 | PIP CANADA LTD | E | 2887 | EYE PROTECTION | PIPCAN |
| 449 | PIP CANADA LTD | F | 2888 | FACE PROTECTION | PIPCAN |
| 449 | PIP CANADA LTD | G | 2889 | FALL PROTECTION | PIPCAN |
| 449 | PIP CANADA LTD | H | 3890 | HEAD PROTECTION | PIPCAN |
| 449 | PIP CANADA LTD | I | 3470 | COOLING | PIPCAN |
| 449 | PIP CANADA LTD | J | 3471 | FOOT PROTECTION | PIPCAN |
| 449 | PIP CANADA LTD | K | 3472 | HEARING PROTECTION | PIPCAN |
| 449 | PIP CANADA LTD | L | 3473 | SITE SAFETY | PIPCAN |
| 449 | PIP CANADA LTD | M | 3474 | WARMING | PIPCAN |
| 450 | F.M.S.I AUTOMOTIVE | A | 0920 | AIR CONDITIONING | FMSI |
| 450 | F.M.S.I AUTOMOTIVE | B | 0921 | BRAKE HARDWARE | FMSI |
| 450 | F.M.S.I AUTOMOTIVE | C | 0922 | FUEL LINE REPAIR & HEATER HOSE | FMSI |
| 450 | F.M.S.I AUTOMOTIVE | D | 0923 | CHEMICALS AND LUBRICANTS | FMSI |
| 450 | F.M.S.I AUTOMOTIVE | E | 0924 | DOOR REPAIR KITS | FMSI |
| 450 | F.M.S.I AUTOMOTIVE | F | 0925 | HARDWARE | FMSI |
| 450 | F.M.S.I AUTOMOTIVE | G | 0926 | ASSORTMENTS AND TOOLS | FMSI |
| 450 | F.M.S.I AUTOMOTIVE | H | 0927 | ELECTRICAL | FMSI |
| 454 | ANSELL | A | 0454 | ARM PROTECTION | ANSELL |
| 454 | ANSELL | B | 0455 | BODY PROTECTION | ANSELL |
| 454 | ANSELL | C | 0456 | CHEMICAL PROTECTION | ANSELL |
| 454 | ANSELL | D | 0457 | CHEMICAL RESISTANT | ANSELL |
| 454 | ANSELL | E | 0458 | COLD PROTECTION | ANSELL |
| 454 | ANSELL | F | 0459 | CUT RESISTANT | ANSELL |
| 454 | ANSELL | G | 0460 | ELECTRICAL PROTECTION | ANSELL |
| 454 | ANSELL | H | 0461 | GENERAL PURPOSE | ANSELL |
| 454 | ANSELL | I | 0462 | IMPACT PROTECTION | ANSELL |
| 454 | ANSELL | J | 0463 | SINGLE USE | ANSELL |
| 454 | ANSELL | K | 0464 | OTHER | ANSELL |
| 458 | BRADY | A | 0933 | LOCKOUT/TAGOUT SOLUTIONS | BRADY |
| 458 | BRADY | B | 0934 | SORBENTS & SPILLS CONTAINMENT | BRADY |
| 458 | BRADY | C | 0935 | IDENTIFICATION SOLUTIONS | BRADY |
| 458 | BRADY | D | 0936 | OTHER | BRADY |
| 460 | F. BACON/LUBRIPLATE | A | 0959 | INDUSTRIAL OIL | FBACON |
| 460 | F. BACON/LUBRIPLATE | B | 0953 | AUTOMOTIVE | FBACON |
| 460 | F. BACON/LUBRIPLATE | C | 0954 | FOOD GRADE | FBACON |
| 460 | F. BACON/LUBRIPLATE | D | 0955 | MARINE | FBACON |
| 460 | F. BACON/LUBRIPLATE | E | 0956 | SPECIALTY | FBACON |
| 460 | F. BACON/LUBRIPLATE | F | 0957 | INDUSTRIAL FLUIDS | FBACON |
| 460 | F. BACON/LUBRIPLATE | G | 0958 | INDUSTRIAL GREASE | FBACON |
| 473 | KINETIC FUEL TECHNOLOGY | A | 0258 | FUEL TREATMENT | KINETI |
| 476 | GILMOUR | A | 1005 | HOSE | GILMOU |
| 476 | GILMOUR | B | 1006 | HOSE ENDS | GILMOU |
| 476 | GILMOUR | C | 1007 | TANKS | GILMOU |
| 476 | GILMOUR | D | 1008 | TOOLS | GILMOU |
| 482 | GSP | A | 2721 | CV AXLES | GSP |
| 482 | GSP | B | 2722 | ATV UTV AXLES | GSP |
| 482 | GSP | C | 2723 | HUB ASSEMBLY | GSP |
| 482 | GSP | D | 2724 | LOADED STRUT ASSEMBLIES | GSP |
| 482 | GSP | E | 2720 | SHOCKS | GSP |
| 483 | NORTHLAND | A | 1019 | ALL PRODUCTS | NORTHL |
| 483 | NORTHLAND | B | 1020 | TRACERLINE (NON-STOCKING) | NORTHL |
| 483 | NORTHLAND | C | 1021 | AMERSEAL | NORTHL |
| 483 | NORTHLAND | D | 1022 | HI-GEAR, HYLOMAR, MOP&BRUSH | NORTHL |
| 485 | FEL-PRO | A | 1033 | DIFF GASKET/SET | FELPRO |
| 485 | FEL-PRO | B | 1034 | HEAD BOLT SET | FELPRO |
| 485 | FEL-PRO | C | 1035 | HEAD GASKET SETS | FELPRO |
| 485 | FEL-PRO | D | 1036 | HEAD GASKETS | FELPRO |
| 485 | FEL-PRO | E | 1037 | MANIFOLD GASKETS/SET | FELPRO |
| 485 | FEL-PRO | F | 1038 | MISCELLANEOUS GASKET | FELPRO |
| 485 | FEL-PRO | G | 1039 | OIL PAN GASKETS/SETS | FELPRO |
| 485 | FEL-PRO | H | 1040 | OVERHAUL GASKET SETS | FELPRO |
| 485 | FEL-PRO | I | 1041 | TIMING CVR GSKT SETS | FELPRO |
| 485 | FEL-PRO | J | 1042 | TRANS. GASKET/SETS | FELPRO |
| 485 | FEL-PRO | K | 1043 | VALVE CVR GSKTS/SETS | FELPRO |
| 485 | FEL-PRO | L | 1044 | VALVE STEM SEALS | FELPRO |
| 487 | WORX ENVIRONMENTAL PRODUCTS INC | A | 2960 | HAND CLEANERS | WORX |
| 487 | WORX ENVIRONMENTAL PRODUCTS INC | B | 2961 | DISPENSERS | WORX |
| 487 | WORX ENVIRONMENTAL PRODUCTS INC | C | 2962 | ATTAX CLEANERS | WORX |
| 487 | WORX ENVIRONMENTAL PRODUCTS INC | D | 2963 | ACCESSORIES | WORX |
| 494 | ERGODYNE | A | 0494 | HEATER GEAR | ERGODY |
| 494 | ERGODYNE | B | 0495 | ERGONOMICS | ERGODY |
| 494 | ERGODYNE | C | 0496 | STORAGE | ERGODY |
| 494 | ERGODYNE | D | 0497 | HEAD PROTECTION | ERGODY |
| 494 | ERGODYNE | E | 0498 | COOLING | ERGODY |
| 494 | ERGODYNE | F | 0499 | TOOL TETHERING | ERGODY |
| 494 | ERGODYNE | G | 0493 | TRACTION | ERGODY |
MSC / AMS Line Code to AMS Price Level - Lines 500 - 990
| Product Line | Line Description | AMS Product Code | Product Class | Product Code Description | Catalogue Vendor |
| 500 | CONTINENTAL | A | 1046 | TIMING BELTS & KITS | GDYR |
| 500 | CONTINENTAL | B | 1047 | INDUSTRIAL BELTS (PTP) | GDYR |
| 500 | CONTINENTAL | C | 1048 | GATORBACK POLY-V BELTS | GDYR |
| 500 | CONTINENTAL | D | 1049 | GATORBACK V-BELTS | GDYR |
| 500 | CONTINENTAL | E | 1050 | INSTA-PWR BELTS | GDYR |
| 500 | CONTINENTAL | F | 1051 | MOLDED RAD HOSES | GDYR |
| 500 | CONTINENTAL | G | 1052 | SUPER CUSHION AIR SPRINGS | GDYR |
| 500 | CONTINENTAL | H | 1053 | TENSIONERS AND PULLEYS | GDYR |
| 500 | CONTINENTAL | I | 1054 | INDUSTRIAL/AGRICULTURAL HOSES | GDYR |
| 500 | CONTINENTAL | J | 1055 | MERCHANDISERS - NET JB | GDYR |
| 500 | CONTINENTAL | K | 1056 | MISCELLANEOUS HOSES (SP) | GDYR |
| 500 | CONTINENTAL | L | 1057 | MISCELLANEOUS BELTS | GDYR |
| 500 | CONTINENTAL | M | 1058 | GATORBACK SPORT (ATV) | GDYR |
| 500 | CONTINENTAL | N | 1059 | METRIC BELTS | GDYR |
| 500 | CONTINENTAL | O | 1060 | OTHER MISC HOSES | GDYR |
| 500 | CONTINENTAL | R | 1064 | WATER PUMP KITS | GDYR |
| 500 | CONTINENTAL | S | 1065 | AIR SPRING PALLET | GDYR |
| 502 | LINCOLN LUBE | A | 1072 | REEL/TUBE/HOSE ASSEM | LINCOL |
| 502 | LINCOLN LUBE | B | 1073 | GUNS/PUMPS/LUBRICATOR | LINCOL |
| 502 | LINCOLN LUBE | C | 1074 | VALVES/ GAUGES/METERS | LINCOL |
| 502 | LINCOLN LUBE | D | 1075 | KITS/TESTERS | LINCOL |
| 502 | LINCOLN LUBE | E | 1076 | FUEL INJ AND FLUID SYS | LINCOL |
| 502 | LINCOLN LUBE | F | 1077 | FITTINGS/COUPLINGS | LINCOL |
| 502 | LINCOLN LUBE | G | 1078 | ACCESSORIES | LINCOL |
| 502 | LINCOLN LUBE | H | 1079 | ADAPTERS | LINCOL |
| 502 | LINCOLN LUBE | I | 1080 | BATTERY/CHARGERS | LINCOL |
| 502 | LINCOLN LUBE | J | 1081 | DISPLAYS/MERCH | LINCOL |
| 504 | GREAT PLAINS | A | 1084 | FUEL PUMPS | GR-PL |
| 504 | GREAT PLAINS | B | 1085 | FLOW METERS | GR-PL |
| 504 | GREAT PLAINS | C | 1086 | FUEL PUMP & FLOW METER COMBO | GR-PL |
| 504 | GREAT PLAINS | D | 1087 | ACCESSORIES & KITS | GR-PL |
| 504 | GREAT PLAINS | E | 1088 | GALLON MODELS & COMBOS | GR-PL |
| 510 | CONTINENTAL HYDRAULIC | A | 1100 | HOSE | GDYR |
| 510 | CONTINENTAL HYDRAULIC | B | 1101 | FITTINGS & ADAPTORS | GDYR |
| 510 | CONTINENTAL HYDRAULIC | C | 1102 | COOL CLIP (A/C) | GDYR |
| 510 | CONTINENTAL HYDRAULIC | D | 1103 | ACCESSORIES | GDYR |
| 510 | CONTINENTAL HYDRAULIC | E | 1104 | QUICK COUPLINGS | GDYR |
| 510 | CONTINENTAL HYDRAULIC | F | 1105 | EQUIPMENT | GDYR |
| 510 | CONTINENTAL HYDRAULIC | G | 1106 | ADAPTORS | GDYR |
| 522 | GROTE | A | 1127 | SIGNAL LIGHTING | GROTE |
| 522 | GROTE | B | 1128 | INTERIOR LIGHTING | GROTE |
| 522 | GROTE | C | 1129 | PIGTAILS/HARNESSES | GROTE |
| 522 | GROTE | D | 1130 | FLASHERS | GROTE |
| 522 | GROTE | E | 1131 | ELECTRICAL ACCESSORY | GROTE |
| 522 | GROTE | F | 1132 | FORWARD LIGHTING | GROTE |
| 522 | GROTE | G | 1133 | WARNING/HAZARD | GROTE |
| 522 | GROTE | H | 1134 | MISCELLANEOUS | GROTE |
| 522 | GROTE | I | 1135 | LAMPS/LANTERNS/LENSES | GROTE |
| 522 | GROTE | J | 1136 | BRACKET/GROMMET/BEZEL | GROTE |
| 522 | GROTE | K | 1112 | CORDS/WIRES/CABLES | GROTE |
| 522 | GROTE | L | 1113 | BATTERY CONNCT/HARNES | GROTE |
| 522 | GROTE | M | 1114 | CABLE TIES | GROTE |
| 522 | GROTE | N | 1115 | DISPLAYS | GROTE |
| 522 | GROTE | O | 1116 | TOOLS | GROTE |
| 522 | GROTE | P | 1117 | AIR BRAKE | GROTE |
| 522 | GROTE | Q | 1118 | HORNS | GROTE |
| 522 | GROTE | R | 1119 | BACK-UP ALARMS | GROTE |
| 522 | GROTE | S | 1120 | GREASE/LUBRICANT | GROTE |
| 522 | GROTE | T | 1121 | CAMERA SYSTEMS | GROTE |
| 522 | GROTE | U | 1122 | FUSES | GROTE |
| 522 | GROTE | V | 1123 | SWITCHES | GROTE |
| 522 | GROTE | W | 1124 | WORK LIGHTING | GROTE |
| 522 | GROTE | 1 | 1125 | MIRRORS | GROTE |
| 522 | GROTE | Y | 1126 | RELCT/COSPICUTY TAPE | GROTE |
| 525 | GLEASON INDUSTRIAL PRODUCTS | A | 1137 | ALL | GLEAS |
| 526 | HELLA | A | 1143 | ELECTRONICS (I,K) | HELLA |
| 526 | HELLA | B | 1144 | LIGHTING (C2,C1,A1,B,H) | HELLA |
| 526 | HELLA | C | 1145 | WORK LIGHTING (G,E,F) | HELLA |
| 526 | HELLA | D | 1146 | NON-PROGRAM PRODUCT | HELLA |
| 526 | HELLA | F | 1148 | EMERGENCY / WARNING | HELLA |
| 526 | HELLA | G | 1149 | BRIGADE BACKUP SYSTEMS (D2) | HELLA |
| 526 | HELLA | H | 1150 | FRICTION | PAGID |
| 526 | HELLA | I | 1138 | ROTORS/DRUMS | PAGID |
| 526 | HELLA | J | 1139 | CALIPERS | PAGID |
| 526 | HELLA | K | 1140 | WEAR SENSORS | PAGID |
| 526 | HELLA | L | 1141 | HARDWARE | PAGID |
| 530 | EMHART | A | 1176 | HELI-COIL | EMHART |
| 530 | EMHART | B | 1177 | INDUSTRIAL | EMHART |
| 530 | EMHART | C | 1178 | POP RIVETS AND TOOLS | EMHART |
| 530 | EMHART | D | 1179 | BULK POP RIVETS | EMHART |
| 530 | EMHART | E | 1180 | OTHER ITEMS | EMHART |
| 536 | HYFLEX | A | 1202 | GREASE WHIPS | HYFLEX |
| 543 | J-B WELD | A | 1212 | ALL PRODUCTS | JBWELD |
| 543 | J-B WELD | B | 1211 | FIBER FIX | JBWELD |
| 545 | JET EQUIPMENT INDUSTRIES LLD | A | 3500 | SAFETY-DUE NORTH | JET |
| 545 | JET EQUIPMENT INDUSTRIES LLD | B | 3501 | SAFETY-JACKSON | JET |
| 545 | JET EQUIPMENT INDUSTRIES LLD | C | 3502 | SAFETY-K1 | JET |
| 545 | JET EQUIPMENT INDUSTRIES LLD | D | 3503 | SAFETY-MEGA COMFORT | JET |
| 545 | JET EQUIPMENT INDUSTRIES LLD | E | 3504 | SAFETY-NEOS | JET |
| 545 | JET EQUIPMENT INDUSTRIES LLD | F | 3505 | SAFETY-OBERON | JET |
| 545 | JET EQUIPMENT INDUSTRIES LLD | G | 3506 | SAFETY-PEAKWORKS | JET |
| 545 | JET EQUIPMENT INDUSTRIES LLD | H | 3507 | SAFETY-PIONEER | JET |
| 545 | JET EQUIPMENT INDUSTRIES LLD | I | 3508 | SAFETY-RANPRO | JET |
| 545 | JET EQUIPMENT INDUSTRIES LLD | J | 3509 | SAFETY-SELLSTROM | JET |
| 545 | JET EQUIPMENT INDUSTRIES LLD | K | 3510 | TOOLS-ITC | JET |
| 545 | JET EQUIPMENT INDUSTRIES LLD | L | 3511 | TOOLS-JET | JET |
| 545 | JET EQUIPMENT INDUSTRIES LLD | M | 3512 | TOOLS-STARTECH | JET |
| 545 | JET EQUIPMENT INDUSTRIES LLD | N | 3513 | TOOLS-STRONGARM | JET |
| 545 | JET EQUIPMENT INDUSTRIES LLD | O | 3514 | ITC AIR TOOLS & ACCES | JET |
| 545 | JET EQUIPMENT INDUSTRIES LLD | P | 3515 | JET AIR TOOLS & ACCES | JET |
| 552 | IDEAL BRAKE PARTS | A | 1232 | TRUE CERAMIC | IDEAL |
| 552 | IDEAL BRAKE PARTS | B | 1233 | PREMIUM METALLIC | IDEAL |
| 552 | IDEAL BRAKE PARTS | C | 1234 | SEVERE DUTY | IDEAL |
| 552 | IDEAL BRAKE PARTS | D | 1235 | SHOES | IDEAL |
| 552 | IDEAL BRAKE PARTS | E | 1236 | FIT BRAKE PADS | IDEAL |
| 556 | REELCRAFT | A | 3088 | ALL | REELCR |
| 558 | MR HEATER | A | 1247 | ALL PRODUCTS | MRHEAT |
| 558 | MR HEATER | B | 1248 | PARTS & ACCESSORIES | MRHEAT |
| 563 | PHILLIPS INDUSTRIES | A | 1269 | PLUGS AND SOCKETS | PHILL |
| 563 | PHILLIPS INDUSTRIES | B | 1270 | AIR HOSE/ASSEMBLEYS | PHILL |
| 563 | PHILLIPS INDUSTRIES | C | 1271 | ALL IN ONE ASSEMBLEYS | PHILL |
| 563 | PHILLIPS INDUSTRIES | D | 1272 | CABLE AND WIRE | PHILL |
| 563 | PHILLIPS INDUSTRIES | E | 1273 | BACK OF CAB | PHILL |
| 563 | PHILLIPS INDUSTRIES | F | 1274 | DOCUMENT HOLDER | PHILL |
| 563 | PHILLIPS INDUSTRIES | G | 1275 | FITTINGS | PHILL |
| 563 | PHILLIPS INDUSTRIES | H | 1276 | GLADHANDS | PHILL |
| 563 | PHILLIPS INDUSTRIES | I | 1277 | HARNESS | PHILL |
| 563 | PHILLIPS INDUSTRIES | J | 1278 | LIGHTS | PHILL |
| 563 | PHILLIPS INDUSTRIES | K | 1279 | PRIMARY WIRE | PHILL |
| 563 | PHILLIPS INDUSTRIES | L | 1280 | PROMOTIONAL DISPLAYS | PHILL |
| 563 | PHILLIPS INDUSTRIES | M | 1281 | TOLS | PHILL |
| 563 | PHILLIPS INDUSTRIES | N | 1282 | TRAILER CABLES | PHILL |
| 563 | PHILLIPS INDUSTRIES | O | 1283 | WIRE ACCESSORIES | PHILL |
| 568 | CEC INDUSTRIES | A | 1937 | MINIATURES | CECIND |
| 568 | CEC INDUSTRIES | B | 1938 | SEALED BEAMS | CECIND |
| 568 | CEC INDUSTRIES | C | 1939 | ROUGH SERVICE BULBS | CECIND |
| 568 | CEC INDUSTRIES | D | 1940 | FLASHERS | CECIND |
| 568 | CEC INDUSTRIES | E | 1941 | FLUORESCENT | CECIND |
| 568 | CEC INDUSTRIES | F | 2104 | DISPLAYS | CECIND |
| 568 | CEC INDUSTRIES | G | 1943 | SOCKETS | CECIND |
| 568 | CEC INDUSTRIES | H | 1932 | HALOGEN | CECIND |
| 568 | CEC INDUSTRIES | I | 1933 | LED | CECIND |
| 568 | CEC INDUSTRIES | J | 1934 | HID | CECIND |
| 575 | HI-LIFT JACK COMPANY | A | 3040 | JACKS | HILIFT |
| 575 | HI-LIFT JACK COMPANY | B | 3041 | ACCESSORIES | HILIFT |
| 577 | BUYERS PRODUCTS | A | 1308 | TOWING & CARGO CONTROL | BUYERS |
| 577 | BUYERS PRODUCTS | B | 1309 | TOOLBOXES & MOUNTING BRACKETS | BUYERS |
| 577 | BUYERS PRODUCTS | C | 1310 | TRUCK & TRAILER HARDWARE | BUYERS |
| 577 | BUYERS PRODUCTS | D | 1311 | RUBBER & POLYMER PRODUCTS | BUYERS |
| 577 | BUYERS PRODUCTS | E | 1312 | DUMP BODY HARDWARE | BUYERS |
| 577 | BUYERS PRODUCTS | F | 1313 | HYDRAULICS | BUYERS |
| 577 | BUYERS PRODUCTS | G | 1314 | PNEUMATICS | BUYERS |
| 577 | BUYERS PRODUCTS | H | 1315 | CABLES & CONTROL SYSTEMS | BUYERS |
| 577 | BUYERS PRODUCTS | I | 1316 | DRIVELINE COMPONENTS | BUYERS |
| 577 | BUYERS PRODUCTS | J | 1317 | ELECTRICAL & LIGHTING | BUYERS |
| 577 | BUYERS PRODUCTS | K | 1318 | ALL SEASON SPREADERS | BUYERS |
| 577 | BUYERS PRODUCTS | L | 1319 | MISCELLANEOUS | BUYERS |
| 577 | BUYERS PRODUCTS | M | 1320 | SNOW CONTROL | BUYERS |
| 581 | STAR WARNING | A | 1331 | ALL PRODUCTS | STARW |
| 581 | STAR WARNING | B | 1332 | INDUSTRIAL | STARW |
| 585 | KIT MASTERS | A | 0960 | FAN CLUTCH | KITMST |
| 585 | KIT MASTERS | B | 0961 | FAN BLADE | KITMST |
| 585 | KIT MASTERS | C | 0962 | MISC PARTS | KITMST |
| 585 | KIT MASTERS | D | 0963 | PULLEYS/TENSIONERS | KITMST |
| 585 | KIT MASTERS | E | 0964 | CONTROLS | KITMST |
| 585 | KIT MASTERS | F | 0965 | REBUILD KITS | KITMST |
| 586 | KUTMASTER | A | 1343 | KNIVES | KUTMAS |
| 586 | KUTMASTER | B | 1344 | FLASHLIGHTS | KUTMAS |
| 586 | KUTMASTER | C | 1345 | TOOLS | KUTMAS |
| 586 | KUTMASTER | D | 1346 | CUTLERY | KUTMAS |
| 586 | KUTMASTER | E | 1347 | DISPLAYS/MISCELLANEOUS | KUTMAS |
| 589 | TRACKIMO-WEBOOST | A | 1936 | TRACKERS/ACCESSORIES | TRACKI |
| 589 | TRACKIMO-WEBOOST | B | 1935 | WEBOOST | TRACKI |
| 595 | LAVAGRIP | A | 3106 | ALL | LAVAGR |
| 599 | STAR BRITE | A | 3590 | ADDITIVE | STARBR |
| 599 | STAR BRITE | B | 3591 | CLEANING & CARE | STARBR |
| 599 | STAR BRITE | C | 3592 | DISPENSERS/DISPLAYS | STARBR |
| 599 | STAR BRITE | D | 3593 | LUBRICATION | STARBR |
| 599 | STAR BRITE | E | 3594 | MOISTURE CONTROL | STARBR |
| 599 | STAR BRITE | F | 3595 | STRAP/BUNGEE | STARBR |
| 600 | SHINN FU | A | 1410 | HEIN-WERNER | SHINNF |
| 600 | SHINN FU | B | 1411 | OMEGA | SHINNF |
| 600 | SHINN FU | C | 1412 | PORTO-POWER | SHINNF |
| 600 | SHINN FU | D | 1413 | BONE CREEPER | SHINNF |
| 600 | SHINN FU | E | 1414 | BLACKHAWK AUTOMOTIVE | SHINNF |
| 600 | SHINN FU | F | 1415 | PROLIFT | SHINNF |
| 602 | MEGUIAR'S | A | 1422 | AUTOMOTV MIRROR GLAZE PRODUCTS | MEGUIA |
| 602 | MEGUIAR'S | B | 1423 | CONSUMER/GOLD CLASS PRODUCTS | MEGUIA |
| 602 | MEGUIAR'S | C | 1424 | ACCESSORIES | MEGUIA |
| 602 | MEGUIAR'S | D | 1425 | MARINE | MEGUIA |
| 604 | SILENCER - ABS FRICTION | A | 0603 | FLEET BRAKE PAD | SILENC |
| 604 | SILENCER - ABS FRICTION | B | 0604 | OE SPECIFIC BRAKE PAD | SILENC |
| 604 | SILENCER - ABS FRICTION | C | 0605 | DRUM BRAKE SHOE | SILENC |
| 604 | SILENCER - ABS FRICTION | D | 0606 | PARKING BRAKE SHOE | SILENC |
| 606 | COUNTERACT | A | 0662 | WHEEL CENTERING | COUNTA |
| 606 | COUNTERACT | B | 0663 | BALANCING BEADS | COUNTA |
| 606 | COUNTERACT | C | 0664 | LUBRICANTS | COUNTA |
| 606 | COUNTERACT | D | 0665 | TOOLS AND ACCESSORIES | COUNTA |
| 610 | PERMATEX | A | 1436 | PERMATEX | PERMA |
| 610 | PERMATEX | B | 1437 | RAIN-X | RAINX |
| 610 | PERMATEX | C | 1438 | SPRAY NINE | PERMA |
| 610 | PERMATEX | D | 1439 | SLIME | PERMA |
| 610 | PERMATEX | E | 1440 | SLICK50/GUMOUT/BLKMGC | PERMA |
| 610 | PERMATEX | F | 1477 | WIPER ACCESSORIES | RAINX |
| 610 | PERMATEX | G | 1478 | WIPER ARCH | RAINX |
| 610 | PERMATEX | H | 1479 | WIPER DISCOVER | RAINX |
| 610 | PERMATEX | I | 1480 | WIPER FUSION | RAINX |
| 610 | PERMATEX | J | 1481 | WIPER HEAVY DUTY | RAINX |
| 610 | PERMATEX | K | 1482 | WIPER LATITUDE | RAINX |
| 610 | PERMATEX | L | 1483 | WIPER QUANTUM | RAINX |
| 610 | PERMATEX | M | 1484 | WIPER REAR | RAINX |
| 610 | PERMATEX | N | 1485 | WIPER SILICON ADV | RAINX |
| 610 | PERMATEX | O | 1486 | WIPER WEATHERBEATER | RAINX |
| 610 | PERMATEX | P | 1487 | WIPER WEATHERTRAC | RAINX |
| 610 | PERMATEX | Q | 1488 | WIPER WINTER | RAINX |
| 611 | DANA THERMAL LONG MFG. | A | 1450 | ALL PRODUCTS | LONG |
| 613 | GLOBE COMMERCIAL PRODUCTS | A | 2910 | CARTS | GLOBE |
| 613 | GLOBE COMMERCIAL PRODUCTS | B | 2911 | CLEANING | GLOBE |
| 613 | GLOBE COMMERCIAL PRODUCTS | C | 2912 | FOOD SERVICE | GLOBE |
| 613 | GLOBE COMMERCIAL PRODUCTS | D | 2913 | SAFETY | GLOBE |
| 613 | GLOBE COMMERCIAL PRODUCTS | E | 2914 | WASHROOM CARE | GLOBE |
| 613 | GLOBE COMMERCIAL PRODUCTS | F | 2915 | WASTE CONTAINERS | GLOBE |
| 616 | NOCO | A | 2725 | BATTERY CHARGER | NOCO |
| 616 | NOCO | B | 2726 | JUMP STARTER | NOCO |
| 616 | NOCO | C | 2727 | ON BOARD | NOCO |
| 616 | NOCO | D | 2728 | LITHIUM BATTERIES | NOCO |
| 616 | NOCO | E | 2729 | CHARGERLIGHT | NOCO |
| 616 | NOCO | F | 2730 | BATTERY PACK AND SOLAR | NOCO |
| 616 | NOCO | G | 2731 | ACCESSORIES | NOCO |
| 616 | NOCO | H | 2932 | AIR INFLATORS | NOCO |
| 620 | NATIONAL | A | 1620 | BEARINGS | BCA |
| 620 | NATIONAL | B | 1621 | SEALS | BCA |
| 620 | NATIONAL | C | 1622 | OIL BATH SEALS | BCA |
| 620 | NATIONAL | D | 1623 | OTHER | BCA |
| 621 | K&N FILTERS | A | 1460 | AIR FILTERS | KNFILT |
| 621 | K&N FILTERS | B | 1461 | FUEL FILTERS | KNFILT |
| 621 | K&N FILTERS | C | 1462 | OIL FILTERS | KNFILT |
| 621 | K&N FILTERS | D | 1463 | INTAKE KITS | KNFILT |
| 621 | K&N FILTERS | E | 1464 | ACCESSORIES | KNFILT |
| 621 | K&N FILTERS | F | 1465 | PROMO/DISPLAYS | KNFILT |
| 621 | K&N FILTERS | G | 1466 | HVAC FILTERS | KNFILT |
| 622 | GOJO | A | 1472 | DISPENSERS | GOJO |
| 622 | GOJO | B | 1473 | HAND CLEANERS/WASH | GOJO |
| 622 | GOJO | C | 1474 | ACCESSORIES | GOJO |
| 622 | GOJO | D | 1475 | PURELL | GOJO |
| 622 | GOJO | E | 1476 | PURELL ES | GOJO |
| 624 | EZ OIL DRAIN | A | 2669 | VALVES | EZOILD |
| 624 | EZ OIL DRAIN | B | 2670 | ADAPTERS | EZOILD |
| 625 | MILTON IND | A | 1495 | ALL OTHER PRODUCTS | MILTON |
| 625 | MILTON IND | B | 1496 | BLO GUNS | MILTON |
| 625 | MILTON IND | C | 1497 | COUPLERS & PLUGS | MILTON |
| 625 | MILTON IND | D | 1498 | FRLS | MILTON |
| 625 | MILTON IND | E | 1499 | GAUGES | MILTON |
| 625 | MILTON IND | F | 1500 | HOSE & FITTINGS | MILTON |
| 625 | MILTON IND | G | 1501 | LUBRICATION | MILTON |
| 625 | MILTON IND | H | 1502 | PNEUMATIC ACCESSORIES | MILTON |
| 625 | MILTON IND | I | 1503 | TIRE HARDWARE | MILTON |
| 625 | MILTON IND | J | 1504 | OIL DRAINING / FLUID EVACUATOR | MILTON |
| 625 | MILTON IND | K | 1505 | FLUID PUMPS | MILTON |
| 625 | MILTON IND | L | 1506 | REPAIR KITS | MILTON |
| 625 | MILTON IND | M | 1507 | TOOLS | MILTON |
| 633 | GARANT | A | 1525 | ACCESSORIES/MISCELLANEOUS | GARANT |
| 633 | GARANT | B | 1526 | PICKS | GARANT |
| 633 | GARANT | C | 1527 | SNOW SHOVELS | GARANT |
| 633 | GARANT | D | 1528 | GRAIN SCOOPS | GARANT |
| 633 | GARANT | E | 1529 | SHEARS & WEEDERS | GARANT |
| 633 | GARANT | F | 1530 | CULTIVATORS & HOES | GARANT |
| 633 | GARANT | G | 1531 | RAKES | GARANT |
| 633 | GARANT | H | 1532 | WHEELBARROWS | GARANT |
| 633 | GARANT | I | 1533 | HAMMERS | GARANT |
| 633 | GARANT | J | 1534 | SNOW BRUSH & SCRAPER'S | GARANT |
| 633 | GARANT | K | 1535 | HATCHETS, AXE, SPLITTING MAULS | GARANT |
| 633 | GARANT | L | 1536 | BARS | GARANT |
| 633 | GARANT | M | 1537 | SHOVELS | GARANT |
| 633 | GARANT | N | 1538 | FORKS | GARANT |
| 633 | GARANT | O | 1539 | KIDS | GARANT |
| 633 | GARANT | P | 1540 | SPREADERS/SCRAPERS | GARANT |
| 633 | GARANT | Q | 1541 | ROOF RAKES | GARANT |
| 633 | GARANT | R | 1524 | WATERING TOOLS | GARANT |
| 635 | NGK | A | 1545 | SPARK PLUGS | NGK |
| 635 | NGK | B | 1546 | PLATINUM PLUGS | NGK |
| 635 | NGK | C | 1547 | IRIDIUM PLUGS | NGK |
| 635 | NGK | D | 1548 | OXYGEN SENSORS | NGK |
| 635 | NGK | E | 1549 | WIRE SETS | NGK |
| 635 | NGK | F | 1550 | UNCLASSIFIED | NGK |
| 635 | NGK | G | 1592 | IGNITION COIL | NGK |
| 635 | NGK | H | 1593 | MAP SENSOR | NGK |
| 635 | NGK | I | 1594 | MAF SENSOR | NGK |
| 635 | NGK | J | 1595 | VVT SOLENOID | NGK |
| 644 | NEAPCO | A | 1607 | UNIVERSAL JOINTS | NEAPCO |
| 644 | NEAPCO | B | 1608 | NEAPCO-AG/PTO | NEAPCO |
| 644 | NEAPCO | C | 1609 | NEAPCO-CV BOOTS | NEAPCO |
| 644 | NEAPCO | D | 1610 | HD DRIVE LINE | NEAPCO |
| 644 | NEAPCO | E | 1611 | CV AXLE ASSEMBLIES | NEAPCO |
| 644 | NEAPCO | F | 1612 | DRIVESHAFT/COMPONENTS | NEAPCO |
| 644 | NEAPCO | G | 1613 | INDIVIDUAL REPAIR COMPONENTS | NEAPCO |
| 653 | SOLEMAT INC | A | 0653 | INSOLES | SOLEMA |
| 653 | SOLEMAT INC | B | 0654 | MATTING | SOLEMA |
| 656 | KYB | A | 3430 | DOMESTIC PASS.CAR | KYB |
| 656 | KYB | B | 3431 | DOMESTIC TRUCK / SUV | KYB |
| 656 | KYB | C | 3432 | IMPORT PASS. CAR | KYB |
| 656 | KYB | D | 3433 | IMPORT TRUCK / SUV | KYB |
| 656 | KYB | E | 3434 | SHARED PLATFORM - PASS.CAR | KYB |
| 656 | KYB | F | 3435 | SHARED PLATFORM - TRUCK / SUV | KYB |
| 656 | KYB | G | 3436 | HDTRUCK,BUS,MOTORHOME | KYB |
| 656 | KYB | H | 3437 | ACCESSORIES | KYB |
| 665 | RAYBESTOS | A | 1682 | RLINE CALIPERS | RAY |
| 665 | RAYBESTOS | B | 1683 | ELEMENT3 PADS | RAY |
| 665 | RAYBESTOS | C | 1684 | SG PADS | RAY |
| 665 | RAYBESTOS | D | 1685 | SHOES | RAY |
| 665 | RAYBESTOS | E | 1686 | SPECIALTY ROTORS | RAY |
| 665 | RAYBESTOS | F | 1687 | RLINE ROTORS | RAY |
| 665 | RAYBESTOS | G | 1688 | RLINE DRUMS | RAY |
| 665 | RAYBESTOS | H | 1689 | HYDRAULICS | RAY |
| 665 | RAYBESTOS | I | 1690 | HARDWARE | RAY |
| 665 | RAYBESTOS | J | 1691 | BRAKE CABLE | RAY |
| 665 | RAYBESTOS | K | 1692 | RLINE COATED CALIPERS | RAY |
| 665 | RAYBESTOS | L | 1693 | ELEMENT3 NEW CALIPERS | RAY |
| 665 | RAYBESTOS | M | 1694 | ELEMENT3 SHOES | RAY |
| 665 | RAYBESTOS | S | 1700 | POLICE | RAY |
| 665 | RAYBESTOS | T | 1701 | ELEMENT3 COATED ROTORS | RAY |
| 665 | RAYBESTOS | U | 1702 | RLINE PADS | RAY |
| 665 | RAYBESTOS | V | 1703 | EUROPEAN | RAY |
| 665 | RAYBESTOS | W | 1704 | SCHOOL BUS | RAY |
| 665 | RAYBESTOS | Y | 1705 | TRUCK & MEDIUM DUTY | RAY |
| 665 | RAYBESTOS | N | 1707 | PERFORMANCE | RAY |
| 665 | RAYBESTOS | O | 1708 | RACING PADS | RAY |
| 665 | RAYBESTOS | P | 1706 | BRAKE HOSE | RAY |
| 665 | RAYBESTOS | Q | 1580 | BRAKE MASTER CYLINDER | RAY |
| 665 | RAYBESTOS | R | 1581 | WHEEL CYLINDER | RAY |
| 665 | RAYBESTOS | 6 | 1582 | PRK BRK HARDWARE KIT | RAY |
| 665 | RAYBESTOS | Z | 1583 | DRM BRK HARDWARE KIT | RAY |
| 665 | RAYBESTOS | 1 | 1584 | CALIPER BOLT KIT | RAY |
| 665 | RAYBESTOS | 2 | 1585 | DISC BRK HARDWARE KIT | RAY |
| 665 | RAYBESTOS | 3 | 1586 | DRUM BRK SELF ADJUSTR | RAY |
| 665 | RAYBESTOS | 4 | 1587 | CALIPER BUSHING KIT | RAY |
| 665 | RAYBESTOS | 5 | 1588 | CLUTCH HYDRAULIC HOSE | RAY |
| 667 | TECTRAN | A | 0325 | VALVES | TECTRA |
| 667 | TECTRAN | B | 0326 | LIFELINE KITS | TECTRA |
| 667 | TECTRAN | C | 0327 | PRIMARY WIRE | TECTRA |
| 667 | TECTRAN | D | 0328 | AIR POWER LINES | TECTRA |
| 667 | TECTRAN | E | 0329 | BATTERY CABLE | TECTRA |
| 667 | TECTRAN | F | 0330 | AIRCOILS | TECTRA |
| 667 | TECTRAN | G | 0331 | ELEC CONNECTORS & ACCESSORIES | TECTRA |
| 667 | TECTRAN | H | 0332 | BATTERY HARDWARE | TECTRA |
| 667 | TECTRAN | I | 0333 | TRUCK/TRAILER CABLE | TECTRA |
| 667 | TECTRAN | J | 0334 | ELECTRICAL CABLE ASSEMBLIES | TECTRA |
| 667 | TECTRAN | K | 0335 | AIR BRAKE TUBING | TECTRA |
| 667 | TECTRAN | L | 0336 | AIR CONNECTORS & ACCESSORIES | TECTRA |
| 667 | TECTRAN | M | 0337 | BRAKE HOSE & ASSEMBLIES | TECTRA |
| 667 | TECTRAN | N | 0338 | BRASS FITTINGS | TECTRA |
| 667 | TECTRAN | O | 0526 | HOSE & TUBING | TECTRA |
| 667 | TECTRAN | P | 0527 | GENERAL ACCESSORIES | TECTRA |
| 667 | TECTRAN | Q | 0528 | HORNS | TECTRA |
| 667 | TECTRAN | R | 0529 | SUSPENSION PARTS | TECTRA |
| 667 | TECTRAN | S | 0530 | AIR TREATMENT | TECTRA |
| 667 | TECTRAN | T | 0531 | CYLINDERS | TECTRA |
| 667 | TECTRAN | U | 0532 | ABS | TECTRA |
| 667 | TECTRAN | V | 0533 | SPRING BRAKE & CHAMBERS | TECTRA |
| 667 | TECTRAN | W | 0534 | SAFETY PRODUCTS | TECTRA |
| 667 | TECTRAN | Y | 0535 | LIGHTS | TECTRA |
| 667 | TECTRAN | Z | 0536 | OIL CAPS & DIPSTICKS | TECTRA |
| 667 | TECTRAN | 1 | 0537 | INSTRUMENT GAUGES | TECTRA |
| 667 | TECTRAN | 2 | 0538 | MERCHANDISING | TECTRA |
| 670 | WALKER | A | 2710 | ACCESSORIES & HARDWARE | WALKER |
| 670 | WALKER | B | 2711 | HD EXHAUST PIPES/FLEX PIPES | WALKER |
| 670 | WALKER | C | 2712 | HD MUFFLER/RESONATOR | WALKER |
| 670 | WALKER | D | 2709 | CONVERTERS | WALKER |
| 670 | WALKER | E | 2713 | HD HARDWARE/ACCESSORIES | WALKER |
| 670 | WALKER | F | 2714 | EXHAUST PIPES/FLEX PIPES | WALKER |
| 670 | WALKER | G | 2715 | MUFFLER/RESONATOR | WALKER |
| 674 | CHANNELOCK | A | 1709 | SPECIALTY PLIERS | CHANNE |
| 674 | CHANNELOCK | B | 1710 | TONGUE&GROOVE | CHANNE |
| 674 | CHANNELOCK | C | 1711 | CUTTING PLIERS | CHANNE |
| 674 | CHANNELOCK | D | 1712 | UNCLASSIFIED | CHANNE |
| 680 | H. PAULIN | A | 3200 | BOLTS | PAULIN |
| 680 | H. PAULIN | B | 3201 | SCREWS | PAULIN |
| 680 | H. PAULIN | C | 3202 | WASHERS | PAULIN |
| 680 | H. PAULIN | D | 3203 | NUTS | PAULIN |
| 680 | H. PAULIN | E | 3204 | PINS | PAULIN |
| 680 | H. PAULIN | F | 3205 | RIVETS | PAULIN |
| 680 | H. PAULIN | G | 3206 | FITTINGS | PAULIN |
| 680 | H. PAULIN | H | 3207 | BITS/SETTERS/ADAPTORS | PAULIN |
| 680 | H. PAULIN | I | 3208 | ANCHORS | PAULIN |
| 680 | H. PAULIN | J | 3209 | THREADED ROD | PAULIN |
| 680 | H. PAULIN | K | 3210 | NAILS | PAULIN |
| 680 | H. PAULIN | L | 3211 | WHEEL NUTS BOLTS | PAULIN |
| 680 | H. PAULIN | M | 3212 | THREAD REPAIR | PAULIN |
| 680 | H. PAULIN | N | 3213 | DRAIN PLGS GSKTS | PAULIN |
| 680 | H. PAULIN | O | 3214 | AUTO TRIM FASTENERS | PAULIN |
| 680 | H. PAULIN | P | 3215 | AUTO BRAKE | PAULIN |
| 680 | H. PAULIN | Q | 3216 | EYEWEAR | PAULIN |
| 680 | H. PAULIN | R | 3217 | GLOVES | PAULIN |
| 680 | H. PAULIN | S | 3218 | AUTOMOTIVE | PAULIN |
| 680 | H. PAULIN | T | 3219 | INDUSTRIAL | PAULIN |
| 680 | H PAULIN | U | 3220 | ASSORTMENTS | PAULIN |
| 680 | H PAULIN | V | 3221 | MERCHANDISERS | PAULIN |
| 680 | H PAULIN | W | 3222 | GAUGES | PAULIN |
| 687 | OLD WORLD INDUSTRIES - PEAK | A | 3687 | HEADLAMPS | PEAK |
| 687 | OLD WORLD INDUSTRIES - PEAK | B | 3688 | HID | PEAK |
| 687 | OLD WORLD INDUSTRIES - PEAK | C | 3689 | LED | PEAK |
| 687 | OLD WORLD INDUSTRIES - PEAK | D | 3690 | MINI BULBS | PEAK |
| 687 | OLD WORLD INDUSTRIES - PEAK | E | 3691 | SEALED BEAM | PEAK |
| 687 | OLD WORLD INDUSTRIES - PEAK | F | 3692 | ASSORT/DISPLAYS | PEAK |
| 687 | OLD WORLD INDUSTRIES - PEAK | G | 3693 | ALL SEASON BLADE | PEAK |
| 687 | OLD WORLD INDUSTRIES - PEAK | H | 3694 | HEAVY DUTY BLADE | PEAK |
| 687 | OLD WORLD INDUSTRIES - PEAK | I | 3695 | OPTIX BLADE | PEAK |
| 687 | OLD WORLD INDUSTRIES - PEAK | J | 3696 | REAR BLADE | PEAK |
| 687 | OLD WORLD INDUSTRIES - PEAK | K | 3697 | SILICON PLATINUM BLAD | PEAK |
| 687 | OLD WORLD INDUSTRIES - PEAK | L | 3698 | WINTER BLADE | PEAK |
| 695 | DV SYSTEMS | A | 1729 | STANDARD DUTY | DVSYST |
| 695 | DV SYSTEMS | B | 1730 | HD/ROTARY/DRYERS | DVSYST |
| 695 | DV SYSTEMS | C | 1731 | PARTS | DVSYST |
| 695 | DV SYSTEMS | D | 1732 | TOOLS | DVSYST |
| 700 | K-SEAL | A | 0700 | KSEAL | K-SEAL |
| 702 | ASSOCIATED EQUIP | A | 1742 | ALL PRODUCTS | ASOCEQ |
| 702 | ASSOCIATED EQUIP | B | 1743 | OVER 500 | ASOCEQ |
| 706 | PAXTON INDUSTRIES | A | 3090 | ALL PRODUCTS | PAXTON |
| 707 | THERSTY HYDRATION PRODUCTS LTD | A | 0770 | HYDRATION | THERST |
| 711 | DERALE PERFORMANCE | A | 3100 | HARDWARE | DERALE |
| 711 | DERALE PERFORMANCE | B | 3101 | ENGINE COOLING FAN | DERALE |
| 711 | DERALE PERFORMANCE | C | 3102 | ENG/TRAN OIL COOLER | DERALE |
| 711 | DERALE PERFORMANCE | D | 3103 | TRANSMISSION OIL COOLER | DERALE |
| 711 | DERALE PERFORMANCE | E | 3104 | POWER STEERING COOLER | DERALE |
| 717 | FLEXZILLA | A | 1181 | AIR | FLEXZI |
| 717 | FLEXZILLA | B | 1182 | WATER | FLEXZI |
| 721 | TIMBREN | A | 1942 | SUSPENSION ENH PARTS | TIMBRE |
| 725 | VIKING | A | 1795 | VIKING OUTERWEAR | VIK |
| 725 | VIKING | B | 1796 | VIKING BOOTS | VIK |
| 725 | VIKING | C | 1797 | GLOVES | VIK |
| 725 | VIKING | D | 1798 | HOUSEHOLD&CLEANING | VIK |
| 725 | VIKING | E | 1799 | VIKING FIREWALL | VIK |
| 727 | SUNAIR PRODUCTS | A | 1716 | A/C REPAIR | SUNAIR |
| 727 | SUNAIR PRODUCTS | B | 1717 | HARDWARE | SUNAIR |
| 727 | SUNAIR PRODUCTS | C | 1718 | SENSORS/SWITCHES | SUNAIR |
| 727 | SUNAIR PRODUCTS | D | 1719 | A/C REC/DRIER | SUNAIR |
| 727 | SUNAIR PRODUCTS | E | 1720 | BLOWER MOTORS | SUNAIR |
| 727 | SUNAIR PRODUCTS | F | 1721 | A/C COMPRESSORS | SUNAIR |
| 727 | SUNAIR PRODUCTS | G | 1722 | A/C EVAPORATORS | SUNAIR |
| 727 | SUNAIR PRODUCTS | H | 1723 | A/C CONDENSERS | SUNAIR |
| 727 | SUNAIR PRODUCTS | I | 1724 | EMISSIONS PARTS | SUNAIR |
| 727 | SUNAIR PRODUCTS | J | 1725 | A/C CHEMICALS | SUNAIR |
| 727 | SUNAIR PRODUCTS | K | 1726 | HVAC REPAIR | SUNAIR |
| 727 | SUNAIR PRODUCTS | L | 1727 | DASH FANS | SUNAIR |
| 735 | BWD | A | 1831 | IGNITION & DOOR | BORG |
| 735 | BWD | B | 1832 | ENGINE MANAGEMENT | BORG |
| 735 | BWD | C | 1833 | FUEL INJECTION | BORG |
| 735 | BWD | D | 1834 | CARB | BORG |
| 735 | BWD | E | 1835 | WIRE AND CABLE | BORG |
| 735 | BWD | F | 1836 | REMAN | BORG |
| 735 | BWD | G | 1837 | TECHSMART | TECHSM |
| 735 | BWD | H | 1838 | UNCLASSIFIED | BORG |
| 735 | BWD | I | 1827 | SENSORS | BORG |
| 735 | BWD | J | 1828 | SOLENOIDS & SWITCHES | BORG |
| 735 | BWD | K | 1829 | FUSES & CONNECTORS | BORG |
| 735 | BWD | L | 1830 | EMISSIONS | BORG |
| 737 | TRUX ACCESSORIES | A | 1893 | LIGHTING | TRUXAC |
| 737 | TRUX ACCESSORIES | B | 1894 | LIGHTING ACCESSORIES | TRUXAC |
| 737 | TRUX ACCESSORIES | C | 1895 | HEAD LIGHTS/WORK LAMP | TRUXAC |
| 737 | TRUX ACCESSORIES | D | 1896 | BODY ACCESSORIES | TRUXAC |
| 737 | TRUX ACCESSORIES | E | 1897 | EXHAUST ACCESSORIES | TRUXAC |
| 737 | TRUX ACCESSORIES | F | 1898 | WHEEL ACCESSORIES | TRUXAC |
| 737 | TRUX ACCESSORIES | G | 1899 | UNIVERSAL ACCESSORIES | TRUXAC |
| 737 | TRUX ACCESSORIES | H | 1900 | FENDERS AND KITS | TRUXAC |
| 740 | SIERRA INTERNATIONAL - PRIME LINE | A | 3000 | ATV DECK/DRIVE/TIRE | SIERRA |
| 740 | SIERRA INTERNATIONAL - PRIME LINE | B | 3001 | ATV ELECTRICAL/IGN | SIERRA |
| 740 | SIERRA INTERNATIONAL - PRIME LINE | C | 3002 | ATV FUEL/LUBRICANT | SIERRA |
| 740 | SIERRA INTERNATIONAL - PRIME LINE | D | 3003 | ATV OTHER | SIERRA |
| 740 | SIERRA INTERNATIONAL - PRIME LINE | E | 3004 | MOELLER ELECT/IGN | SIERRA |
| 740 | SIERRA INTERNATIONAL - PRIME LINE | F | 3005 | MOELLER FUEL/LUB | SIERRA |
| 740 | SIERRA INTERNATIONAL - PRIME LINE | G | 3006 | MOELLER PLUMBING | SIERRA |
| 740 | SIERRA INTERNATIONAL - PRIME LINE | H | 3007 | MOELLER OTHER | SIERRA |
| 740 | SIERRA INTERNATIONAL - PRIME LINE | I | 3008 | OPE AIR FILTER | SIERRA |
| 740 | SIERRA INTERNATIONAL - PRIME LINE | J | 3009 | OPE BLADE | SIERRA |
| 740 | SIERRA INTERNATIONAL - PRIME LINE | K | 3010 | OPE DECK/DRIVE/TIRE | SIERRA |
| 740 | SIERRA INTERNATIONAL - PRIME LINE | L | 3011 | OPE ELECTRICAL/IGN | SIERRA |
| 740 | SIERRA INTERNATIONAL - PRIME LINE | M | 3012 | OPE FUEL/LUBRICANT | SIERRA |
| 740 | SIERRA INTERNATIONAL - PRIME LINE | N | 3013 | OPE HANDHELD | SIERRA |
| 740 | SIERRA INTERNATIONAL - PRIME LINE | O | 3014 | OPE OTHER | SIERRA |
| 740 | SIERRA INTERNATIONAL - PRIME LINE | P | 3015 | OPE STARTER SYSTEM | SIERRA |
| 740 | SIERRA INTERNATIONAL - PRIME LINE | Q | 3016 | SEASTAR DECK/DRIVE | SIERRA |
| 740 | SIERRA INTERNATIONAL - PRIME LINE | R | 3017 | SEASTAR OTHER | SIERRA |
| 740 | SIERRA INTERNATIONAL - PRIME LINE | S | 3018 | SHIELDS | SIERRA |
| 740 | SIERRA INTERNATIONAL - PRIME LINE | T | 3019 | SIERRA COOLING SYSTEM | SIERRA |
| 740 | SIERRA INTERNATIONAL - PRIME LINE | U | 3020 | SIERRA DECK/DRIVE | SIERRA |
| 740 | SIERRA INTERNATIONAL - PRIME LINE | V | 3021 | SIERRA ELECT/IGN | SIERRA |
| 740 | SIERRA INTERNATIONAL - PRIME LINE | W | 3022 | SIERRA FUEL/LUBRICANT | SIERRA |
| 740 | SIERRA INTERNATIONAL - PRIME LINE | Y | 3023 | SIERRA OTHER | SIERRA |
| 740 | SIERRA INTERNATIONAL - PRIME LINE | Z | 3024 | VP FUEL/LUBRICANT | SIERRA |
| 744 | LIPPERT COMPONENTS | A | 1400 | AXLE REPLACEMENT | LIPPER |
| 744 | LIPPERT COMPONENTS | B | 1401 | ALIGNMENT/ SUSPENSION | LIPPER |
| 744 | LIPPERT COMPONENTS | C | 1402 | LEVELING/ STABILIZING | LIPPER |
| 744 | LIPPERT COMPONENTS | D | 1403 | FURRION ELEC POWER | LIPPER |
| 744 | LIPPERT COMPONENTS | E | 1404 | DENVER MATTRESS | LIPPER |
| 744 | LIPPERT COMPONENTS | F | 1405 | FURRION ELECTRONICS ACCESSORIES | LIPPER |
| 744 | LIPPERT COMPONENTS | G | 1406 | LCI AXLE COMPONENTS | LIPPER |
| 744 | LIPPERT COMPONENTS | H | 1407 | LCI RV PARTS AND ACCESSORIES | LIPPER |
| 744 | LIPPERT COMPONENTS | I | 1408 | LCI AWNINGS AND ACCESSORIES | LIPPER |
| 744 | LIPPERT COMPONENTS | J | 1409 | PGK RV ACCESSORIES | LIPPER |
| 744 | LIPPERT COMPONENTS | K | 1399 | MARINE | LIPPER |
| 744 | LIPPERT COMPONENTS | L | 1510 | SEALANTS AND ADHESIVE | LIPPER |
| 745 | DANA | A | 2655 | U JOINT KITS | SPICEU |
| 745 | DANA | B | 2656 | SEALS | SPICEU |
| 745 | DANA | C | 2657 | AXLE SHAFTS | SPICEU |
| 745 | DANA | D | 2658 | RING AND PINION KITS | SPICEU |
| 745 | DANA | E | 2659 | HD STEER AND SUSENSION | SPICEU |
| 745 | DANA | F | 2660 | DIFFERENTAL | SPICEU |
| 745 | DANA | G | 2661 | DRIVESHAFTS | SPICEU |
| 745 | DANA | H | 2662 | UNCLASSIFIED | SPICEU |
| 745 | DANA | I | 2652 | HARDWARE | SPICEU |
| 745 | DANA | J | 2653 | CENTER BEARING | SPICEU |
| 745 | DANA | K | 2654 | YOKE | SPICEU |
| 745 | DANA | L | 2651 | SEALANTS | SPICEU |
| 746 | RECOCHEM | A | 1851 | ANTIFREEZE | RECOCH |
| 746 | RECOCHEM | B | 1852 | WINDSHIELD WASH | RECOCH |
| 746 | RECOCHEM | C | 1853 | DEF | RECOCH |
| 746 | RECOCHEM | D | 1854 | CHAIN OIL | RECOCH |
| 746 | RECOCHEM | E | 1855 | SOLVENTS - OTHER | RECOCH |
| 750 | PLOMBCO | A | 1860 | LEAD | PLOMBC |
| 750 | PLOMBCO | B | 1861 | ZINC | PLOMBC |
| 750 | PLOMBCO | C | 1862 | STEEL | PLOMBC |
| 750 | PLOMBCO | D | 1863 | PLASTEEL | PLOMBC |
| 750 | PLOMBCO | E | 1864 | ADHESIVE | PLOMBC |
| 750 | PLOMBCO | F | 1865 | TOOLS & ACCESSORIES | PLOMBC |
| 757 | LAUNCH TECH USA INC | A | 2780 | DIY PRODUCTS | LAUNCH |
| 757 | LAUNCH TECH USA INC | B | 2781 | TPMS | LAUNCH |
| 757 | LAUNCH TECH USA INC | C | 2782 | BATTERY PRODUCTS | LAUNCH |
| 757 | LAUNCH TECH USA INC | D | 2783 | IMMOBILIZER PRODUCTS | LAUNCH |
| 757 | LAUNCH TECH USA INC | E | 2784 | PROFESSIONAL SCANNERS | LAUNCH |
| 757 | LAUNCH TECH USA INC | F | 2785 | MODULES & ACCESSORIES | LAUNCH |
| 757 | LAUNCH TECH USA INC | G | 2786 | SCOPES | LAUNCH |
| 757 | LAUNCH TECH USA INC | H | 2787 | EV TOOLS | LAUNCH |
| 757 | LAUNCH TECH USA INC | I | 2788 | SMARTLINK | LAUNCH |
| 757 | LAUNCH TECH USA INC | J | 2789 | ADAS | LAUNCH |
| 757 | LAUNCH TECH USA INC | K | 2790 | ADAS ACESSORIES | LAUNCH |
| 757 | LAUNCH TECH USA INC | L | 2791 | ADAS MOBILE | LAUNCH |
| 757 | LAUNCH TECH USA INC | M | 2792 | ADAS TABLETS | LAUNCH |
| 757 | LAUNCH TECH USA INC | N | 2793 | LDW PACKAGE | LAUNCH |
| 757 | LAUNCH TECH USA INC | O | 2794 | RADAR TARGET | LAUNCH |
| 759 | ATRO | A | 2759 | ADAPTER KIT | ATRO |
| 759 | ATRO | B | 2760 | AXLE WRAP | ATRO |
| 759 | ATRO | C | 2761 | BUSHING | ATRO |
| 759 | ATRO | D | 2762 | CROSS TUBE | ATRO |
| 759 | ATRO | E | 2763 | END PLUG | ATRO |
| 759 | ATRO | F | 2764 | HARDWARE | ATRO |
| 759 | ATRO | G | 2765 | KIT | ATRO |
| 759 | ATRO | H | 2766 | LOAD PAD | ATRO |
| 759 | ATRO | I | 2767 | MOUNTS | ATRO |
| 759 | ATRO | J | 2768 | PRESS TOOL | ATRO |
| 759 | ATRO | K | 2769 | SPRG END CSHN/PAD | ATRO |
| 759 | ATRO | L | 2770 | SPRING PINS | ATRO |
| 759 | ATRO | M | 2771 | THRUST WASHER | ATRO |
| 759 | ATRO | N | 2772 | TORQUE ROD | ATRO |
| 759 | ATRO | O | 2773 | TRAILER AXLE WRAP | ATRO |
| 759 | ATRO | P | 2774 | TRAILER BUSHING | ATRO |
| 759 | ATRO | Q | 2775 | TRAILER SPRING KIT | ATRO |
| 759 | ATRO | R | 2776 | TRAILER TORQUE ROD | ATRO |
| 759 | ATRO | S | 2777 | WEAR PAD | ATRO |
| 761 | PLEWS & EDELMANN | A | 3080 | RACK | EDEL |
| 761 | PLEWS & EDELMANN | B | 3081 | PUMP | EDEL |
| 761 | PLEWS & EDELMANN | C | 3082 | GEAR | EDEL |
| 761 | PLEWS & EDELMANN | D | 3083 | POWER STEER HOSE | EDEL |
| 761 | PLEWS & EDELMANN | E | 3084 | KITS, SEALS & FITTINGS | EDEL |
| 761 | PLEWS & EDELMANN | F | 3085 | COOLERS | EDEL |
| 764 | BOSCH AUTO | A | 2674 | SPARK PLUGS | BOSCH |
| 764 | BOSCH AUTO | B | 2675 | WIPER BLADES | BOSCH |
| 764 | BOSCH AUTO | C | 2676 | COMMON RAIL DIESEL | BOSCH |
| 764 | BOSCH AUTO | D | 2677 | OXYGEN SENSORS | BOSCH |
| 764 | BOSCH AUTO | E | 2678 | ENGINE MANAGEMENT | BOSCH |
| 764 | BOSCH AUTO | F | 2672 | BRAKING SYSTEMS | BOSCH |
| 764 | BOSCH AUTO | G | 2671 | ELECTRIC PARTS | BOSCH |
| 764 | BOSCH AUTO | H | 2679 | GAS/STEERING SYSTEMS | BOSCH |
| 764 | BOSCH AUTO | I | 2673 | NON-PROGRAM PRODUCT | BOSCH |
| 764 | BOSCH AUTO | J | 2684 | QUIETCAST HD SD | BOSCH |
| 764 | BOSCH AUTO | K | 2695 | QUIETCAST ROTOR | BOSCH |
| 764 | BOSCH AUTO | L | 2696 | QUIETCAST PAD | BOSCH |
| 764 | BOSCH AUTO | M | 2697 | BOSCH BLUE PADS | BOSCH |
| 764 | BOSCH AUTO | N | 2694 | BRAKE BOOSTER | BOSCH |
| 764 | BOSCH AUTO | O | 3415 | EUROLINE PADS | BOSCH |
| 764 | BOSCH AUTO | P | 3416 | QUIETCAST MD PADS | BOSCH |
| 764 | BOSCH AUTO | Q | 3417 | QUIETCAST SD PADS | BOSCH |
| 764 | BOSCH AUTO | R | 3418 | BOSCH BLUE SHOES | BOSCH |
| 764 | BOSCH AUTO | S | 3419 | POLICE PURSUIT PADS | BOSCH |
| 764 | BOSCH AUTO | T | 2740 | WIPER ACCESSORIES | BOSCH |
| 764 | BOSCH AUTO | U | 2741 | WIPER CLEAR ADV | BOSCH |
| 764 | BOSCH AUTO | V | 2742 | WIPER DIRECT CONNECT | BOSCH |
| 764 | BOSCH AUTO | W | 2743 | WIPER EVOLUTION | BOSCH |
| 764 | BOSCH AUTO | Y | 2744 | WIPER EXCEL+ | BOSCH |
| 764 | BOSCH AUTO | Z | 2745 | WIPER ICON | BOSCH |
| 764 | BOSCH AUTO | 1 | 2746 | WIPER INSIGHT | BOSCH |
| 764 | BOSCH AUTO | 2 | 2747 | WIPER MICRO EDGE | BOSCH |
| 764 | BOSCH AUTO | 3 | 2748 | WIPER REAR | BOSCH |
| 764 | BOSCH AUTO | 4 | 2749 | WIPER SNOW DRIVER | BOSCH |
| 764 | BOSCH AUTO | 5 | 2750 | WIPER TWIN | BOSCH |
| 764 | BOSCH AUTO | 6 | 2751 | WIPER XPRESSFIT PRO | BOSCH |
| 766 | TERA PUMP | A | 0300 | PUMPS | TERAPU |
| 766 | TERA PUMP | B | 0301 | BULK | TERAPU |
| 766 | TERA PUMP | C | 0302 | ACCESSORIES/PARTS | TERAPU |
| 771 | LA-CO MARKAL | A | 1840 | GEN PURPOSE MARKERS | LA-CO |
| 771 | LA-CO MARKAL | B | 1841 | HOLDERS/ TEMP INDICATORS | LA-CO |
| 771 | LA-CO MARKAL | C | 1842 | INK MARKERS | LA-CO |
| 771 | LA-CO MARKAL | D | 1843 | LIQUID PAINT MARKERS | LA-CO |
| 771 | LA-CO MARKAL | E | 1844 | LUMBER/ TIMBER MARKERS | LA-CO |
| 771 | LA-CO MARKAL | F | 1845 | SOLID PAINT MARKERS | LA-CO |
| 771 | LA-CO MARKAL | G | 1846 | WELDING MARKERS | LA-CO |
| 771 | LA-CO MARKAL | H | 1847 | LA-CO | LA-CO |
| 771 | LA-CO MARKAL | I | 1848 | ALL WEATHER | LA-CO |
| 771 | LA-CO MARKAL | J | 1849 | TEMPIL | LA-CO |
| 772 | CHAPIN INTERNATIONAL INC | A | 3060 | SPRAYERS | CHAPIN |
| 772 | CHAPIN INTERNATIONAL INC | B | 3061 | PARTS | CHAPIN |
| 775 | FIAMM | A | 1914 | ALL PRODUCTS | FIAAM |
| 778 | PROLINE HD | A | 3480 | SLACK ADJUSTERS | PROLHD |
| 778 | PROLINE HD | B | 3481 | CLEVIS PINS | PROLHD |
| 778 | PROLINE HD | C | 3482 | MANUAL SLACK ADJ | PROLHD |
| 778 | PROLINE HD | D | 3483 | HALDEX AUTO SLACK ADJ | PROLHD |
| 778 | PROLINE HD | E | 3484 | GUNITE AUTO SLACK ADJ | PROLHD |
| 778 | PROLINE HD | F | 3485 | CREWSON AUTO SLACK ADJ | PROLHD |
| 778 | PROLINE HD | G | 3486 | OE AUTO SLACK ADJ | PROLHD |
| 778 | PROLINE HD | H | 3487 | BENDIX AUTO SLACK ADJ | PROLHD |
| 778 | PROLINE HD | I | 3488 | MERITOR AUTO SLACK ADJ | PROLHD |
| 801 | SPECTRUM BRANDS | A | 1952 | ARMORALL WIPES | SPECBR |
| 801 | SPECTRUM BRANDS | B | 1953 | STP | SPECBR |
| 801 | SPECTRUM BRANDS | C | 1954 | CLEANERS & PROTECTANTS | SPECBR |
| 801 | SPECTRUM BRANDS | D | 1955 | AIR FRESHENERS | SPECBR |
| 805 | STEWART WARNER | A | 1962 | STEWART-WRNR PRODS. | STEW |
| 805 | STEWART WARNER | B | 1963 | ALEMITE PRDS (NOT STOCKED) | STEW |
| 805 | STEWART WARNER | C | 1964 | PERFORMANCE GUAGES | STEW |
| 808 | INDUCTION INNOVATIONS | A | 0809 | MINI-INDUCTOR SERIES | INDUCT |
| 808 | INDUCTION INNOVATIONS | B | 0810 | INDUCTOR SERIES | INDUCT |
| 808 | INDUCTION INNOVATIONS | C | 0811 | ALFE SERIES | INDUCT |
| 808 | INDUCTION INNOVATIONS | D | 0812 | ACCESSORIES | INDUCT |
| 810 | PHILLIPS & TEMRO | A | 1991 | ENGINE HEATERS | TEMRO |
| 810 | PHILLIPS & TEMRO | B | 1992 | CAB & CARGO | TEMRO |
| 810 | PHILLIPS & TEMRO | C | 1993 | CIRUCLATION HEATING | TEMRO |
| 810 | PHILLIPS & TEMRO | D | 1994 | ACCESSORIES | TEMRO |
| 810 | PHILLIPS & TEMRO | E | 1995 | OTHER HEATERS/WARMERS | TEMRO |
| 810 | PHILLIPS & TEMRO | F | 1996 | HEAVY DUTY | TEMRO |
| 810 | PHILLIPS & TEMRO | G | 1998 | EVOCHARGE | TEMRO |
| 811 | TSE BRAKES | A | 0118 | COMPONENTS | TSEBRK |
| 811 | TSE BRAKES | B | 0119 | AIR DISC CHAMBERS | TSEBRK |
| 811 | TSE BRAKES | C | 0120 | OMNIBRAKE CHAMBERS | TSEBRK |
| 811 | TSE BRAKES | D | 0121 | REX CHAMBERS | TSEBRK |
| 811 | TSE BRAKES | E | 0122 | SLACK ADJUSTERS | TSEBRK |
| 811 | TSE BRAKES | F | 0123 | ULTRALIFE CHAMBERS | TSEBRK |
| 811 | TSE BRAKES | G | 0124 | FORGE CHAMBERS | TSEBRK |
| 815 | 3M | A | 1999 | ABRASIVES | 3M |
| 815 | 3M | B | 2000 | TAPES | 3M |
| 815 | 3M | C | 2001 | PERSONAL PROTECTIVE EQUIPMENT | 3M |
| 815 | 3M | D | 2002 | TOOLS & EQUIPMENT | 3M |
| 815 | 3M | E | 2003 | FILMS & SHEETING | 3M |
| 815 | 3M | F | 2004 | ADH, SEALANTS, FILLERS | 3M |
| 815 | 3M | G | 2005 | CLEANING SUPPLIES | 3M |
| 815 | 3M | H | 2006 | ELECTRICAL | 3M |
| 815 | 3M | I | 2007 | COMPOUNDS & POLISHES | 3M |
| 815 | 3M | J | 2008 | SIGNAGE/MARKING | 3M |
| 815 | 3M | K | 2009 | COATINGS | 3M |
| 815 | 3M | L | 2010 | AUTO PARTS HARDWARE | 3M |
| 815 | 3M | M | 2011 | OFFICE SUPPLIES | 3M |
| 815 | 3M | N | 2012 | MEDICAL | 3M |
| 815 | 3M | O | 2013 | ADVANCED MATERIALS | 3M |
| 815 | 3M | P | 2014 | HOME | 3M |
| 815 | 3M | Q | 2138 | LUBRICANTS | 3M |
| 815 | 3M | R | 2139 | BUILDING MATERIALS | 3M |
| 815 | 3M | S | 2140 | INSULATION | 3M |
| 815 | 3M | T | 2141 | LAB SUPPLIES TESTING | 3M |
| 815 | 3M | U | 2142 | FILTRATION/SEPARATION | 3M |
| 815 | 3M | V | 2143 | UNASSIGNED | 3M |
| 821 | BUSSMANN | A | 2015 | FUSES & ACCESSORIES | BUSS |
| 821 | BUSSMANN | B | 2016 | CIRCUIT BREAKERS | BUSS |
| 821 | BUSSMANN | C | 2017 | BLISTER PK. SWITCHES | BUSS |
| 822 | DENSO HD | A | 2293 | CONSTR/AGRI/IND ALTER | DENSO |
| 822 | DENSO HD | B | 2294 | MD/HD ALTERNATOR | DENSO |
| 822 | DENSO HD | C | 2295 | CONSTR/AGRI/IND START | DENSO |
| 822 | DENSO HD | D | 2296 | MD/HD STARTER | DENSO |
| 822 | DENSO HD | E | 2297 | HD AC COMPRESSOR | DENSO |
| 823 | TRICO | A | 2029 | WA/PUMPS & GEN. PRODS. | TRICO |
| 823 | TRICO | B | 2030 | CHILL | TRICO |
| 823 | TRICO | C | 2031 | DISPLAYS/PROMOS | TRICO |
| 823 | TRICO | D | 2032 | SILICONE CERAMIC | TRICO |
| 823 | TRICO | H | 2033 | NEOFORM BLADES | TRICO |
| 823 | TRICO | E | 2034 | UNCLASSIFIED | TRICO |
| 823 | TRICO | I | 2477 | CLASSIC | TRICO |
| 823 | TRICO | J | 2478 | EXACT FIT | TRICO |
| 823 | TRICO | K | 2479 | FORCE | TRICO |
| 823 | TRICO | L | 2480 | HEAVY DUTY | TRICO |
| 823 | TRICO | M | 2481 | ICE | TRICO |
| 823 | TRICO | N | 2482 | REAR | TRICO |
| 823 | TRICO | O | 2483 | REFILL | TRICO |
| 823 | TRICO | P | 2484 | SENSE | TRICO |
| 823 | TRICO | Q | 2485 | SHIELD | TRICO |
| 823 | TRICO | R | 2486 | TRICO STANDARD | TRICO |
| 823 | TRICO | S | 2487 | TECH | TRICO |
| 823 | TRICO | T | 2035 | SENTRY | TRICO |
| 823 | TRICO | U | 2533 | TRICO PRO | TRICO |
| 828 | DENSO | A | 2918 | SPARK PLUGS | DENSO |
| 828 | DENSO | B | 2919 | IGNITION COILS | DENSO |
| 828 | DENSO | C | 2920 | O2 SENSORS | DENSO |
| 828 | DENSO | D | 2921 | RADIATORS | DENSO |
| 828 | DENSO | E | 2922 | OTHER SENSORS | DENSO |
| 831 | ENERGIZER CANADA | A | 2060 | RETAIL BATTERIES | ENRGIZ |
| 831 | ENERGIZER CANADA | B | 2061 | INDUSTRIAL BATTERIES | ENRGIZ |
| 831 | ENERGIZER CANADA | C | 2062 | FLASHLIGHTS | ENRGIZ |
| 831 | ENERGIZER CANADA | D | 2063 | AUTOMOTIVE DETAILING | ENRGIZ |
| 832 | DELPHI | A | 2073 | ENGINE MANAGEMENT | DELPHI |
| 832 | DELPHI | B | 2074 | OXYGEN SENSORS | DELPHI |
| 832 | DELPHI | C | 2075 | HEATING AND COOLING | DELPHI |
| 832 | DELPHI | D | 2076 | DIESEL | DELPHI |
| 832 | DELPHI | E | 2077 | UNCLASSIFIED | DELPHI |
| 832 | DELPHI | F | 2079 | SPARTA ELEC FUEL PUMP | SPARTF |
| 832 | DELPHI | G | 2080 | SPARTA HANGER PUMP | SPARTF |
| 832 | DELPHI | H | 2081 | SPARTA FUEL MODULE | SPARTF |
| 832 | DELPHI | I | 2082 | SPARTA FUEL STRAINER | SPARTF |
| 832 | DELPHI | J | 2065 | LOCK RING/ACCESSORIES | DELPHI |
| 832 | DELPHI | K | 2066 | ELECTRICAL FUEL PUMP | DELPHI |
| 832 | DELPHI | L | 2067 | FUEL PUMP MODULE ASSY | DELPHI |
| 832 | DELPHI | M | 2068 | FUEL TANK SEND UNIT | DELPHI |
| 832 | DELPHI | N | 2069 | FUEL PUMP STRAINER | DELPHI |
| 832 | DELPHI | O | 2070 | DI HP FUEL PUMP | DELPHI |
| 832 | DELPHI | P | 2071 | HANGER PUMP ASSEMBLY | DELPHI |
| 832 | DELPHI | Q | 2072 | MECHANICAL FUEL PUMP | DELPHI |
| 845 | CLOYES GEAR AND PRODUCTS | A | 1363 | CHAIN | CLOYES |
| 845 | CLOYES GEAR AND PRODUCTS | B | 1364 | TENSIONERS AND GUIDES | CLOYES |
| 845 | CLOYES GEAR AND PRODUCTS | C | 1365 | 3-PIECE SET | CLOYES |
| 845 | CLOYES GEAR AND PRODUCTS | D | 1366 | GEAR | CLOYES |
| 845 | CLOYES GEAR AND PRODUCTS | E | 1367 | SPROCKET | CLOYES |
| 845 | CLOYES GEAR AND PRODUCTS | F | 1368 | OTHER | CLOYES |
| 860 | FPPF CHEMICAL | A | 2091 | ALL PRODUCTS | FPPF |
| 876 | AWSUM OUTCOMES INC | A | 3055 | OIL ADDITIVE | AWSUM |
| 876 | AWSUM OUTCOMES INC | B | 3056 | FUEL ADDITIVE | AWSUM |
| 876 | AWSUM OUTCOMES INC | C | 3057 | GREASE | AWSUM |
| 876 | AWSUM OUTCOMES INC | D | 3058 | SPECIALTY LUBRICANT | AWSUM |
| 880 | ANCRA INTL | A | 2117 | FLATBED EQUIPMENT | ANCRA |
| 880 | ANCRA INTL | B | 2118 | AUTO AND CONSUMER | ANCRA |
| 880 | ANCRA INTL | C | 2119 | INTERIOR VAN EQUIPMENT | ANCRA |
| 880 | ANCRA INTL | D | 2120 | GEN HARDWARE/WEBBING | ANCRA |
| 880 | ANCRA INTL | E | 2121 | S-LINE | ANCRA |
| 880 | ANCRA INTL | F | 2122 | MISC | ANCRA |
| 880 | ANCRA INTL | G | 2123 | TIRE CHAIN | ANCRA |
| 881 | LUK CLUTCHES | A | 2112 | CLUTCH KIT | LUK |
| 881 | LUK CLUTCHES | B | 2113 | FLYWHEEL | LUK |
| 881 | LUK CLUTCHES | C | 2114 | MASTER CYLINDER | LUK |
| 881 | LUK CLUTCHES | D | 2115 | SLAVE CYLINDER | LUK |
| 881 | LUK CLUTCHES | E | 2116 | OTHER | LUK |
| 881 | LUK CLUTCHES | F | 2093 | TOOLS | LUK |
| 881 | LUK CLUTCHES | G | 2094 | DLER/TENSION/PULLEY | INA |
| 881 | LUK CLUTCHES | H | 2097 | COOLING | INA |
| 881 | LUK CLUTCHES | I | 2098 | CHAINS/KITS | INA |
| 881 | LUK CLUTCHES | J | 2099 | BELTS/KITS | INA |
| 881 | LUK CLUTCHES | K | 2100 | BEARINGS | INA |
| 881 | LUK CLUTCHES | L | 2111 | ENGINE MANAGEMENT | INA |
| 890 | STABILUS | A | 3520 | AUTOMOTIVE LIFT SUPPORT | STABIL |
| 890 | STABILUS | B | 3521 | UNIVERSAL LIFT SUPPORT | STABIL |
| 890 | STABILUS | C | 3522 | AUTO POWER LIFT SUPPORT | STABIL |
| 890 | STABILUS | D | 3523 | STUD KIT | STABIL |
| 890 | STABILUS | E | 3524 | AGRICULTURAL LIFT SUPPORT | STABIL |
| 890 | STABILUS | F | 3525 | HD LIFT SUPPORT | STABIL |
| 901 | MAHLE Service Solutions | A | 1600 | A/C SERVICE EQUIPMENT (ArcticPRO) | MAHLE |
| 901 | MAHLE Service Solutions | B | 1601 | FLUID EXCHANGE SYSTEM (FluidPRO) | MAHLE |
| 901 | MAHLE Service Solutions | C | 1602 | HD LIFT EQUIPMENT (ShopPRO) | MAHLE |
| 901 | MAHLE Service Solutions | D | 1603 | ARCTICPRO ACCESSORIES | MAHLE |
| 901 | MAHLE Service Solutions | E | 1604 | FLUIDPRO ACCESSORIES | MAHLE |
| 901 | MAHLE Service Solutions | F | 1605 | SHOPPRO ACCESSORIES | MAHLE |
| 908 | POWERBRIGHT | A | 2151 | ALL PRODUCTS | POWERB |
| 914 | AGS | A | 2161 | AGS GREASE AND LUBRICANT | AGS |
| 914 | AGS | B | 2162 | COPPER TUBING | AGS |
| 914 | AGS | C | 2163 | POLY ARMOUR | AGS |
| 914 | AGS | E | 2164 | REPAIR KITS | AGS |
| 914 | AGS | D | 2165 | OIL DRAIN PLUGS | AGS |
| 914 | AGS | F | 2166 | FITTINGS | AGS |
| 922 | LOCKNLUBE | A | 0312 | GREASE | LOCKNL |
| 922 | LOCKNLUBE | B | 0313 | AIR | LOCKNL |
| 922 | LOCKNLUBE | C | 0314 | OTHER | LOCKNL |
| 924 | NightRider LED | A | 3920 | ACCESSORIES | NRIDER |
| 924 | NightRider LED | B | 3921 | APPAREL | NRIDER |
| 924 | NightRider LED | C | 3922 | AUTO & EQUIP LIGHTING | NRIDER |
| 924 | NightRider LED | D | 3923 | COMMERCIAL LIGHTING | NRIDER |
| 924 | NightRider LED | E | 3924 | EMERGENCY LIGHTING | NRIDER |
| 924 | NightRider LED | F | 3925 | PORTABLE & AREA LIGHTING | NRIDER |
| 924 | NightRider LED | G | 3926 | REPLACEMENT PARTS | NRIDER |
| 928 | IRWIN TOOLS | A | 2186 | CHISELS | IRWIN |
| 928 | IRWIN TOOLS | B | 2187 | CIRCULAR SAW BLADES | IRWIN |
| 928 | IRWIN TOOLS | C | 2188 | CLAMPING TOOLS | IRWIN |
| 928 | IRWIN TOOLS | D | 2189 | FASTENER DRIVE & SCREWDRIVING | IRWIN |
| 928 | IRWIN TOOLS | E | 2190 | HANDSAWS | IRWIN |
| 928 | IRWIN TOOLS | F | 2191 | LEVELS | IRWIN |
| 928 | IRWIN TOOLS | G | 2192 | LINEAR EDGE | IRWIN |
| 928 | IRWIN TOOLS | H | 2193 | MARKING & LAYOUT TOOLS | IRWIN |
| 928 | IRWIN TOOLS | I | 2194 | MASONRY DRILLING | IRWIN |
| 928 | IRWIN TOOLS | J | 2195 | METAL DRILLING | IRWIN |
| 928 | IRWIN TOOLS | K | 2196 | OTHER | IRWIN |
| 928 | IRWIN TOOLS | L | 2197 | PLIERS, WRENCHES, & LOCKING TOOLS | IRWIN |
| 928 | IRWIN TOOLS | M | 2198 | SNIPS | IRWIN |
| 928 | IRWIN TOOLS | N | 2199 | TAPS & DIES | IRWIN |
| 928 | IRWIN TOOLS | O | 2200 | UTILITY KNIVES & BLADES | IRWIN |
| 928 | IRWIN TOOLS | P | 2201 | WOOD DRILLING | IRWIN |
| 928 | IRWIN TOOLS | Q | 2541 | WORKSITE PRODUCTS | IRWIN |
| 929 | A-LINE | A | 0978 | BRAKE PADS | ALINE |
| 929 | A-LINE | B | 0979 | BRAKE CHAMBERS | ALINE |
| 929 | A-LINE | C | 0980 | BRAKE ROTORS | ALINE |
| 929 | A-LINE | D | 0981 | ACCESSORIES & KITS | ALINE |
| 931 | PICO | A | 2202 | BATTERY & BOOSTER | PICO |
| 931 | PICO | B | 2203 | BREAKERS, RELAYS | PICO |
| 931 | PICO | C | 2204 | CABLES TIES & MOUNTS | PICO |
| 931 | PICO | D | 2205 | CONNECTORS & TERMINAL (was X) | PICO |
| 931 | PICO | E | 2206 | KITS DISPLAYS | PICO |
| 931 | PICO | F | 2207 | SHRINK TUBING AND LOO | PICO |
| 931 | PICO | G | 2208 | SOCKETS PIGTAILS PLUG | PICO |
| 931 | PICO | H | 2209 | TOOLS,TAPE & WELDING | PICO |
| 931 | PICO | I | 2210 | TRAILER CONNECTORS | PICO |
| 931 | PICO | J | 2211 | WIRE & CABLE | PICO |
| 931 | PICO | K | 2212 | BULK WIRE | PICO |
| 936 | SCEPTER MFG. | A | 2227 | ACCESSORIES | SCEPTR |
| 936 | SCEPTER MFG. | B | 2228 | GASOLINE | SCEPTR |
| 936 | SCEPTER MFG. | C | 2229 | DIESEL | SCEPTR |
| 936 | SCEPTER MFG. | D | 2230 | MARINE | SCEPTR |
| 936 | SCEPTER MFG. | E | 2231 | WATER | SCEPTR |
| 936 | SCEPTER MFG. | F | 2232 | KEROSENE | SCEPTR |
| 947 | LLOYDS LABORATORIES | A | 2871 | CLEANERS | LLOYDS |
| 947 | LLOYDS LABORATORIES | B | 2872 | PROPERTY MAINT | LLOYDS |
| 947 | LLOYDS LABORATORIES | C | 2873 | LUBRICATION | LLOYDS |
| 947 | LLOYDS LABORATORIES | D | 2874 | AUTO AND FLEET MAINT | LLOYDS |
| 947 | LLOYDS LABORATORIES | E | 2875 | SPECIALTY | LLOYDS |
| 960 | RED BOW CO - DRYSHOD | A | 2700 | ARCTIC STORM | DRYSHO |
| 960 | RED BOW CO - DRYSHOD | B | 2701 | HAYMAKER | DRYSHO |
| 960 | RED BOW CO - DRYSHOD | C | 2702 | SOD BUSTER | DRYSHO |
| 960 | RED BOW CO - DRYSHOD | D | 2703 | STEEL TOE CSA | DRYSHO |
| 960 | RED BOW CO - DRYSHOD | E | 2704 | NOSHO ULTRA HUNT | DRYSHO |
| 960 | RED BOW CO - DRYSHOD | F | 2699 | LEGEND | DRYSHO |
| 960 | RED BOW CO - DRYSHOD | G | 2698 | OTHER | DRYSHO |
| 960 | RED BOW CO - DRYSHOD | H | 3600 | STEADYETI | DRYSHO |
| 961 | INGERSOLL RAND | A | 2237 | AUTOMOTIVE | IG-RA |
| 961 | INGERSOLL RAND | B | 2238 | PARTS/ACCESSORIES | IG-RA |
| 961 | INGERSOLL RAND | C | 2239 | MANUAL HOISTS | IG-RA |
| 961 | INGERSOLL RAND | D | 2240 | NON-PROGRAM PRODUCT | IG-RA |
| 970 | MONROE AUTO | A | 2685 | MONROE SHOCKS | MONROE |
| 970 | MONROE AUTO | B | 2686 | OESPECTRUM | MONROE |
| 970 | MONROE AUTO | C | 2687 | ECONOMATIC | MONROE |
| 970 | MONROE AUTO | D | 2688 | QUICKSTRUT | MONROE |
| 970 | MONROE AUTO | E | 2689 | MAGNUM | MONROE |
| 970 | MONROE AUTO | F | 2690 | MONRO-MATIC | MONROE |
| 970 | MONROE AUTO | G | 2691 | RANCHO | RANCHO |
| 970 | MONROE AUTO | H | 2692 | LIFT KITS | MONROE |
| 970 | MONROE AUTO | I | 2693 | LIFT SUPPORTS | MONROE |
| 970 | MONROE AUTO | J | 2707 | REFLEX | MONROE |
| 970 | MONROE AUTO | K | 2708 | STRUT MATE (MOUNTS) | MONROE |
| 970 | MONROE AUTO | L | 2716 | MONROE STRUT | MONROE |
| 970 | MONROE AUTO | M | 2717 | HARDWARE KITS | MONROE |
| 970 | MONROE AUTO | N | 2718 | CONVERSION KITS | MONROE |
| 980 | WD-40 | A | 2249 | WD-40 PRODUCTS | WD40 |
| 980 | WD-40 | B | 2250 | 3-IN-ONE | WD40 |
| 980 | WD-40 | C | 2251 | 2000 FLUSHES | WD40 |
| 980 | WD-40 | D | 2252 | SPOT SHOT | WD40 |
| 980 | WD-40 | E | 2253 | DISPLAY/PROMO | WD40 |
| 989 | MOLYSLIP | A | 2261 | GREASES | MLYSLP |
| 989 | MOLYSLIP | B | 2262 | ANTISEIZE/ASSY COMPOUNDS | MLYSLP |
| 989 | MOLYSLIP | C | 2263 | SPECIALTY LUBES/AEROSOLS | MLYSLP |
| 989 | MOLYSLIP | D | 2264 | SUPPLEMENTS | MLYSLP |
| 989 | MOLYSLIP | E | 2265 | DISPLAYS | MLYSLP |
| 990 | WARN | A | 2272 | WARN WINCHES | WARN |
| 990 | WARN | B | 2273 | WARN VR WINCHS | WARN |
| 990 | WARN | C | 2274 | BUMPERS | WARN |
| 990 | WARN | D | 2275 | LIGHTS&ACCESSORIES | WARN |
Price Multipliers
Part of the data required in setting up a new product line includes identifying the base price that will be received from the Manufacturer or Buying Group as well as setting up the various multipliers used to calculate the prices of all other fields.
This work is initiated via the following Menu Path, or by entering “Multipliers” in the menu search
- Inventory… -> 4. Pricing… -> 1. Data Maintenance… -> 1 Price Multipliers -> 1. Add Multiplier
(To Modify existing pricing structures select 2. Change Multiplier as the last selection above.)
Which brings up the following screen
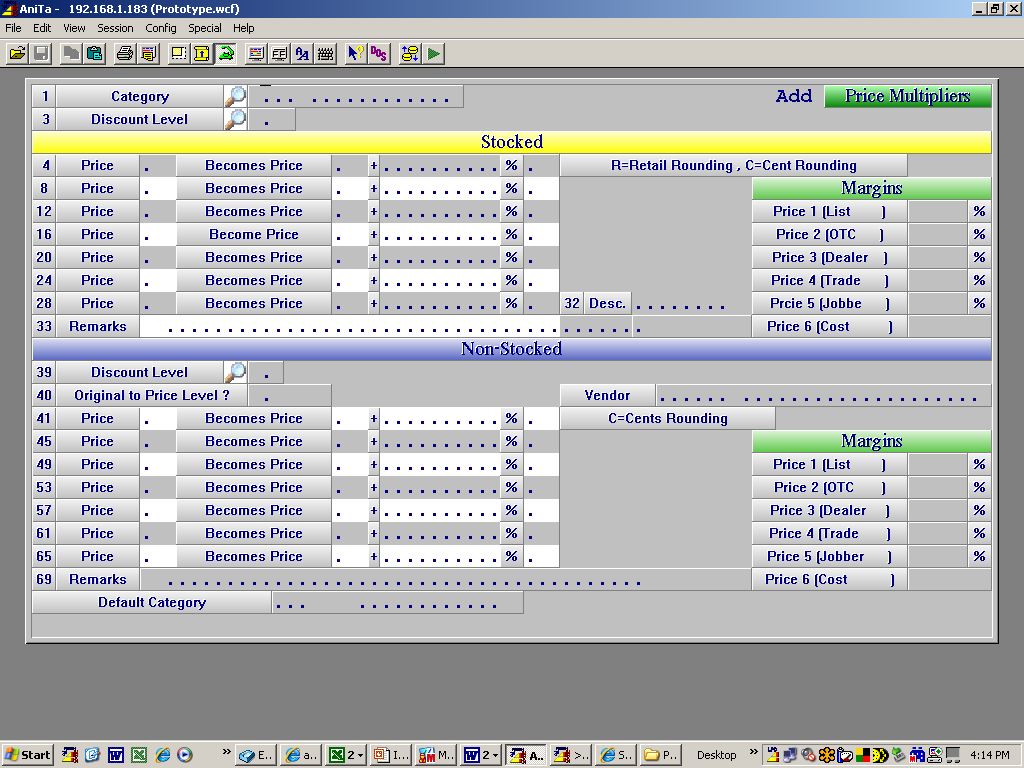
For all new categories you must add as a minimum a set of multipliers for “Space” in 3 - Discount Level.
Enter the category abbreviation in 1 - Category
(Category must exist – if not yet added stop here and add the category.)
The multipliers set up under Space are used at the time of price updating as a catch all so that in the absense of a specific set for a product price group the space multiplier set will be used thus ensuring that all parts will show up as priced. Therefore you will only need to set up additional Discount Level Multiplier Sets when you are dealing with a line that has different pricing structures for some aspect of that line.
Enter your stocking part multipliers. If for example you want to reference everything from cost but you get jobber be sure to enter the cost price in the first calculation as per the example below.
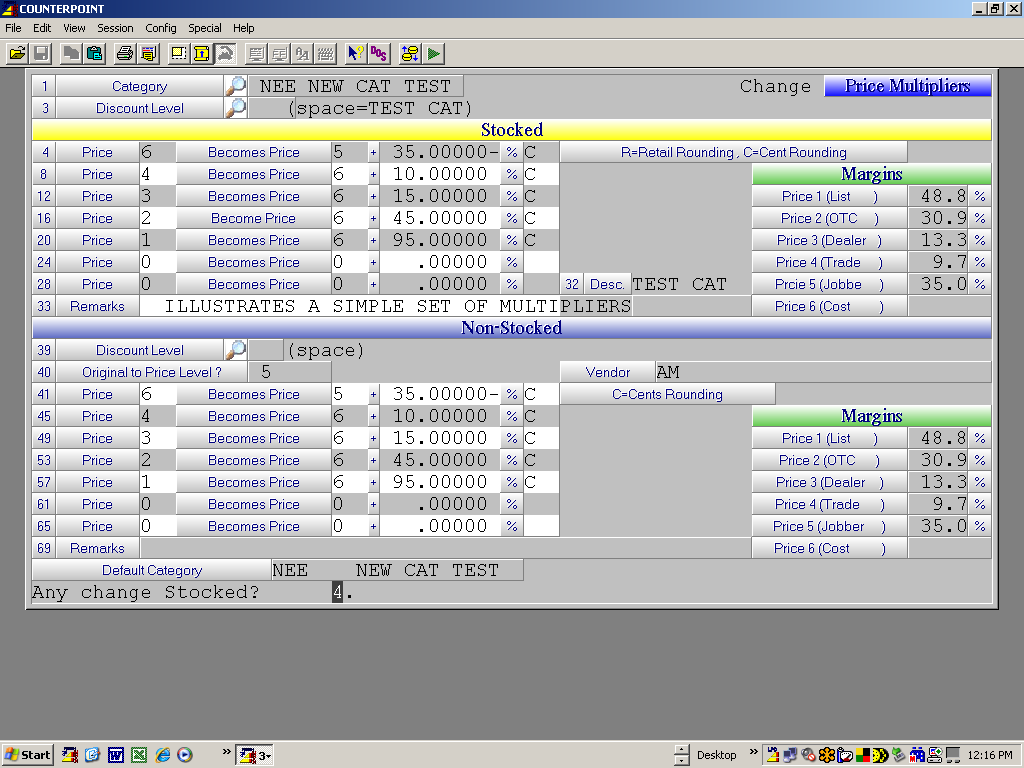
Note that hitting F1 (Accept) in response to Any Change Stocked? Question will result in the system asking if you wish copy the stocking multipliers to the non stocking multipliers. If you do not want to set up different multipliers for non stock answer “Y”. Wether the same or different multipliers are used it is important that you have a set of multipliers set up for the “Space” Discount level for non stocked since without non stock multipliers no pricing will show up when trying to invoice non stock items.
Once completed entering the Non Stocked multipliers either by copying from stocked or manually entering, the program will ask “Any Change Non Stocked?” If you are in Change mode hitting [F1] will cause the program to Ask “Update Prices Now?” A ”Y” response will cause the program to recalculate all stocking item prices using your newly entered multipliers. Hitting N will bypass this step.
In Add mode you will not see the Update Prices Now? question
Price Rounding
Overview
Price Rounding is an option provided in COUNTERPOINT which if properly implemented can add two to three percent to your net bottom line on stocking inventory. The beauty of this is that when properly implemented neither the customer nor the counter staff will ever notice it and since the calculation is done at price update time the rounding remains in effect regardless of what the customers discount structure might be.
This option allows the set up of rounding parameters that can later be used when doing price changes or price updates. These parameters can be used on any category and on selected price levels within a category based on how the [R]ounding flags are set in the price multiplier maintenance screen.
Set up the Rounding Rules Parameters
The retail price rounding option becomes effective when price multipliers are set up in 6. inventory control…à4. pricing…->1. Data maintenance to use the [R] rounding option for a line (discussed later in this document). Rounding is only available on stocked items.
Prior to turning rounding on at the line and price field level, we must first establish the rounding rules. This is done in the Retail Rounding Parameters Maintenance Program accessible via the following menu path.
- Inventory…-> 4. Pricing…-> 1. Data Maintenance…-> 3. Retail Rounding Parameters
Alternately Type “Retail Rounding” into the Menu search. Select add/Change Delete as appropriate then enter data as follows
Field Entries
- Up to value
This field is the maximum value for this set of rounding rules, but also in effect, creates the minimum value for the next rounding rule. In the example below the first rounding rule is set for items with prices up to 1.00, then the minimum for this record is assumed to be 0.00. When the next rounding record is set up, in this example it is for items with prices up to $5.00, then the $1.00 maximum from the previous record becomes the minimum value for the new record. You can set up as many levels as deemed appropriate Typical examples might be $1, $5, $10, $25, $50, $100, $400, $1000, $999,999. At the higher retail price levels you can round up in dollars as well as cents. So, for example you could say that items selling between $400 and $1000 should have $3.99 added to the selling price if they end in .00 to .49 and $4.99 if they end in .50 to .99. The examples on the following page illustrate the principles discussed here.
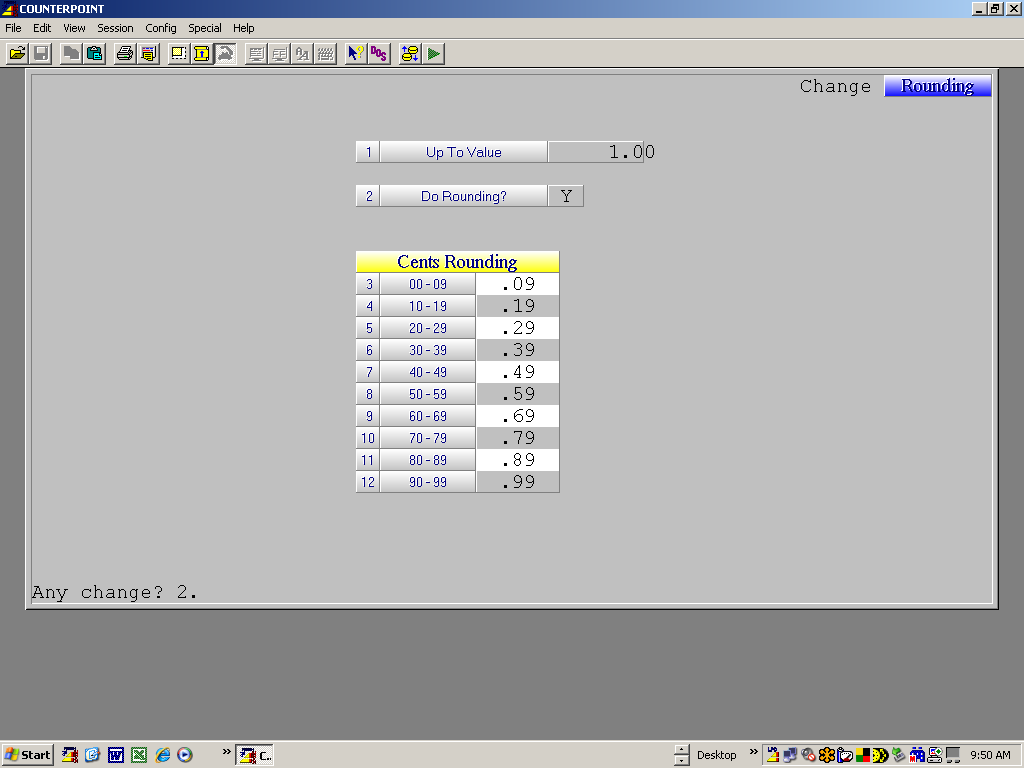
The screen above sets the lower limit for the next price rounding level. Note that as the first rounding record on file its assumed lower limit is .01 Cents. All other Rounding records use the previous record to determine their lower limit.
The screen below is used to round items items priced from $1.01 to $5.00

- Do rounding?
There may be a range of prices for which no rounding is required, but the record still needs to be set up because of the assumed minimum it will create for the next record. If the previous record had a maximum of $5.00 and no rounding is desired between $5.01 and $10.00, then a record needs to be set up with a maximum of $10.00 with the Do Rounding? field set to [N]. All the remaining fields on the screen will automatically be set to .00 when Do Rounding equals N.
- Cents / Rounding
For each grouping, indicate the number of cents to round up to. Rounding to [100] will roll the price up to the next dollar. When price changes occur, the system first calculates the new prices based on the multipliers that have been set up and then based on the entries here, resets the prices accordingly. Thus ensuring that the rounding is applied before any customer specific discounts are applied. Note that rounding only applies to Stocked Items.
Turn On Rounding on Multipliers
As shown in the following screen rounding is activated by setting the field following the % symbol to R on all price levels where price rounding is desired. This allows the user to further refine how rounding will be applied. In the example below rounding will apply to price levels 1 and 2 only but not be applied to price levels 3, or 4.
Once this is completed Save the Record by hitting [F1] And then exit the program.
Note – If you would like the rounding to be implemented immediately Answer “Y” in response to the “Update Prices now? prompt at the end of the record acceptance sequence. This will cause the program to recalculate all stocking item prices incorporating the specified rounding.
If you answer “N” to the “Update Prices Now?” prompt rounding will not take affect until the next price update.
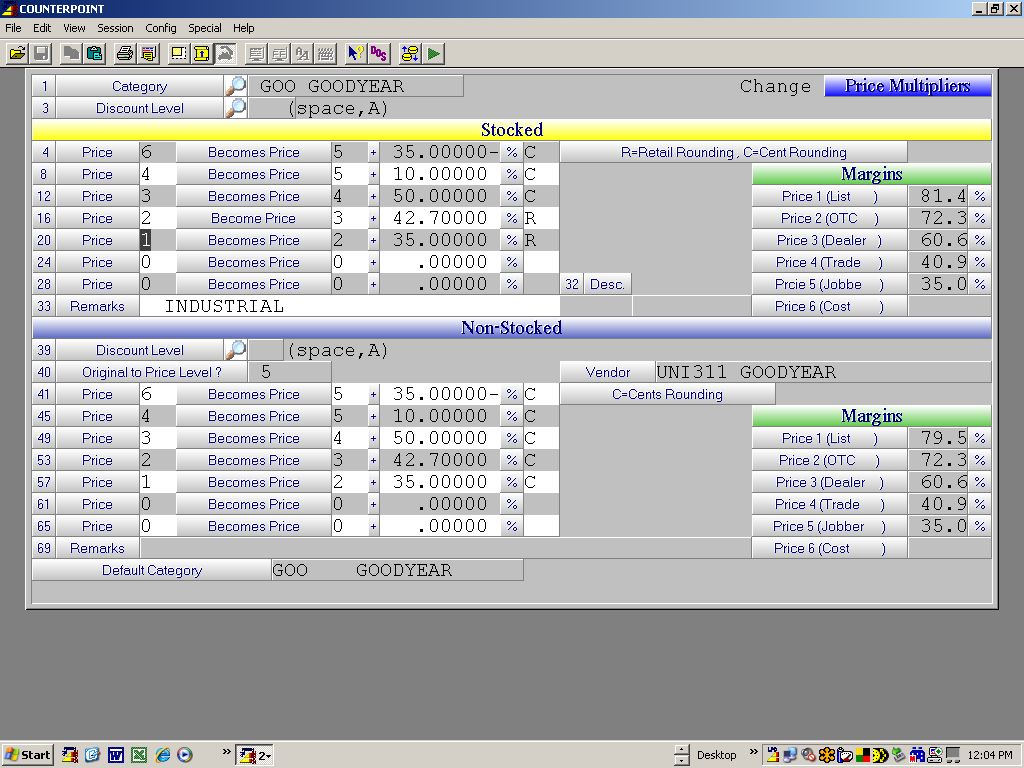
In summary there are two parts to using the rounding
Part 1 – Set up the rounding rules. And
Part 2 - Specify the categories and price levels within them that rounding should be applied to.
We suggest starting with a retail line that has known sales history and good movement. Start slowly until you get the handle of working with this tool and then expand rounding to include all lines where rounding would obviously work.
Pricing Theory
COUNTERPOINT pricing while appearing to be complex is actually a matter of ensuring that three pieces of data required in setting up pricing are in place and correct. At its most basic level those pieces are as follows;
Category Record (AKA Line Code Record)
This record identifies the product line. It provides among other things the following information to the system.
- Price Book Vendor – Tells the system what price book to use when pricing items for this line code.
- Catalogue Vendor – Associates the Electronic Catalogue product line to the category.
Category Price Multipliers
When price files are delivered to your system they typically contain only one price (eg Jobber or Net) and optionally may also contain core price where applicable. Given that the auto parts industry universally works with five price levels plus cost there needs to be a mechanism to put pricing in all of the non populated fields.
As a Jobber you will know that your Buying Group or Supplier sends you price lists with (typically) Jobber or Cost. You will also know what your discount off Jobber is, what the street price is for the product and at what price you will sell the product to established account customers. Armed with this knowledge COUNTERPOINT provides a method of allowing you to predefine the upcharges reguired to populate all required fields using the base price supplied in the price book as your starting point. This is accomplished via Pricing Parameter Maintenance.
Given that you may not buy non stocked parts as efficiently as you buy stocked parts COUNTERPOINT provides a separate set of multipliers for non stocked purchases. This set must be present if you wish to have non stock sales price properly. That said, the non stocked multipliers can be set to match the stocking multipliers with a single key stroke.
The Non Stock multiplier set also contains a field Called “Original To Price Level”. The system uses this field to determine where to put, and find, the product lines base price level. Historically this field was almost always set to 5 (Jobber) but with the recent shift to reference or net pricing the field can be set to almost any price level as dictated by what the you receive as a base price from the supplier.
DISCOUNT LEVELS
COUNTERPOINT provides for the reality that you may get more than one discount structure on a single product line.
An example of this might be belts where the price list is based on J-35% for Automotive belts, J-45% for Industrial Belts and J-55% for Recreational belts.
In order to accommodate this the Price Multiplier Maintenance screen includes a field called Discount Level. This field accepts entry of Space (The Space bar) A thru Z and Zero thru Nine which provides for up to 37 different multiplier sets with each Discount level, potentially, having a unique set of multipliers.
IMPORTANT NOTE
- TIMESAVER - If a price file is broken up into many separate files but you get the same price structure on all of them or you receive NET pricing from the supplier, you need only ensure that you have set up the space multiplier set for both stocked and non stocked before the update is run. Done this way all prices will be forced to use the SPACE Discount Group.
- If a price file that is broken up into many Discount Groups is run into the system with no multipliers set up for any Discount Group the price file on your system will be structured in such a way that your only option will be to set up specific multiplier sets for each Discount Group. This would normally only be required if the manufacturers prices to you require unique multiplier sets for each Discount Group. If the same Multipliers can be used for all Discount Groups within the line the simplest fix is to set up multipliers for the Space Discount Group in both Stocked and Non stocked and rerun the update. This combines the many price files into one with a Discount Group of Space
- In summary lets say you have a product line with 16 Discount Groups. Your Options are
- Set up Multipliers for the space Discount Group for both stocked and non stocked only. Then, run the price update. (Assumes that all discount Groups are priced the same)
- Set up Multipliers for Space and any other Discount Groups requiring unique Multiplier sets. Then Run (or rerun) the Price update.
- If a price update gets run before you have Multipliers set up for both stocked and non stocked the price book will end up on your system broken up into Discount Groups that match what the supplier sent. If this is correct due to each group requiring unique sets of multipliers you will need to set up the multiplier sets before any pricing will work. If that segmented pricing is not required, set up multipliers for stocked and non stocked under space and rerun the update.
Product Master Discount Level
If all of the foregoing checks out and your stocked item pricing is still not working the last point to check is the product master record to determine what is in field 53 Discount Level. If this specifies something other than the correct Discount level or it contains an “*”you will need to change it to the correct level. (Note – In the event that there are too many records involved to efficiently do this manually you can use the Product master reset program, but use this program with EXTREME CAUTION as MISTAKES CANNOT BE UNDONE if it erases data based on what you entered)
In summary, If the Category Record, the Price Multipliers and the specified Discount Level on the stocked item product master records are set up correctly your pricing will work as expected.
Also see the document titled Pricing Trouble shooting.
Troubleshooting (Real World Example)
Jobber states that non stocked part Carter P76148M is not pricing correctly.
Prices as initially presented shown below.

Cost (F6) as shown on UNI Victor is $163.64
List (UNI Reference (F1) as shown on Victor is $467.54
When you see results like these it what you are looking at is a simple arithmetic problem. The first step to figuring out what is going on is to confirm that the category record is looking at the correct price book. In this case we confirmed that the correct price book is UNI560 and the Category record in fact does reference that in the Price book field.
With that confirmed the next (and most likely) place to look is at your multipliers. Do this in Pricing – Multiplier Maintenance – Change Mode. Calling this up for this example we see the screen as on the following page. ( Jobber stated he had copied multipliers from PAD since it was priced the same way as the problem category.
This means that the category in question originally had the following multipliers.
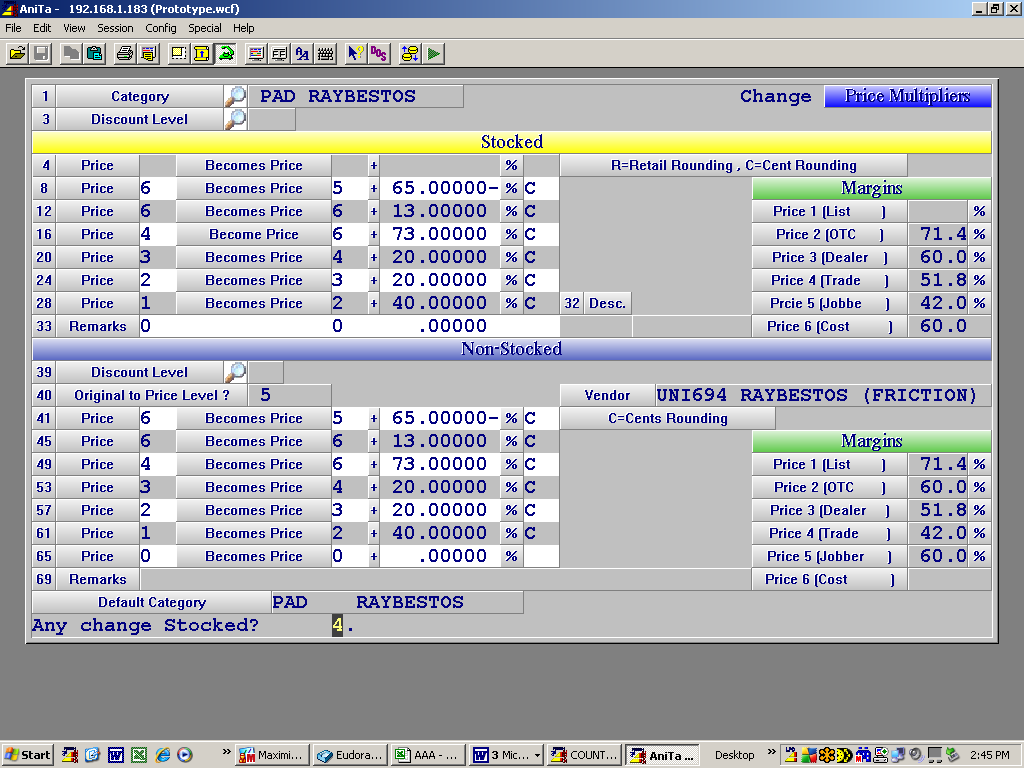
In looking at this screen we see that field 40 tells us that the Original to price is “5” this field is initially filled based on what you specify as the initial calculation to be done on the first “Becomes Price” line as shown in 41.
We know that the Price book delivered to your system from UNI contains a cost (F6) of $163.63 and List (F1) contained a value of $467.54
It is important to pay attention to what UNI tells you they are providing as a base price. If they state that this line is a reference priced line you MUST use the value shown in Price one as your base level. While there MAY be values in the other fields you cannot count on that being true as they have specified that this line is a reference priced line and that is the only price they can be counted on to provide. So… with that back ground lets look at the parameters set up above.
We know that this is a reference line so the first thing that is wrong is that field 40 should be set to 1 (List). This will automatically reset itself when we correct the multipliers. The following steps will illustrate the process to fix this specific problem.
Starting with the first line in Stocking Inventory We looked up on Victor and determined the Victor Cost to be $163.64. So grabbing our calculator we perform the following calculation.
Cost x 100 / list -100 = Discount Percent from list to get to cost. (ie 163.63 x 100 / 467.54 – 100 = 65)
So the first line in Stocking Inventory should read as
Price 6 becomes Price 1 plus -65.00000 C – As shown in screen shot following. (NOTE The multiplier is a negative number)
To confirm this as accurate grab a calculator and run the calculation (ie 467.54 minus 65% = 163.639 which rounds out to $163.64 which exactly matches UNI Victor cost on the sample item.
Now that you have List (Supplied by Uni) and Cost calculated above and confirmed you can flesh out the other price levels by working from list down or cost up as appropriate to your business. (For this illustration we used Cost up).
For example I might decide that F5 Jobber should be 30% higher than Cost so the next line would read Price 5 becomes Price 6 plus 43.00000 C
The next line might read Price 4 becomes Price 6 plus 65.00000 C
The next line might read Price 3 becomes Price 6 plus 100.00000 C
The next line might read Price 2 becomes Price 6 plus 140.00000 C
We did not include a calculation for Price 1 since that is the base price that Uni Supplied in the price list and as such is already populated.
When I finished adding lines to the stocked portion of the screen I was asked to confirm that they should be copied to the non stocked portion of the screen and replied Y. Note that the system changed the TO PRICE field from 5 to 1. This field is used by the system to know where to put and find the base price when calculating Non stocked prices.
This screen shot following illustrates the finished product.
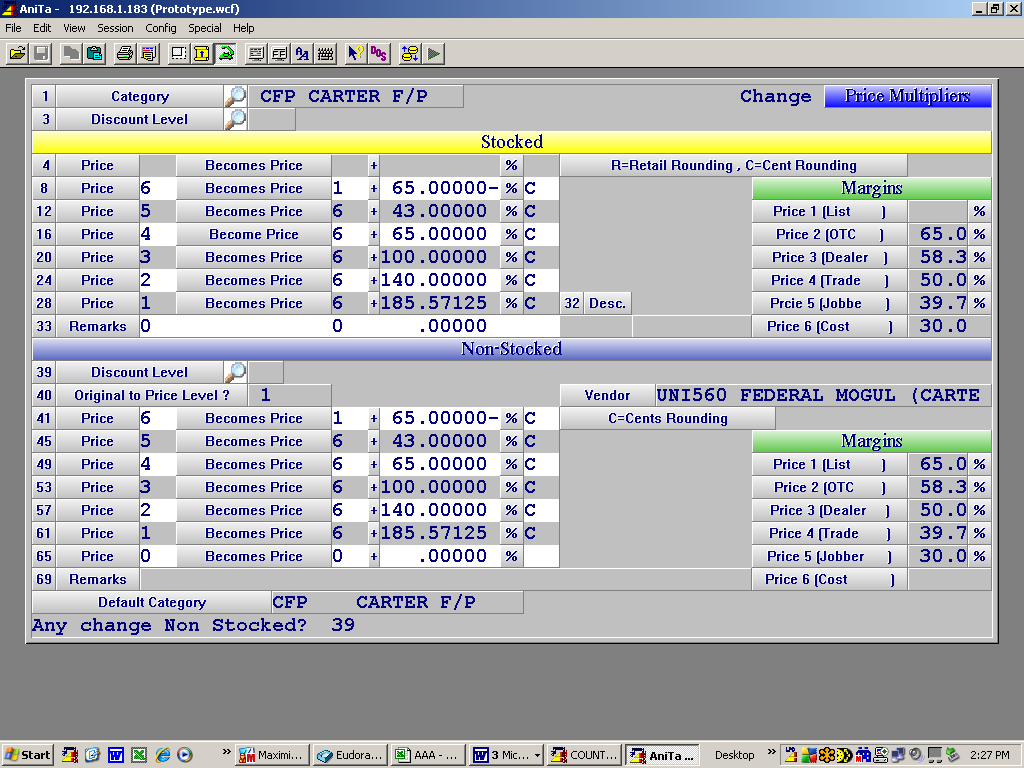
Note that on the right the system has calculated the Gross Margin that will be achieved via the use of the multipliers as currently entered. If all looks acceptable, hit F1 to accept the input. Otherwise enter the field number you wish to change.
At this point you can check your work by going to the invoice screen and keying in a non stocked part as shown on the following page.
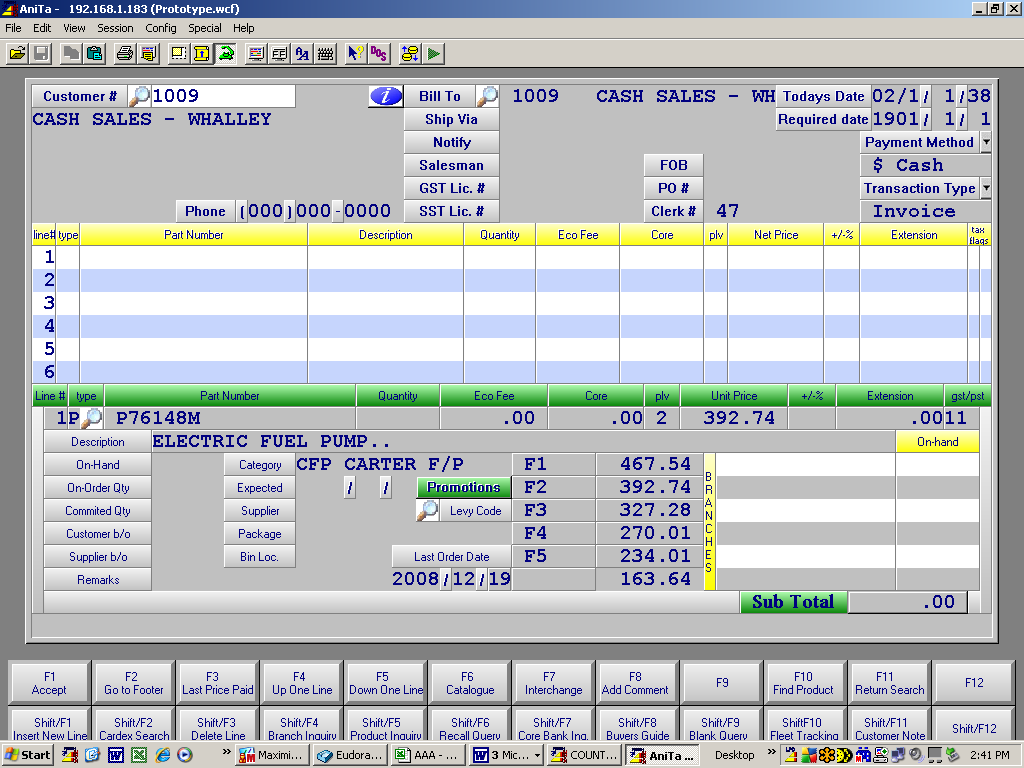
If the non stock pricing now works correctly you can do a manual price update or if the price book is not on your system request that it be loaded and it will auto update overnight or you can run it right away.
Updating Prices by %
Overview
There are situations wherein prices need to be updated, across the board, by a percentage. In these cases, there are two step to take to ensure that all current prices and future updates are handled.
Update all categories by %
To update all of the current pricing by a percentage amount, you will need to navigate to 6. Inventory > 4. Pricing 5. Online Price Change > 3. All Categories - By %age
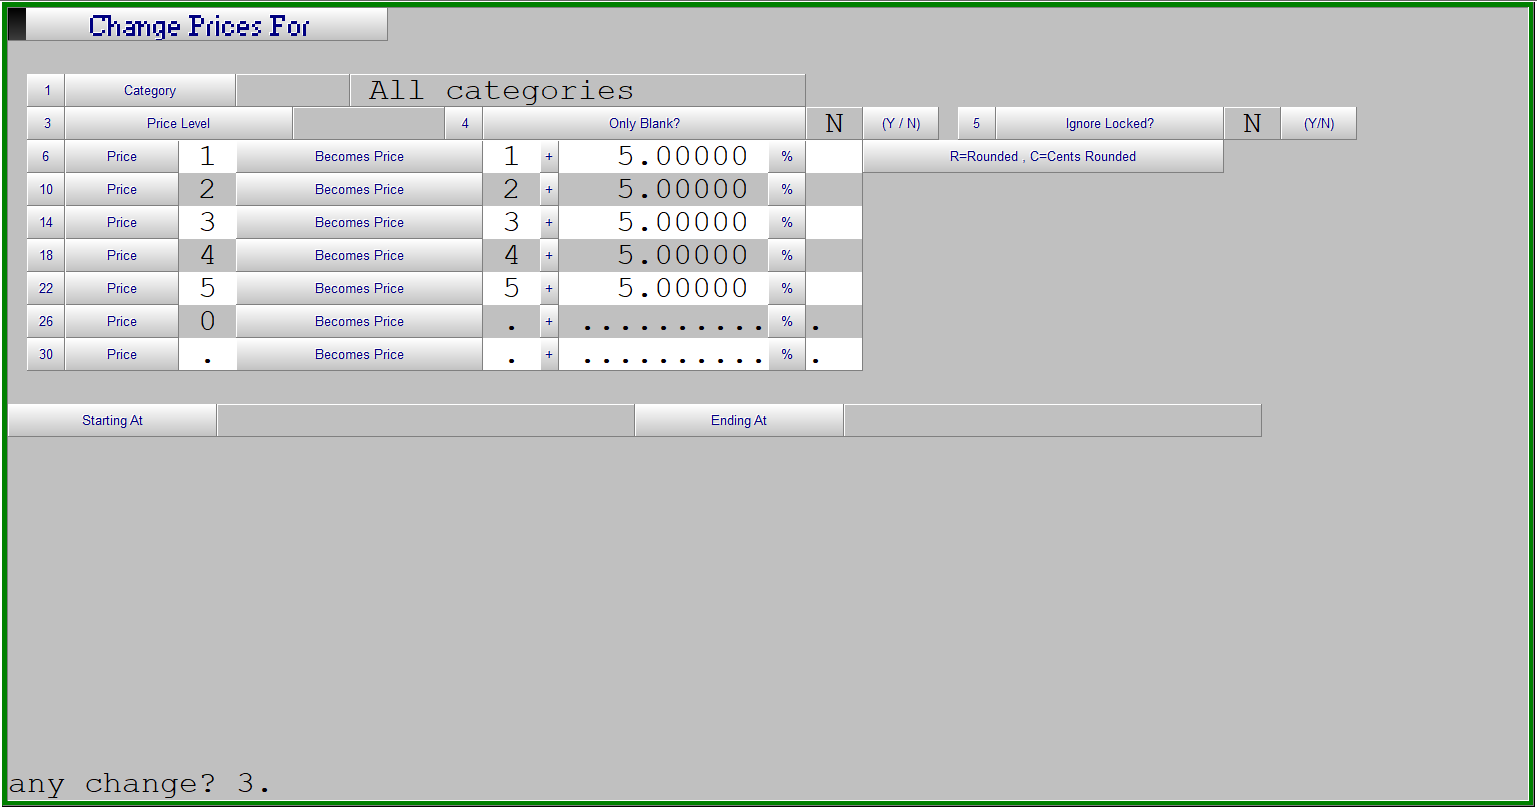
The screen gives you a number of options:
1. Category - You are able to select a specific category to update, or press Enter to select all categories. If you select just one category, you can also select a specific range of parts.
3. Price Level - If you wish to update just one price discount level within the category, you can enter it here. Press enter if you wish to select all. You would also press enter if you wish to just update the blank price level items.
4. Only Blank? - If you pressed enter on option 3, you could enter Y here to elect to update only blank price level items. Otherwise, select N to opt to update all items within the category/categories
5. Ignore Locked? - Y or N to ignore any * locked items within the category
6-30 - The price levels and desired percentage change. You enter the price level you wish to change, the price level you wish to base that change off of and then the percentage change to make.
In the above example, we will be adding a 5% surcharge to all sell price levels (1-5) for all categories in the inventory.
Update price parameters by %
When updating any prices at a large scale, the price parameters should also be addressed in order to deal with any future price updates. This can be done via 6. Inventory > 4. Pricing > 1. Data Maintenance > 4. Reset Price Multipliers by %
Some thought needs to be put into which multipliers to adjust. Updating multiple price levels can have a cascading effect which will increase prices more than desired. If all multipliers move up from a common cost, this shouldn't be an issue
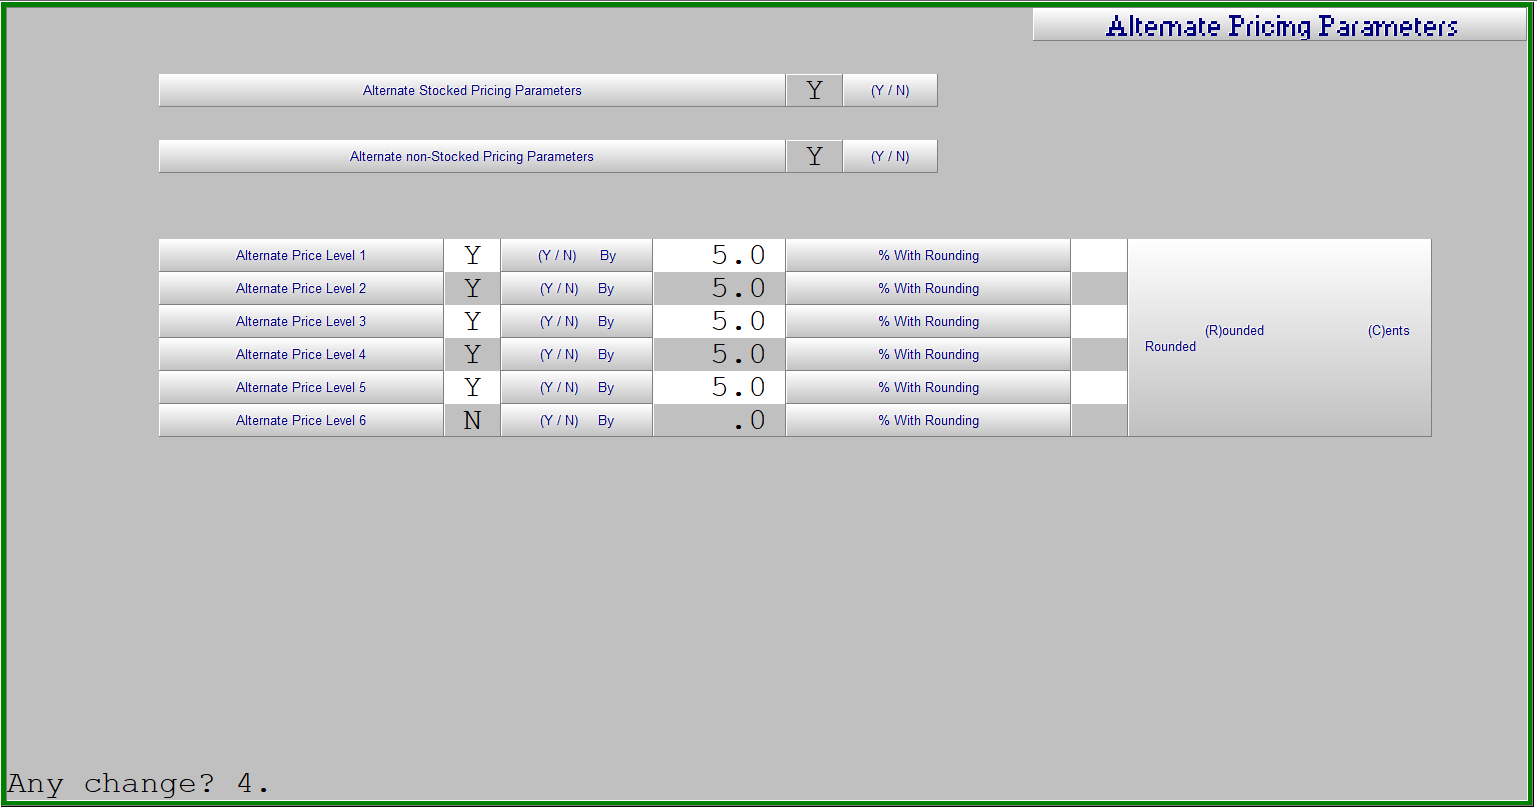
The screen gives you a number of options:
Alternate Stocked Pricing Parameters -Y/N on whether to adjust your stocking price parameters
Alternate Non-Stocked Pricing Parameters - Y/N on whether to adjust your non-stocked pricing parameters
Alternate Price Level X - Y/N on whether to adjust the respective price level. If Y, then you can enter an amount to adjust it by (to one decimal place) and an option to change the rounding type.
It is not recommended to adjust your cost pricing (price 6) here.
Purchasing
Common functions and procedures within the purchasing module
Suggested Order Calculation
Modified Suggested Order Create screen

Suggested Order – Name of the suggested order to be used to recall, maintain and turn into a Purchase Order.
1: Categories to Buy – This can be up to 20 different individual categories or by leaving the first field blank the calculation can be done for All categories.
21: Days Stock Being Bought – Number of days inventory to be purchased.
22: Include Special Orders? – Option to include (Y), exclude (N), or only (O) include Special Orders entered through the Point of Sale system which have not already been ordered.
23: All Branch Special Orders? – If Include Special Orders is Y or O then the Special Orders for all locations can be included (Y) or only the locations selected in Branches to Buy (N).
24: Include Backorders? – Option to include (Y), exclude (N), or only (O) include Customer Backorders entered through the Point of Sale system which cannot presently be filled by quantities on hand or on order by the locations selected in Branches to Buy.
25: All Branch Backorders? – If Include Backorders is Y or O then the Backorders for all locations can be included (Y) or only the locations selected in Branches to Buy (N).
26: Include Lost Sales History? – Lost Sales recorded through the Point of Sale system are to be included as demand in the suggested order calculation (Y) or not (N).
27: Include Non-Stocked Items? – Sales of Non-Stocked parts from the Point of Sale system are to be included in the suggested order calculation (Y) or not (N).
28: Ignore Negative Available? – If the part presently has a negative on hand the suggested order calculation should view this as Zero on hand (Y) or buy the negative quantity to bring the part back to zero on hand (N).
29: Exclude Current On-Order? – To include the present on-order quantity as part of the available inventory (N) or to ignore the present on-order quantity (Y). This option is typically used when there is an outstanding purchase order which has a long delivery time and inventory needs to be replenished prior to its arrival.
30: Use Maximum? – Have the suggested order calculation buy to the Maximum if it is set (Y) or to ignore the maximum and buy based on sales movement (N).
31: Use Minimum? – Have the suggested order calculation buy to the Minimum if it is set (Y) or to ignore the minimum and buy based on sales movement (N).
32: Branch Surplus:
- A new parameter by location for a minimum transfer threshold value.
- An individual parts surplus value [(On Hand – Required Quantity) * Cost ] in the branch would have to exceed this amount to be considered for transfer back to the DC.
- To Adjust the Transfer Threshold value Utilities à System Setup à Purchasing à Parameter Maintenance à Screen 2
- The terminology on screen has been changed from “Ignore Branch Overstock” to “Branch Surplus”.
- This revised option will accept one of 5 indicators:
- T = Transfer branch surplus quantities back to the DC where the value exceeds the minimum transfer value parameter and order any additional products required.
- O = Only include items where the branch surplus is in excess of the minimum transfer value to allow transfers to be created back to the DC. No items would be included for ordering.
- I = Ignore All surplus available quantities in all locations EXCEPT the main branch where the order is being run. This would only apply if the order is being run for multiple locations.
- V = Ignore surplus available quantities up to the minimum transfer value parameter in all locations EXCEPT the main branch where the order is being run. This would only apply if the order is being run for multiple locations.
- A = Include any branch surplus in the available quantity (As the calculation worked in previous versions of COUNTERPOINT).
33: Include (N)o Reorder Products? – Inventory parts numbers with reorder allowed set to an “N” are not to be included in the suggested order calculation (N) or they are to be included in the calculation (Y).
34: Supplier – Enter the 6 digit supplier number to be purchased from or leave this field blank to look at all suppliers. If buying for all categories the use of the supplier number will limit the parts on the suggested order to be those assigned to the supplier entered.
36: Minimum Order Value – If a value is used here the suggested order will be bumped up to meet this value by increasing the suggested quantity to order for the parts included.
37: Branches to Buy – Only the branches selected will be included in the suggested order calculation.
Suggested Order Calculation
The suggested order calculation uses a variety of different formulas based on the purchase code of the part number which is automatically reviewed monthly. The various purchase codes assigned to the parts are:
O – Obsolete part reorder allowed set to N
Not included in the suggested order calculation unless the option Include (N)o Reorder Products is set to (Y)
D – Dead Stock where the part was added over 24 months ago and had no sales activity in the last 24 months for this location.
Will only buy to the Minimum or Maximum if these values are set
S – Service item or slow mover with less than 5% of the months the product has been active showing sales activity for this location
Will only buy to the Minimum or Maximum if these values are set
N – New Part less that 90 days activity
Number of days required based on the weighted average daily sales over the last 90 days
W – Winter item with over 70% of total sales activity being done in the Dec Jan Feb months
V – Spring item with over 70% of total sales activity being done in the Mar Apr May months
U – Summer item with over 70% of total sales activity being done in the Jun Jul Aug months
F – Fall item with over 70% of total sales activity being done in the Sep Oct Nov months
The suggested order quantity for seasonal parts is calculated using the weighted average daily sales for the last 2 seasons if the days to buy for are in the season. When the days to order is out of season for the product the suggested order calculation uses the weighted average daily sales for the last 18 out of season months.
A – Active part for all other parts
The suggested order calculation for Active parts can set to use on the last 12 or 24 months sales activity based on the purchasing parameter settings on screen 2 Suggested Order Months (field 25) and Months Weighting (field 27). If these parameters are not set the default 12 is used.
Purchasing Parameters
The Purchasing Parameters contain the maximum number of months sales to be used in the suggested order calculation, the minimum number of months with activity, the allowable tolerance for spikes in sales and the minimum value of branch overstock for a part to be considered for a transfer. These parameters can be modified through Utilities à System Setup à Purchasing à Parameter Maintenance, screens 2 and 3.
Screen 2
Suggested Order Months (field 25) and Months Weighting (field 27). If these parameters are not set the default 12 is used. This is the maximum number of months of sales activity that will be used in the suggested order calculation. If the part is less that this number of months old the sales from the first received date are used.
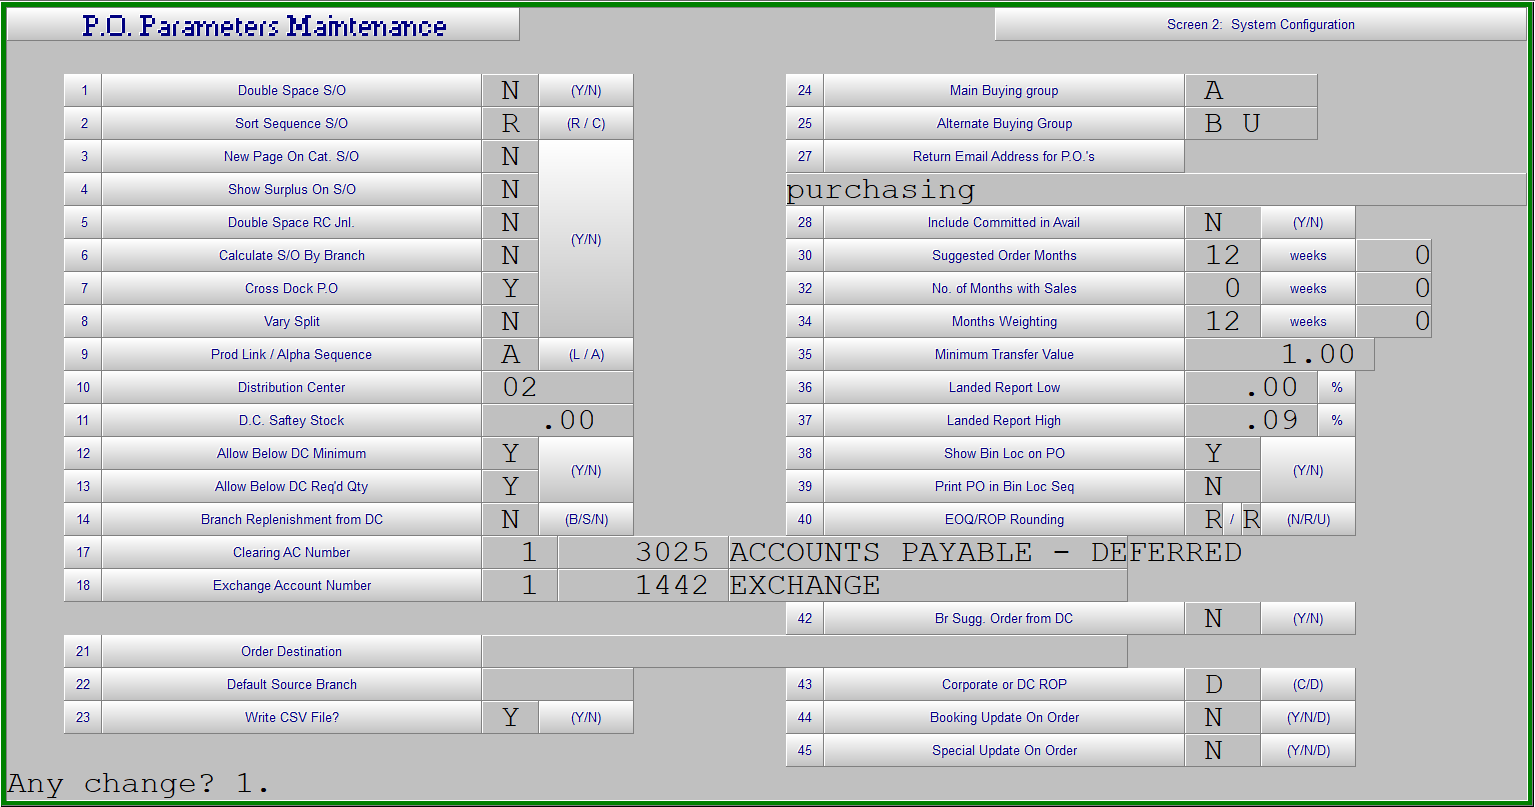
Products that do not have sales activity in more than the No. of Month with Sales (field 26) value will have the sales for that location excluded from the suggested order calculation.
Screen 3
In order to remove sales spikes from the suggested order calculation the Purchasing Parameter Maintenance now includes a set of Smoothing Parameters on screen 3 as well as the defaults for the suggested order create.
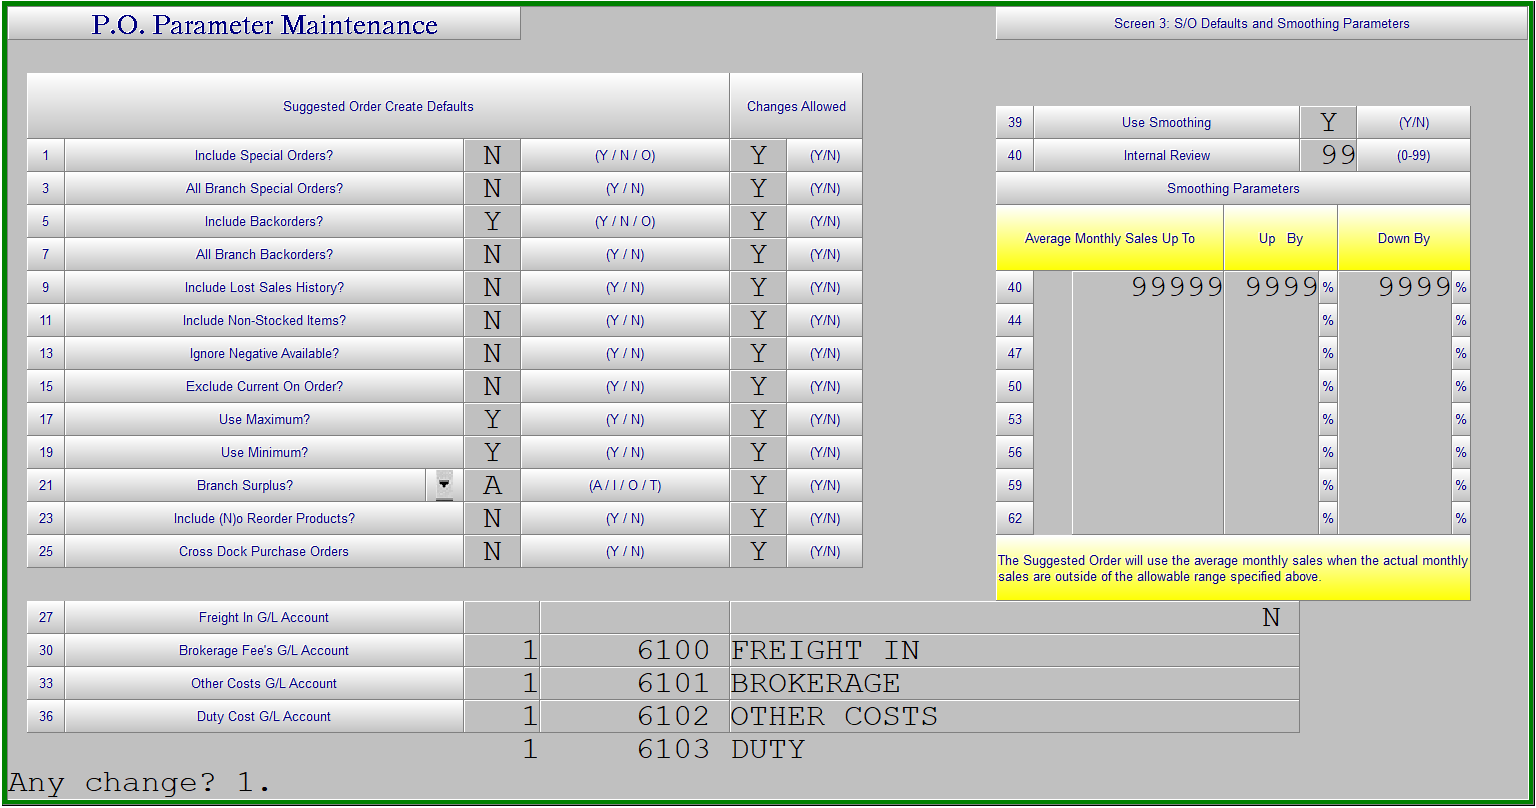
This smoothing can be done using up to 8 different average monthly sales values assigning different percentages to each value. The smoothing calculation uses the number of month specified on screen 2 of the parameters for Months Weighting and averages the sales for the location over those months and then calculates an allowable range using the percentages entered here. Actual monthly sales quantities which are outside the range specified are replaced with the average monthly sales in the suggested order calculation.
Required Quantity
The daily usage rate for the parts is calculated on a Weighted Average basis over the number of months specified in the parameters or the number of months the parts has been active, since the First Received Date, whichever is less.
The required quantity is the daily use rate multiplied by the Days Stock Being Bought entered on the suggested order create screen.
Suggested Quantity
The Suggested Buy quantity is:
- The required quantity calculated above less the current available quantity which is On Hand plus On Order (if included) plus Committed (if included) minus Customer Backorders (if included).
- The Minimum if not zero and if included in the calculation less the current available if this is greater than #1 above.
- The Maximum if not zero and if included in the calculation less the current available if this is less than #1 above.
- The value is then rounded up by the Purchase Quantity assigned to the part.
The Suggested Transfer quantity is:
- Using “Branch Surplus” options “T” or “O”
- Transfer quantity is the branch excess above the calculated required quantity as above where the total value of this excess product is greater than the Minimum Transfer Value set in the Purchasing Parameters.
- If 2. is True then the On Hand in excess of the required quantity would be the transfer quantity.
- If 2. is False then the product will not be suggested to transfer.
Release Notes
Release notes for Counterpoint
Release Notes - Version 5
A listing of updates contained in COUNTERPOINT V5, their functionality and usage
Detailed Invoice Search
Basic Usage Notes
- The updated Detailed Invoice Search is a web based search routines that allows users to quickly access invoices and invoice history via a wide range of channels.
- Updated Detailed Invoice Search is available via the Invoicing screen and the main menu system, and now will launch in a separate browser, providing a larger window in which to view information.
Launching the D.I.S. via Invoicing
- When in the invoicing screen, the top right hand button along the bottom button panel will now show a D.I.S. icon
.
- A left click on this icon at any time during the invoicing process will pop up a browser window with the summary invoice detail for all
- A right click on this icon at any point after entering the line body of the invoice screen will pop up a browser window with the summary invoice detail for the selected
Launching the D.I.S. via the Menu system.
- In the COUNTERPOINT menu system, clicking the
or
icons (depending on your version of COUNTERPOINT) will pop up a new browser window with the summary invoice detail for all customers
Using the D.I.S.
- The summary invoice detail view looks like this:
-

- Once in the summary invoice detail screen, clicking on any of the top row headings will sort the respective columns, while typing into the text boxes in the second row of the heading will filter the respective column based on what you type.
- Each page is limited to 25 listings, clicking on the page links in the bottom right will navigate you through the pages.
- Clicking on the
button in the top right of the screen will switch you into the Detailed Invoice view, which looks like this:
-

- The screen is identifiable by the increased number of columns by which you can filter.
- Within the detail screen, you are able to sort and filter much the same as the summary screen. You will also note the page navigation in the bottom right.
- All highlighted invoices are active links that will take you to a .pdf version of the selected invoice.
Release Notes - Version 6
Documentation on the features associated with Version 6
New Purchasing Module
Overview
This is a complete overhaul of the current suggested order logic in an attempt to provide the user with more of a table driven utility while at the same time making the underlying logic that determines the order quantities more transparent. In addition, the demand cleansing or smoothing will become more granular by the use of weekly versus monthly demand.
The fundamental changes include the adoption of a weekly sales bucket (Current plus the last 104 weeks), an ABC ranking based on Annual Sales $’s or Units and the introduction of an automatic reorder point based on a dynamic lead time (Last x receiving’s) and a parameterized safety stock factor by sales rank.
There is a corporate version of the ABC ranking table as well as one for each branch, carrying different values that will support inter branch versus corporate replenishment.
The vendor profile is also expanded to support the rules for pre-paid freight shipment. This will be used to determine when a corporate suggested order could have one or more PO’s produced because one or more branches meet the free shipment criteria. This requires user confirmation that split PO’s are desired on any given SO.
The PO receiving process is also enhanced to allow a recalculation of the branch split if the order was a corporate PO. In addition, a prorated calculation is performed for partial shipments, with an option to receive any partial shipment into the DC only.
Basic functionality
- ABC ranking: A new weekly process will calculate the annual sales in $’s at cost or Unit’s, based on which method is being used, for each part number. This value will be compared to a table that carries up to twenty ranges, 100 – 1000, 1001 – 5000, etc. Each range will be associated with an ABC ranking which in turn will carry the number of required inventory turns as well as the safety stock %. The number of weeks used in the sales ranking is determined by the user, 1 104.
- Re-order Point: Will replace or become the current Minimum Qty field on the item master. There is also be a new field that controls whether or not the re-order point is recalculated weekly or is locked for the number of weeks enteredmanually into this field. If the Re-order point is to be permanently locked a value of 99 is used in the Auto Lock field. The weekly process will decrement this field by one until it reaches zero. Zero will be considered as indicating the item is on automatic re-order point calculation. NOTE: the manual change of the Auto Lock forces entry into the Re-order point field to enter the quantity manually. New product will default to a standard parameter for the Auto Lock weeks and a Re-order point will need to be entered manually.
- Re-order Point calculation: This will be done on a weekly boundary based on the items lead time (Average of last xx number of receiving’s) and the safety stock associated with the items ABC ranking. The lead time in days would be multiplied by the daily use rate and the result of this multiplied again by the safety stock. EXAMPLE: Item A123 is classified as a “C” ranking (25% safety stock), has a lead time of 20 days and a daily use rate of 2 units. The re-order point qty therefore would be (40 times 1.25 or 50 units).
- Re-Order Quantity: This new value for the Vendor and DC replenishment is calculated based on the Sales Ranking of the product and the required Turns setup in the sales ranking table. The annual sales are divided by the required number of turns to determine the Re-order Quantity.
- Rounding: Parameters are available to control the rounding characteristics of both the Re-order Point and the Re-order Quantity, round up, round at 0.5 or round down.
- Suggested Order Calculation: Would be calculated as the total annual units sold divided by the number of required turns for the items ABC ranking plus the difference between On-hand and the Re-order point qty. EXAMPLE: Item A123 from above has 35 units On-hand, sells 1200 units a year and is classified as a C ranking, which calls for 4 turns. This would result in the suggested order qty being calculated as 1200 (annual unit sales) divided by 4 (required turns for “C” ranking) plus 15 (Re-order qty – On-hand) or 315 units.
Inventory Enhancements
- An Auto Lock field to stop calculation of the Reorder Point for xx number of weeks. The new weekly routine will decrement this field until zero, at which point the part number will qualify to have a reorder point calculated. The decrement process is run before the reorder point calculation so as to catch items coming off a locked condition. A manual entry of 99 in the lock field means to not attempt a decrement and not to recalculate the reorder point. This is the equivalent of a manually set Min qty.
- When adding new product the Auto Lock field is set to a parameterized value and the Re-order point needs to be set to ensure the product is ordered.
- A field to carry the branch ABC part ranking based on the branch only sales.
- A field to carry the corporate ABC ranking based on corporate sales for the part.
- Two fields that will contain trends for both branch and corporate. (For Future Use)
- A field to carry the Reorder Qty both Vendor and DC replenishment to be used when On-hand is <= Re-order point.
Supplier Enhancements
- Hold a Buyers Initials to be used as a filter when listing the new overnight suggested orders/transfers. There will be two fields, one for SO’s and a second for ST’s in case different people are responsible for branch replenishment. The Buyer can also be assigned to a specific category.
- A field that Determines the frequency with which this vendor will be purchased from, expressed in terms of Daily, Weekly, Monthly
- A field tied to the frequency that allows the Day of the week or month to be stipulated.
- A field to indicate the number of receiving’s to be used in the lead time calculation.
Weekly Demand
A new WEEKSALES data has been created to include the RAW sales total as well as the smoothed or normalized total. This will then allow the potential for a refresh if the smoothing parameters are changed. The daily average sales for the week is also stored to avoid having to calculate this number on the fly. The need to perform a weighted average in regards the daily sales qty will no longer be required as all xx weeks (Number of weeks to be considered in calculations) will be added and then averaged. The demand smoothing and calculation of average daily sales is done on a weekly boundary.
Sales Ranking
The sales ranking is recalculated on a weekly basis after the demand smoothing is completed along with the Vendor and DC replenishment Re-order quantities.
Lead Time and Safety Stock
- The lead time is calculated based on the number of receiving’s specified on the Supplier for the product.
- The Re-order point is calculated using the average daily sales * lead time + safety stock from the sales ranking parameters.
Branch replenishment
The current replenishment logic has been changed to look at the branch ABC ranking table to determine what the correct stocking levels for a branch would be. For a DC replenishment the re-order point (lead time and safety stock) would be driven from a
parameterized setting by branch. For a vendor purchase the corporate lead time and safety stock would be used. In both cases the Suggested Order Qty would be based on the branch ABC ranking of the item and whatever turns and safety stock are contained in the sales ranking table.
Seasonal Profiling (In Development)
Revisions are being made to the Seasonal profiling to support User Defined seasons.
This will include up to 4 seasons indicating the start and end month for each season and the % of annual sales required in the season to mark the part as a seasonal item.
The calculation of Re-order Point and Re-order Quantity will use the movement from the previous season when buying in season and the movement from the previous off-season when buying out of season.
The intent is to use the lead time of the product to determine if the purchase is going into or out of season.
The seasonal flag will be visible on the suggested order detail.
Suggested Order
The SO routine has been modified to remove the need for user input, taking instead a series of default arguments in how the program will function. This will allow for easier management and more consistency in what the buyers use as criteria. In addition, the system will maintain a perpetual pending order status by creating a SO for every vendor every night, adding or changing the status of an item based upon the previous day’s activity.
The buyers will now be offered a Buyers Focus screen with a number of filters that will control the view, and therefore the amount of data they will have to look at. This includes those vendors where there is a schedule, daily, weekly, monthly. In addition, the concept of a buyer being assigned a vendor will be introduced that will further filter the current data overload as well as support monitoring of a buyers habits and/or performance.
- A new nightly background process that will look at each part and determine which product is at or below the reorder point. The various arguments for the routine to be drawn from a default parameter file. This will create a Supplier suggested order for products where the DC available quantity is <= the Vendor Re-Order Point. The suggested order will be named bbbb-vvvvvv where bbbb is the Buyer ID and vvvvvv is the Supplier number
- Where a branch is below its reorder point, but the DC is not, the system will create a ST (Suggested Transfer) instead. These suggested transfers will be named bbbb-BRnn where bbbb is the buyer ID and nn is the Branch number. The rules for branch replenishment from the DC location are as follows:
- A new parameter is available to determine how the program is to react when the DC available quantity reaches the Re-order point, B=allow reduction below both safety stock and lead time qty, S=below safety stock but not below lead time qty, N=not below either safety stock or lead time qty.
- The suggested buy quantity will be the calculated Re-Order Quantity based on the required turns plus the available quantity – Re-Order Point.
- Revised SO maintenance routine to:
- Filter by the buyer ID, input on entering the program, and list both SO’s and ST’s. The ST file would have the branch number as its name and the SO would include the Vendor number in the name both preceded by the Buyer ID.
- A second filter, entered immediately after the buyer ID, that would provide the ability for the user to determine the content of the screen display list:
- (S) SO’s only meeting pre-paid limits
- (T) ST’s only meeting $ thresholds
- (B) Both SO’s and ST’s meeting $ thresholds
- (E) SO’s containing an emergency condition (Stock outs) but not reaching the pre-paid limit
- (D) Scheduled SO’s based on Supplier settings
- (A) All vendors with SO content
- The summary listing to display, for a SO, the order total and the prepaid order value from the vendor record and for the branch transfer the minimum $ value set for transfers, if any.
- Suggested order item detail is available by clicking on the buy quantity. This will display a web page containing the following details per branch:
- Category
- Part Number
- Description
- Part Remarks
- Order Quantity
- Supplier Remarks
- Sales Rank
- Required Turns
- Cost
- On Hand
- On Order
- Committed
- Auto Lock
- Re-order Point
- Re-order Quantity (EOQ)
- Buy Quantity
- Weeks Use
- Daily Use Rate
- 12 Month Demand
- New fields to track the original SO Qty versus the Order Qty. These are used to prevent over writing work done and perhaps not complete before the next nightly run.
- A flag to indicate if the SO has been changed and thereby avoiding looking at each line item. Suggested Orders that have not been modified will be replaced each night. If a suggested order has been modified only parts that have not been looked at will be amended during the nightly run.
- Upon PO or ST creation the SO and/or ST file to be moved off to a new file name referenced by either PO or ST number. This will support later analysis of a buyer’s habits / performance such as the % of items where SO Qty is overridden, number of lines processed, etc.
Receiving Enhancements
Calculation of the Xdocking requirements for the branches are made upon the receipt of the product at the DC. Stock Transfers can be automatically created when the PO is updated for Xdock product.
The receipt of product either by the use of bar code scanning or entry against the purchase order data itself.
Reporting
- An extract of all inventory items is available on a daily basis with all of the same information that is included on the Item Detail HTML.
- Ranking Parameters example by $’s:
- Ranking Parameters example based on Unit’s
Version 6 Overview
Point of Sale
- Quote / Order search combined: When keying in a customer number, instead of the ‘Open Orders for This Customer’ prompt, counter-staff may be presented with any combination of a [A/O/P/Q/N] prompt, allowing them to quickly view any [O]pen Orders, [P]acking Slips or [Q]uotes. Other options include [A]ll or [N]one
- Option to Delete Quotes: Upon invoicing a quote now, counter staff will be asked if they wish to delete the quote.
- Dispatch with Delivery Runs: The delivery dispatch module now has the ability to assign customers to a delivery type, and a run. This allows you to keep cash sale transactions, and non-delivery customers out of the dispatching screen. Cleaning up the process for your dispatcher. Delivery type and Run maintenance is handled in the 4. Sales Desk > 7. Delivery Dispatch menu, with delivery types determining whether an invoice is delivered or not, and a run helping group customers in geographic runs. Once delivery types and runs are set up, they are assigned to a customer in the customer maintenance screen.
- We include 3 default delivery types [D]eliver, [P]ick-Up, and E[X]press. Both [D]eliver and E[X]press will be pushed to the delivery dispatch screen, which no delivery type or a [P]ick-Up delivery type will not.
- After all maintenance is done, the counter-staff will notice a ‘Deliver’ option when finalizing an invoice. Typing the ‘D’ key will give them the option to change the default value. The dispatcher & drivers can also select a run number when displaying invoices, but do not have to.
- JDispatch 'base' is now included for all Version 6 customers. Full documentation on JDispatch can be found here
- Inclusion of Pick Tickets in the transactions sent to the dispatching screen. Pick tickets will now be available for dispatch via the COUNTERPOINT dispatch module.
- Gift Receipt Option: If activated, the other new option when finalizing an invoice will be the option to print a gift receipt.
- Lost Sale Reason Codes: You can now add reason codes for when counter-staff log lost sales. Once you set up reason codes, when a lost sale is logged, the reasons show on screen for selection.
- Standard Comments and General Charges: Ability to automatically apply standard comments to invoices based on customer.
- Deposits: Utilizing the general charges module, you can accept deposits on items. These can be a pre-set percentage, a default value or a value keyed in at the time of sale.
- Change PO Number after invoice completed.
- Customer Notes to be printed on the invoice: You can select a customer note type to automatically print on the invoice
- Branch Stock Inquiry transfer create enhanced. From within the invoicing screen, when you hit the Shift/F4 function key to access the Branch Stock Inquiry, you can now also create stock transfers. These transfers can be for a single item at the time you enter the inquiry, or you can create and add to a running transfer for completion at a later time.
- Loyalty Rewards: Slight revamp to our loyalty rewards program.
- Add part to invoice using Customers Part Number: For customers who have an internal part numbering system, and order from you with those parts, there is now the ability to invoice them with those part numbers, which are tied to your real part number.
- Extra Invoice copies for customers controlled by transaction type: Extra invoice copies are now paramaterized by transaction type. So, for instance, you can have duplicate copies of invoices but not quotes.
- Email option for VIP Customers: Ability to email transactions to VIP customers.
- Control all pricing from Contracts/Specials screen: With the inclusion of both Price Level and Discount group as possible filters to add Contracts/Specials via 4. Sales Desk > 8. Administration > 2. Customer Pricing > 3. Contracts / Specials, there is the possibility to migrate all pricing matrixes and discounts into the Specials, and do all pricing/discount maintenance from that one screen. There is a migration routine that must be run by AMS prior to adopting this method.
- Web order discounts: Allows the setup of a global discount (by branch) to be applied to web orders. This discount is then printed on the invoice. However, the printed web discount is printed in place of the customer’s regular discount (Both discounts still apply, only one prints).
- Ability to disallow clerks from lowering prices. This feature is a new field in the clerk maintenance that, when activated, will prohibit the clerk in question from lowering the selling price from within the invoice. Clerks may change the price of an item to a higher selling price.
Customer Maintenance
- Delivery Type: This is where you need to add in the delivery type by customer. Delivery runs are mandatory to enable delivery of invoices for a customer. However, we will automatically enable any customer who has already had an invoice delivered under the current system.
- Delivery Run: This is where you can add the delivery run by customer. Delivery runs are an optional part.
- Core Billing: Used for customers setup to not pay core charges at time of purchase
- No Print of invoice for customers receiving Automatic Email: Ability to turn off the printing of invoices for customers set for automatic emails
- Automatic Email to multiple recipients: Additional emails can be added with the (A)utomatic type, and emails will be sent to all available addresses
- Customer change log: A running log of changes made to the customer record, available for inquiry at any time.
Customer Notes
- Customer Note type "P": A “P” type note has been added to the standard customer not types, and these notes will be printed on the invoice automatically.
Accounts Payable
- Cheque Void: Ability to void a cheque after creation
General Ledger
- Upload of Budget Values
Sales Analysis
- Extract files for selected Sales Analysis reports
- Hourly Sales extract: Hourly sales extract is a routine that will analyze your hourly sales for a given time-frame, export the information to an excel template and present you with raw detail and graphed information on your hourly sales.
Inventory
- Revised Maintenance screen: The product maintenance screen has been enhanced to allow for a number of new fields related to our ‘turns based’ purchasing module.
- Rename of Minimum to ROP Vendor: This does not include the entire new purchasing module, but is a precursor
- Return allowed flag – Defined whether a part is allowed to be returned to the supplier.
- Base Price and Base Core (Primarily for foreign currency): Addition of a ‘Base’ price and core. This is the price that was used to update your system pricing, before pricing parameters were added.
- Duty Rate
- Quantity per barcode as part of product maintenance: Addition of a quantity tied to a barcode, for use on items that come in and can be sold by a unit and/or case.
- Option to Chain Substitutes as part of product maintenance.
Purchasing
- Enhanced support for Foreign Currency
- Booking and Special PO Handling
- RF Gun based rush receiving
- Updated parameters for Critical Inventory report to include and report on items in a low inventory status based on minimum usage value
Sales Analysis
Customer Sales Reporting
As a normal part of working with your customer base there will be times when you need to understand a customers buying habits by category. Counterpoint provides a report specifically for this purpose. The report is accessed via the following menu path.
- Sales Analysis…-> 3. Sales/Core Reports…-> 4. Customer Reporting…-> 2. Customer Sales_Returns
Which brings up the following screen.
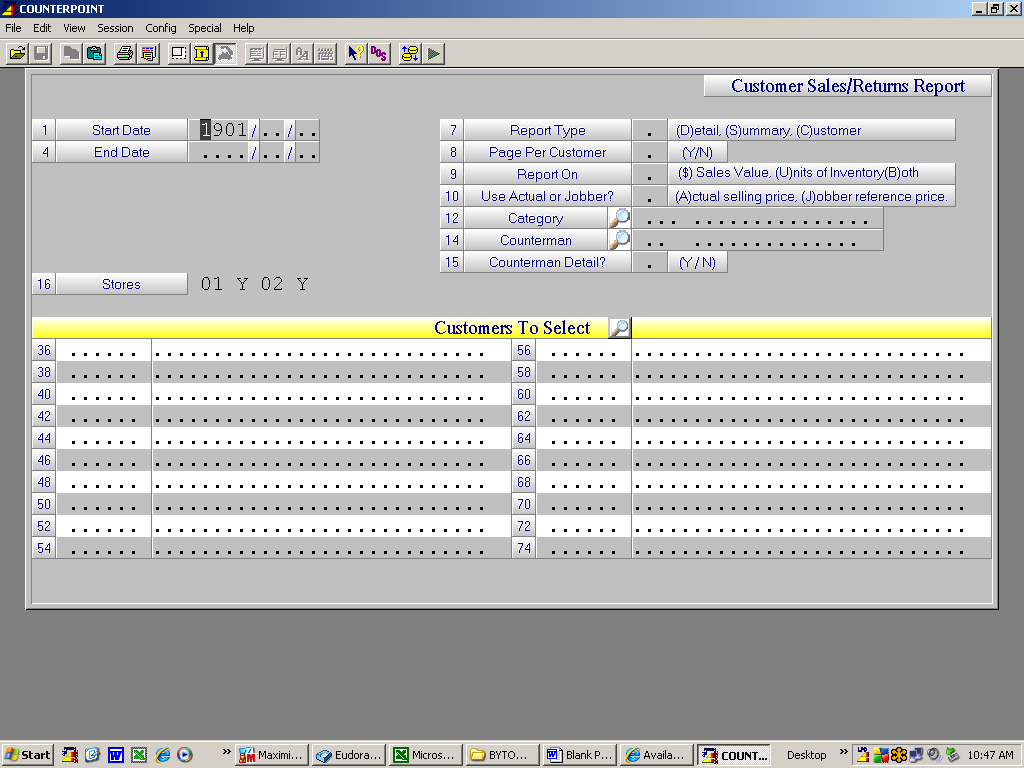
Enter data into fields as follows.
1 Start Date – Enter date you would like analysis to begin –hit Enter to include all customer purchases.
4 End Date – Enter date of last day you wish to include in the analysis – hit enter to include all data.
7 Report Type – Enter one of the displayed options as appropriate to your need for this report.
8 Page - Per Customer – Enter Y or N as appropriate.
9 Report On – Enter One of the displayed options as appropriate to your needs.
10 Use Actual or Jobber – Enter as appropriate to your needs.
12 Category – Enter category to be reported or hit [Enter] to report on all categories.
14 Counterman – Enter Counterman number to report or hit [Enter] to report on all Counterman sales.
15 Counterman Detail – Enter Y or N as appropriate to your needs.
16 Stores – Prompt will list the stores on your system by branch number. All will have default value of Y change to N as appropriate to your needs.
Fields 36 thru 74 – Enter customer account numbers of all customers you wish to see reported. Hit [Enter] to see all customers reported. Use the Tab key to launch a customer account search if you are unsure of the account number.
When you have entered all fields hit [F1] to run the program.
Report can be displayed on screen or printed out as appropriate to your intended usage.
Warehouse Utilities
Uni-Select SAX Reporting Setup
Installer Customer Maintenance
In order to provide the proper sales reporting for the SAX program some maintenance is required to identify the installers that have signed up for the program and which program they are enrolled in.
Left Click the Uni-Select Logo on the button the the right of the Cursor at the bottom of the screen. From that menu take the following menu selections’
5. Uni-Select Installer Reporting… - -> 1. Installer Customer Maintenance
Select Add Change Delete as appropriate which will bring up the following screen.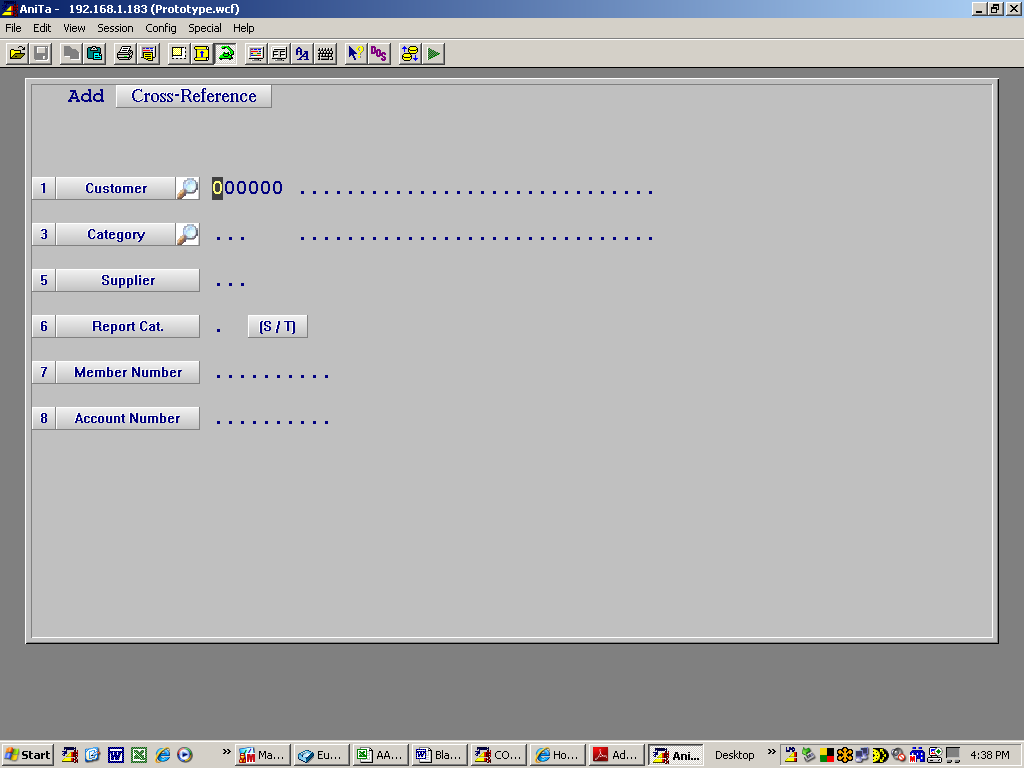
Customer = Your A/R customer number for the installer
Category = Your category code for the product line. (This will automatically be converted to the Uni-Select supplier code when data is sent to Uni.)
An entry must be made for all product lines that are to be reported under the program for which installer reporting is being set up in this session. As you are making entries the fields will default to the previous entry made in that field
Report Cat. = S for SAX or T for the Specialist.
Member Number = Your Uni-Select member number in format 00-000.
Account Number = The Installers Uni-Select program account number
Installer Sales Reporting
This is only for manual processing needs. The system automatically runs reporting on a monthly basis to send to UNI
The sales reporting for the Uni-Select Installer Programs will report all customers and categories for the installer program within the date range entered.
Left Click the Uni-Select Logo on the button the the right of the Cursor at the bottom of the screen. From that menu take the following menu selections’
- Uni-Select Installer Reporting… - -> 2. Installer Sales Reporting. Which brings up the Following screen.
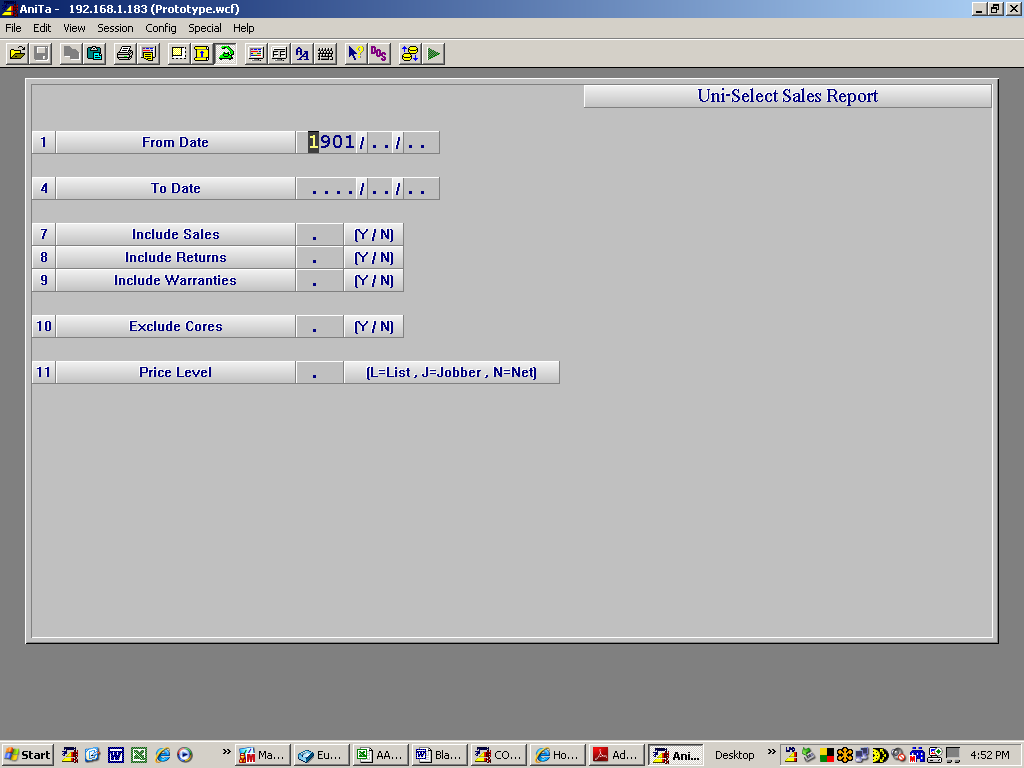
When running the report you must select the date dange to be reported and which line types are to be included in the report totals by category.
You must also choose whether core values are to be Excluded - (Y/N), or Included - (Y/N) in the report values.
The last selection determines which price the reported sales values are to be based on. The price levels shown for List and Jobber are controlled by the the setup of pricing structure in Billing Parameters Screen 1 field 41 for Jobber and List.
The Net option uses the price the items sold to the installer at, including any line discounts given at time of sale.