** Release Notes - Version 6+
A complete listing of documentation related to the new features and enhancements found in COUNTERPOINT version 6+
- ** COUNTERPOINT® Version 6+
- Accounts Receivable Enhancements
- Add Inventory from Invoicing
- Barcode Quantities
- Base Price Automated Updates
- Bin Selection in Invoicing
- Branch Stock Inquiry
- Category File Listing
- Change PO Number
- Cheque Void Option
- Consignment Processing
- Core Bank Enhancements
- Credit Check Enhancements
- Cross Dock HTML Pop-up
- Customer Notes
- Customer Notes Enhancements
- Customer Part Numbers
- Process EDI Invoices
- EOQ & ROP Calculation
- Fleet Part Tracking
- Foreign Currency
- General Charges & Core Handling
- Gift Receipts
- GL Budget Upload
- Invoice Price Change Restrictions
- Kit Maintenance
- Locked Product Inquiry
- Lost Sales Reason Code
- Loyalty Rewards
- Multiple Bin Locations
- Multiple Invoice Copies
- Physical Count - Add Bin Location
- Change PO on Pick Ticket
- Price Override Reporting
- Printing of Orders when Customer Backorders Received
- Product Maintenance Access Control
- Product Maintenance Screen Enhancements
- Purchase Orders - Booking & Specials
- Quote Handling Improvements
- RF Gun User Guide - 2022
- Substitute Chaining
- Suspense Payment Enhancements
- Web Order Discounts
- Specials / Contracts Enhancements
- Accounts Payable Invoice Matching
** COUNTERPOINT® Version 6+
Release Overview
The upcoming release of COUNTERPOINT will consolidate for the first time in several years a number of features that have not been considered mainstream, meaning only certain customers got certain features based on their requests. This was a strategic mistake as in many cases this has held AMS back from being more aggressive in the software development cycle. This release of Version 6+ will move all customers to the same version, making support, training and new development rollout easier and allow for more frequent updates, which is why we plan to move to a quarterly software release update schedule. Bugs will be released as completed. The listing below may well contain features you already have and use but also others you may not be aware of or have forgotten are available. All active links will take you to a more detailed overview of the specific enhancements.
We encourage you, once settled into Version 6+ to submit to us any functionality you would like to see added or changed for consideration in a future release. We will also be releasing a list of the currently planned updates for 7.1 shortly.
Functionality & Highlights
Point-of-Sale
- Credit Card Integration enhancements: For those dealing with Global, Moneris and Digitech changes have been made to eliminate Suspended transactions prior to day end.
- Improvements to outstanding quote handling: Including deletion upon Invoicing.
- In addition the Quote / Order search combined: When keying in a customer number, instead of the ‘Open Orders for This Customer’ prompt, counter-staff may be presented with any combination of a [A/O/P/Q/N] prompt, allowing them to quickly view any [O]pen Orders, [P]acking Slips or [Q]uotes. Other options include [A]ll or [N]one
- Improvements to handling of over credit limit customers: For transactions that put customer over their credit limit on completion of an invoice the system will offer to keep the order as a quote instead of losing it which can be recalled by searching for a PO # containing CH(Credit Hold).
- Gift Receipt Option: If activated, when finalizing an invoice, the user will prompted to print a gift receipt.
- Support of User Defined Lost Sale Reason codes: With drop down selection list.
- Standard Comments and General Charges: This provides the ability to apply standard comments to an invoice using the “G” line type.
The General Charges feature allows the ability to accept deposits by a pre-set percentage, a default value or a manually keyed amount at the time of sale.
The General Charges also provide the ability to add an automatic charge to all invoices, such as a Fuel Surcharge
- The ability to change the PO number: After the invoice has been completed.
- Change PO# on Zslip: For those using Zslips the PO# can now be changed during the billing process in instances where the customer only issues a PO# when the order is complete.
- New Customer Notes Options: More flexibility for creating customer notes such as notes that can be automatically printed on the invoice, such as delivery instructions or who has singing authority.
- The Branch Stock Inquiry access: Shift/F4 from within the billing screen has been enhanced. You can now also create stock transfers from a branch. These transfers can be for a single item at the time you enter the inquiry, or you can create and add to a running transfer for completion at a later time.
- The ability to ADD a non-stocked part number automatically: From the Price Book, meaning receiving and returns have been made significantly easier.
- Add part to invoice using your Customers Part Number: For customers who have an internal part numbering system, and order from you with those parts, there is now the ability to invoice them with those part numbers, which are tied to your real part number. Will also modify the “customer to your part #” link if you transfer your part to a new number. The order can be keyed by their part # or yours and will print both numbers on their invoice.
- Control of Specials and Contract pricing from one maintenance routine: With the inclusion of both Price Level and Discount group as possible filters to add Contracts/Specials via 4. Sales Desk > 8. Administration > 2. Customer Pricing > 3. Contracts / Specials, there is the possibility to migrate all pricing matrixes and discounts into the Specials, and do all pricing/discount maintenance from that one screen. There is a migration routine that must be run by AMS prior to adopting this method.
- Ability to prevent Counter Staff from lowering prices: This feature is a new field in the clerk maintenance that, when activated, will prohibit the clerk in question from changing the selling price from within the invoice. Any price changes would need to be authorized by a user with authority to change prices by entering their PIN.
- Multiple Bin # display on the billing screen with the option to select which Bin the product was picked from.
- Customer Fleet Vehicle tracking: This is the ability to set up your customer’s equipment/vehicle using their ID number with the parts it takes for ease of lookup.
- Extra Invoice copies for specific customers: Extra invoice copies are now parameterized by transaction type. So, for instance, you can have duplicate copies of invoices but not quotes.
- CAPS Lock: We have updated the PC software to automatically enable the CAPS lock when using Counterpoint. This means you do not need to toggle the CAPS lock on or off when going in/out of Counterpoint
- Icons, Etc.: Many of the menu icons have been updated and standardized
Enhancements to JDISPATCH:
- Inclusion of Pick Tickets in the transactions sent to the dispatching screen. Pick tickets will now be available for dispatch via the COUNTERPOINT dispatch module.
- This provides the customer with an unpriced document.
- Delivery Runs: The delivery dispatch module now has the ability to assign customers to a delivery type, and a run. This allows you to keep cash sale transactions, and non-delivery customers out of the dispatching screen, cleaning up the process for your dispatcher. Delivery type and Run maintenance is handled in the 4. Sales Desk > 7. Delivery Dispatch menu, with delivery types determining whether an invoice is delivered or not, and a run number helping group customers in geographic runs. Once delivery types and runs are set up, they are assigned to a customer in the customer maintenance screen. We include 3 default delivery types [D]eliver, [P]ick-Up, and E[X]press. Both [D]eliver and E[X]press will be pushed to the delivery dispatch screen, which no delivery type or a [P]ick-Up delivery type will not.
- After all maintenance is done, the counter-staff will notice a ‘Deliver’ option when finalizing an invoice. Typing the ‘D’ key will give them the option to change the default value. The dispatcher & drivers can also select a run number when displaying invoices, but do not have to.
- If you are still not signed up with JDispatch, It is a full featured delivery tracking and signature capture module built to interact with COUNTERPOINT and the Counterpoint Cloud Platform. The best part? The base version is included with your COUNTERPOINT system! Keep track of deliveries and pick-ups, track driver locations and more. Information on JDispatch can be found online here.
Web order (autoecat.com) related Changes
- Web order discounts: Allows the setup of a global web order discount (by branch) to be applied to web orders. This discount is then printed on the invoice. However, the printed web discount is printed in place of the customer’s regular discount (Both discounts still apply, only one prints).
- Servicing Branch Fulfilment Changes: Ensures that all web orders print at a customer's servicing branch. autoecat now passes through pre-defined messages to alert your counter staff of product availability and where to source out of stock items from.
- Pick up in store enhancements: Pick up in store orders are now available in the open order review screen. Customers can optionally also request a confirmation email
- autoecat Desktop Browser: The new autoecat browser is aimed at providing your counter staff the the best possible performance and most functionality possible when they use autoecat from within the billing system. Some of the key features of the new browser are:
- Enhanced speed of browsing
- Streamlined transfer of items from the catalogue / shopping cart and back into your invoice
- We have also been very busy upgrading your and your customer's online ordering experience as well. A complete listing of recent and ongoing changes to the autoecat.com website can be found here.
Customer Specific Changes
- Core Billing flag for customers: For those who are allowed to not pay core charges provided they return the core by a certain date, the number of days of the grace period is specified in a related data field. Specific Core statements can be produced for the customers flagged as being in the program.
- The ability to suppress the printing of invoices: For customers set to automatically receive their invoices by Email. In addition the ability to Email to multiple recipients has been added.
- Consignment Inventory: For customers purchasing high volumes of certain part numbers, they can be set up with an opening inventory balance that will only be billed when they reorder.
- Enhancements to the Loyalty Rewards Program: The system has been changed to allow the rewards to be based on Reward Points that is based on a Points/Dollar ratio that can be set by category. In addition, Invoices can now be Emailed to the VIP customer.
Inventory Control Changes
- Product Maintenance Access Control: A new parameter to set which fields certain users have access to within the Product Maintenance
- Revised Maintenance Screen: That has been enhanced to allow for a number of new fields related to the optional “Turns Based” purchasing logic.
- Rename of Minimum to ROP.
- New field to lock recalculation of the ROP for xx number of months.
- New field for Last Price Update: Added on maintenance screen to show when the last price change was applied to the item.
- Item is not returnable: A new flag to indicate if the item is not returnable to the supplier.
- Additional data fields to support imported product:
- Base Price and Base Core (Primarily for foreign currency): Addition of a ‘Base’ price and core. This is the price that was used to update your system pricing, before pricing parameters were added.
- Duty rate
- Ability to Chain Substitutes: As part of the maintenance routine.
- Quantity per barcode as part of product maintenance: Addition of a quantity tied to a barcode, for use on items that come in and can be sold by a unit and/or case.
- Kit Handling: The two types of Kits supported:
- Manufactured Kits – which are assembled from a group of parts then received into inventory for resale as the kit part number
- Counter Kits – which are kits that are put together at the time of the sale the components removed from inventory when the sale is completed
- Category Listing: The category listing has been modified to produce an extract for import into excel with additional fields included.
- Physical Count Bin Add: Has been added to allow the adding of a new bin during a physical count.
Repair Shop Module
- The ability to print Multiple Invoice copies by Customer
- New flexibility by the Integration of Edit Pad Pro for Work Order Labour Notes
- Spell Check
- Auto Line Wrap
- Adjustable Line Length
- Increased Text/Labour line to 2000 characters, up from 480 at present.
Purchasing / Receiving
- Booking and Special Purchase Order handling
- Suggested Order report breaks out On Order Quantity of both types
- Reporting on New Purchase Order Types
- RF Gun/Android Tablet Based Receiving capability
- Updated parameters for Critical Inventory report
- Include and report on items in a low inventory status based on minimum On Hand value
- Enhanced Foreign Currency support: Use of Base Price to maintain the suppliers cost before exchange, duty and freight.
Sales Analysis
- Full Integration to Counterpoint.cloud that includes:
- Nightly Sales Emails - Formatted emails to report on a number of different sales metrics
- Sales By Branch
- Clerk Sales
- Top 10 Categories
- Top 10 Classes
- Top 10 Customers
- Top 10 Gaining Categories
- Top 10 Gaining Classes
- Top 10 Gaining Customers
- Top 10 Gaining Industries
- Top 10 Industries
- Top 10 Losing Categories
- Top 10 Losing Classes
- Top 10 Losing Customers
- Top 10 Losing Industries
- Low Margin Report
- FlightDeck
- Sales Analysis - Track sales metrics via an easy to read sales dashboard comparing current sales to previous
- Sales by Day / Industry / Territory / Product Group
- Online vs. In store sales
- Cumulative Sales
- Product/Inventory Analysis - Review overall inventory performance through the Inventory dashboard
- Old / Invalid Stock
- Inventory Value by branch / category / product type
- Sales Goals - Set incremental sales goals by month / year
- Sales Analysis - Track sales metrics via an easy to read sales dashboard comparing current sales to previous
- CRM
- Easily review high level sales metrics, and detailed sales information by customer
- Automatically track customers based on sales thresholds
- Manually target customers to focus on
- Track correspondence with customers through the CRM CounterMessages module
- Easily review high level sales metrics, and detailed sales information by customer
- Web site ECAT Analysis
- KPI’s
- % of Change
- KPI’s
- A full list of recent updates to the Counterpoint Cloud Platform is available online here
- Nightly Sales Emails - Formatted emails to report on a number of different sales metrics
- Hourly Sales extract: Hourly sales extract is a routine that will analyze your hourly sales for a given time-frame, export the information to an excel template and present you with raw detail and graphed information on your hourly sales.
- Price Override Reporting: The Price Override reporting now allows for reporting over a period of time based on Customer, Sales Clerk, Range of categories and Override type.
- Price override report can also be automatically loaded to the counterpoint.cloud platform on a monthly basis for archiving and review
Accounts Receivable
- A customer change log: Has been added to allow Inquiry on what changes have been made to the customer’s master data, when the change was made and by whom.
- Ability to Switch between Customer Maintenance and Customer Analysis: The Customer Maintenance and Customer Analysis have been enhanced to switching between with a single key stroke.
- Customer Notes Edit/Inquiry: The ability to access Customer Notes has been added to the Customer Analysis and Cash Receipts input.
Accounts Payable
- Ability to Void a Cheque:
- Ability to void a cheque outstanding cheques
- EDI Invoice Processing:
- The ability has been added to receive invoices electronically from vendors via an EDI transaction that can be selected for adding to a A/P transaction batch
General Ledger
- Ability to Upload Budgets:
- Ability to upload budgets from Excel Spreadsheet
- General Ledger Year End:
- The General Ledger Year End step has been incorporated into the Period 12 Month End to eliminate issues with order process being run between these 2 critical steps.
Accounts Receivable Enhancements
Customer Maintenance
The Customer Maintenance screen has been modified to allow access to the Customer Analysis. Select “A” when the message Enter #,P(ricing),C(redit),E(di),A(nalysis) L(og),F1=accept,F2=reject is displayed on screen.
This will display the summary screen of Customer Analysis with the customer from the maintenance screen.
Another new option is the (L)og option where you can view a log of changes made to the Customer master

Customer Analysis
Several new options have been added to the Customer Analysis screen:
- Access to Customer Maintenance
- Access to Customer Notes
- Ability to view Detail based on start date entered
- Ability to view Detail from a specified invoice
- Ability to view only open invoices in the detail or all invoices
- Ability to send invoices electronically from the detail screen
- Customers Statement Email displayed on screen
Summary Screen Options:
In the Summary screen of Customer Analysis the options available when a Customer is selected are D(etail),C(ustomer),N(otes),E(xit).
D - Will access the detail screen showing the invoices outstanding for the customer
C – Will go to the Customer Maintenance screen in change mode displaying the customer selected in the analysis screen.
N – Will go to the Customer Note inquiry prompting to the note type to be viewed. Pressing Enter at the note type will display all notes entered for the customer. The option to Add new notes will be available.
Detail Screen Options:
In the Detail screen of Customer Analysis the options available are E(xit),Q(uit),N(xt),P(rv),S(end),D(ate),I(nv),A(ll),O(pen)
Use of the new options:
S – Used to send an invoice electronically. When selected a prompt will display which line number, select the line number display on screen for the invoice to send. This will then display the Invoice email addresses setup for the customer. The invoice can be sent to an email on file or can be entered manually using line 99 which allows entry of the email address.
Note: Only invoices can be sent by email, not other charges such as A/R transactions or Service Charges.
D – Prompts for a start date to view invoices from.
I – Prompts for an invoice number to start at.
A – Display all invoices and payments outstanding
O – Display only open invoices outstanding
Cash Receipts Input
New options available when entering Cash Receipts are F3 to go to Customer Maintenance or F11 to go to Customer Notes. Both of these options are available after the Customer Number has been entered.
Add Inventory from Invoicing
Definition
The option to add parts to inventory from the invoicing screen has been enhanced so when in use, non-stocked parts added to an invoice which are in the price book will automatically be added to inventory after the quantity is entered without user intervention using the category assigned on the invoice.
Processing
Billing Parameter Maintenance
Menu path System Utilities > Sales Desk > Parameter File Reset.
Screen 2
The Reorder Allowed setting for newly added parts from invoicing is controlled by the Default Reorder Allowed setting shown in field 38.
Screen 4
The setting for “Invoice Qty (F11) Key Use” must be set to “I” field 46
Sales Clerk
In the Sales Clerk maintenance, the clerk MUST be set to “Y” for Add Part #’s to Inventory.

Invoicing
When adding a non-stock part from the price book to an invoice the line will display as a “P” line to start. After the quantity is entered the part will be added to inventory using the price and description from the price book then using the price multipliers to calculate the selling prices.
A new screen will display showing a message “Adding Stocked Part” and there will be a slight pause while the part number is being added as it is added to all locations.
As the part number is added to inventory the invoice line type will change from “P” to Space.
The new part will be treated the same as any other stocked part after it has been added
Barcode Quantities
Definition
Counterpoint has been updated to maintain package quantities by barcode for a part used when scanning parts at the point of sale and receiving.
Processing
Product Master Maintenance when selecting to “Maintain Barcodes” or Alt Barcode option allow for entry of the quantity for a Barcode.
When the barcode is scanned in invoicing or RF receiving the quantity on the barcode will be used.
When entering a quantity on a barcode this must be in selling units as that is how it will be received or sold.
Base Price Automated Updates
Definition
The automation to update the Base Price is part of the nightly price updates where the system will look for files that have an effective date of today or prior and will update the Base Price for the part numbers included in the file. Also as part of this update a standard price file will be created with the effective date for the update to Canadian Cost, Price 6. Price 6 cost will be calculated using the current exchange rate for the supplier currency, plus duty applied to the part, plus any percentages assigned for Freight, Brokerage and Other Charges.
The Canadian cost and selling prices will be updated on the date assigned.
In order for the update to Canadian Cost and selling prices to from a Base price, the pricing multipliers MUST work up from Cost, Price 6.
Parameters
Default GL Accounts
System Utilities > System Set-up > Purchasing > Parameter Maintenance > Screen 3 S/O Defaults
System Utilities > System Set-up > Purchasing > Parameter Maintenance > Screen 2 S/O Defaults
All credits and debits rolling into the GL do so in Canadian dollars
Each branch has to have GL codes amended @ the Branch level
Currency Rate
Purchasing > Data Maintenance > Currency Rate
Foreign Exchange Rates are a global setting and can be added or changed in this screen
Fields:
- Code = Currency
- Rate = Exchange Rate
- Update Prices = If the currency rate has changed this should be set to Y if you want to update the selling prices based on the new rate. The update of selling prices for a currenct rate are only performed weekly.
- Last Update = Date that prices were last updated for this currency rate based on a change in Currency Rate
When prices are updated on a currency rate change this also includes Non-Stock products
Supplier Maintenance
Additional fields have been added to the Supplier maintenance for Freight, Brokerage and Other Charges percentages to be used in the calculation of cost from the base price. These are NOT cumulative, the value is calculated and then each value added to the cost after conversion to Canadian Currency.
The Price Level used for the Supplier must be “B” and currency other than “C”
PRODUCT Maintenance Screen
Inventory > Data Maintenance > Master File > Product Master
Fields
Base Cost/Core – Suppliers cost and core price in their currency from price file.
These prices are normally updated with a price file update but can also be entered manually when necessary.
Tax Code | Duty % | Season – Part tax code | duty % for the part which is applied into the landed cost of the goods at the time of PO receipt and when Canadian prices are calculated.
Information required for Automatic Update of base price
The information required to create the Base Price update file is:
- Category
- Part Number
- Base Price
- Base Price Effective Date
- Canadian Price Effective Date
- Supplier Code
- Description
- Duty Rate
- Core Price
The Base price update will apply the new Base price on the base Price Effective Date and will update the Canadian prices [prices 1 – 6] on the Canadian effective date.
Bin Selection in Invoicing
Definition
New feature when using Multiple Bin Locations and wanting to force the users to select the Bin Location that the product is going to be picked from in order to keep the on-hand quantities for each bin location accurate.
Processing
Billing Parameters
New option added to screen 5 of the Billing Parameters “Select Bin Loc. In Invoice” would need to be set to “Y
For Counter Kits where product is kept in multiple Bin Locations the parameter “18. Kit Detail Display” on screen 3 would also need to be set to Y
Invoicing
In the invoice screen the user will be prompted to select the bin location the product will be picked from after the quantity is entered. Bin locations are displayed in descending order based on quantity on hand. Dock locations are shown at the end of the list and cannot be selected, these are information only. A line number MUST be chosen.
Only the Bin Location chosen will be printed on the invoice and the overall inventory of the part will be reduced and the quantity available in the chosen Bin Location.
Exceptions where this screen will not be displayed:
- If a part is only assigned to a single bin location
- If the quantity sold is greater than the quantity available is any single bin location
When selling a “C”ounter Kit the Kit components will be displayed on screen and if any of the components are located in multiple bin locations you will be prompted to select the Bin Location those parts will be pulled from. The components and the chosen Bin Locations will be printed on the invoice.
Invoice Print
The invoice print will only show the bin location selected for a part.
Exceptions:
- No one bin location had enough quantity to fulfil the order and all locations will be printed.
- Invoices created from backorder fulfilment will show the primary bin location
- Web orders will show the primary bin location.
- Automatic Transfers will show the primary bin location
Inventory Update
The on-hand quantity will be updated for the selected bin location.
The on-hand quantity will be updated for the Primary bin location:
- No one bin location had enough on hand
- Invoices created for back order fulfilment
- Web orders
- Automatic transfers
Branch Stock Inquiry
Definition
The Branch Stock Inquiry has been updated to allow the creation of a Stock Transfer to source product from another location. This program is designed to be a multi- purpose tool to view stock in all locations, if multi branch, as well as initiated a TRANSFER between any of the locations, not just the home branch of the user.
Processing
Branch Stock Inquiry
When in the branch stock inquiry screen either from the menu option, Sales Desk à Inventory Queries à Branch Stock, or from the Invoice screen using Shift F4 in the body of the invoice

SCRATCHPAD
The program will maintain a Scratchpad of transfer requests that have not been actioned, based on the User Login ID. This allows the option for the user to leave the program without the loss of any work they might want to action at a later time. If the scratchpad is not empty the user will be reminded each time they enter the program that they have un-actioned requests pending. If the user elects not to delete the scratchpad the program will take them to the Category Field where they can lookup other product.
Viewing SCRATCHPAD
From the Category Field the user can view the contents by pressing the F11 key. To return to the Category Field press the ENTER key with the “Q” showing in the action field.
If there are several transfer requests in the SCRATCHPAD the program will sort them by the FROM/TO sequence.
SCRATCHPAD Maintenance
To change the content of any request enter the line # which will position the cursor in the Qty Field. After the Qty is entered, simply pressing ENTER will retain the original Qty, the cursor will move to the comment line for the part number in question. This can also be changed or the F1 key can be pressed to return the cursor to the action field. The change is automatically saved.
Leaving the SCRATCHPAD
To leave the program use the ESC or F2 key from the Category Field. If there are any entries in the SCRATCHPAD the program will ask if the transfers are to be created. The Default is (Y)es but this can be changed to (N)o. A second question will be asked if the transfers were not created about whether or not the entries are to be kept or deleted. The default is (N)o.
If the transfers are created the system will provide the document number for each transfer before leaving the program.
Category File Listing
Processing
The category file listing has been updated to produce and extract file for import into excel. Menu path inventory > reporting > master file listings > category file.
After clicking the Close Window button in the report viewer, a new option will be displayed to view the listing in excel

Clicking on the “View Category File Listing in Excel” will open the report in excel, providing Microsoft Excel is installed on the PC.
This extract contains additional information from the printed report such as the Modern Sales and Uni-Select supplier line codes.
Clicking the Close Window button will return to the menu.
Change PO Number
Process
Pick Ticket/Z Slip
The process for changing the Z Pick Ticket PO number:
- When closing the Pick Ticket in the SF2 screen from Invoicing will have a new field for the New Po Number

- If you enter a different PO number you will receive the question to “really change [original PO number]? You will need to answer the question with Y or N, the default being Y
- You will then be prompted “really invoice [original PO number]?
- The PO number will be changed on all associated pick tickets
Invoice
To change the Customer Purchaser Order number on an invoice
- In the invoice screen recall the invoice using F3 then keying in the invoice number
- Select the Change option using “C”
- Press Enter through Payment Method, Invoice Discount, Freight
- Make Necessary changes to the PO Number and press enter
- Press Accept (F1) to complete the change.
- A Modified reprint appear if the parameters are configured to print Modified Invoices
Cheque Void Option
Cheque Void
An option has been added to allow the void of a Cheque which will reverse the G/L entries made when the cheque was updated and restore the invoices paid to the outstanding accounts payable
Cheque Void Option
Accounts Payable > Bank Reconciliation > Cheque Void

Enter the original source of the cheque “A” or “M” and the cheque number.
The date, payee and amount will be displayed based on the cheque information in the system.
This feature is only allowed for outstanding cheques.
A report of the cheques voided will be printed when you exit the screen.
For Automatic Cheques all Invoices paid by the cheque that was voided will be added back to the Accounts Payable and an entry made in the General Ledger to reverse the cheque in the current Accounts Payable fiscal period. The invoices will be available for payment is a subsequent automatic cheque run.
Consignment Processing
Consignment Inventory
CounterPoint presents a suite of new features, enhancing the functionality of the system by creating the opportunity to process and track consignment inventory.
Pre-requisites
There are a few basic changes that must be made to the system in order for the consignment options to be activated.
General Ledger
Create a new account for the consignment inventory in General Ledger > G/L File Maintenance > Account Maintenance à Add Accounts. This is an asset account and would normally be numbered just after the existing Inventory account.
Add the new Consignment Inventory G/L account to the financial statements using the menu option General Ledger > Balance Sheet Maintenance.
Sales Desk
The new Consignment Inventory G/L account number must be added to Sales Desk Control > File Maintenance > GL Autopost Account Maintenance. The new field is at the bottom of the list.
Accounts Receivable
A new flag has been added to the customer record found in Accounts Receivable > File Maintenance > Customer File Maintenance called [acct control flag]. Enter a lower case ‘c’ to any one of the 8 fields available to indicate that this customer is part of the consignment programme.
Processing
Original ‘transfer’ of consignment goods
Using Sales Desk à Invoicing/Transfers, create a consignment invoice using a transact type of ‘M’. The paid by will automatically convert to ‘on account’ and can not be changed. There is no difference between entering a normal invoice and entering a consignment invoice.
Inventory will be relieved at the time of the completion of the consignment invoice and the entry will show in the cardex inquiry. The invoice total will be $0.00 since the consigned inventory is only billed to the customer when it is replaced at the consignment site.
The G/L account for consignment inventory will be increased by the cost value of the goods on consignment and is not affected again until or unless the consignment quantity changes.
Replacement of sold consignment goods
Since the quantity on hand at the customers site must equal the agreed upon quantity, periodic billing will be required to replace products sold. This is done through normal invoicing procedures.
Adjusting the consignment inventory
To increase the quantity on consignment, use another consignment invoice (type M). If the quantity is to be decreased, then the consignment invoice is still used, but the line type is ‘R’. A return search is not valid for consignment goods, since they aren’t actually sold yet).
If one consignment item is being switched out for another, the consignment invoice is able to process both ‘sales’ and ‘return’ types on the same document.
Reporting
A new report has been created in Inventory Control > Inventory Reports > Additional Inventory Reports > Consignment inventory list which will provide information on all consignment products. The report may be printed for all (or single) customer, all (or single) categories, in detail or in summary, showing costs or not. As well as information on the quantity on consignment and the date of the original consignment invoice, the last 12-month sales quantity information is provided to assist with analysis.
If a new customer record was created for the consignment programme, the 12-month sales history will be new as well.

Core Bank Enhancements
Review of Core Billing Process and Enhancement for billing Overdue Cores Not Charged for at Time of Sale
Selling Cores
Selling products which carry a core charge. This is a value that is contained in the product master record at cost. By default, any item that has a core value will automatically add this to the price the item is being sold at. The system has the ability to sell cores at a price other than cost by the use of the Core Markup routine found under Customer Pricing. This works on the basis of a markup over the cost price carried in the inventory master and can be applied either by a percentage or a flat dollar amount. In addition, the markup can be applied by:
- All Customers all categories
- All Customers by specific category(s)
- By Customer for all categories
- By Customer by specific category(s)
Customer Core Pricing setup
When a product with a core is sold the system determines if the customer selected is set to be charged the core at the time of sale or not. This is controlled by whether a specific type of entry exists in the core markup database. An example of where customer 123456 is not to be charged for cores at the time of sale would be a record in the database showing the following:
- Customers account number=123456
- A specific Category or All Categories
- % as the Type of Markup
- -99 as the Percentage
- N for no rounding
If a customer is not to be billed for cores at time of sale on any product category one entry in the database will accomplish this. An important point to remember though is that while one entry in the database will create the global default for a customer exceptions can be handled by additional records that control specific exceptions. An example of this could be Customer 123456 is exempt from paying for cores at the time of purchase on all categories other than products contained under Category RAY. For this category the customer might be required to pay for cores at a 50% markup over cost. A second entry in the core markup file would look like this:
- Customers account number=123456
- Category=RAY
- % as the Type of Markup
- 50 as the Percentage markup (If the core is to be charged at cost this field would be zero)
- N for no rounding of cents
Core billing
If a customer is billed the core on an invoice the system creates a record in the Core Bank database. This allows future validation for returns as it contains the invoice detail, including the qty and price charged as well as core cost. For those customers that are set up as being exempt from core charges at time of sale, or where the core charge is set to zero at the time of sale, the system will still create an entry in the core bank but with a zero in the price charged field. This results in a margin impact as the core cost is still charged against the cost of the sale.
Example
Part # 5555 sells at $50.00 and no core is charged although has a core cost of $10.00. The cost of this transaction is Average cost of $30.00 plus the $10.00 core cost for a total cost of $40.00 on the $50.00 reported as the sale amount. Had the customer been charged the core the transaction would report a higher gross margin, Sell = $60.00, Cost = $40.00.
Core Returns
A core is processed through the POS as a C line type. The user is prompted to select the invoice the core was sold on in order that the system can credit the correct price. Irrespective of whether the core was charged or not the Qty of cores outstanding is still adjusted by the Qty returned. The return can be applied against any invoice containing the part number in question that has a core qty balance outstanding.
Unbilled Core Management - Enhancement
For those customers not charged cores the system has now been enhanced to support the automatic billing of cores where the customer has exceeded the return grace period. The number of days, from the original billing date, is customer specific assuming the maintenance has been done on the customer’s master record. In addition, there is a second new customer flag that controls whether the customer would fall into the Auto Bill process or not.

Electronic Statement Set up
The customer’s master record will also contain a new transaction type of C that will allow the direction of the core statement to a unique email address. This would be set under the EDI Info section. In addition, there will be a copy of the customers email sent to a pre-determined internal email, unique by branch.
Overdue Core Billing Menu
The overdue Core Billing menu options are found through Sales Desk > Administration > Overdue Core Billing.
Overdue Core Billing Parameters
Aging dates, Statement Message and Email Subject Line along with the internal email address for statements are all controlled in the Core Billing Parameters

Processing Flow
- Mid month the Customer Core Statement will be created on demand using the Extract Overdue Cores option which will:
- Create an electronic or hard copy statement for each customer with outstanding cores, Email Statements = Y. It will show all cores outstanding as well as the number of days they will be outstanding as of the last business day of the current month. A message on the statement will advise the customer that those cores showing as overdue will be billed at month end if not returned before that date.
- Electronic copies will be emailed or faxed per the customer setup and copies will be emailed to the internal email address in the Core Billing Parameters.
- Month End the outstanding core billing process will be run and create a pre-billing work file for review. The Extract Overdue Cores option will be run again but the Email Statements = N
- The user will have the option to review on screen, through the Select for Billing option, customers will be billed for what cores. Any item may be deferred which means it will appear on the next months statement if still outstanding. Once the review is complete and accepted the system will automatically create invoices for all outstanding cores that were not deferred.
- The screen detail will be as follows:
- Branch
- Customer
- Category
- Part Number
- Description
- Invoice Number
- Invoice Date
- Overdue Quantity
- Value (Core Value for selling these cores will be at the default Core Markup for All Customers and all categories)
- number of days overdue from the due date of return
- Defer Billing Y/N
The system will automatically retire the entry in the core bank that is carrying a zero core value based on the invoice number shown on the billing screen. In addition, a second record will be added to the core bank carrying the new invoice number and the core value as calculated above.
Internal Reporting
In addition to the customers core statement there will also be a consolidated report available for branch use that is generated at the same time as the customer’s statements are produced.
Enhanced On-Demand Outstanding Core Report
The current routine has been enhanced to offer the following options:
- Customer detail (Y/N)
- Part # detail (Y/N)
- Starting Customer
- Ending Customer
- Starting Category
- Ending Category
- Starting Part #
- Ending Part #
- Start date
- Branch # (1 or all)
- No Charge Only (Y/N)
Credit Check Enhancements
Invoicing Credit Check
The use of Credit Limits through the point of sale has been parameterized to prevent any sale that goes over the customers credit limit or the current option to display a message advising the user if a customer is going over their credit limit and giving the user the option to complete this sale.
These parameters are found in Screen 1 of the Billing Parameters menu option System Utilities > System Setup > Sales Desk > Parts Billing Parameters fields 19 and 20

Invoicing
If parameter field 19 is N then no credit checking against customer credit limits is done.
If parameter field 19 is Y and field 20 is BLANK or N the user will be prompted with the question to allow a sale to take the customer over their credit limit.
The user will see the first message that the customer is “Now over credit limit” when they accept the invoice lines entered
And when the user does the final accept, they will receive a second message “Allow sale over credit limit? (Y/N)” which they must answer with a Y or N.

The new update is when parameter fields 19 and 20 are both set to Y.
In this situation when an invoice takes the customer over their credit limit the user will see the same first message as above “Now over credit limit” when they accept the invoice lines entered.
When they do the final accept of the invoice which will take the customer over their credit limit they will see a new message, “Over Limit Save as Quote? (Y/N)” that must be answered with Y or N.

If it is saved as a Quote the PO number will be changed to “CH” so these credit hold Quotes can be easily searched when recalling the customer and the quote will be printed for reference.
If a PO number was entered on the original invoice this will become a comment line on the Quote “CH FOR: [PO Number]”
If a Quote is recalled that will take the customer over their credit limit the user will receive the same questions to save as a Quote again.
When creating an Order, the user will see the messages that the customer is “Now over credit limit” and then “Allow sale over credit limit? (Y/N)” when doing the final accept. When the Order is invoiced if this still takes the customer over their credit limit the user will be prompted to save as Quote as shown above. The user can reject from this and leave the Order outstanding. The amount of outstanding orders in the system do affect the available credit for a customer.
If a customer is over their credit limit when starting an invoice, the Credit Rating will be COD or HOLD based on the setting in the Accounts Receivable Parameters forcing the sale to be paid by some form of cash or prohibit selling using the customers account number.
Cross Dock HTML Pop-up
View of On Order and Cross Dock Quantities
New HTML Pop-Up
A new Pop-Up has been added to COUNTERPOINT for viewing of all Branch On Order and Cross Dock quantities.

This information will be available for all parts except Kits and will be refreshed nightly
Product Maintenance and Inquiry
The Product Maintenance and Inquiry screens have been updated to view this information by clicking on the magnifying glass icon in the On Order description.

Branch Stock Inquiry
The Branch Stock Inquiry screen has also been updated to view this information by clicking on the magnifying glass icon on the On Order description.

Invoicing
The Invoice screen has also been updated to view this information by clicking on the magnifying glass icon on the On Order description.

Daily HTML extract
The Daily HTML exports has been updated to include a new column indicating the Cross Dock quantities. This is in Column R with heading DC Cross Dock
Customer Notes
Customer Notes
New programmes have been added to accounts receivable for adding and inquiring into free- form notes for a customer. The inquiry into customer notes has also been added to the sales desk menu.
There is a total of 6 note types, spread across two styles: reserved and non-reserved, with a maximum number of reserved note types of three (3). Customer notes are date and time stamped during entry and then assigned to a particular type. There may be many notes of the same type attached to the same customer.
The use of “A” type notes will display automatically as a customer is selected in the invoice screen.
The other reserved or default note types are “B” and “C”.
Creating a new Note type
Adding notes to customers
To add a note to a customer, use the menu option accounts receivable > DATA MAINTENACE > customer notes (add). A TAB to search is available from the customer number field. Only A/R customers are available for notes, not VIP customers. The note is date and time stamped and the user is prompted to classify this note with a particular type.
When the note text has been completed, press [enter] to complete the field, then [F1] to accept.
Changes are allowed at the any change? prompt. Entering the line number for change will bring the user to the beginning of the line. If the first field of the line requires no change, pressing [enter] will advance to the beginning of the second field/section on that same line. Changes to notes are also available from the change notes menu option. A note that has been assigned to a reserved type may still be deleted.
Viewing/Adding Customer Notes
Accounts Receivable > Inquiry Functions > Customer Analysis
Accounts Receivable > Inquiry Functions > Customer Notes Inquiry
Sales Desk > Customer Queries > Customer Analysis
Sales Desk > Customer Queries > Customer Notes
Sales Desk > Invoicing – Press Shift F11 from the Customer field or from the Line Type
Accounts Receivable > Transaction Processing > Cash Receipts Processing > Cash Receipts Input – Press F11 after the Customer is entered
Enter the customer number or use the search option to find the customer then select a note type or press enter to view all notes for the customer.
Notes are displayed in date sequence with the most recent first
Print Customer Notes on Invoices
The ability to include Customer Notes has been added to the invoice print. This requires that a Note Type be added with the setting to Print on Invoice = Y. These notes will print in the body of each invoice for the customer.
Note Type Maintenance
A new Note Type must be added to the system to identify which notes are to be included on the invoice. This is done using the menu option Utilities > System Setup > Accounts Receivable > Note Parameters. Use “1. Add Type” and use a letter or number as a code (eg “P”), assign a description and set Print on Invoice to “Y”.
Customer Note
Notes for the customer can be added through Accounts Receivable > Data Maintenance à Customer Notes or through the Invoice Screen using Shift F11 from the “customer #”. When adding the note use the type setup above and enter the text to be printed on the invoice.
The invoice will only print the first 40 characters of each line of the note text
If multiple print type notes are setup for a customer, all of them will print on each invoice.
Customer Notes Enhancements
Customer Notes
New programmes have been added to accounts receivable for adding and inquiring into free-form notes for a customer. The inquiry into customer notes has also been added to the sales desk menu.
There is a total of 6 note types, spread across two styles: reserved and non-reserved, with a maximum number of reserved note types of three (3). Customer notes are date and time stamped during entry and then assigned to a particular type. There may be many notes of the same type attached to the same customer.
The use of “A” type notes will display automatically as a customer is selected in the invoice screen.
The other reserved or default note types are “B” and “C”.
Creating a new Note type
Adding notes to customers:
To add a note to a customer, use the menu option accounts receivable > DATA MAINTENACE > customer notes (add). A TAB to search is available from the customer number field. Only A/R customers are available for notes, not VIP customers. The note is date and time stamped and the user is prompted to classify this note with a particular type.
When the note text has been completed, press [enter] to complete the field, then [F1] to accept.
Changes are allowed at the any change? prompt. Entering the line number for change will bring the user to the beginning of the line. If the first field of the line requires no change, pressing [enter] will advance to the beginning of the second field/section on that same line. Changes to notes are also available from the change notes menu option. A note that has been assigned to a reserved type may still be deleted.
Viewing/Adding Customer Notes:
- Accounts Receivable > Inquiry Functions > Customer Analysis
- Accounts Receivable > Inquiry Functions > Customer Notes Inquiry
- Sales Desk > Customer Queries > Customer Analysis
- Sales Desk > Customer Queries > Customer Notes
- Sales Desk > Invoicing – Press Shift F11 from the Customer field or from the Line Type
- Accounts Receivable > Transaction Processing > Cash Receipts Processing > Cash Receipts Input – Press F11 after the Customer is entered
Enter the customer number or use the search option to find the customer then select a note type or press enter to view all notes for the customer.
Notes are displayed in date sequence with the most recent first
Print Customer Notes on Invoices
The ability to include Customer Notes has been added to the invoice print. This requires that a Note Type be added with the setting to Print on Invoice = Y. These notes will print in the body of each invoice for the customer.
Note Type Maintenance
A new Note Type must be added to the system to identify which notes are to be included on the invoice. This is done using the menu option Utilities à System Setup à Accounts Receivable à Note Parameters. Use “1. Add Type” and use a letter or number as a code (eg “P”), assign a description and set Print on Invoice to “Y”.
Customer Note
Notes for the customer can be added through Accounts Receivable à Data Maintenance à Customer Notes or through the Invoice Screen using Shift F11 from the “customer #”. When adding the note use the type setup above and enter the text to be printed on the invoice.
The invoice will only print the first 40 characters of each line of the note text
If multiple print type notes are setup for a customer, all of them will print on each invoice.
Customer Part Numbers
Description
The customer part number is used to allow you to print your customer’s part number on an invoice along with your own part number. Typically used where the customer has an internal number that they use for their own stocking purposes. The customer must be identified as having their own part numbers. This feature only works with Stocking Part Numbers
Customer Maintenance
The customer must be identified as having their own part numbers which is done through the Customer Maintenance by adding an “A” into one of the Account Control Flags.
Customer Part Number Maintenance
Customer Part Number maintenance is done through Inventory > Data Maintenance > Utilities à Setup Customer Part #'s. The customer MUST be setup before trying to enter the part numbers. When adding new part numbers you can enter past the Category field and enter the part number. If there are multiple categories you will have to select the proper category.
A Customer Part must be entered and the description is optional

In the invoice screen when creating an invoice for a customer assigned Customer Part Numbers, if you enter the customer’s part number it will be translated to your part number.
After entering the part number then pressing Enter the stocking part number is displayed. If the stocking part number has substitutes you will be prompted to select from the list
Both the stocking part number and the customer’s part number will be printed on the invoice. The customer’s part number will be on a separate line with a comment “customer part#”
Process EDI Invoices
Definition
When EDI Invoices are received from the vendors that invoices will be processed and added to the new EDI Transaction List available for selection and processing.
Processing
Vendor Maintenance
Vendor Maintenance has need modified to allow entry of the Vendor EDI ID and the Vendor Currency. The EDI ID is provided by the Vendor/Supplier when setting up for EDI.

Note: only EDI invoices received from Vendors with a matching EDI ID to what is setup on the Vendor will be processed. This setup is separate to the setup of the Suppliers for placing purchase orders as there can be many Suppliers for a single Vendor.
EDI Transaction Selection
This option will list all of the received EDI invoices not yet processed or show a summary of invoices received for a selected vendor or all vendors.

Using the tab or clicking the magnifying glass in the first screen will launch the Vendor Search
Using F3 will display the Vendor Summary screen where a summary of the number of invoices and total value is displayed by Vendor.

Once again, the Vendor Search is available using the TAB key or clicking on the magnifying glass.
Pressing the Enter key in the Vendor field will display a summary for all vendors.
Exit will exit back to the Vendor Invoices screen, Quit will allow the selection of a new Vendor, entering a line number will select that Vendor and display the invoice details on the Vendor Invoice screen.
In the Vendor Invoice screen all available invoices for the Vendor will be displayed and you will be prompted whether the invoice should be selected to add to a transaction batch. The Select Options are Y to have the invoice added to a transaction batch for posting, N or blank to not select and leave the invoice available for future selection or D to Delete the invoice from the selection screen. The delete option would be used if the invoice was processed manually or received in error.
Using Accept after the invoices have been selected will prompt “create transaction batch N”, changing the response to Y will append to the users A/P Transaction batch.
If invoices are being deleted a prompt will be displayed “delete flagged invoices ? N” changing the response to will delete the invoices so they will no longer appear on the selection screen
The transaction batch created will use the following information:
- EDI document Invoice Number to Invoice Number
- EDI document Invoice Date to Invoice Date
- Edi document PO Number to Reference Number
- Payment and Discount Days are from the Counterpoint Vendor Setup and the day of the following month.
- Financial is the current Counterpoint financial period.
- EDI document Invoice Amount to Invoice Amount.
- EDI document tax value to Federal Tax Amount.
- Distribution to the Vendor Default GL Account
Any required adjustments can be made through the regular Transaction Input option and the edit list is available prior to update for review.
The update of these transactions would be done through the normal Transaction Update option.
EOQ & ROP Calculation
Ranking Table
- Product Ranking Table for Corporate and by Branch including required Turns and Safety Stock Factor based on Annual Sales Dollars or Units.
- Use of dollars or units determined by billing parameter setting.
Purchasing Parameters
- Default Timer for new product added
- Weeks Active
- Number of Weeks with Activity
- Weighting Weeks
- EOQ and ROP rounding
- ROP and EOQ corporate or store
- Use Demand Smoothing
- Internal Review
- ROP/EOQ Use – DC or Corporate
- Branch Replenishment from DC – B/S/N
Ranking Calculation
- Ranking calculated based on Unit Sales or Dollar Sales according to Billing Parameter setting screen 4 – Sales Rank Basis (U/$)
- Run once for all locations
- Calculate Active Weeks from first receipt date to current date
- Ignore items without a first receipt date
- Calculate sales value by week for weighting weeks using invoice costing based on billing parameter setting, screen 2 invoice costing Average or Last (P6)
- Sum these values and the rank will set when the total sales value is less than the next value in the rank parameters.
- The sum of the sales value for all branches is used to calculate the corporate sales rank
Calculate EOQ Values
- This is done for each branch separately
- Age Week Sales
- If Reorder Allowed = N, S or K do nothing
- If Reorder Lock not 0 do nothing
- Calculate the Active Weeks
- Only done for products that have a first receipt date
- Active weeks from First Receipt to current
- If the Active Weeks is > Weeks Active parameter use the parameter value
- If the Active Weeks is 0 do nothing
- Calculate Annual Unit Sales = previous 52 weeks sales.
- If Active weeks is < 52 calculate annual units as sum of previous 52 weeks * 52 / Active Weeks.
- Weeks with Activity = Weeks in Active Weeks that have sales not = 0
- If Weeks with Activity < Number of Weeks with Activity move zero to Vendor and Transfer EOQ
- Assign the EOQ
- Based on the ranking parameter for the part divide the annual unit sales by the turns parameter giving the EOQ Vendor and Transfer.
Calculate Lead Time by Part
- Use the number of receiving’s set on the supplier record. If blank or 0 then default of 8 is used
- Calculate the average lead time for the most recent number receiving’s of the part.
- Compare the average lead time to the highest number of days and add the lower of the difference or 25% of the average lead time.
Calculate ROP Values
- Use DC lead time from branch record.
- If Lock value = 99 do nothing
- Does not use RANK-CUTOFF value
- Reduce the lock value by 1
- Calculate active weeks from first receipt date to current date
- Sum the sales units for the Weighting weeks.
- Compute the daily sales = total sales by week / (weighting weeks * 6). It was decided early on that only 6 business days per week should be used for the daily sales calculation.
- Using the sales ranking and lead time for the part calculate the Vendor ROP. Daily Sales * (Lead Time + Internal Review Time). Round this value based on Purchasing Paramenter settings. Add safety stock percentage and round again.
- Calculate the DC ROP value as Daily Sales * DC Lead Time, then round based on purchasing parameter setting. Add safety stock percentage and round again.
Calculate Corporate Values
- Add the Vendor EOQ for all locations and put the total as the Corporate EOQ
- Add the Vendor ROP for all locations and put the total as the Corporate ROP
Daily Suggested Order
- The daily suggested order calculation can be based the DC or Corporate ROP/EOQ
- Recalculates for all parts each day with the exception of parts on outstanding suggested orders where the order quantity has been modified and not ordered yet.
- Suggested order will buy direct to branch based on supplier setting
- Do not order product set as N for reorder allowed unless there is a customer backorder.
- DC available quantity for replenishment to branches calculated based parameter Branch Replenishment from DC.
- Transfers it the quantity available is equal to or less than the ROP DC order the DC EOQ – Qty Available + ROP DC base on DC Available Quantity. Use branch purchase quantity for transfers
- Corporate Vendor Orders compare the DC available quantity to the Corporate ROP and order when the available is less that the corporate ROP
Fleet Part Tracking
Fleet Tracking Setup
The Billing invoice screen has a built in Customer Fleet Part Tracking module. This module allows the counter staff to in affect build customer, unit, specific electronic catalogues. The creation of these catalogues can have a dramatic affect on the accuracy and speed with which counter staff can service parts requests on a customers fleet vehicles. The fleet part tracking is available from the LINE TYPE field on any invoice line while building an invoice by hitting Shift/[F10]. Doing so will launch the following screen.

If this is the first time you have launched fleet part tracking on the system you will need to take the (M)aintain records option. Which will change the prompts at the bottom of the screen to read as follows.
“(E/P/G) Equipment, Parts , or Groups”
If this is the initial launch of Fleet Part Tracking take the (G)roups option, which will bring up the Add Change Delete Screen. Select ADD which brings up the following screen.

Sub Groups are required to support future reporting potential, so in this case you can make the subgroups very simplistic if you choose. For example if your operation sells HD parts and well as automotive and light truck you may want to set up only two sub groups being AUT and HD as shown below.


Once your groups are set up you will only need to return to this screen if you decide to change the basic groups that you set up. Upon Completion of the Groups Maintenance hit [F2] to exit this routine which will return you to the initial screen. As shown below.

Note that the prompt at left bottom starts with “No Records” This is an indication that this customer, has not had any vehicles added to his fleet. In this case take the M(aintain Files) option then select The Equipment option which will bring up the Add/Change/Delete screen. Selecting Add brings up the following screen

Enter Data as outlined below.
Description – Enter a meaningful description of this vehicle. Try to use the description that the customer will relate to as they will likely tell the counter staff that they are working on the “old red beast” or some other such internal name for this unit when they call in for parts.
Year – Yr of Vehicle.
Make – A three digit Alpha code for the make of the vehicle. Hit TAB to see a list of valid Car and Light Truck models. If the Unit is not automotive/light truck (ie a Heavy Duty or Construction vehicle) simply enter in the information required.
Model – A three digit Alpha code for the model of the vehicle. Hit TAB to see a list of valid options. If the Unit is not automotive/light truck (ie a Heavy Duty or Construction vehicle) simply enter in the information required.
License Plate, VIN, - Fill or leave blank as appropriate you your use
Unit Number – Typically a customer assigned number or name for this vehicle.
Odometer – Optional Enter if required. When field is accepted cursor to skip down to Remarks field.
Last Service, Last Invoice Number – These fields are system maintained from the repair shop module if it is used.
Fields 19 thru 14 - Reserved for Future use. No entry is required or possible in this screen.
When all fields are complete and you are happy with the results hit [F1] to add this vehicle to the customers fleet. If there are no other units to be added to this fleet, hit [F2] to exit the program. This will return you to the Fleet Vehicle list page.
Select M(aintain) and then select PartsList enter Add/Change/Delete as appropriate which will bring up the screen as shown on the following page.

Enter Data as follows
Customer – Entered by the system.
Customer Unit Number – Enter the unit number or name that the part(s) you are about to enter will be used on.
Product Group – Enter the Product Group that the entered parts will have sales data captured under. (ie HD or AUT in this example)
Category – Cursor will skip this field and auto fill when you enter a part number. In the case where the part exists in more than one category you will need to select the correct category from the displayed options.
Part Number – Part number used on the specified vehicle.
Quantity Required – Enter the quantity required in this units use of the part.
Comment – Optional Enter a free form comment that will assist in ensuring this part is correctly chosen when the request comes in (ie “Used on the PTO for the hydraulic pump”) or something similar.
When you are happy with the screen hit [F1] to accept the entry.
Repeat for all other parts used on this Unit. When done hit [F2]
This completes the set up of a Unit and it associated parts.
Using The Fleet Part System Within COUNTERPOINT
When a customer calls in for parts and identifies that these are for a unit in his fleet proceed as follows.
- Set up the invoice for the customer as normal (ie enter customer number PO if required and your customer number.
- When the cursor is in the Line Type field hit Shift/[F10] which will bring up the customer fleet list similar to that shown below.

- Select the appropriate unit as specified by the customer which will bring up the parts list. As shown below.

- Enter line number(s) corresponding to the parts you need to sell. Note that as you select line numbers the program moves selected lines to the space just above the “Maintain files” line.
- When you have selected all required parts hit “E” to exit the screen and move the parts in the quantities specified at the customers prices onto the invoice.
Notice that the parts list displays the quantity on hand and the quantity required for each part.
If you need to add, delete or change a part for this unit it can be done at this point by entering M to launch the maintain files routine.
Foreign Currency
Foreign Currency
Purchases made outside Canada can be purchased in the foreign countries’ currency
In addition to the currency enhancement, three additional fields allow the system to roll into the average cost @ the time of Purchase Order Receipt, Freight, Brokerage and Additional Costs. These values can be entered as part of the PO receiving or as a default % in the Supplier Maintenance screen. In addition, where Duty is applicable @ the part level, this cost rolls up as a part of the cost
Default GL Accounts
System Utilities > System Set-up > Purchasing > Parameter Maintenance > Screen 3 S/O Defaults and Smoothing
System Utilities > System Set-up > Purchasing > Parameter Maintenance > Screen 2 System Configuration
All values posted into the GL are in Canadian dollars
Each branch has to have GL codes amended @ the Branch level
Foreign Exchange Rate
Purchasing > Data Maintenance > Currency

Foreign Exchange Rates are a global setting and can be added or changed in this screen. This can also be used where there is an uplift from the supplier or additional changes are incurred such as freight. Adding a currency code other than “C” with an exchange rate of 1.0000 and assigning supplier to this code allows for updating of P6 cost and selling prices based on the base cost allowing purchase orders to be issued with the accurate supplier cost.
Fields
1 – Code = Currency
2 – Rate = Exchange Rate
3 – Update Prices = If the currency rate has changed this should be set to Y if you want to update the selling prices based on the new rate.
The automatic price update for currency rate changes is typically scheduled to run weekly on Sundays.
4 – Last Update = Date that prices were last updated for this currency rate based on a change in Currency Rate
Supplier Set-Up
Purchasing > Data Maintenance > Supplier

While the Exchange Rate is global the Supplier Maintenance screen is where you select the currency you are going to buy in.
Fields
19 – Currency; select currency
21 – Price Level = Base; the field in the Inventory Maintenance screen the supplier’s price is displayed from their price list
- Enter “B” in this field for all foreign exchange suppliers
29 – Update Last Cost to Inventory Y/N; at time of PO receipt “Y” will update Canadian selling prices “N” will not update selling prices but average price is updated.
34 – Freight Percentage: is a default percentage for freight costs.
35 – Brokerage Percentage: is a default percentage for brokerage fees
36 – Other Charges; any additional costs such as a pallet cost or insurance
These default costs are applied to all parts received from the supplier in the calculation of the landed cost to update average cost and when Canadian cost [Price 6] and selling prices are calculated during the Base Cost update
Inventory Maintenance Screen
Inventory Data Maintenance > Master File > Product Master

Fields
Base Cost/Core – Suppliers cost and core price in their currency from price file
Tax Code | Duty % | Season – Part tax code | duty % for the part which is applied into the landed cost of the goods at the time of PO receipt and when Canadian prices are calculated.
Purchase Order
Foreign purchase orders will print with the supplier’s base cost

Purchase Order Receipt
Purchasing > Purchase Order Receipt > PO Receipts Input

Fields
Currency – the currency the purchase order was created in and the current exchange rate for that currency.
Price Level – relating to the Supplier, “B” = Base Price
Freight – freight costs are entered here, are spread evenly across all SKU’s on the purchase order and are in CDN dollars
Brokerage – brokerage costs are entered here, are spread evenly across all SKU’s on the purchase order and are in CDN dollars
Other Costs – any other cost associated with the acquisition of the PO can be entered here and are spread evenly across all SKU’s on the purchase order and are in CDN dollars
If these values are left blank the percentages assigned to the supplier, if any, will be used to calculate approximate costs.
PO Receipts Journal
The PO Receipts journal will include these additional costs

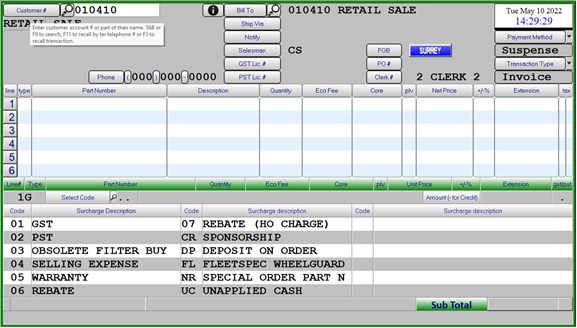
General Charges & Core Handling
Definition
General charges are a new line type in the COUNTERPOINT invoicing program which allows you to include amounts on the invoice which do not impact inventory or apply standard comments to an invoice. The charges can be automatically applied to all transactions based on a percentage up to a maximum value or a set dollar amount. General charges can also be added to an invoice manually. This feature will also allow deposits to be added to Order transactions which will automatically reduce the amount owed when the order is completed and turned into an invoice.
Processing
General Charge Codes
The maintenance of General Charge Codes is found through System Utilities > System Setup > Sales Desk > General Charge Code Maintenance.
A maximum of two characters is used for the code. The description used will be put on the invoice when the code is used. The Type can be a $, % or C for a standard comment. The charge can either be setup as a percentage or as a dollar value. This is used for automatic charges and deposits. For manually added charges the value would be left at zero. If a percentage charge is to be capped at a certain value that would be entered in the maximum value. The tax codes are based on the values setup in the Billing Parameters. If levies are to be included in the calculation of an automatic charge this flag must be set to Y. Deposits are not to be set as an automatic charge. If the “enter text” setting is Y the user will be able to alter the comment which will be printed on the invoice. If the value is allowed to be changed or entered manually the “enter value” setting must be Y. In the case of a return the date range is also used to determine if an automatic charge should be refunded based on the original purchase date.

Customer Maintenance
Customers that are exempt from Automatic general charges require a “G” be entered in one of the “account control flags” in the customer maintenance screen.
Invoicing
Any Automatic charges will be added as the last line on an invoice when the body of the invoice is accepted. If new lines are added later, the value of the automatic charge will be adjusted to reflect the new total of the invoice. Should an automatic charge be adjusted manually it will not be altered if any other changes are made to the lines on the invoice.
To enter a general charge or standard comment manually use the new line type of “G”. This will display a list of up to 18 codes in the information window or you can use the TAB key to search additional codes
Deposit type codes may only be used on Order transactions.
Comment codes will have no value associated with them.
When taking a deposit for products that will be delivered at some future time you must use a transaction type of “O”rder. The items being purchased are to be added to the order as Backorder (Normally stocked items) or a Special Order (Non Stocked/Pickups) lines. When the items have been added enter a “G” line for the deposit and select the deposit code which has been setup. Providing the deposit code has been setup with a percentage the amount of deposit required will be shown on the screen. This can be changed if necessary providing the code has been setup to allow the value to be entered.
When recalling the order and turning it into an invoice the value of the deposit amount will automatically be reversed so the total owing will reflect the price of the items less the amounts previously received. If a customer returns to make additional deposits the original order must be recalled and the second deposit added to the order.
Customer Backorders
When a backorder is being fulfilled upon receipt of the product and an invoice is created the standard comments contained on lines 1 through 3 of the original transaction will be included on the fulfillment invoice.
Invoice Register
The total value of any Freight and General Charges will be shown on the invoice register in the relabelled column “Freight /Oth Chgs”.
Gift Receipts
Parameter Maintenance
The use of Gift Receipts in Counterpoint is controlled by settings in the Billing Parameters, System Utilities à System Setup à Sales Desk à Parts Billing Parameters à Screen 5.
Field 1 = Y/N for the use of Gift receipts in the store.
Field 2 = Y/N for the default on the printing of Gift Receipts
Fields 3 – 14 = Single Character for alignment of the message on the receipt
C = Center
L = Left
R = Right
Up to 40 characters of text over 6 lines to be printed on the Gift Receipt
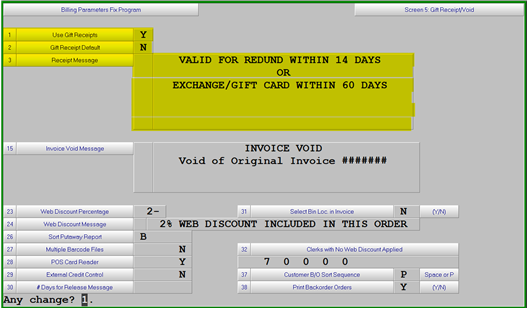
The message is optional and “GIFT RECEIPT” will be automatically printed in the same position as the “DUPLICATE” message is printed on the invoice
Invoicing
If the use of Gift Receipts is turned on in the parameters the message when completing and invoice will show as – “Header,Line#,Cust#,Footer,GiftRec N ?”. The parameter setting for the default print is the last character in the message. In this case the parameters are set to not print a Gift Receipt automatically. To change this on the individual invoice press “G” then Gift Receipt could be changed to Y to have the additional copy printed when the invoice is completed.
Should a Gift Receipt be required after the original invoice has been created you would recall the invoice by pressing F3 from the Customer # and keying in the invoice number, or if it was the last invoice generated that would already be displayed on screen and you would just need to press ENTER. The message at the bottom of the screen would be “Change,Reprint,Void,GiftRec Y ?”, press “G” and the message “gift receipt (Y/N),R(eprint)?” will appear where you can select “R” to Reprint. You could also use the F11 Alt Print to redirect to a printer other than the default printer or to email/fax the Gift Receipt
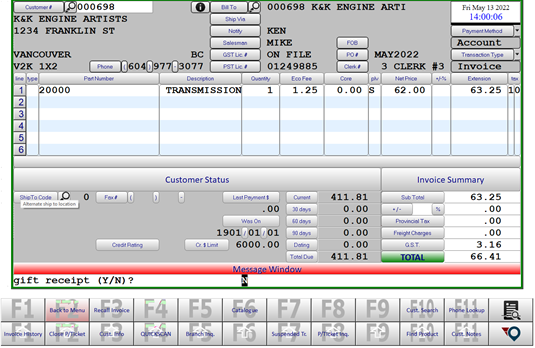
If desired Gift Receipts can be defaulted to print on an alternate printer using the Printer Profiles system utilities > system setup > sales desk > printer profiles. The Gift Receipt printer ID would need to be changed to the desired printer ID.
GL Budget Upload
Processing
Load Budgets
The Load Budget option, General ledger > Data maintenance > Load budgets, requires a spreadsheet file containing the monthly budget values first be saved to Z:\html\gl1 as a tab delimited text file named GLBUDGET.txt.
Notes:
- An excel template is available named Z:\html\gl1\GLBUDGET.xltx
- Credit values must include the “-“ sign
- Please do not include “$” or “,” for thousand separators in any of the values
- Only accounts included in the file will be updated
- Not all GL accounts need to be included
- All GL Budget values will be cleared before the new ones are loaded.
- Any errors found during the upload will be included in the upload report created.
Invoice Price Change Restrictions
Definition
Counterpoint has been updated to provide the ability to restrict Sales Clerks from changing prices. For this process to work it is required that all users have a unique login ID for Counterpoint.
Processing
Clerk Maintenance
The User Login ID can be assigned to a clerk and this will force the clerk number used on the invoice based on the Login ID. They will not be able to change the clerk number when processing an invoice or credit note.
The Sell Below Cost option prohibits the clerk from selling below cost.
The Invoice Prices options are:
- Y – Display the price level in the information window and allowed to view/key on the invoice line
- N – Do not display in the information window and do not allow entry in the invoice line
- L – Do not display in the information window but allow entry in the invoice line to see the price value.
Disallow Price Changes will prevent the clerk from changing prices without the entry of a PIN code by a user that IS allowed to change prices. The Disallow Price Changes field MUST be set to N in order for a clerks PIN # be allowed to authorize a price change.
For these changes to be effective those clerks authorized to changes price should reset their PIN #’s and keep them private.

Invoicing
With the Sales Clerk Login ID assigned the clerk number will be automatically entered after the customer is entered. Using the Field Up, Field Down or Enter will not allow access to the clerk field of the invoice, therefore preventing them from changing the number to be allowed to change prices.
If the Sales Clerk is set to Disallow Price Changes, when entering an invoice line the clerk will be prompted to “Enter pin #:” if there has been any changes to the price or discount when the line is completed.
The options at the “Enter pin #:” message are:
If the sales clerk is not allowed to change prices and the Customer number is changed on an invoice, they will no longer be offered the option to Recalculate the prices, the prices will be recalculated automatically based on the new customer on the invoice.

Kit Maintenance
Definition
Kits
A KIT is defined as either a COUNTER KIT: one that is created at the time of sale, or a MANUFACTURED KIT, one that is created and placed on the shelf ready for sale. A COUNTER KIT has no inventory on hand, a MANUFACTURED KIT does.
A kit item may belong to any category, or a separate category may be created for manufactured kits, if desired. There is no difference between a regular category record and one that is created for kit items.
Processing
Add the Kit Part Number
Identifying a kit item involves two steps. First, enter [K] (not displayed as an option) in the REORDER FIELD on the item record in INVENTORY > DATA MAINTENANCE > MASTER FILES > PRODUCT MASTER. Then differentiate the item as a COUNTER [C] kit or a MANUFACTURED [M] kit in the KIT TYPE field directly below. The remainder of the fields may be set up as usual.
If the part is being manufactured in one branch only the reorder type can be changed by branch in the MAINTAIN BRANCH INFO screen. This scenario would not apply to Counter kits.
Attach Components to the Kit
Once the kit item has been created and [F1] accepted, the user is prompted with MAINTAIN KIT DEFINITION? If [N], the function is complete and the user is able to add a new kit number. The kit definition will have to be set up at a later date using the CHANGE PRODUCT menu option. If the response to MAINTAIN KIT DEFINITION? Is [Y], a secondary input screen is presented for entry.
The user will enter the category/part number combination for each product that will be used in the manufacture of this new item and the quantity that will be used. If the kit type is [M], the default for the SUB field will be [N] and may not be changed. If the kit type is [C], then the SUB field is available for entry and may be either [Y] or [N].
A SUB refers to the user’s ability to substitute another item for the one listed in the kit definition at the time of sale. Since a manufactured [M] kit is created and assembled prior to sale, no substitutions are permitted. However, a counter [C] kit is assembled at the time of sale and by its nature, requires the ability to sub out items on the fly.
The HIDE field refers to whether or not to hide the component items on the printed invoice. If the items are hidden on the printed invoice, then only the kit item will appear as with a normal item. When the items are not hidden on the printed invoice, then the kit item is printed as usual, and the component items are listed underneath. No pricing information is printed for the component items.
How Kit components print on an invoice may differ based on custom invoice developed for certain customers.
Inventory Considerations
As stated previously, no inventory is held on hand for counter [C] kits. The components are subtracted from inventory at the time of the sale, just as if each individual item was sold separately. Reporting of the sales demand and cardex entries for parts included in a counter kit are shown on the individual components.
Customer back order should not be used for Counter Kits.
Manufactured [M] kits are held on the shelf ready for sale and therefore must be received prior to being able to be sold. Increases in inventory levels for [M] type kit items are done through PURCHASING > PURCHASE ORDER RECEIPTS > RUSH RECEIVING. As the inventory of the full good is increased, the inventory of the component items is reduced.
The changes in on hand quantity all happens in the branch the product is received in.
Type [M] kits can also be added to a purchase order either from a suggested order or manually to be used for requesting assemble of the kits. This purchase order would then be received PURCHASING > PURCHASE ORDER RECEIPTS > P.O. RECEIPTS INPUT and the component inventory would be removed from stock and the assembled kit part would be added to inventory.
Sales of the components will be recorded at the time the [M] kit is received into inventory
Locked Product Inquiry
Definition
Processing
Locked Products Inquiry

Any items stopping inventory updates from invoicing will be displayed.
Also, a message is sent to the offending users screen when this situation occurs.
The Refresh option will redisplay the screen with the new status of the parts
The message “No AUDITLOCK on file” when there are no products locked that are holding up inventory updates. Pressing enter will go back to the “R(efresh),E(xit),Q(uit)” message
Exit or Quit will return to the menu.
Other Messages for Locked Products
- Product Maintenance – “locked by [user name] on [session ID]
- Rush Receiving – “locked by [user name] on [session ID]
- Stock Adjustment – “locked by [user name] on [session ID]
- Stock Transfer Confirmation – “locked by [user name] on [session ID]
- Purchase Order Maintenance – “locked by [user name] on [session ID]
- Purchase Order Update – “locked by [user name] in [abbreviated program description]
Lost Sales Reason Code
Processing
The recording of lost sales now has a Reason Code attached; these reason codes are setup using the menu option System Utilities > System Setup > Sales Desk > Lost Sale Reason Codes.

If the Include in Sales Total flag is set to Y any Lost Sales recorded through invoicing will be added to the Monthly and Weekly sales totals, increasing the demand for the part.
Invoicing
When recording a Lost Sale in the invoicing screen [using F6 after the quantity is entered] a list of the Lost Sale codes will be displayed to select the appropriate reason.

Reporting
The Lost Sales Detail report allows for the selection of one or all Categories, Customers or Reason Codes for a selected date range

Running this report will also create an extract file that can be loaded into excel Z:\html\b1\BLDRP.csv
Loyalty Rewards
Loyalty Rewards
Definition
The new LOYALTY REWARDS program will allow you to offer and track point rewarded to customers for purchases made. This program can be for selected customers and products and the rewards value can be maintained by Category.
The new suite of programs is available through Sales Desk > Administration > Loyalty Rewards
Loyalty Programs
- Assign a Program Code for customers to be included in the program
- Setup a Type Code which will be assigned to Customers included in the program such as “R”
- Add a Description for the program
- Default Redemption Rate for the program, points per dollar
- There is no automatic Redemption at this time
- Extra charges to be included in the value such as Taxes and Levies
- The initial default for this setting is “N”
- Default Statement Message

Loyalty Customers
- Add, Change or Delete Customers from a Loyalty Program
- You can assign a customer to multiple programs should you choose.

Loyalty Adjustment Codes
- Used to setup codes and descriptions of the various adjustment types required.
- Example RE = Redemption

Loyalty Rates
- This is to assign the reward rates for various categories.
- Using an “All Category” entry could setup the default and then you could setup individual categories as exceptions.
- The Start and End Dates control the time that the Special Rate is in effect.
- The rate is the number of points earned per sales dollar.
- Only those extra charges set to Y for the program would be included in the sales total.

Loyalty Reward Adjustments
- To make adjustments to a customer total point not related to sales invoices
- Used to assign the initial start point and to adjust for point redemptions
Loyalty Rewards Inquiry
- View the current status of a customer’s Loyalty Rewards points and the activity
Loyalty Rewards Report
- A listing of the customer’s Loyalty Rewards point activity
Loyalty Rewards Statement
- Similar to a customers A/R statement showing their activity and balance.
- These Loyalty Reward statements can also be emailed to the customer.
Once the customers have been assigned to the program and the rates have been setup the point information can be built from invoice history from a start date if desired.
Invoicing
- When an invoice is generated for a customer included in the program their Loyalty Rewards will be updated when the invoice is completed and the current Loyalty Reward total can be printed on the invoice.
Multiple Bin Locations
Overview
There is now the option for setting up alternate bin locations for each item. Before proceeding, make sure that the flag to allow multiple bin locations (field # 45) has been set to [y] in System Utilities > System Setup > Sales Desk > parts billing parameters > Screen 2.
Another parameter change is required to have the bin location sold from selected on the invoice screen, Screen 5 > Select Bin Location in Invoice (field # 31) needs to be set to Y
Process
Bin Location Maintenance
This option is used to set up, view a specific location or view all locations for a specified product. Deleting an alternate bin location is also available from this menu. This option is found in the menu inventory > Data Mantenance > Master Files > Bin Location Maintenance.
Bin Location maintenance can also be performed when in the Product Master maintenance by selecting “B(ins)”.
The Bin Type “R”, Retail, is used to identify product in the retail space of the store. Nightly reporting is available to indicate which retail products currently have zero available and need to be replenished from other locations.
The retail bin location can only be the primary location if it is the only location for the product and POS transactions will update the on hand in the Retail location.
Receiving and Stock Transfers will update the quantity on hand in the primary location which is the location shown on screen in Product Maintenance and Inquiry.
Any product with multiple bin locations and the Retail location that has a negative on hand quantity will have the Retail location adjusted up to zero and the primary adjusted down by the same quantity nightly.
Stock Relocation Adjustment
inventory > Data Maintenance > Inventory Adjustments > Stock Relocation Adjustment
Use this option to adjust the on-hand quantities for each alternate bin location. Enter the category and part number. All of the locations will be displayed. At the any change prompt, press enter to get to the quantity to adjusted by field. Enter the quantity (followed by a minus sign) that is to be moved to other locations. Then distribute that amount to the alternatives. The total field at the bottom must be 0 in order to [f1] accept the entry. Pressing enter after the accept will allow you to continue with further adjustments and “N” will exit to the menu.
this would be the preferred method for adjusting bin location quantities.
Stock Relocation Report
This will report all Retail Locations that have and On Hand Quantity of 0 or less which is to be used to replenish these locations. This report will be run automatically each night.
On Dock Purchase Orders
To flag a purchase order as On Dock use Purchasing > Purchase Order Receipts > On Dock Assignment. Enter the PO Number then confirm it is the correct PO, the first page of lines on the PO will be displayed and answer “Y” to create the Dock locations for this PO.
The Dock locations are automatically removed when the PO Receipts Update is completed for the PO.
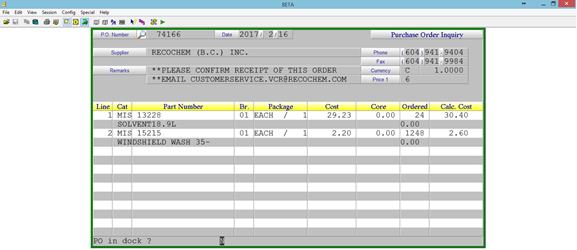
P.O. Receipts Relocation Listing
Multiple bin location items are automatically received to the primary bin location as listed on the PRODUCT master maintenance screen. This report provides the information necessary for the user to relocate the quantity received to different locations.
This report is Purchasing > Purchase Order Receipts > P.O. Rec. Relocation Listing
P.O. Receipts Relocation Adjustment
Similar to the Stock relocation adjustment, the user is able to move the recently received quantity from the primary (default) location to multiple locations.
P.O. Receipts Relocation Update
The adjustments made in the above step will be updated.
Alternatively, the adjustments can be made using the Stock Relocation Adjustment described earlier in this document.
Inventory Adjustments
When entering Inventory Adjustments, inventory > Data Mantenance > Inventory Adjustments > Stock Adjustments, if a part is assigned to multiple bin locations you will need to enter the quantities adjusted by bin location when completing the adjustment
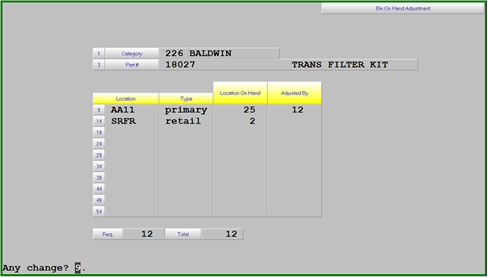
The default is to adjust the primary bin but you can change the quantities however the adjusted quantity for the bin locations must equal the total adjustment quantity.
This is the same procedures as used in the Stock Relocation Adjustment
Bin Location Lookup in Invoicing
Products with Multiple Bin Locations that have an on hand quantity will be identified on the invoice screen with a comment of “*MANY*” and products that have zero on hand but are included in an On Dock PO will have a comment of “*DOCK*”.
To check the available quantities for multiple bin locations within the invoicing screen press Shift F8 from the line Type field and you will be prompted for a line number to search. The bin location quantities for the selected part will be displayed in the Information Window. The sale of a product will always reduce the on hand quantity for the Retail bin location if one exists and if no retail location exists the Primary location will be adjusted.
All bin locations will be included on the printed invoice.
If the Select Bin Location in Invoice option is on and the part being sold is assigned to Multiple Bin Locations the locations with available inventory to fulfill the sale will be displayed on screen
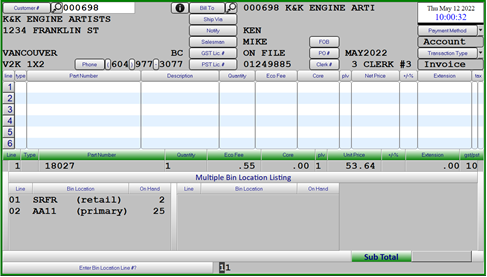
Bin Location Selection in Invoicing - Optional
New feature when using Multiple Bin Locations and wanting to force the users to select the Bin Location that the product is going to be picked from in order to keep the on-hand quantities for each bin location accurate.
Billing Parameters
New option added to screen 5 of the Billing Parameters “Select Bin Loc. In Invoice” would need to be set to “Y
For Counter Kits where product is kept in multiple Bin Locations the parameter “18. Kit Detail Display” on screen 3 would also need to be set to Y
Invoicing
In the invoice screen the user will be prompted to select the bin location the product will be picked from after the quantity is entered. Bin locations are displayed in descending order based on quantity on hand. Dock locations are shown at the end of the list and cannot be selected, these are information only. A line number MUST be chosen.
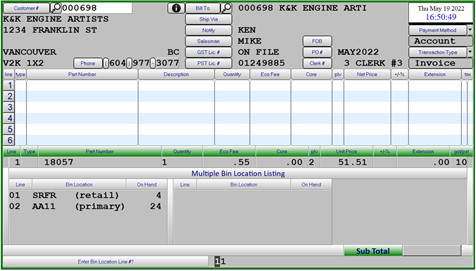
Only the Bin Location chosen will be printed on the invoice and the overall inventory of the part will be reduced and the quantity available in the chosen Bin Location.
Exceptions where this screen will not be displayed
If a part is only assigned to a single bin location
If the quantity sold is greater than the quantity available is any single bin location
When selling a “C”ounter Kit the Kit components will be displayed on screen and if any of the components are located in multiple bin locations you will be prompted to select the Bin Location those parts will be pulled from. The components and the chosen Bin Locations will be printed on the invoice.
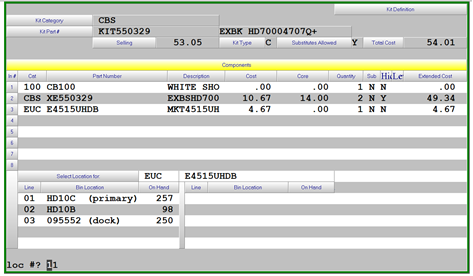
Invoice Print
The invoice print will only show the bin location selected for a part.
Exceptions
- No one bin location had enough quantity to fulfil the order and all locations will be printed.
- Invoices created from backorder fulfilment will show the primary bin location
- Web orders will show the primary bin location.
- Automatic Transfers will show the primary bin location
Inventory Update
The on-hand quantity will be updated for the selected bin location.
The on-hand quantity will be updated for the Primary bin location when:
- No one bin location had sufficient quantity on hand
- Invoices created for backorder fulfillment
- Web Orders
- Automatic Transfers
Multiple Invoice Copies
Overview
Multiple invoice copies can be printed at the time of sale or as a batch during the Accounts Receivable month end
Process
Customer Maintenance
If multiple copies are to be printed at the time of sale then the customer must have an “Account Control Flag” of “m” and the “ME Invoice Copies” field needs the number of invoice copies that are to be printed, use 2 if you require 1 extra copy for the customer.
Where you have the customer setup to receive automatic emails this feature can now be used to suppress the printing of invoices by leaving the “ME Invoice Copies” as 0. Also the Billing Parameter “Duplicate On Multiple Inv” must be set to “N” to print 0 copies
The printing of DUPLICATE on the additional invoice copies is controlled by the billing parameters, screen 1 “DUPLICATE on Multiple Inv”.
To print invoice copies as a batch during the month end the ME Invoice Copies field needs a number. Only 1 copy of each invoice for the customer will be printed as part of the month end. Changing this field during the month will result in the invoices after the change getting printed during the month end.
Where customers are set to print extra copies this can be turned off for different document types using Utilities > System Setup > Sales Desk > Printer Profiles.
If the Extra Copies field is set to “N” the extra copies set for the customer is ignored.
Physical Count - Add Bin Location
Definition
The Physical Count Input routine has been updated to include the option to Add a Bin Location during the count. This will add the bin location to the part immediately and the quantity will be updated when the count update is completed.
Processing
Changes to the count input screen are the new option to A(dd loc).

Using this option will prompt first for the Category and Part Number
Cat/Part .../...................
The next prompt will be for Bin Location
bin location/......
Next will be the Quantity
qty/......
last will be the Bin Type, blank or R for retail
type/.
When the bin has been added the input screen will show with the added part on line 1. If the part was not assigned a Primary bin location previously the new bin added will be considered the Primary Bin location and with should in the product maintenance and inquiry screens.
The new bin location quantity will be updated when the count update is complete and the quantity added to a new bin location will be considered a count variance as it is assumed the product will have a negative variance in another bin location.
Change PO on Pick Ticket
Process
The process for changing the Z Pick Ticket PO number:
- When closing the Pick Ticket in the SF2 screen from Invoicing will have a new field for the New Po Number

- If you enter a different PO number you will receive the question to “really change [original PO number]? You will need to answer the question with Y or N, the default being Y
- You will then be prompted “really invoice [original PO number]?
- The PO number will be changed on all associated pick tickets
Price Override Reporting
Definition
The reporting of price overrides has been updated to continue to provide the daily report and also allow for reporting of price overrides done in the past.
Processing
The new reporting option is found in the menu through Sales Desk > Administration > Reporting > Pricing > Price Override Analysis or using the menu search (TAB key) Search String “PRICE O”.

In the selection screen leaving the fields blank will report all branches, customers, clerks, categories and exception types.
Alternatively, the report can be filtered to include only selected overrides
The report content is the same as the nightly report and is also available in a .csv format for import into excel. After the report is viewed on screen the option to load into excel will show

Click on the View Price Override Analysis in Excel to load the report into excel. When complete click on the Close Window to return to the menu.
Printing of Orders when Customer Backorders Received
Definition
Update to allow Order type transactions to be reprinted when Customer Backorders are received
Processing
Billing Parameters
The Billing Parameters maintenance has been updated with a new parameter to indicate if Orders should be reprinted when a customer backorder is received. This new setting will be found in screen 5 field 38.

Product Receiving
When goods are received either through PO Receipts Update or Rush Receiving, any customer backorders on Order transactions will be reprinted with the quantity received and extended value. The Order will still have to be recalled and invoiced.
Product Maintenance Access Control
Definition
The Product Maintenance has been modified to allow Field level authorization by login ID
Processing
Branch Maintenance
The branch must first be flagged to use the user level Product Maintenance Limits

The Product Maintenance Limits must be set to Yes
Product Maintenance Screen Enhancements
Definition
Enhancements made to the product maintenance screen.

- Class and Subclass – can be used for special pricing and reporting
- Corporate and Branch ranking – informational display of the part ranking for the “Turns Based Purchasing”
- Fields moved to provide additional screen space
- On Order/Committed
- Customer b/o / Supplier b/o
- Defective On-hand/Cores Out
- On RGM/Lost Sales
- EOQ Corp/Dir – Tran – Economic Order Quantity calculated based on the part ranking for use with the “Turns Based Purchasing”
- Auto Lck – used with the “Turns Based Purchasing” to set the number weeks to lock EOQ and ROP typically for new parts.
- ROP Vendor/Transfer – ROP [Replenish Order Point] alternate term for Minimum. ROP Vendor is the value used for the minimum on hand when ordering from the supplier and ROP transfer would be the branch minimum when replenishment is done from the DC branch. Both are calculated values when using the “Turns Based Purchasing”
- Last Price Update – date of the last price file updated
- Ret Allowed – information field to indicated if the part can be returned to the supplier
- Currency – information field to show the currency code of the supplier
- B Cost/Core – base cost and core cost typically used for products sourced outside the country in foreign currency. Supplier purchase orders will show the Base Price and the exchange, duty and freight costs will be added at the time of receipt in the calculation of average cost. Further details on Base Price are found in the Foreign Currency document.
- Duty – duty percentage for product being imported
Purchase Orders - Booking & Specials
Definition
Alternate purchase order types can be allowed by Supplier, Booking and Special so the order quantity does not affect normal replenishment at all or until the purchase order should be in transit. The visibility of the order quantity is controlled by a setting in the purchasing parameters, always show the on order quantity the same as a regular PO, never show the on order quantity or only show the on order quantity when the PO Required Date is withing the Suppliers lead time
Processing
Parameter Maintenance
The options are:
- Y – Always update the part on order quantities
- N – Never update the part on order quantities
- D – Only update the part on order quantities when the PO required date is within the suppliers lead time in days.
- A nightly update is run to check the Booking and Special purchase orders, if the D setting is used and the conditions are met the on order for the part will be updated
Supplier Maintenance
In order to use the Booking or Special purchase order option the Supplier must also be set to allow this. Menu option Purchasing > Data maintenance > supplier

Field “27 Booking/Special?” must be set to Y to allow these types of PO for the Supplier.
Create Purchase Order from Suggested Order
When selecting “Order” from a suggested order one of the options is to designate the purchase order a Booking or Special PO.
The On Order quantities will be updated based on the purchase order type chosen. A regular purchase order will be created if this field is left blank.

Once the purchase order is created the Booking/Special flag cannot be changed on the purchase order.
Purchase Order Maintenance
If adding a new purchase order manually through the Add/Change Purchase Order the Booking/Special can also be assigned.

Leaving this field blank with treat the on order quantities as a regular PO, if changed to B or S the on order quantities will be updated based on the type chosen.
The type of Booking or Special can only be set when initially Adding a purchase order, once the purchase order number has been assigned and parts are about to be added this can no longer be changed
Suggested Order Report
A new column has been added to the Suggested Order report, “B/S Order”, which will show the Booking and Special on order quantities for information.
Items On Order by Vendor

Quote Handling Improvements
Overview
Parameter Maintenance
The Billing Parameters have been updated to allow the inclusion of Orders, Quotes and Packing Slips in the document search options when you call up a customer in the invoicing screen. For Quotes the option to Delete and the Default setting for the Delete have also been added.

Invoicing
In the Invoice screen when a customer is entered various messages could be displayed based on the outstanding documents of file for the customer. One or many of these options could be displayed O – Open Orders, P – Packing Slips, Q – Quotes, A – All, N – None such as shown below.

The default is always “N” to continue and start a new transaction but any of the other options can be entered to launch the search function.

The search offers to option to search by Purchase Order number or pressing Enter will list all Open Transactions for the selected type.
For Cash Sales using the PO Number or Ship To Name to identify the customer will assist in the recall of Open Transactions.
Quotations created for transactions that exceed the customers credit limit will automatically have a purchase order assigned as “CH”.
RF Gun User Guide - 2022
RF Gun Procedures
Login and password
The standard login of the RF gun is [rf]. Multiple store installations or sites with more than 1 rf gun will have custom logins that you will be advised of at the time of install. The password matches the login.
Control Keys
- CTRL A = to accept an entry
- CTRL C = to switch between the barcode and part number fields
- CTLR F = to move cursor to order quanity
- CTRL I = to display last 12 months purchases
- CTRL R = to reject an entry
3) Receive O/S P.O.
This option will list all of the outstanding Purchase orders on the system and will allow you to select one to be received. To select a P.O. simply select one of the three options, 0=PO, 3=NEXT and 9= QUIT. When you use option 0 you will be prompted to enter the PO number. The P.O. number to be received does not have to be displayed on the screen to enter the P.O. number. CTLR followed by R will take you back to the main menu.
The PO Listing screen could be bypassed if desired and the menu altered to go to the second screen to enter the PO Number with freight, brokerage and other costs
P.O. # SUPPLIER NAME 105053 NTN BEARING C 105312 FLEETSPEC 106325 MODERN SALES 106372 MODERN SALES 106771 DANA HEAVY VE 106783 AUTOMANN CANA 106833 ZF CV SYSTEMS 106923 MODERN SALES 106931 GLOBAL PARTS- 106933 GLOBAL PARTS- 107041 DANA HEAVY VE 107252 ZF CV SYSTEMS 107253 BENDIX CVS CA
0=PO,3=Next,9=Quit N
When a PO Number has been selected the supplier will be displayed with the option to enter the freight, brokerage and other cost values.
po# 111346 GABRIEL RIDE CO freight ......... brokerage .00 other costs .00
The first question to be answered in the third screen is if you wish to use “Autoscan” Y or N.. The use of “Autoscan” prompts you to scan each item and it defaults the received quantity to 1 unit for each scan and then goes back to the barcode field for the next scan. Alternatively, if “Autoscan” is turned off N you will be prompted for a quantity each time you scan an item. You will have to accept each entry with CTRL followed by A.
If you are using the “Autoscan” mode you can correct the quantity after the item is scanned by pressing Tab or CTRL I. After entering the new quantity press CTRL A at “Any change” to accept the entry.
When not using Autoscan, the cursor will go to the “received” field after the barcode is scanned waiting for a quantity to be entered. The quantity entered will be ADDED to any previous quantity received. A negative quantity received can be used to correct an error.
If the quantity received is excess of the total quantity ordered for that part a message will display Over-receive?(Y/N) Y
po# 111364 sup RIDE-AIR CONTRO #lines/OS 6/ 4 b/c ............... cat ... ...........
.................... .................... PO line# ..... units ord'rd ...... units rec'vd ...... back-ordered .
Autoscan? N
If the part scanned is to be cross docked to other branches a message will display near the bottom of the screen “CROSS DOCK” so the user can separate these parts for splitting to the branches during the update.
po# 111384 sup KLEEN-FLO TUMBL #lines/OS 6/ 6 b/c 700002354940 cat KLE KLEEN-FLO part 291 LEMON DASHBOARD CLE PO line# 1 units ord'rd 24 units rec'vd back-ordered Y received ...... CROSS DOCK
Pressing CTRL A at the barcode will start the completion process where you will be asked “update now?” where the options are Y or N. When answered with an “N” the user is asked if they wish to print the Edit List.
When starting the update, the next option is to enter the invoice number.
If the PO included parts for cross dock, these parts will be shown with the split quantities for each location. This information is to be used to separate the parts received for the various locations. If the part is not received in full the user will need to allocate the quantity received to the locations based on their needs. The quantity allocated to a branch CANNOT exceed the original quantity ordered. If a branch requires more than has been ordered for them, a manual transfer will need to be created to send the additional amount.
cat GAB order 56 85934 rec 56 split 56 br order o/h split 01 18 5 18 02 0 0 03 8 0 8 05 0 8 06 30 9 30 08 0 25 09 0 0 10 0 0
After all of the quantity splits have been reviewed the update process will begin and the various update reports printed. Also, Stock Transfers for the split quantities will be printed during the update process.
Substitute Chaining
Definition
Part number Substitutes can now be chained and maintained from a single screen for all parts in the chain
Processing
Parameter Maintenance
A parameter must first be set to use the substitute chaining feature in the product maintenance screen. Menu option system utilities > system setup > sales desk > Parts Billing Parameters > screen 1

There are 2 flags, Substitute Chain is to show all related substitutes in the information window on the invoice screen and the new addition is the Maintenance option to show the substitute chain when using Product Maintenance.
Product Maintenance
When using the product maintenance screen with the Substitute Maintenance set to “Y” another message will appear after accepting the part, Maintain substitutes?. Entering “Y” to this question will bring up the Substitute Chain screen.

From this screen a new substitute can be added, providing it does not already have a substitute, or a substitute can be deleted from the chain. The Substitute information for any changes will be updated on the affected parts.
Suspense Payment Enhancements
Definition
Modifications have been made to remove any invoices with a payment type of Suspense prior to the end of day being completed so they do not impact the General Ledger because they have not impacted Inventory when they were created. Also, to prevent an attempt to process a card payment on a PC without a card terminal the payment screen has been modified to test for the presence of an active card terminal.
Processing
Payment Screen
When processing a cash sale, the payment screen will now test for a card terminal being properly connected when first entering the screen. If the card terminal is not properly connected or if the PC does not have a card terminal you will see a message “please wait testing terminal”

If the card terminal is not active or if the work station does not have a card terminal the payment screen will show a message “No Card Terminal, Only Cash Payment Types, Press ENTER to test for Terminal Again”

If there is no card terminal then the only options allowed for payment are $ - Cash , C – Cheque or E – E-Transfer. If the card terminal issue has been corrected pressing Enter will test for the terminal again and if found will allow a card transaction.
End of Day
A new report has been added to the end of day processing which will list any invoices created that day with a payment type of Suspense. This report will be run separately for each location
Also, a new process has been added before the End of Day updates which will:
- Check to see if a payment was received for the invoice
- If a payment was received update the payment information on the invoice to the correct payment method and amount received.
- Update the inventory and Cardex for the parts on the invoice as this was not done when the invoice was originally created.
- If no payment has been made on the invoice, remove the invoice from the invoice file and add it to a new database of Suspense Invoices.
Once this process is complete the normal End of Day updates will run and there will be no invoices with a payment type of Suspense included.
Web Order Discounts
Definition
Counterpoint can be configured to automatically apply a percentage discount to web orders received. This discount can also be limited to customer assigned to certain sales clerks.
Processing
Billing Parameters
The percentage discount must be added to the Billing Parameters, system utilities > system setup > sales desk > parts billing Parameters > screen 5
- In order for the web order discount to work the “Discount on Screen” parameter screen 3 > field 50 must be set to N. Customer price discount cannot be shown on screen or printed in combination with a web discount percent. The invoice screen and printed invoice will show the customers net price after any price discounts or surcharges.
- The discount percentage must be entered with a minus sign.
- The web discount message can be Centered, Left Justified or Right Justified
- There are 40 characters available for the message and it will print as a comment line on the invoice at the top under the “purchase order reference” comment.
- To exclude certain customers from receiving the web discount you can assign then to a clerk number that is included in the parameters. Up to 5 clerk numbers can be excluded from the web discount.

Specials / Contracts Enhancements
Overview
Modifications have been made to the Specials/Contract screen to allow the creation of a Special or Contract based on the Discount Level assigned to parts within a category, Product Class, Product Subclass and Customer Discount Group.
Another option added to the Specials/Contracts is the inclusion of Non-Stocked products. This only applies to Specials/Contracts setup for an entire category where the part being sold is found in the Price Book. If using the Discount Level option for the Special the Non-Stocked pricing parameter on the part would need to match the Discount Level on the Special


Specials Maintenance
At least one of the main options must be chosen when setting up a new special, Customer, Category, Discount Level, Discount Group, Class or Sub Class or a combination of these can be selected.

Customer
If left blank the special will apply to all customers and if you wish to use a specific customer they will need to be setup to “Allow Contract Pricing = Y” in the Customer Maintenance screen. Depending on the Billing Parameter setting “Contract Only” found on screen 3 a Contract setup for a specific customer will always sell at the Contract price if set to Y and will sell at the lowest available price based on Discounts and Specials for the product if set to N.
The Billing Parameter Maintenance is found under Utilities > System Setup > Sales Desk > Parts Billing Parameters.

Category – Part Number
A Special/Contract can be setup for a specific Category/Part Number or an entire Category by just entering the Category and leaving the Part Number blank. If setup for an entire Category then the pricing will be entered as a Price Level and Discount (+/-).
Discount Level
The use of Discount Level for a Special or Contract requires that the Special/Contract be setup for an entire Category or All Categories. When adding a Special/Contract for an entire Category it also requires that you identify if the Special/Contract is to only affect parts with a blank Discount Level or if it is to be all parts. If a specific Discount Level is assigned to the Special/Contract the Only if Blank will be automatically filled in.
Discount Group
Specials setup for a Discount Group will apply to all customers assigned to that discount group regardless of the “Allow Contract Pricing” setting on the customer.
Class/Subclass
The Special/Contract will apply to all part numbers contained in the Class or Class and Subclass. The pricing will be by Price Level and Discount (+/-).
Only at Net
When this is set to “N” [Net Only] the Special will apply to All Customers as the net price. This will override the customers regular discounts but if the Billing Parameters are set for “Contract Only” = Y then an existing Contract price will take precedence.
Start – End Dates
This is the time frame the Special/Contract will run for, inclusive of the start and end dates. If a To Be Sold quantity is used then the Special/Contract will be in effect until the available quantity is sold or the end date is reached, whichever occurs first.
Price
If the Special/Contract is for a specific part number then a Unit Price can be entered otherwise the price will be based on a Price Level and Discount (+/-)
Price Break
The Quantity Price Breaks option has been updated to allow Quantity Breaks for individual customers or discount groups as well as all customers. The dates may be used to limit the time this price break is offered. The net price is left blank and “0” (zero) is used for the price level with a blank percentage value when adding a Price Break Special. The Price Break code is entered into the special, the Tab key can be used to search the codes setup in the system. Only S type Price Break codes can be used in the Specials.
Within the Billing Parameters the system must be set to not show line discounts in order to take advantage of Quantity Price Breaks. This setting, D% on screen YNDS is found on screen 3 of the Billing Parameter Maintenance and must be an N as shown in the parameter screen above.
Include Non-Stocked
Specials/Contracts setup for an entire category or discount level can be applied to Non-Stocked parts included in the price book.
To Be Sold
This will limit the Special/Contract to the number of units entered. When the quantity sold exceeds the “To be Sold” value the price will revert back to the normal price.
Quantity Sold
This value is updated automatically as sales take place
Flyer
This is a reference description used for reporting.
Accounts Payable Invoice Matching
Overview
The Accounts Payable matching in Counterpoint®has been updated to allow matching of invoices, received through EDI or entered manually, to Purchase Order receipts and product received through Rush Receiving along with the ability to match a single invoice to multiple receipts.
Additional reporting has also been added for review of invoices or receipts that are not matched.
Processing
Accounts Payable Parameters
A new date has been added to the Accounts Payable parameters to limit the invoices listed in the matching screen at startup, ignoring invoices prior to the Match Date.
The Invoice Adjustment allows for inclusion of a default percentage or amount in the transaction entry to be included in the distribution amount and allocated to a separate G/L Account.
The Invoice Matching process uses is the Threshold Data where invoices that have a price difference less than the threshold will have the variance amount posted to the A/P Invoice Price Variance GL Account indicated in the branches Purchasing Parameters as described later.
Override Codes
A new database for Override Codes has been added to allow users to bypass the matching process, however these overrides are logged and can be reported on and require a PIN # to be used.
The new option to maintain these codes is Accounts Payable à Data Maintenance à Override Codes. The Add, Change and Delete options are available for the 2 character code and 30 character description.
Whenever an invoice for a Vendor which is setup for invoice matching is not matched a PIN # will be required and an Override Code will be required. The reason for this is to allow reporting of unmatched invoices.
Invoice Adjustment Codes
Transaction Adjustment Codes are used to apply a default adjustment amount to an A/P Transaction for a Vendor.
These codes can be applied as a default to the Vendor or can be entered manually during the Accounts Payable transaction input
Vendor Maintenance
Changes have been made to the Vendor Maintenance screen so the Vendor can be flagged as a Vendor which requires matching and a default transaction adjustment code.
This field must be populated with “Y” to invoke the matching process when processing Accounts Payable Invoices.
The Adjustment code will be applied to all A/P Transactions for the Vendor by default but could be removed during the transaction entry if needed.
Supplier Maintenance
As there can be many Purchasing Suppliers setup for a single Accounts Payable Vendor a new field has been added to the Supplier Maintenance screen to identify the Accounts Payable Vendor number. This can be a Canadian or US Vendor
Purchasing Parameters
A new GL Account entry has been added to the purchasing parameters for use with price variances between purchase receipts and accounts payable invoices. Amount variances within the allowable threshold will be posted to this account.
Accounts Payable Transaction Input
Vendors setup with a default Transaction Adjustment code will have the code and rate displayed when the transaction is entered.
- Changes to the Adjustment Code or value must be made from the “Chg Header?” prompt
For Vendors setup to require invoice matching, after the GL Distribution amounts are entered:
- If the invoice number and amount are a match to the amounts received the invoice will be automatically matched and no further selection will be required.
- If the invoice amount does not match the received amount the amount will have to be matched to the outstanding list of received orders.
- The listing of goods received is n Date order, oldest to newest.
The Allocate value must balance to the invoice amount entered or be within the threshold value to complete the entry without requiring an Override Code and PIN
- If the Available amount for each receiving matches the amount Allocated then the screen will return to the transaction input when complete.
- If the Allocate Amount does not match the invoice amount but is within the threshold the distribution of the A/P Transaction will be adjusted to reflect the price variance
- Enter O or R to search by P(O) # or (R)eference. This will list the transactions ascending by the selection with the closest match at the top.
- In the screen above a PO # search for 609759 was used. Please note that there have been multiple receivings for this purchase order.
- The default display order when the match screen is opened uses the date from oldest to newest.
- If the Allocate value entered does not match to the Available amount for the receiving the individual lines from the receiving will be displayed and the amount to be paid will be distributed by line as per the screen below.
Select EDI Invoices for Payment
The EDI invoices to process will be selected from the list of EDI invoices received. When the selection is complete and Create Transaction Batch is selected:
- If the invoices selected are a match to the value of the goods received the entries will be automatically flagged as matched and will return to select another Vendor for EDI invoices after the transaction batch is created.
- If the invoice amount does not match the received amount the amount will have to be matched to the outstanding list of received orders.
- If the EDI invoice information, invoice #, packing slip or po number, the invoice will have to be matched to the outstanding list of received orders.
- If multiple invoices have been selected the match screen will only be displayed for those invoices which require matching, not those that are an exact match.
- Invoices within the threshold percentage will require matching the same as in transaction input.
- If the Allocate value entered does not match to the Available amount for the receiving and is outside the threshold amount the individual lines from the receiving will be displayed and the amount to be paid will be distributed by line as per the screen below.
Foreign Currency Rush Receiving Match
Adding an Adjustment Code for Foreign Currencies, coded to the GL Foreign Exchange account number, will assist in the matching of goods received through Rush Receiving from foreign suppliers allowing the transaction to be fully match through the transaction input screen.
Adding the Adjustment code to the transaction then updating the amount to match the receipt and Vendor invoice. Using the Adjustment value to increase the distribution amount by the currency exchange value.
Manual Matching
The Receipt PO number is used to recall a receipt of goods and the items to match are selected to match to the vendor invoice.
Invoice Match Override Clear
A Vendor number can be entered to view a single vendors invoices or the field can be left blank to view all invoices overrides.
Enter a “Y” to select the invoices to be cleared.
The total selected to be cleared will be displayed at the to of the screen
When complete a PIN number and Override Code will be required to exit.
Reporting
Available Purch. For Payment
This report is to list product receiving’s that have not been fully paid.
Report has been modified to include:
- An extract file for import to excel
- core and levy values in available costs
- the Supplier Vendor in the selection criteria
- receipt date
After the closing the Report Viewer window the option to open the extract with excel will be displayed
The extract file to import into excel manually is Z:\html\ap1\APAVAILLS.csv
Invoice Match Overrides
Report to list all invoices that where an Override was used to complete the invoice process
This will create both a report and extract for import to excel.
After the closing the Report Viewer window the option to open the extract with excel will be displayed
Click on the Close Window to return to the menu
The extract file for import to excel is Z:\html\ap1\APLOGRP.csv
|
Vendor |
Vendor Name |
Invoice |
Invoice Reference |
Invoice Date |
Federal Tax Amount |
Invoice Amount |
Amount to Distribute |
Reason |
User |
Pin |
|
|
001320 |
BALDWIN FILTERS INC. |
23425684 |
2023-01-23 |
0 |
1075.8 |
1183.38 |
Force Pay Invoice |
amslogin |
3 |
||
|
001320 |
BALDWIN FILTERS INC. |
23468406 |
2023-02-10 |
0 |
1368.36 |
1505.2 |
Invoice Not Paid |
amslogin |
698 |
||
|
001340 |
DAYTON PARTS |
12345 |
0 |
0 |
0 |
Invoice Not Paid |
amslogin |
698 |
|||
|
001340 |
DAYTON PARTS |
123456 |
2023-05-01 |
19.05 |
400 |
0 |
Force Pay Invoice |
amslogin |
698 |
||