Invoicing
How-to guides for the COUNTERPOINT invoicing screen
- Adding Flyers to Invoicing
- Bin Selection in Invoice
- Customer History Part Search for Unknown Number
- Fleet Part Tracking
- General Charges & Deposit Handling
- Invoicing with Global Payments Terminals
- Selling a Core
- Suspense Payments with Payment Terminal
- Updating Credit Hold Invoice
Adding Flyers to Invoicing
Overview
The promotions button on the Invoicing screen has the ability to allow the user to specify a currently running, or Future Dated flyer and have it available as a clickable item under the promotions button on the COUNTERPOINT Invoicing screen.
This also sets up attachment’s to be included with Customer A/R Statements
Setup
To do this the user must save the PDF document in the Z drive on their system under the HTML directory.
Once filed there they must identify the flyer by name using the Flyer Maintenance program.
The instructions below walk the user through the process of doing this.
Step 1
- Open the PDF Document on your PC with Adobe
- Click File – Save a Copy Navigate to My Computer select Z:\Flyer - and Click “Save”
Write down the name that you saved it under as you will need this for the next step.
Record Capitals and lower case exactly as this is important.
Step 2
Enter 1 – ADD FLYER
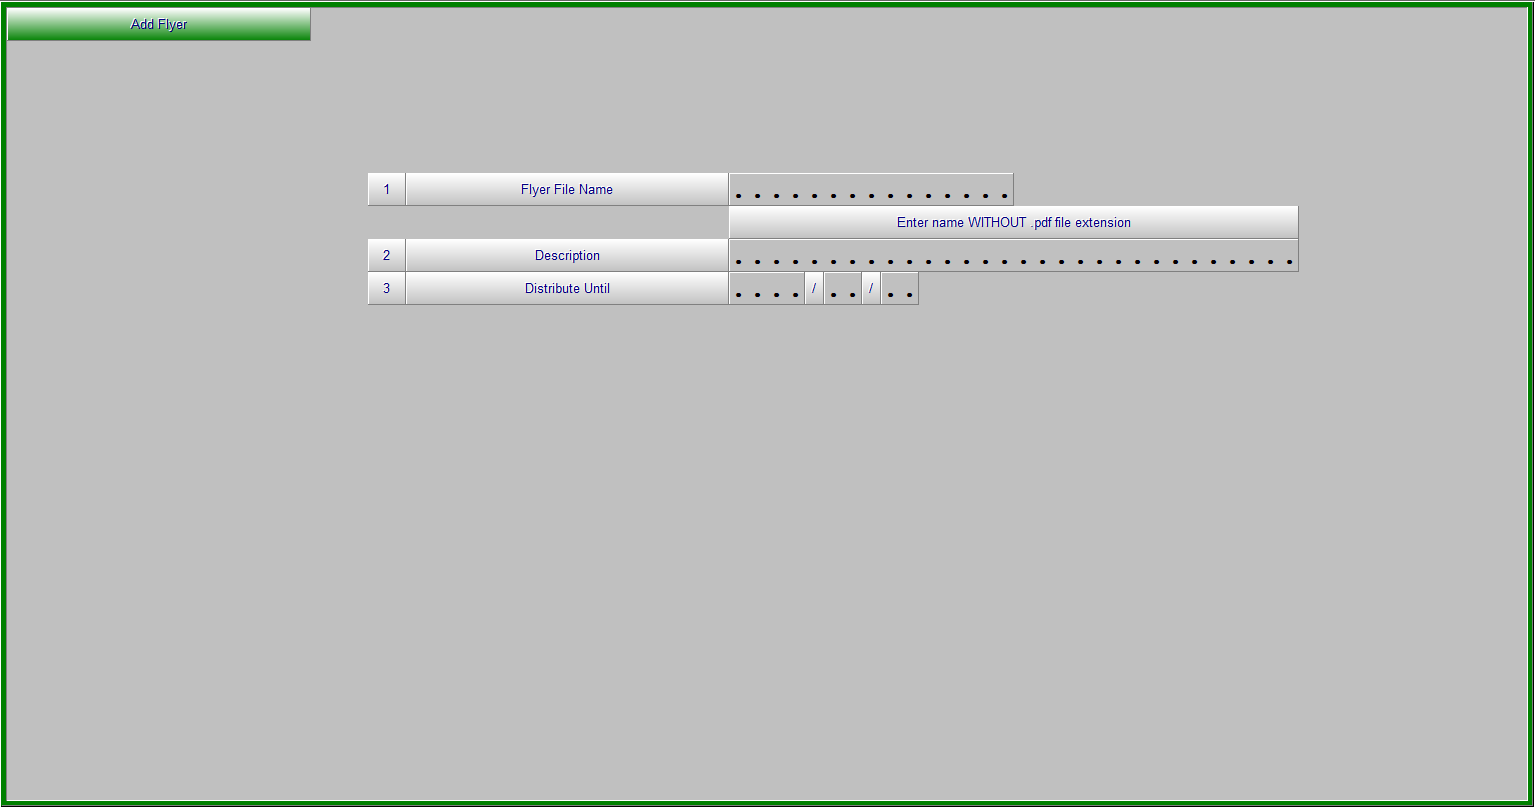
Fill in the fields as required.
When complete Hit F1-Accept.
Close the program.
Flyer should now be available as a clickable option under Promotions Button.
Bin Selection in Invoice
Definition
New feature when using Multiple Bin Locations and wanting to force the users to select the Bin Location that the product is going to be picked from in order to keep the on-hand quantities for each bin location accurate.
Processing
Billing Parameters
New option added to screen 5 of the Billing Parameters “Select Bin Loc. In Invoice” would need to be set to “Y
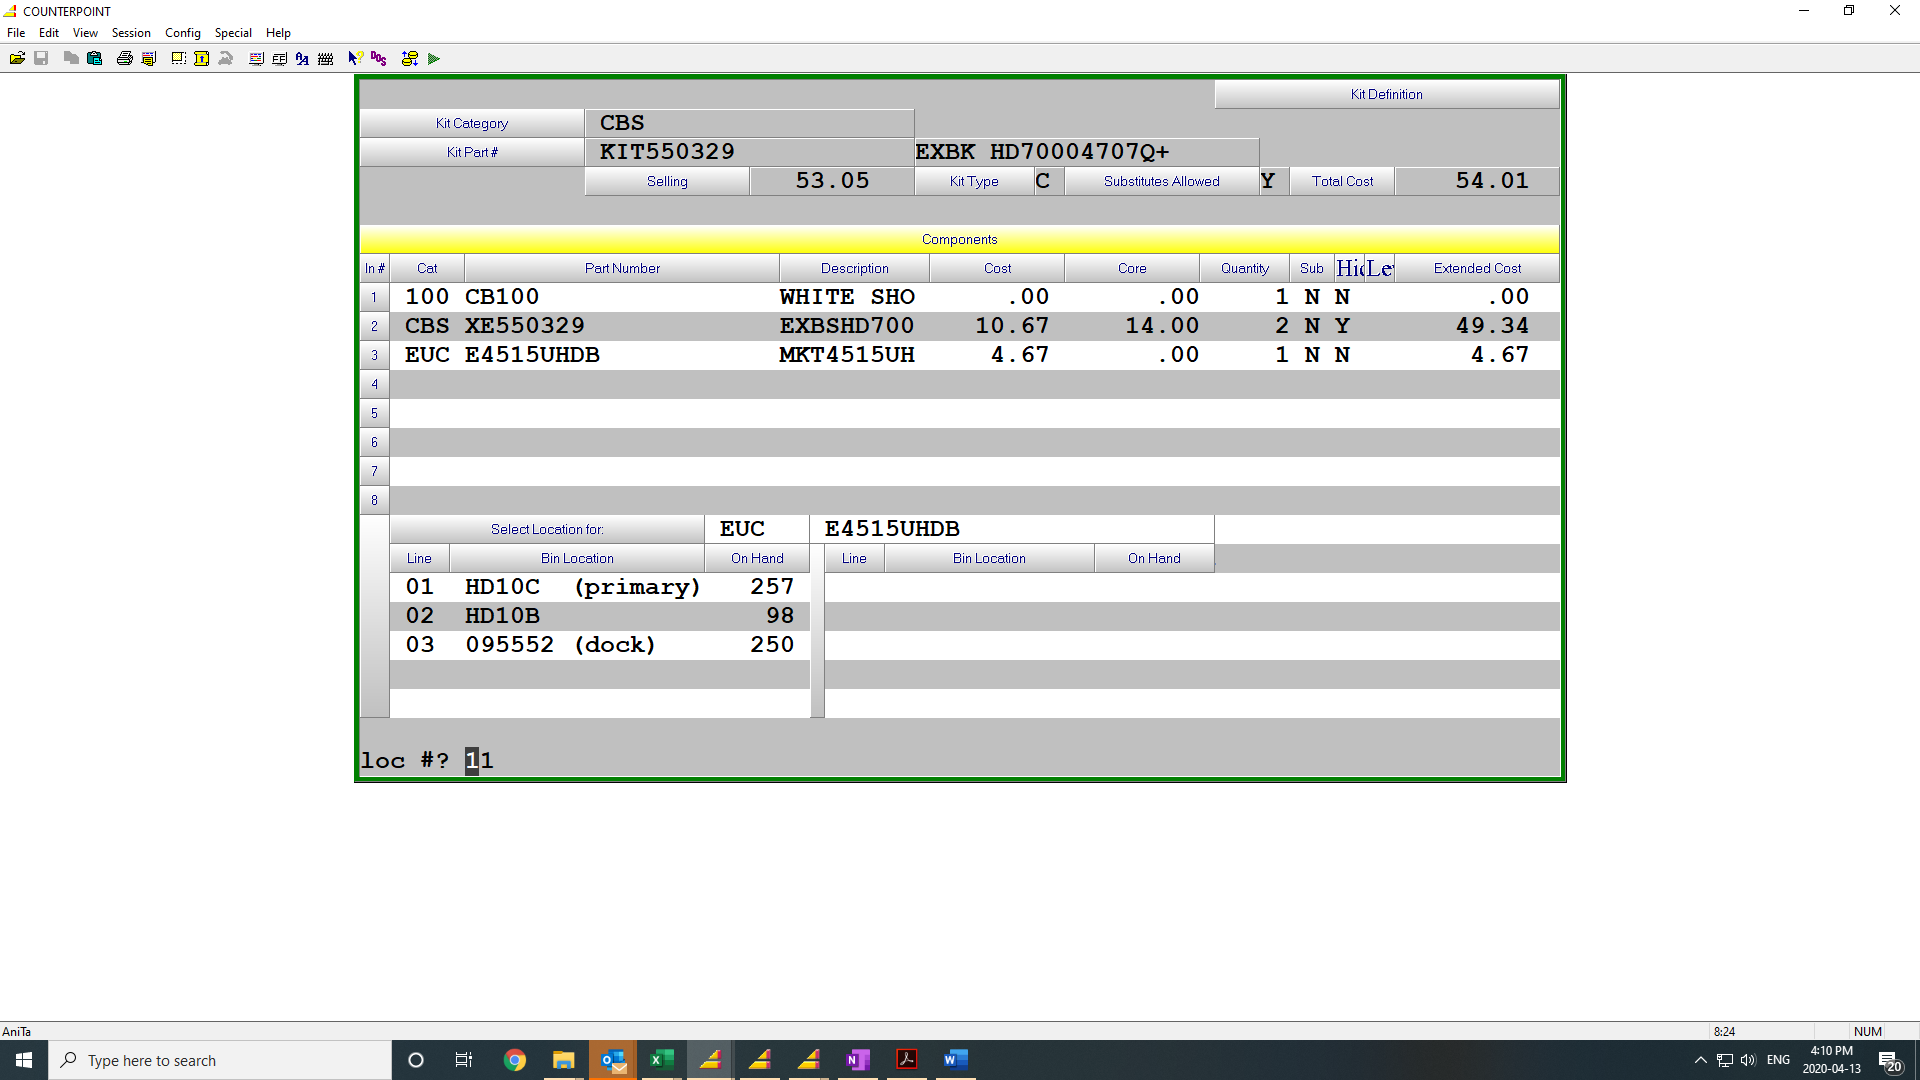
For Counter Kits where product is kept in multiple Bin Locations the parameter “18. Kit Detail Display” on screen 3 would also need to be set to Y
Invoicing
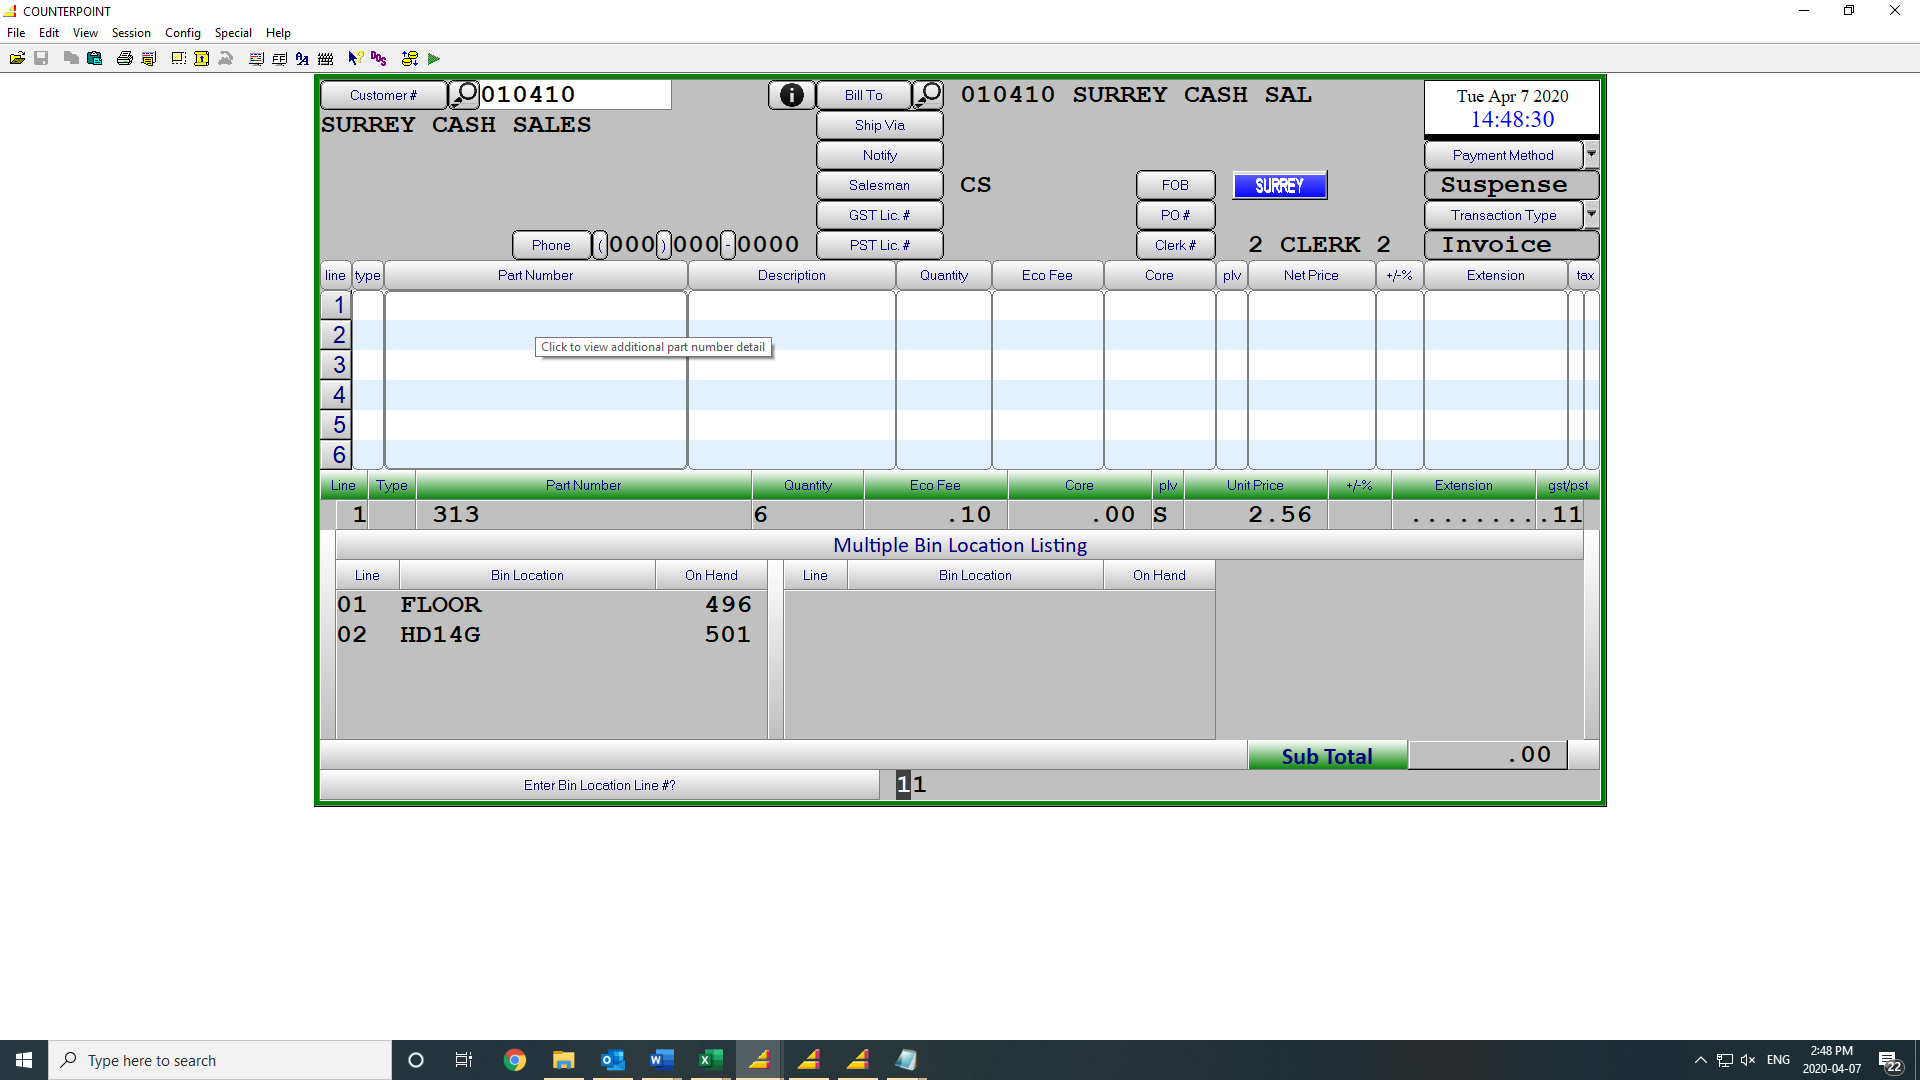
In the invoice screen the user will be prompted to select the bin location the product will be picked from after the quantity is entered. Bin locations are displayed in descending order based on quantity on hand. Dock locations are shown at the end of the list and cannot be selected, these are information only. A line number MUST be chosen.
Only the Bin Location chosen will be printed on the invoice and the overall inventory of the part will be reduced and the quantity available in the chosen Bin Location.
Exceptions where this screen will not be displayed:
- If a part is only assigned to a single bin location
- If the quantity sold is greater than the quantity available is any single bin location
When selling a “C”ounter Kit the Kit components will be displayed on screen and if any of the components are located in multiple bin locations you will be prompted to select the Bin Location those parts will be pulled from. The components and the chosen Bin Locations will be printed on the invoice.
Invoice Print
The invoice print will only show the bin location selected for a part.
Exceptions:
- No one bin location had enough quantity to fulfil the order and all locations will be printed.
- Invoices created from backorder fulfilment will show the primary bin location
- Web orders will show the primary bin location.
- Automatic Transfers will show the primary bin location
Inventory Update
The on-hand quantity will be updated for the selected bin location.
The on-hand quantity will be updated for the Primary bin location:
- No one bin location had enough on hand
- Invoices created for back order fulfilment
- Web orders
- Automatic transfers
Customer History Part Search for Unknown Number
Occasionally you will get a customer asking for the same part as they ordered last Week/Month/Year etc. (Pick one). To compound the problem that will typically not know the part number. If they know the time frame of the purchase use the following procedure to locate the part number they ordered.
- From the Customer number field in the Invoicing screen hit Shift/[F1] which will launch the Invoice History Inquiry Program.
- Cursor will initially be in the Invoice number field, since we do not have that information hit [F3] twice to move the cursor to the Customer number field.
- Enter the Customer number of the customer making the request.
- Cursor will move to the bottom of the screen and request that you “Enter Start Date:” in the format YYYY/MM/DD. Enter the earliest date that you believe the sale would have been made. Optionally, if it is known, you can enter a PO number as well. If PO number is unknown hit enter.
- The screen will display the first invoice completed on or after the start date you entered.
- If that is not the correct invoice hit [F2] (Cancel) followed by [F7] (Next) to display the next invoice.
- Repeat the F2-F7 sequence until the correct invoice is located or you are ready to give up the hunt.
- Hit [F2] to cancel and return to the invoice screen.
Fleet Part Tracking
Fleet Tracking Setup
The Billing invoice screen has a built in Customer Fleet Part Tracking module. This module allows the counter staff to in affect build customer, unit, specific electronic catalogues. The creation of these catalogues can have a dramatic affect on the accuracy and speed with which counter staff can service parts requests on a customers fleet vehicles. The fleet part tracking is available from the LINE TYPE field on any invoice line while building an invoice by hitting Shift/[F10]. Doing so will launch the following screen.
If this is the first time you have launched fleet part tracking on the system you will need to take the (M)aintain records option. Which will change the prompts at the bottom of the screen to read as follows.
“(E/P/G) Equipment, Parts , or Groups”
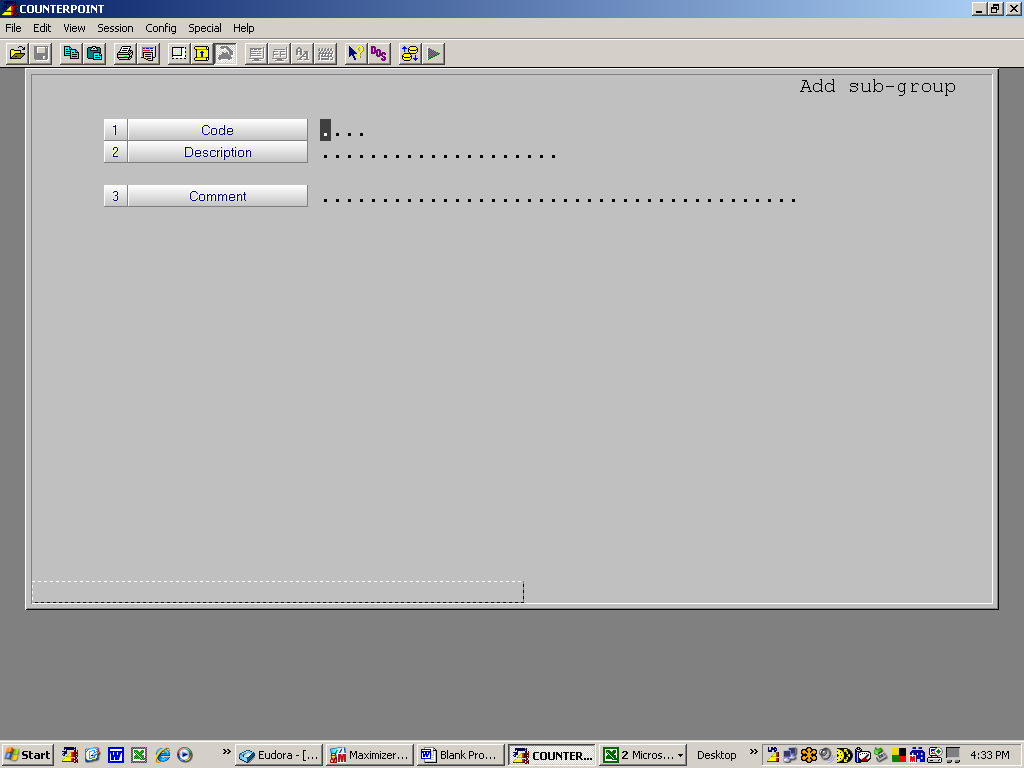
Again If this is the initial launch of Fleet Part Tracking take the (G)roups option. Which will bring up the Add Change Delete Screen. Select ADD which brings up the following screen.
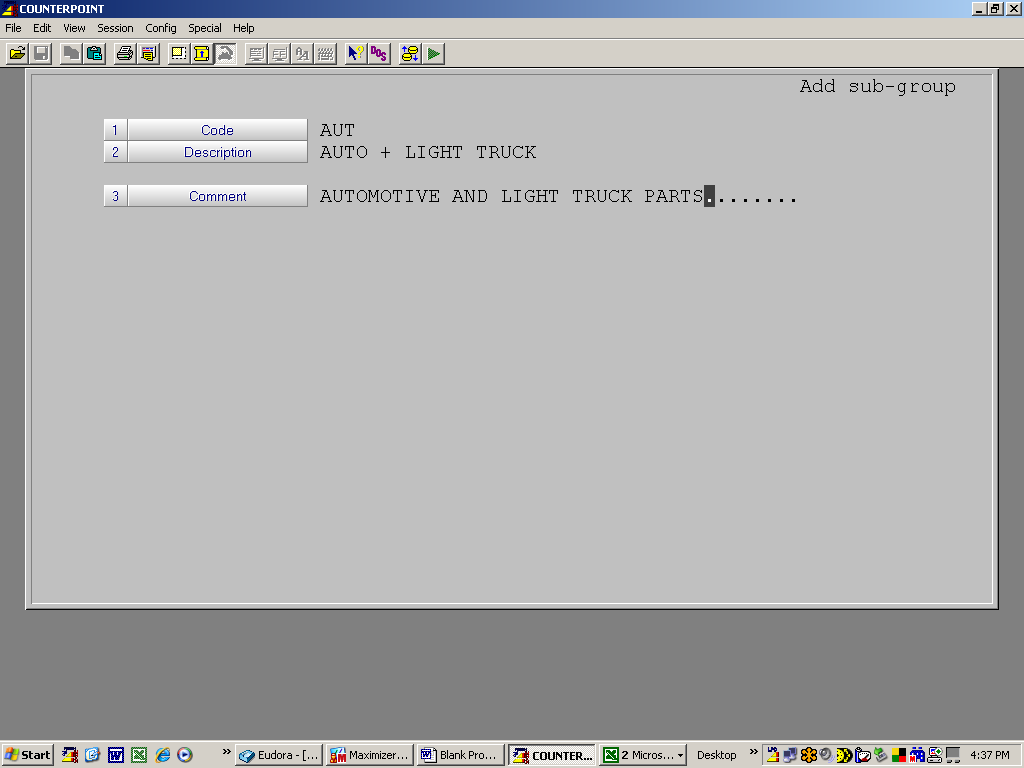
Sub Groups are required to support future reporting potential, so in this case you can make the subgroups very simplistic if you choose. For example if your operation sells HD parts and well as automotive and light truck you may want to set up only two sub groups being AUT and HD as shown below.

Once your groups are set up you will only need to return to this screen if you decide to change the basic groups that you set up. Upon Completion of the Groups Maintenance hit [F2] to exit this routine which will return you to the initial screen. As shown below.
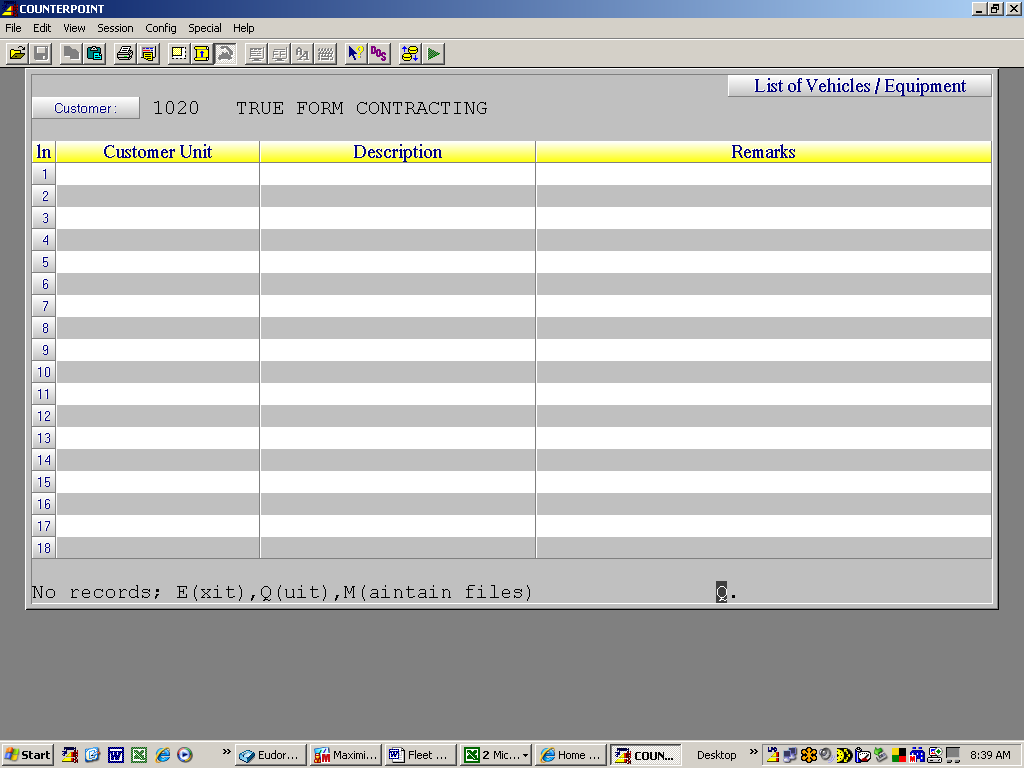
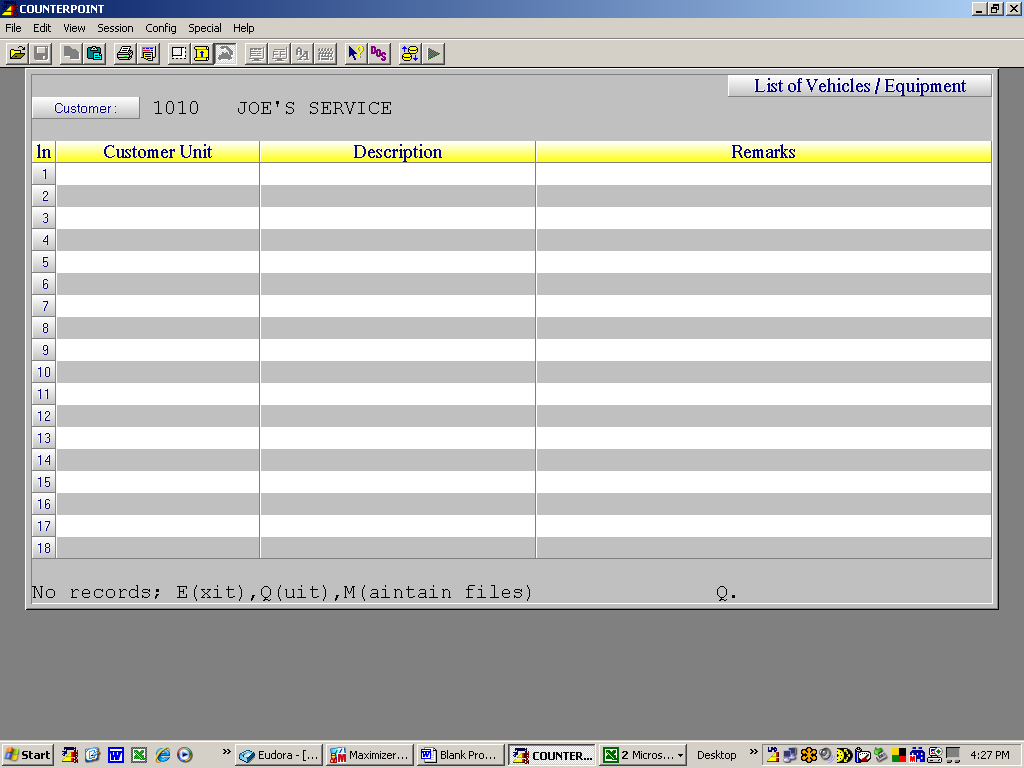
Note that the prompt at left bottom starts with “No Records” This is an indication that this customer, has not had any vehicles added to his fleet. In this case take the M(aintain Files) option then select The Equipment option which will bring up the Add/Change/Delete screen. Selecting Add brings up the following screen
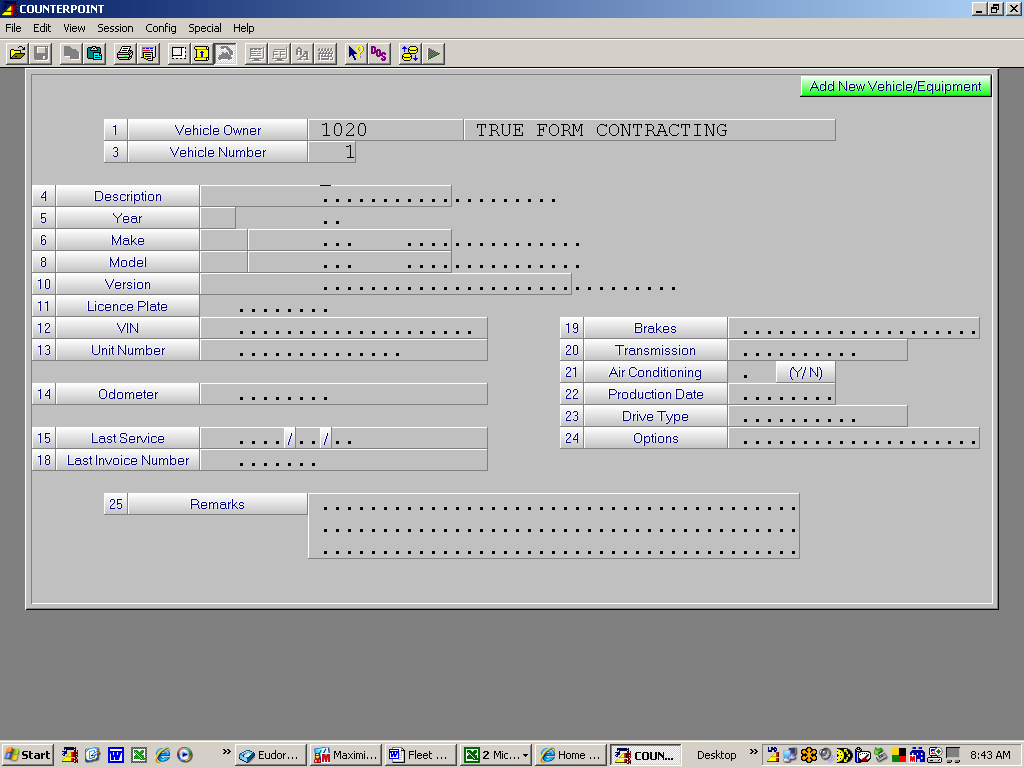
Enter Data as outlined below.
Description – Enter a meaningful description of this vehicle. Try to use the description that the customer will relate to as they will likely tell the counter staff that they are working on the “old red beast” or some other such internal name for this unit when they call in for parts.
Year – Yr of Vehicle.
Make – A three digit Alpha code for the make of the vehicle. Hit TAB to see a list of valid Car and Light Truck models. If the Unit is not automotive/light truck (ie a Heavy Duty or Construction vehicle) simply enter in the information required.
Model – A three digit Alpha code for the model of the vehicle. Hit TAB to see a list of valid options. If the Unit is not automotive/light truck (ie a Heavy Duty or Construction vehicle) simply enter in the information required.
License Plate, VIN, - Fill or leave blank as appropriate you your use
Unit Number – Typically a customer assigned number or name for this vehicle.
Odometer – Optional Enter if required. When field is accepted cursor to skip down to Remarks field.
Last Service, Last Invoice Number – These fields are system maintained from the repair shop module if it is used.
Fields 19 thru 14 - Reserved for Future use. No entry is required or possible in this screen.
When all fields are complete and you are happy with the results hit [F1] to add this vehicle to the customers fleet. If there are no other units to be added to this fleet, hit [F2] to exit the program. This will return you to the Fleet Vehicle list page.
Select M(aintain) and then select PartsList enter Add/Change/Delete as appropriate which will bring up the screen as shown on the following page.
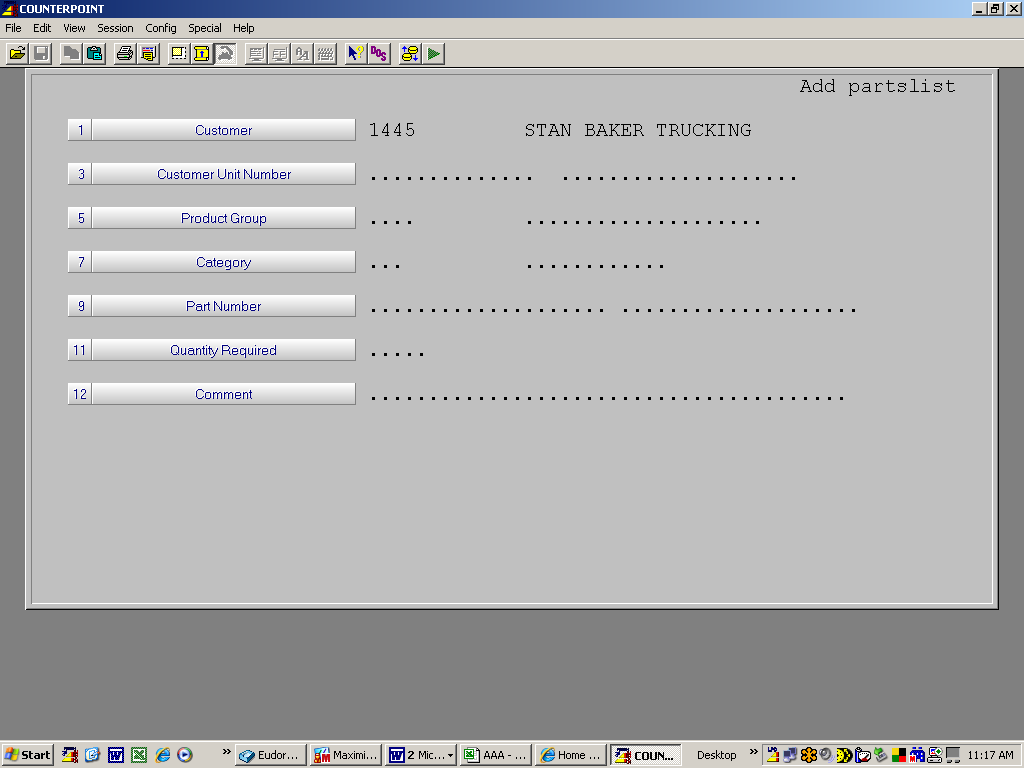
Enter Data as follows
Customer – Entered by the system.
Customer Unit Number – Enter the unit number or name that the part(s) you are about to enter will be used on.
Product Group – Enter the Product Group that the entered parts will have sales data captured under. (ie HD or AUT in this example)
Category – Cursor will skip this field and auto fill when you enter a part number. In the case where the part exists in more than one category you will need to select the correct category from the displayed options.
Part Number – Part number used on the specified vehicle.
Quantity Required – Enter the quantity required in this units use of the part.
Comment – Optional Enter a free form comment that will assist in ensuring this part is correctly chosen when the request comes in (ie “Used on the PTO for the hydraulic pump”) or something similar.
When you are happy with the screen hit [F1] to accept the entry.
Repeat for all other parts used on this Unit. When done hit [F2]
This completes the set up of a Unit and it associated parts.
Using The Fleet Part System Within COUNTERPOINT
When a customer calls in for parts and identifies that these are for a unit in his fleet proceed as follows.
1 Set up the invoice for the customer as normal (ie enter customer number PO if required and your customer number.
2 When the cursor is in the Line Type field hit Shift/[F10] which will bring up the customer fleet list similar to that shown below.
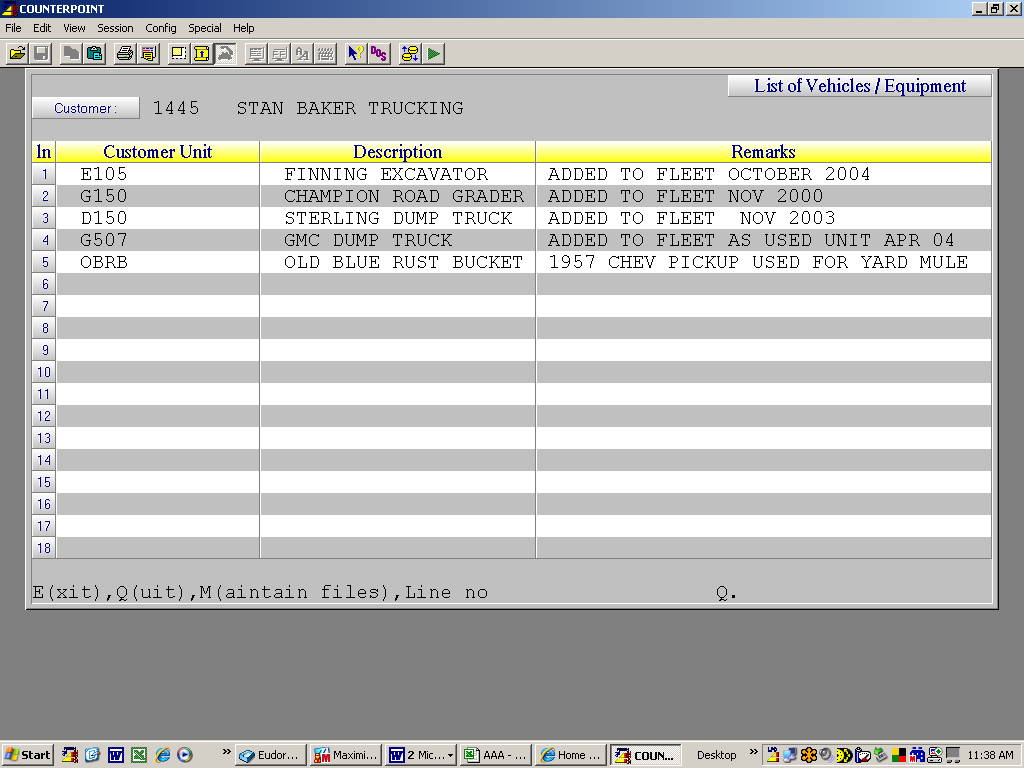
3 Select the appropriate unit as specified by the customer which will bring up the parts list. As shown below.
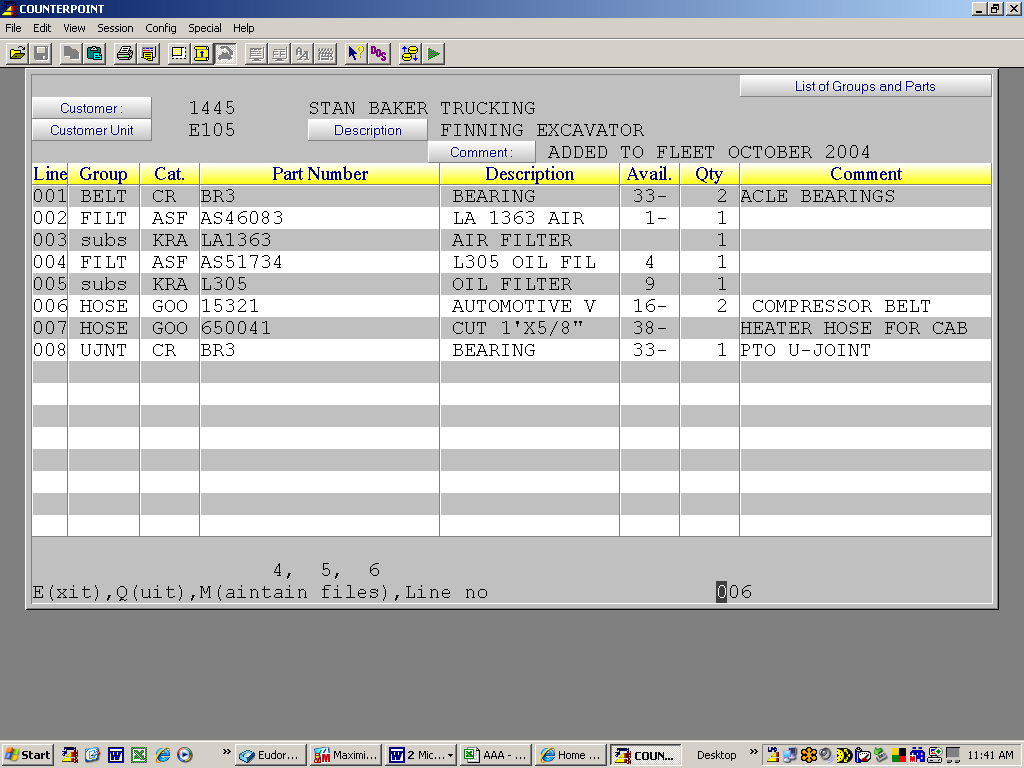
4 Enter line number(s) corresponding to the parts you need to sell. Note that as you select line numbers the program moves selected lines to the space just above the “Maintain files” line.
5 When you have selected all required parts hit “E” to exit the screen and move the parts in the quantities specified at the customers prices onto the invoice.
Notice that the parts list displays the quantity on hand and the quantity required for each part.
If you need to add, delete or change a part for this unit it can be done at this point by entering M to launch the maintain files routine.
General Charges & Deposit Handling
Definition
General charges are a new line type in the COUNTERPOINT invoicing program which allows you to include amounts on the invoice which do not impact inventory or apply standard comments to an invoice. The charges can be automatically applied to all transactions based on a percentage up to a maximum value or a set dollar amount. General charges can also be added to an invoice manually. This feature will also allow deposits to be added to Order transactions which will automatically reduce the amount owed when the order is completed and turned into an invoice.
Processing
General Charge Codes
The maintenance of General Charge Codes is found through System Utilities > System Setup > Sales Desk > General Charge Code Maintenance.
A maximum of two characters is used for the code. The description used will be put on the invoice when the code is used. The Type can be a $, % or C for a standard comment. The charge can either be setup as a percentage or as a dollar value. This is used for automatic charges and deposits. For manually added charges the value would be left at zero. If a percentage charge is to be capped at a certain value that would be entered in the maximum value. The tax codes are based on the values setup in the Billing Parameters. If levies are to be included in the calculation of an automatic charge this flag must be set to Y. Deposits are not to be set as an automatic charge. If the “enter text” setting is Y the user will be able to alter the comment which will be printed on the invoice. If the value is allowed to be changed or entered manually the “enter value” setting must be Y. In the case of a return the date range is also used to determine if an automatic charge should be refunded based on the original purchase date.
Customer Maintenance
Customers that are exempt from automatic general charges require a “G” be entered in one of the “account control flags” in the customer maintenance screen.
Invoicing
Any automatic charges will be added as the last line on an invoice when the body of the invoice is accepted. If new lines are added later, the value of the automatic charge will be adjusted to reflect the new total of the invoice. Should an automatic charge be adjusted manually it will not be altered if any other changes are made to the lines on the invoice.
To enter a general charge or standard comment manually use the new line type of “G”. This will display a list of up to 18 codes in the information window or you can use the TAB key to search additional codes
Deposit type codes may only be used on Order transactions.
Comment codes will have no value associated with them.
When taking a deposit for products that will be delivered at some future time you must use a transaction type of “O”rder. The items being purchased are to be added to the order as Backorder "B" linetype (Normally stocked items) or a Special Order "S" linetype (Non Stocked/Pickups) lines. When the items have been added enter a “G” line for the deposit and select the deposit code which has been setup. Providing the deposit code has been setup with a percentage the amount of deposit required will be shown on the screen. This can be changed if necessary providing the code has been setup to allow the value to be entered.
When recalling the order and turning it into an invoice the value of the deposit will automatically be reversed so the total owing will reflect the price of the items less the amounts previously received. If a customer returns to make additional deposits the original order must be recalled and the second deposit added to the order.
Customer Backorders
When a backorder is being fulfilled upon receipt of the product and an invoice is created the standard comments contained on lines 1 through 3 of the original transaction will be included on the fulfillment invoice.
Invoice Register
The total value of any Freight and General Charges will be shown on the invoice register in the relabelled column “Freight /Oth Chgs”.
Invoicing with Global Payments Terminals
To process a cash sale (paid by cash or credit card):
Always take the credit card first and cash last
- Create your invoice as normal
- If a charge customer decides to pay by cash or credit/debit you will need to change the customer on the invoice to your cash sale customer. When asked “recalculate pricing” the default is N.
- You cannot change the method of payment for a charge customer unless taking a deposit on account.
- Select F1 in Counterpoint for payment; this will bring you directly to the payment screen:

- Select F1 in Counterpoint to accept the amount owing. This amount will pass to the terminal
- Tap or insert the customer’s credit card, all credit card and payment information will feed back to Counterpoint
- The screen will go back to the invoice screen
-
If the customer would like to pay with multiple payment types:
- At the payment screen, select F3 in Counterpoint to change the value, then process the credit pmt
- Now the new balance owing appears on the same payment screen
You can do up to 3 payment types
- If the balance is paid by cash, enter “$” on the bottom of the screen (to the right of F11)
- If the card is swiped, a signature is required, a ‘signature capture’ screen will appear, customer is to sign on the signature pad
- If the card is declined, the message ‘declined’ will be on the terminal, select F1 to go back to the terminal to use another payment card
- If you start to pay a transaction paid by cash/credit/debit you must complete this prior to processing another cash sale on the same work station
To process a credit invoice on the customer’s credit/debit card:
- Create your credit as normal
- Select F1 in Counterpoint for refund, screen will go straight to the payment screen
- Select F1 in Counterpoint to accept the credit amount
- This amount will pass to the terminal
- You will need to enter the manager password (this will be provided in your go-live documentation)
- Tap or insert the customer’s credit card, all credit card and payment information will feed back to Counterpoint
The method of payment must be the same as the original invoice
- The screen will go back to the invoice screen
Daily refund limits per terminal per day: credit card $5,000, debit card $2,000, for refunds over those limits, please use a different terminal or call the help desk to put the credit through
To void an invoice that was processed on the customer’s credit/debit card:
- Select F11 in Counterpoint, this will reverse the transaction, including multiple payment types
- F11 Can also be used to void a transaction in the payment screen where no payment can be received because of insufficient funds.
To process a credit card payment on an invoice, card NOT present:
- Manually enter the credit card number in the terminal
- You will be asked if the card is present, you must answer ‘NO’ otherwise you will be prompted to get a customer signature after completing the card payment
The 3 digit CVV number is required (card verification value) on the back of the card (not required for a credit return)
You can bypass the other questions on the machine (order number, address, postal code) with the enter key
To process a deposit on order:
Use this function when you are taking a deposit for products that will be delivered at some future time
- When taking a deposit:
- Use transaction type ‘O’ (order)
- The items being purchased are to be added to the order as a Special Order (non stocked/pickups)
- When the items have been added, enter a ‘G’ line for the deposit
- Select DP (deposit on order)
- Take payment from customer
- When the product has been received and you are creating the invoice:
- Recall the order and turn it into an invoice
- The value of the deposit will automatically be reversed so the total owing will reflect the price of the items less the amounts previously received
- If the customer does not want the part anymore, you can void the invoice. The deposit is not refunded to the customer
- Recall the order and turn it into an invoice
When a customer makes a payment on account with a credit card:
do not use this method if customer is paying on account with a cheque
this will be a separate transaction from any current purchases
- From invoicing screen, enter Customer #
- Enter Clerk #
- Now you are at line type – select F4 – this will bring you to payment method
- – select the payment method
- Now you are at Transaction Type – enter ‘C’ for ‘Payment on Account’
- You are back to line type – enter ‘$’ – this brings up part # ‘Received on Account’
- Enter the amount of the payment, this will bring you to the payment screen
- An invoice will be generated
End of day procedures:
The units will automatically close every evening. The next morning you will see a tape of all of your transactions from the previous day. Please give to your designated person who will collect all the tapes and submit to Head Office.
Check your terminal in the morning. If the unit says “Out of Balance” please call Accounting.
If prompted by the Global terminal to call in for an authorization number:
Once you receive the authorization code, go to the main menu on the terminal and choose “Force”
Then choose “Credit” to complete the transaction with the authorization code
FYI
- All backorder fills on cash sales will produce an open order
- As always, once you are at the payment screen, and the customer would like to add to his order, you will need to process another invoice
- If the credit card is declined, and the customer says he will come back with another card, you can open another invoicing screen for your next sales, and keep that current invoice open until the customer comes back. It must be closed off before the end of the day
- If the Global terminal give you a message “call for authorization”, please call the help desk, they will give you an authorization number. Now you can finalize the payment on the Global terminal. This will leave you with an unfinished invoice, you can close the invoice as a cheque sale and advise Accounting.
Selling a Core
There may be ocassions when it is desired to sell a core to a customer. This is done by entering a “C” line type and entering “-1” (Negative 1) as a quantity. Because, in a core line, the quantity amount is automatically reversed from what you entered the end result is a core sale.
If you try this and it will not accept “-1” as a sale quantity it means that you need to change Field 72 Allow Core Sales in the Sales Parameter Maintenance, Screen 1 to a “Y” This program is accessed via menu path as follows.
- System Utilities… -> 3. System Setup… -> 4. Sales Desk… -> 2. Parts Billing Parameters -> Screen 1 – System Defaults
Suspense Payments with Payment Terminal
Payment Terminal – Semi-Integrated
Changes to invoicing related to Suspense Payment Type
- Cash Sale transaction defaults to payment method of Suspense
- Require a new Card Type of “S” to indicate proper GL Account
- Accept of cash transaction goes directly to payment screen without asking payment method
- Actions in the payment screen
- Accept will send invoice information to Payment terminal
- F3 allows change of the amount to go on a card or paid by cash
- F11 will void the transaction
- If no monies have been received both the invoice and credit will be posted to the Suspense Account
- $ will pay the remaining amount of the transaction by cash
- Charge Account cannot change the method of payment to card or cash
- Must change the Customer to the Cash Account
- This change offers the option to recalculate pricing
- The default is a parameterized value that can be set for Y or N
- Customer setup as COD and/or “$” defaults to S as method of payment
- These are treated the same as the Cash Account and will be pushed directly to the payment screen when the invoice is accepted
- Require a GL Account to use for the Suspense payment method
- The Invoice Register can be used to find any transactions posted with the “S” payment code
- Used to determine errors.
- All cash transactions are reported on the invoice register with the card type used by the customer. This is not entered by the sales clerk.
Updating Credit Hold Invoice
Overview
In instances where an online wholesale customer submits an order but is over their credit limit, a credit hold invoice is created. This is a suspended transaction with all of the items they have ordered, which can be released once they are back below their credit limit.
Receiving The Order
When the original order is submitted, a credit hold transaction will print. This will look much like a regular invoice, but will be marked as a 'Credit Hold Invoice' on the paper. It will also have a number in the 9,000,000 range.
Before releasing the credit hold invoice, you must bring the customer back down below their credit limit. To do this, you may increase their limit or receive a payment against the account.
Releasing the Invoice
To release a credit hold invoice, you will need to take the following menu path:
4. Sales Desk > 5. Transaction Queries > 7. Credit Hold Invoice Release
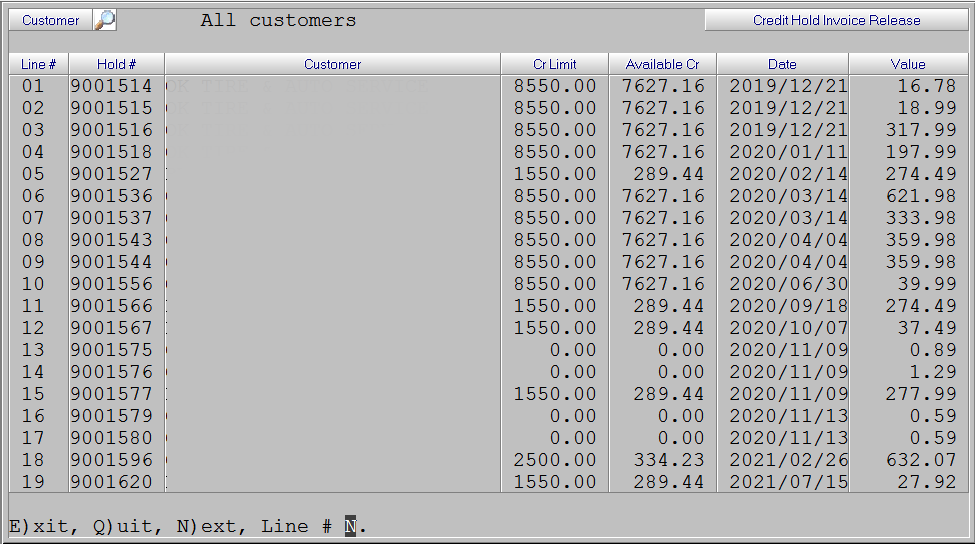
Once you have a listing of the invoices, selecting any line number will give you the option to take action against that respective invoice.

Your options are:
- D)etail - Show the invoice detail on screen
- R)elease - Try invoicing the transaction. Note that if the customer is still above their credit limit a new Credit Hold Invoice will be created
- C)lear - Remove the transaction from the listing. This will delete the transaction from the system completely.