Accounts Receivable
- AR Month End
- AR Reports
- AR Year End
- Cash Receipts Processing
- Customer Analysis
- Customer Notes Inquiry
- Customer Notes Maintenance
- Customer Search
- Data File Maintenance
- Loyalty Rewards Program
- Move ROA Payment from one Customer to Another
- Setting Up Invoice Copies
- Statements
- Transaction Processing
AR Month End
a checklist is provided with this documentation to assist you in the successful completion of the accounts receivable month end.
Set Statement Date
1. ACCOUNTS RECEIVABLE > 5. MONTH END PROCESSING > 1. SET STATEMENT DATE
The date should be the last date on which Invoices or other Transactions were processed, normally the last date of the month. The Accounts Receivable > ar Month End routines are run after the last business day of the month, and after the Sales desk control > Sales desk month End routines have completed. The AR Month End must be completed before the next End of Day process is run, and is designed to be run from start to finish at one time.
Service Charge Processing
Calculate Service Charges
1. ACCOUNTS RECEIVABLE >5. MONTH END PROCESSING >2. SERVICE CHARGES >1. CALCULATE SERVICE CHARGES
This program will calculate the Service Charges based on the figures that you have previously set up in 9. SYSTEM UTILITIES >3. SYSTEM SETUP > 1. ACCOUNTS RECEIVABLE > 1. SYSTEM Parameters , you may wish to double check the ensure that they are correct before you run this procedure for the first time.
Only those customers flagged [y] in the 1. accounts receivable > 1. data maintenance > 1. customer field number 55. Service charges will be considered for calculation.
Once the service charge calculation has taken place, do NOT use this option again, until and unless you have deleted all the system calculated service charges using the service charge adjustments process. If you do so, then customer records will be updated with duplicate service charges.
Service Charge Edit List
1. ACCOUNTS RECEIVABLE > 5. MONTH END PROCESSING >2. SERVICE CHARGES >2. SERVICE CHARGE EDIT LIST
This process will create and print a Transaction Edit List of all transactions entered/created for verification before updating and will also print a GL summary Edit List, which totals the proposed entries to the General Ledger during Update.
Service Charge Adjustments
1. ACCOUNTS RECEIVABLE >5. MONTH END PROCESSING >2. SERVICE CHARGES >3. SERVICE CHARGE ADJUSTMENTS
Any changes you wish to make to the calculated entries shown on the Transaction Edit List have to be done as a Change or Delete (to remove the service charge completely). The Add option will allow you create a Service Charge to a Customer’s account when none has been calculated and follows the same format as those processed in accounts receivable > transaction processing. Make sure that type [1] is chosen.
Service Charge Update
1. ACCOUNTS RECEIVABLE >5. MONTH END PROCESSING >2. SERVICE CHARGES >4. SERVICE CHARGE UPDATE
Press [ENTER] to continue if you are ready to update the Service Charge Transactions, then [ENTER] to start the Update. The screen will display the date and time as it completes each step. A Transaction Journal and a GL Journal will print automatically. Once the update completes, the service charge entries will appear on the customer account and can be displayed in accounts receivable > customer analysis screen.
Trial Balance Reports
Detailed Trial Balance
1. ACCOUNTS RECEIVABLE > 5. MONTH END PROCESSING >3. TRIAL BALANCE REPORTS >1. DETAILED TRIAL BALANCE
This report will print the Customer number and name, the document type and number, date, reference and the amount for any and all entries made to the customer during the period, or since the last open item purge completed. Each customer account is totalled, but there is no ageing on this report.
Open Item Purge
1. ACCOUNTS RECEIVABLE > 5. MONTH END PROCESSING > 3. TRIAL BALANCE REPORTS > 2. OPEN ITEM PURGE
This program will purge all fully paid items from the customer’s account. A fully paid invoice is one that has either a payment or Credit Memo applied against it, or a combination of the two in or to bring the net amount of the invoice or document to $0.00.
Aged Detail Trial Balance
1. ACCOUNTS RECEIVABLE > 5. MONTH END PROCESSING > 3. TRIAL BALANCE REPORTS >3. AGED DETAIL
The Detailed Aged Trial Balance report will age the amounts owing on the customer’s transactions based upon the criteria set up in the 9. SYSTEM UTILITIES > 3. SYSTEM SETUP > 1. ACCOUNTS RECEIVABLE > 1. SYSTEM ParameterS file. You may wish to check this to ensure it is correct prior to running these reports for the first time.
This report shows the customer number and name, the document number, date and reference, and the net amount owed on the account. Then the documents are aged as current, 30 days, 60 days, 90+ days and any future amount (if you used the cash receipts processing > Dating Terms function). The net amount and the aged amounts are totalled.
Aged Summary Trial Balance
1. ACCOUNTS RECEIVABLE > 5. MONTH END PROCESSING > 3. TRIAL BALANCE REPORTS > 4. AGED SUMMARY
The Summary Aged Trial Balance report will age the amounts owing on the customer’s transactions based upon the criteria set up in the 9. SYSTEM UTILITIES > 3. SYSTEM SETUP > 1. ACCOUNTS RECEIVABLE > 1. SYSTEM ParameterS file. You may wish to check the fields called summary aged totals prior to running this report for the first time.
This report shows the customer number, name and phone number, the documents/invoices are aged at current, 30 days, 60 days, 90+ days and any future amount (if you used the Dating Terms function) and the totals are printed.
Aged Detail Trial Balance – Alpha
1. ACCOUNTS RECEIVABLE > 5. MONTH END PROCESSING > 3. TRIAL BALANCE REPORTS > 5. AGED DETAIL - ALPHA
This is the same report as the Aged Detailed Trial Balance, but it prints in Customer Name order instead.
Aged Summary Trial Balance – Alpha
1. ACCOUNTS RECEIVABLE > 5. MONTH END PROCESSING > 3. TRIAL BALANCE REPORTS > 6. AGED SUMMARY - ALPHA
This is the same report as the Aged Summary Trial Balance, but it prints in Customer Name order instead.
Aged Detail by Salesman
1. ACCOUNTS RECEIVABLE > 5. MONTH END PROCESSING > 3. TRIAL BALANCE REPORTS > 7. AGED DETAIL BY SALESMAN
This is the same report as the Aged Summary Trial Balance with the customers by SALESMAN
Aged Summary Trial Balance by Salesman
1. ACCOUNTS RECEIVABLE > 5. MONTH END PROCESSING > 3. TRIAL BALANCE REPORTS > 8. AGED SUMMARY BY SALESMAN
This is the same report as the Aged Summary Trial Balance with the customers grouped by Salesman. After each salesman’s customers are printed, a total is printed for each of the ageing periods.
Here you would process your statements. Review the Statements documentation and resume from here.
Balance Forward Update
- ACCOUNTS RECEIVABLE >5. MONTH END PROCESSING >5. COMPLETE MONTH END >1. BALANCE FORWARD UPDATE
If you have balance forward customers, then use this option to take all the current invoices for each customer and combine them into one balance forward total. Once this step has completed, all details that have been displayed on the Customer Analysis screen will be removed and replaced with the balance forward figure.
Balance Forward Aging
1. ACCOUNTS RECEIVABLE >5. MONTH END PROCESSING >5. COMPLETE MONTH END >2.. BALANCE FORWARD AGING
Once the details have been combined to one value, the ageing process must take place, advancing each balance into the correct age, current, 30 days, 60 days and 90+ days.
AR Month End Update
- ACCOUNTS RECEIVABLE >5. MONTH END PROCESSING >5. COMPLETE MONTH END >3. a/r month end update
Once all steps are complete, the ar month end Update can commence. This option will advance the GL period for Accounts Receivable. If you want to confirm that the update has completed successfully, then check the accounts receivable > data file maintenance > AR Parameters File for the value in the Financial Period field.
SET STATEMENT DATE
1. ACCOUNTS RECEIVABLE > 5. MONTH END PROCESSING >5. COMPLETE MONTH END > 4. SET STATEMENT DATE
Set the statement date to the next month end for proper aging on the invoice screen.
Customer Counter Balances Reset
1. ACCOUNTS RECEIVABLE > 5. MONTH END PROCESSING >5. COMPLETE MONTH END > 5. COUNTER BALANCES RESET
Use this option to recalculate the customer’s ageing figures that appear at the bottom of the screen during sales desk > Invoicing/transfers. The statement date should be reset to the end of the new month prior to resetting the customer balances. Otherwise, any sales made in the new month will be considered as future.
AR Reports
Customer Master List (Numeric)
1. Accounts receivable >3. reporting >1.customer listings >1. customer master -numeric
This report shows most of the information from the Customer Record and is printed in numeric order based on the Customer code (number)
Customer Master List (Alpha)
1. accounts receivable >3. reporting >1.customer listings >2. customer master -alpha
This report shows most of the information from the Customer Record and is printed in alphabetical order based on the Customer name.
Customer Summary List (Numeric)
1. accounts receivable >3. reporting >1.customer listings >3. customer SUMMARY-NUMERIC
This report shows the Customer number, name, and phone number, as well as the complete address (all three lines) and postal code (you entered this in the 4th address line) in numerical order based on the Customer code (number).
Customer Summary List (Alpha)
1. accounts receivable >3. reporting >1.customer listings >4. customer SUMMARY-ALPHA
This report shows the Customer number, name, and phone number, as well as the complete address (all three lines) and postal code (you entered this in the 4th address line) in alphabetical order based on the Customer name.
Shipping Address Report
1. accounts receivable >3. reporting >1.customer listings >5. SHIPPING ADDRESS REPORT
This report prints in Customer number order and shows the Customer number and name, and the code and addresses set up in data file maintenance > Shipping Addresses Maintenance.
VIP CUSTOMER LIST
1. accounts receivable >3. reporting >1.customer listings >6. VIP CUSTOMER LIST
This programme needs the input range of VIP Customers numbers and a selection of a print order. The order may be “V” for VIP no order, “A” for VIP name order, “T” for telephone order, “C” for Cell phone order or “N” for card # order.
Customer List by Salesman
1. accounts receivable >3. reporting >1.customer listings >7. CUSTOMER LIST BY SALESMAN
This is the same report layout as the Customer Summary List, except that in this report, you can select any or all territory and/or salesman to limit the list. If you choose to print all territories and salesmen, then the report is sorted numerically by salesman number, with a page break between salesmen.
Customer List by industry
1. accounts receivable >3. reporting >1.customer listings >8. CUSTOMER LIST BY INDUSTRY
This is the same report layout as the Customer Summary List, except that in this report, you can select any or all industry types in order to limit the list. If you choose to print all industries, then all customers for all industries will be printed, grouped by industry.
INACTIVE Customer LIST
1. accounts receivable >3. reporting >1.customer listings >9. INACTINVE CUSTOMER LIST
The customer record is updated with a last sale date with each invoice. This report will show all customers having no sales after the date you enter. The report prints the customer number, name and phone number, the account balance and aging in summary, including any future amount and the date of the last sale.
Customer Mailing Labels
1. ACCOUNTS RECEIVABLE >3. REPORTING >3. LABEL PRINTING >1. CUSTOMER MAILING LABELS
The standard format for customer mailing labels is 3-1/2” x 15/16” 1 wide
- Starting Customer
- Ending Customer
Select the individual customer or range of customers. Pressing [enter] through these fields will default the selection to all, or from the beginning to the end of the customer records.
- Starting Territory
- Ending Territory
Select the individual territory or range of territories. Pressing [enter] through these fields will default the selection to all territories.
- Starting Salesman
- Ending Salesman
Select the individual salesman or range of territories. Pressing [enter] through these fields will default the selection to all salesmen.
- Include Ship-to’s
Reply [y] if you wish to have a mailing label for the customer’s shipping addresses as set up in data file maintenance > shipping address maintenance.
- Days Overdue
You can further limit the selection of customer labels to print if you wish to only send to those customers with an outstanding and overdue account status. Enter the number of days a customer account is to be aged before being considered for this selection.
- Specify Categories
If you only wish to send a mailing to customers having purchased a specific product line (category) then reply [y]; otherwise all customers regardless of their purchase history will be selected for labels, as long as they also fulfil the other selection criteria.
- – 20. Categories:
You may enter up to six categories.
vip mailing labels
1. ACCOUNTS RECEIVABLE >3. REPORTING >3. LABEL PRINTING >2. VIP MAILING LABELS
This programme allows the entry of a range of VIP customers. This is a create programme and would be printed from the CUSTOMER MAILING LABELS–ALIGN/PRINT
Label AlignMENT TEST
1. ACCOUNTS RECEIVABLE >3. REPORTING >3. LABEL PRINTING >3. LABEL ALIGNMENT TEST
Place the forms in your printer and use this option to align them and then print when the alignment is correct.
Customer Over-Due Report – Summary
1. ACCOUNTS RECEIVABLE >3. REPORTING >2. CREDIT REPORTS >1. SUMMARY OVERDUE
- Starting territory
- Ending territory
Select the individual territory or range of territories. Pressing [enter] through these fields will default the selection to all territories.
- Starting salesman
- Ending salesman
Select the individual salesman or range of territories. Pressing [enter] through these fields will default the selection to all salesmen.
- Days overdue
You can further limit the selection of customer to print on this report if you wish to only include those customers with an outstanding and overdue account status. Enter the number of days a customer account is to be aged before being considered for this selection.
- Date for Aging
Enter the date upon which to calculate the overdue status of the account.
This report has a similar layout to the Ar month end > trial balance reports > aged Detail Trial Balance, showing the customer number, name, contact and phone number, the last payment date and amount, and a summary of the account with the overdue amount and account balance.
DETAIL OverDue
1. ACCOUNTS RECEIVABLE >3. REPORTING >2. CREDIT REPORTS >2. DETAIL OVERDUE
This report has a similar layout to the Ar month end > trial balance reports > aged Detail Trial Balance, showing the customer number, name, contact and phone number. The last payment date and amount, and the details of each invoice with the overdue amount and account balance are also printed for each customer
Over Credit Limit Report
1. ACCOUNTS RECEIVABLE >3. REPORTING >2. CREDIT REPORTS >3. CREDIT LIMIT REVIEW
This report will list all customers with outstanding balances greater than that of the credit limit amount set on the customer record. You can include customers with no credit limit (cash customers) if you wish.
This report prints the customer number and name, the salesman, the balance of the account and the credit limit from the data file maintenance > customer maintenance record, as well as calculating and printing the amount over the credit limit. Any future amount is printed as well should you have used the transaction processing > Dating Terms function.
CUSTOMERS ON HOLD
1. ACCOUNTS RECEIVABLE >3. REPORTING >2. CREDIT REPORTS >4. CUSTOMERS ON HOLD
This report all customers on credit HOLD or COD.
PAYMENTS REGISTER
1. ACCOUNTS RECEIVABLE >3. REPORTING >2. CREDIT REPORTS >5. PAYMENTS REGISTER
This report shows the monthly payments by customer, invoice number, date, amount, discount.
AR Year End
A/R YEAR END UPDATE
- ACCOUNTS RECEIVABLE >6. YEAR END PROCESSING >1. A/R YEAR END UPDATE
This program clears the Year-To-Date sales figures on the customer record. It must be run immediately following the completion of the final month end procedures for the year.
SALES SUMMARY YEARLY CLEAR
- ACCOUNTS RECEIVABLE >6. YEAR END PROCESSING >2. SALES SUMMARY YEARLY CLEAR
This function will clear the Year-To-Date salesman figures as seen in Salesman Maintenance.
SUB-SYSTEM YEARLY CLEAR
- ACCOUNTS RECEIVABLE >6. YEAR END PROCESSING >3. SUB-SYSTEM YEARLY CLEAR
This function will clear the YEAR-TO-DATE total from SUBSALES used in sales by category type.
Cash Receipts Processing
Cash Receipts Input
1. ACCOUNTS RECEIVABLE > 4. TRANSACTION PROCESSING >5. CASH RECEIPTS PROCESSING >1. CASH RECEIPTS INPUT
The receipt of monies from a customer in order to pay their account may be accomplished either at the till/counter through sales desk > invoicing/transfers or through cash receipts processing in accounts receivable.
Enter in the customer number for the payment you have received, the contact from the customer record will be displayed. The date will always default to today’s date. If you enter another date, be aware that each record after this one will duplicate that date, unless you specifically change it. Enter in a reference number (usually the customer’s cheque number) and the amount of the payment being made.
If you use separate gl accounts for the different types of payments received in sales desk > Invoicing/transfers, you can use those same codes here to indicate the type of payment that was received. The choices are [c] cheque [$] CASH [D] DEBIT [V] VISA [M] MASTERCARD. Other payment methods are available if you have set them up in 4. Sales desk > 7. ADMINISTRATION > 1. DATA maintenance > 2. credit card. If you only have one GL account for your bank, then you may choose to simply accept the default [c] for cheque.
You will notice that the left to allocate figure is set to the same amount as the amount received.
If the Cash rec autopay (FIELD 43) flags in the 9. SYSTEM UTILITIES > 3. SYSTEM SETUP > 1. ACCOUNTS RECEIVABLE > 1. SYSTEM ParameterS screen is set to [N], then you can choose whether or not to apply the payment to the oldest invoices first. If you choose to not automatically apply the payment, then you will need to pick and choose the invoices to be paid, entering in the gross amount (usually accepting the value there, unless this is a partial payment) and any discount that may apply to the invoice.
If the customer is an Open Item customer, then the screen will display the first 12 outstanding invoices on file. When the amount to allocate is 0.00, pressing F1 may complete the entry.
If you have turned on the flags for Cash Rec autopay in the Parameter file, then the oldest invoices will be shown as automatically paid, with any partial payments being applied to the more recent invoice.
If the customer is a Balance Forward customer, and the Cash rec autopay flag is set to [N], then you will have to decide whether or not to pay the oldest balance first in the same manner as an Open Item customer. If the Cash rec autopay flag is on, then the oldest balance will be paid automatically. You are always given the option of changing what the system has done before the record is accepted.
If a payment is received and it is unknown at the time of entry which invoices are being paid, enter the amount to the UNAPPLIED line. Application of the payment to the appropriate invoices may be done at a later date.
Cash Receipts Edit List
1. ACCOUNTS RECEIVABLE > 4. TRANSACTION PROCESSING >5. CASH RECEIPTS PROCESSING >2. CASH RECEIPTS EDIT LIST
This (optional) program will create and print a Cash Receipts Edit list of all transactions entered so that you can verify your entries before updating. A GL Summary Edit list will also print, which totals the amounts that will be posted to the General Ledger during the cash receipts Update process.
When you press [Return] to begin, the date and times that the process completes each step will be displayed.
Cash Receipts Update
1. ACCOUNTS RECEIVABLE > 4. TRANSACTION PROCESSING >5. CASH RECEIPTS PROCESSING >3.. CASH RECEIPTS UPDATE
The start of any Update program begins with an extra screen display to alert you to the fact that the Update has been selected. If you do not wish to continue, press the [F2] key to exit this screen and reply [N] to the next prompt.
If you do wish to continue, then press [enter] to get to the next step:
As with Cash Receipts Edit, once you have replied [Y] that you want to start the update, the date and times of each step will be displayed upon completion of that step. You will receive a Cash Receipts Journal and a GL Journal when all steps are complete. If the update fails to complete properly, please note any error message on the screen and contact the Support Department at AMS. You will not be able to do another update until the problem is resolved.
Apply unapplied cash
1. ACCOUNTS RECEIVABLE >4. TRANSACTION PROCESSING >5. CASH RECEIPTS PROCESSING >4. APPLY UNAPPLIED CASH
Use this screen to apply payments that have not previously been applied to invoices and/or transactions or those payments taken at the counter through the sales desk > Invoicing/transfers process. This option applies only to open item customers.
The amount of unapplied cash is displayed and matches the amount to allocate. Either accept with [f11] the amounts as displayed or change the to allocate amount to be the appropriate amount. Once the header has been accepted, the unpaid invoices are displayed and you can indicate whether or not to pay them and how much to apply to each one. Once the amount to allocate is 0.00 the transaction can be completed and not before.
The allocation of the unapplied cash takes affect on the customer account immediately. There is no report generated by this function.
Unapplied cash listing
1. ACCOUNTS RECEIVABLE >4. TRANSACTION PROCESSING >5. CASH RECEIPTS PROCESSING >5. UNAPPLIED CASH LISTING
This is a report showing all of the payments within the Accounts Receivable system that are as yet unapplied to specific invoices or balances. The report shows the customer number and name, the date of the payment, the reference if any, and the amount of the unapplied payment.
Payment history inquiry
1. ACCOUNTS RECEIVABLE >4. TRANSACTION PROCESSING >5. CASH RECEIPTS PROCESSING >6. PAYMENT HISTORY INQUIRY
Use this function to display a customer’s paid invoices between dates that you specify or from the first date on file to today’s date if the default dates are accepted (by pressing enter through the field). If the reference number (usually the cheque number) is known, it may be entered as well. If the reference field is left blank, all references will be included.
Payments processed in accounts receivable cash receipts and payments applied in the apply unapplied cash function are available for inquiry. The reference number, payment date, and discounts applied, the original invoice amount, the original invoice date and the method of payment are displayed. A [?] is used as a method of payment for all invoices paid as part of the apply unapplied cash process.
Customer Analysis
1. ACCOUNTS RECEIVABLE > 1. INQUIRY FUNCTIONS > 1. CUSTOMER ANALYSIS
These screens will provide an overview of the AR customer’s financial position with your company.
The customer must already exist, and the information displayed here comes from the customer record you have previously set up. At the bottom of the screen show detail Y/N is displayed. Reply [Y] to have the customer’s outstanding invoices displayed. If the customer is a balance forward customer, then any outstanding invoices prior to the current month will have been summarised into the bal. Fwd figure at the top of the detail screen.
From the detail screen, you can enter [E] to return to the menu, or [Q] to quit this customer and then enter in another customer to retrieve their information.
Customer Notes Inquiry
1. ACCOUNTS RECEIVABLE > 2. INQUIRY FUNCTIONS >3. CUSTOMER NOTES INQUIRY
Enter in the customer number and press [enter]. Indicate the type of note to inquire into. If un-sure of the type, pressing [enter] at the type will display all notes associated with the selected customer, in date order (regardless of type). When a specific type is selected, only notes of that type will be displayed.
The [A] option within the inquiry screen will take the user to add notes feature.
Customer Notes Maintenance
1. ACCOUNTS RECEIVABLE > 1. DATA MAINTENANCE >6. CUSTOMER NOTES
Providing that the note types have previously been set up using the menu option 9. SYSTEM UTILITIES > 3. SYSTEM SETUP > 1. ACCOUNTS RECEIVABLE > 3. NOTES PARAMETERS,
free-form notes may be added for any customer currently on file.
There are a total of 6 note types, spread across two styles: reserved and non-reserved, with a maximum number of reserved note types of three (3). In future releases of the software, reserved notes will be accessible with hot/function keys from inside various processes (example: invoicing / cash receipts etc.)
A TAB to search is available from the customer number field. Only A/R customers are available for notes, not VIP customers. The note is date and time stamped and the user is prompted to classify this note with a particular type.
When sorting the order of note types displayed during maintenance, reserved notes are listed first, in the order in which they have been entered in the parameter file. After reserved types, numeric and then upper case alphabetic types are listed, and finally lower case alpha types. Reserved note types are indicated with after the code.
There are 6 text fields available for the free-form note, contained on three lines numbered [1] [2] and [3]. The first line has 2 fields; the first is 40 characters in length, followed by 36 characters in the second field. The same applies to the next 2 lines. Should the note extend further than the number of characters available in any one field, the note will automatically be wrapped to the next one.
Word wrapping is done on a letter by letter basis, meaning that a single word may be split across two lines. No hyphenation of the split word is done. Pressing [enter] anywhere on a line will advance to the beginning of the next section, either on the same line or on the next. When the note text has been completed, press [enter] to complete the field, then [F1] to accept.
Changes are allowed at the any change? prompt. Entering the line number for change will bring the user to the beginning of the line. Changes are ALL overtype mode, meaning as soon as typing begins in a field/section, what is currently written will be over-written. If the first field of the line requires no change, pressing [enter] will advance to the beginning of the second field/section on that same line. Changes to notes are also available from the change notes menu option. A note that has been assigned to a reserved type may still be deleted.
Customer Search
1. ACCOUNTS RECEIVABLE > 1. INQUIRY FUNCTIONS > 2. CUSTOMER SEARCH
Enter in the customer name or portion of the customer name followed by the [] to pinpoint the starting place for the search. Enter in only [] in the customer number to start the search at the beginning of the customer file.
If there are multiple customers that are displayed, you can press [enter] or [N] [enter] to advance to the next page.
Data File Maintenance
Customer File Maintenance
1. ACCOUNT RECEIVABLE > 1. DATA MAINTENANCE > 1. CUSTOMERS > SELECT ADD/CHANGE/DELETE AS APPROPRIATE
Account #
When adding new customers, you must first specify the customer number to be used. In 9.SYSTEM UTILITIES…-> 3.SYSTEM SETUP…-> 4. SALES DESK…-> 2. PARTS BILLING PARAMETERS , (Screen 1) FIELD 13 CUSTOMER CODE the type of customer code is selected. You should have indicated which type of customer code you want your countermen to be using, alphanumeric or numeric - (A for alphanumeric is recommended).
If you have chosen alphanumeric, then entering 1000 as the customer will mean that the customer number will be entered as 1000 throughout the system. If the customer number type is numeric only, then 1000 will mean 001000 and the leading zeros will have to be entered.
Start with a number greater than 100, since accounts numbered less than 100 have special uses. (See the explanation for the field Sales Summary number # later on in this section)
Once entered, the customer code may not be changed, although the entire customer record may be deleted under the correct circumstances.
- Name
- Bill to
Enter these fields in the format you wish to have printed on invoices and statements. Use the 4th line of the Bill to field for the customer’s postal code.
- AR method
Enter in either [O] (open item) or [B] (balance forward). For Balance Forward customers, the application of payments is very simple, but the ability to justify or reconcile specific invoices is more difficult.
At the end of the month, customers that have been set to balance forward will have all current invoices summarised into one amount. The aged amounts for 30, 60 and 90 days are kept, but all invoice detail is removed. No detail is removed for outstanding invoices for customers that are set to open item.
You may wish to assign some customers to balance forward, while keeping others at open item. Should you desire to change a customer from one method to another, you may do so only immediately following the completion of the AR Month End process, prior to any Cash Receipts or End of Day process. The function is found in
9. SYSTEM UTILITIES > 9. FINANCIAL SUB-SYSTEM > 1.OPEN/ITEM BAL. Fwd. Switch.
- Phone
- Fax
Phone and fax numbers are to be entered without any formatting and will print with dashes between the sections. If the module called Repair Shop has been installed on your system, then the fax number can be used during invoicing to locate a customer.
- LD?
Enter [y] to indicate a long distance number, [n] to indicate a local number.
- Contact
Enter in the primary contact for this customer.
- Salesman
This is a validated field, which means that the salesman number must have already been created in
1. ACCOUNTS RECEIVABLE >1. DATA MAINTENANCE > 4. SALESMAN
prior to being able to use it here. Validation also means that the salesman number may not be changed at the time of billing (point of sale) to a number other than a valid one. A [TAB] to search for a valid salesman number is available.
Once sales have taken place, a change to this field will affect those sales reports that are created out of the month end process. However, daily sales reports will not be altered, keeping the sales rep information from the invoice as it was created.
- Territory
You may wish to divide or assign your customers to specific territories. These fields are used in the Sales Analysis reports to separate the customers. This is NOT a validated field and so may be left blank or set to any value.
- Start Date
Pressing [enter] will default the date to today’s date, reflecting the starting date of your business relationship with this customer.
- GST Lic. #
An entry of any kind in this field exempts this customer from GST taxes on all sales.
- PST Lic. #
An entry of any kind in this field exempts this customer from PST taxes on all sales, including end user levies (e.g. battery tax etc) that have been set up in
4. SALES DESK >7. ADMINISTRATION > 2.CUSTOMER PRICING > 6. LEVY/ECO FEE
- Remarks
Enter in any remarks to display (but not print) when looking up the customer in
1. ACCOUNTS RECEIVABLE >2. INQUIRY FUNCTIONS >1. CUSTOMER ANALYSIS
or billing the customer in
4. SALES DESK > 1. INVOICING / TRANSFERS
- Default Shipper
Enter in the customer’s preferred method of shipping.
- Standing PO
If the customer wishes to have one PO for all purchases within a given time, enter it here. It will be the default to the PO field in Sales/Invoicing.
- Start
Enter start date for Date Limited PO
- End
Enter end date for Date Limited PO
- Industry Reporting Group
In the same way that the territory field is a way of assigning specific customers together in a group for sales reporting purposes, the industry type allows a different grouping to be created. The individual types are created in 5. Sales and core analysis…. > 1. data maintenance….> 7. industry types and therefore this is a validated field. Press [TAB] to search for the appropriate industry to select.
- Default Payment Terms
This is a validated field, with the codes being set-up in 1. accounts receivable… > 1. DATA maintenance…> 3. payment terms. Use [TAB] to search for appropriate terms code. If this field is blank, then the invoice generated will use the default payment terms that are set-up in the 9. SYSTEM UTILITIES…-> 4. sales desk…-> 2. PARAMETERS FILE RESET > Screen 2: user configuration (FIELD 21 Terms). Regardless of what the individual invoice shows, all invoices are aged by invoice date, there is no due date calculated by the system.
- Default Invoicing Branch
- Account Control Flags
Select up to 8 (eight) options which will apply to this customer, pressing [enter] until the next field is reached. Available options are:
$ - COD Customer
Adding this flag indicates that the customer’s preferred method of payment is COD. At the time of billing (point of sale) the individual invoice may be altered to have a payment type of account, providing that the customer is not overdue and not over the assigned credit limit.
P – Purchase Order is Required
This indicates that either your business or the customer requires all purchases to have a purchase order. If this flag is set, then a PO must be entered at the time of billing (point of sale). If the standing PO field has been assigned, then that number will become the default.
U – US Dollar Account
Invoices generated to US customers are generated and charged to the customer account in Canadian dollars. When the cash receipts are updated, monies received are sent to a separate account in the General Ledger. Please advise AMS if you have US customers.
B – No Backorders
This customer does not permit backorders.
Y – Price the Packing Slip
If using packing slips, prices will be printed.
# - Add customer to special sales report
If you wish to run sales and core analysis > comparative reports > Territory/Selected customer/category then add the [#] here to ensure that the data will be collected.
m – (Lower Case) Multiple Invoice Copies
Multiple invoice copies are required at billing time. If this flag is added to this field, the functionality of the ME invoices field further down changes. In the ME invoices field, enter in the number of copies that are required in total. Each time an [I] invoice, [r] refund [c] payment or [t] voided payment type invoice is created, a duplicate invoice will print immediately following the original.
Use of this flag fundamentally changes the concept of the ME invoices field below. When this flag is set, no invoices are copied for use during 1. accounts receivable…> 5. month end processing…>4. create statements…> 5. invoice copies.
W - Warranty
This is a warranty customer. This option is only required if the module Service Dispatch is being used.
c – (Lower Case) Consignment Inventory Customer
This flag must be set to mark a customer as being one that holds consignment inventory. The consignment features will not work until this is set.
I – Prorated Customer
The presence of this flag will indicate that this customer is a cross province customer and thus subject to special taxation rules.
v – View Balances
If this feature is activated, the customer account balances shown during billing will not
be displayed.
- Overdue Control Flag
In the parameter file, you should have already indicated the default setting on whether an overdue status on the account will result in the accounts being placed on HOLD or COD. This field determines the number days overdue this specific account must be in order to activate either the HOLD or COD. [1]=30 days, [2]=60 days, [3]=90 days. If you wish to ignore the overdue day processing and manually place customers on HOLD or COD, use [0] or [9] in this field.
If you are going to use this feature, please be sure to advise AMS so that your End of Day processing can be configured to correctly update the customer record with the appropriate information.
If the default is to place the customer on COD, then cash sales to this customer will be permitted, but not charges to the account. However, if the default is to place the customer on HOLD, then only Return and Received on Account type transactions will be permitted.
Payments received in the office and applied to the customer account in 1. Accounts Receivable…> 4. transaction processing…>5. cash receipts processing will automatically update the COD/HOLD status on the customer record. This is the field called rating, which can be manually adjusted as long as this field is set to [0] or [9] for ignore.
- Sales Summary Number
The sales summary number is used for those customers who do not require individual Sales Analysis Reporting, perhaps due to volume or frequency of purchases.
In order to use this field, you must have first set up a customer record, using a customer number of less than 100. An example of the functionality of this field is when you have a number of clients of a similar nature, for example farmers. The sales for each individual customer may not be of significance, however when grouped together, the volume or value would be considerable. If you wish to have this customer’s sales merged with those of like types, enter the customer number of your summary account. This only affects sales reporting dollars. All accounting information belongs with the individual customer.
- Allow Contract pricing
Before a special or contract price is set-up in 4. sales desk control… > 7. ADMINISTRATION…> 2. CUSTOMER PRICING …> 3. contract/specials, the customer must be flagged as being permitted to have a contract price. If the customer is not permitted to have contract or special pricing, reply [N]. A special or contract price is different than the other pricing discounts, in that a contract or special is normally for a specific item or range of items within a category or product line and is also date driven.
- Global Discount type
This field could also be called discount group since the choices available for selection are set-up in 4. sales desk…> 7. ADMINISTRATION… > 1. DATA maintenance… > 4. discount LEVELS. A discount group is usually the most general pricing available. It is based on a discount or surcharge on either a specific or all categories for a specified price level. Each customer can then be placed into a specific group, using [tab] to locate the most appropriate one. All customers within that group will be charged the same price for any item within the category, unless a more specific pricing discount over-rides the group. (See the Sales Desk Control User Guide for further information on pricing).
- Prefer Quotation Via
Click the down arrow to open help window. Quotation preference are: E = Email; F= Fax; P=Print
- Credit Limit
This is the maximum amount of credit you wish to extend to this customer. If this is a COD customer or if you are not concerned with the amount this customer will owe at any one time, use [0] to indicate OPEN credit, that is – no limit. Once a customer has charged a sale to their account that takes them over their credit limit (a message will be displayed for the countermen), no further sales activity is permitted on the account until there is an available credit amount. This is displayed at the bottom of the billing screen as the AVA value. The office may raise the credit limit, or the customer may provide a payment to be processed through 1. accounts receivable… > 4. TRANSACTION PROCESSING …> 5. cash receipts processing. As soon as the cash receipts update is complete, further sales activity is again permitted.
- Rating
If the 9. SYSTEM UTILITIES…> 4. SALES DESK… > 2. Parameter File RESET > SCREEN 1 : system defaults field called cust credit check (fielD 19) is set to [Y], then this field will be automatically updated with each End of Day and Cash Receipts update to reflect the status of the account. This field works in conjunction with the field called overdue control flag.
If this customer is always a cash only customer, you may manually enter in [COD]. If this customer is no longer permitted to purchase from you for any reason, manually enter in [HOLD]. If you are manually entering in the rating of this customer, then you must set the field above called overdue control flag to either [0] or [9] for ignore, otherwise the overdue status may change and thus this field would be automatically updated.
This process is completely separate from that of the credit limit processing. It is possible for the customer to be both over their credit limit and on HOLD/COD because of their overdue status.
- Allow Prompt Pay Discount
If you wish to give this customer a discount for the early payment of invoices, enter [y]. If this customer is not to receive an early or prompt payment discount, enter [n].
- Max Number of Days
- Discount
These fields default to the information set-up in 9. SYSTEM UTILITIES… > 3. SYSTEM SETUP… >1. ACCOUNTS RECEIVABLE… > 1. SYSTEM parameterS (FIELD 36) and cannot be changed.
- Require Statement
Is this customer to receive a statement at month-end? Y OR N
- Service Charge
Is the customer to be charged a service charge on over-due amounts?
- M/E Invoice Copies
This field has two separate and distinct uses. Use of the [m] flag in the acct control flag above fundamentally changes the concept of this field.
It can be used exclusively during the accounts receivable > a/r month end > statements > invoice copies optional step to create an extra invoice copy to be sent with the statement. If that is the case, enter [1] here. In that instance, each invoice generated will have a copy added to a separate file for use during the month end processes.
It can also be used in conjunction with the [m] flag in the acct control flag field above. When that flag is present, the invoicing process will look to this field for the total number of invoice copies to print immediately following the printing of the original invoice. If an extra copy is required, enter [2] here, meaning that a total of 2 invoices will print at the time of sale, the original and 1 extra copy. Since the extra copy(s) have already been printed, no copy is added to the separate file for use at month end.
- Redirect To
If used, the customer number in this field represents the parent company for this customer. The customer may be a head office, or it may be the office of a buying association. This is different than having multiple ship-to addresses for the same customer. In that instance all sales dollars are reported to the same customer. In this situation the sales dollars belong to the individual customer, while the invoices are all charged to the parent or head office account and paid by them. If this situation applies, enter the customer number of the parent/head office account.
Customer Credit Control
Available from the any change prompt, customer credit control provides a summary view of a customer’s purchase and credit information for the current period, year to date and last year. Either while adding a new customer or editing/changing an existing customer, the customer credit control may be accessed by selecting the c)redit control at the any change prompt.
This information is for inquiry only and is updated automatically by the point of sale end of day, accounts receivable cash receipts update and accounts receivable transaction update.
The accounts receivable month end clears the Current Period values and the accounts receivable year-end clears the year to date values and moves them to last year.
Definitions:
Current Period, Year to Date, Last Year
Invoice amt Total of invoices processed through point of sale modules
No of invoice Total number of invoices processed through point of sale modules
Payment amount Total of all payments received through accounts receivable cash receipts and point of sale
modules
No of paymts Total number of payments received through cash receipts and point of sale
Cred.note amt Total of all credit notes processed through point of sale modules
No of cred.nts Total number of credit notes processed through point of sale modules
Debt.note amt Total of all transactions posted through accounts receivable transactions
No of debt.nts Total number of transactions posted through a/r transaction input.
Discounts amt Total of all discounts given through a/r cash receipts
No of discnts Total number of discounts given through a/r cash receipts.
Interest amt Total of all service charges applied as part of the a/r month end
No of int.chg Total number times service charges applied as part of the a/r month END.
Curr Year Largest, Last Year Largest
Inv amt Largest total invoice value for the period
Date Date of the largest invoice
Bal amt Largest outstanding balance for the period including future due amounts.
Date Date of the largest outstanding balance
Date of Last
Adjustmt Date of last accounts receivable transaction entry
Cust mnt Date of last change to the customer information
Interest Date of last service charge
Statement Date of last statement
Invoice Date of last invoice through point of sale modules
Cr note Date of last credit note through point of sale modules
Payment Date of last payment through a/r cash receipts or point of sale parts billing
Paymt amt Amount of the last payment
Total no of invoices paid Total number of invoices paid in the current year.
Last year average pay days Average days to receive payment of an invoice.
This is only applicable to Open Item customers
Customer Pricing Control
The second feature available at the any change prompt during customer maintenance (either add or change) is p)ricing. Selecting this option will display all discount structures associated with this particular customer. Industry type or global discounts are displayed first, followed by customer specific discounts.
The user may choose to select either d)iscounts or c)ontract pricing from this screen, and will be redirected to sales desk control > file maintenance > customer discount maintenance or sales desk control > file maintenance > Contract/special pricing maintenance in order to enter new discounts or contract/special pricing, alter existing discounts for this specific customer number, or delete un-necessary discounts. In all cases, the customer number during discount processing will default to the current customer.
tab set
The TAB SET function can be a useful tool in making repetitious changes to a single field or to multiple fields.
If you want to change the value in a field regardless of what the current value is, then enter in that field number. If you need to check the current value of the field prior to making the change, enter in the field number before and then the field you want to change. In other words, if you want to change field 32 and you want to see what the current value is first, enter in 31 [enter] and then 32 [enter]. After each field number is entered, press [enter]. After all the field numbers that require changing are entered, press [F1] to accept your choices.
Some field numbers will not be accessible to you for change due to their function within the software.
After acceptance of your field choices, you will be prompted for the customer number. Pressing [F7] will bring up the first record on file. You will be brought to the first field you requested. If there is a no change to be made to any of the fields on this record, reject with [F2] and request the next record with [F7]. If there is a change to this field, make it now and press [enter] to either move to the next requested field or to the any change prompt. Once at the any change prompt, if the changes made are correct, [F1] to accept, then [F7] to request the next record.
You may [F2] to exit at any time, either in the middle of a record (the changes will not take effect) or instead of pressing [F7] for the next record. Any changes that you’ve made and accepted with [F1] will be kept. You may start again at any time, but you will have to re-select your requested fields.
Shipping Address Maintenance
1.ACCOUNTS RECEIVABLE…>1. DATA MAINTENANCE…>2. SHIP TO CODES
- Customer
When the customer has more than one location to ship to, enter a code numeric location number and the address. The customer entered here must already exist in the customer file. If there is only the one location for shipping to this customer, nothing need be entered.
- Code
The default will always be the lowest location number, so it is recommended that the bill-to address from the customer record be entered as ship-to address number 1. At point of sale time, the ship to address may be selected if it is not the main location.
Enter the branch number or shipping location number
- Ship to
- Postal
Enter the address exactly as you wish it to appear on the invoice.
Parameter File Maintenance
- SYSTEM UTILITIES…>3. SYSTEM SETUP…>1. ACCOUNTS RECEIVABLE…>1.SYSTEM PARAMETERS
The parameter file is generally set-up by AMS personnel during the initial installation of the Accounts receivable system. It is advised that no changes to it take place after the initial options have been chosen without first checking with AMS.
- Aging period 1
- Aging period 2
- Aging period 3
- Aging period 4
These fields control how the Aged Detail Trial Balance is formatted, in this sample, invoices aged up to 31 days will appear under the title Current, invoices aged up to 61 days will appear under the title 30 days etc.
Summary Aged Totals
- Period 1
- Period 2
These fields control the ageing that will be used with the AR Month End > trial balance reports > aged summary trial balance reports.
- Statement Date
This field will show the last date that statements were run and updated during the month end procedures.
- Financial Period
This is the current GL period for Accounts Receivable and Invoicing. It is updated during the accounts receivable >AR month end > ar month end update procedure.
Service Charges
- Percentage
This percentage is used during accounts receivable > ar month end > service charge processing > CALCULATE service charge. This amount must be calculated to the annual compounded percentage. For example, 2% per month is 26.82% annually.
- Days
This is the number of days old an invoice will have to be before being considered part of the calculation for service charges.
- Next Number
This is a system-generated number and may not be changed. It is used to generate the invoice number associated with the service charge.
- G/L Account
When the service charges are created, they generate a dollar value that will be posted to the General Ledger account entered here.
- S/C min?
If there is a minimum service fee you charge that is to over-ride the calculated amount, enter Y and that amount.
- Months Overdue
If ageing by months (as opposed to days) enter the age the invoice must be before a service charge applies.
- Default Return Email Address
- Show Zero Balances
- Default A/R Type
Are the majority of your customers Balance Forward or Open item? Remember that this is only the default response and that you can alter it in the individual customer record.
If a customer is set to Balance Forward, during the AR Month End processes, the outstanding invoices are aged and then summarised into one summary total. Accounts Receivable > Cash receipts processing simply applies whatever monies are received to the outstanding summarised balance.
If a customer is set to Open Item, then each individual invoice is available for review in accounts Receivable > Customer Analysis. During accounts Receivable > cash receipts processing, payments are applied to specific invoices. A field called cash rec autopay appears later in this section to speed the process of paying those individual invoices.
- Age B/Fwd Credits
This field only applies to the processing of balance forward invoices. When a credit is issued, if this flag is set to [n], then the credit will be part of the current balance of the account. If this flag is set to [y], then the credit will act like a payment and reduce the oldest aged balance and thus the balance forward amount. It is important to note that if this is the case, sales reports for the period (perhaps used to calculate commissions) will not match the accounts receivable since the credit amount will have been applied to a prior period.
- Addr Pos (H/L)
When your statements print, the customer address may not fit exactly into the window in the envelope. [H] prints one line higher than [m], which prints one line higher than [L] and may assist you in a better fit.
- Payment History
Reply [y] if you wish to keep a history of all invoices that have been paid and retired through the accounts receivable > Cash Receipts process.
- Aging by Months
This response is usually [y]. The system will age invoices according to the number of days in a month. During a leap year, the number of days is automatically readjusted for you. If you respond [n], then the ageing of invoices is calculated on the average number of days in a month.
- Fiscal 01 = cal
This field connects you fiscal year with the calendar year. If your fiscal year begins in March, then fiscal 1 is equal to calendar [3], if the fiscal year begins in June, this field will be [6].
- Prompt Pay
- Prompt Pay Days
- Prompt Pay Disc
- P.pay if Overdue
- P.pay incl GST / 39. PST? / 40. FRT?
These fields control how (or if) prompt payments apply to your customer accounts. Indicate the number of days an invoice needs to be paid in before receiving the discount and the percentage of that discount. If the account is overdue, the p.pay if overdue flags whether the client would or would not receive a prompt payment discount on a particular invoice even if that particular invoice is paid within the prompt payment parameters. Normally, discounts do not include the GST or PST. However, if the discount is to be on the total of the invoice plus any freight that was added, reply [y] to the frt? field.
- Cash Receipt Sequence
If you have multiple locations for your installation, then the recommended reply to this flag will be [D], (date) since each location may be working with separate invoice numbering sequences. During accounts receivable > Cash receipts processing the invoices will be displayed in date order. Otherwise, [I] for invoice number sequencing is fine.
- Cash Receipt Autopay
- Default
These flags allow the accounts receivable > Cash receipts processing to partially imitate the speediness of processing payments for a balance forward customer. If the flag is set to [y], then the payment is automatically allocated to the oldest invoices until either all invoices are paid, or until the amount to allocate runs out. If there is not enough money to fully pay an invoice, it will be partially paid. An opportunity is given to alter the automatic allocation before acceptance. If this flag is set to [n], then the question apply to oldest is given as an option with each cash receipt.
- Default Overdue
For HOLD or COD purposes, at what age is an invoice considered overdue. [1] is 30 days, [2] is 60, etc. If [2] is the default, then the HOLD/COD status applies after the account goes into 60 days.
- Credit Hold Date
This is the date, either [s] for statement date or [t] for today’s date, to use when calculating whether or not an account is considered overdue. If option [s] is chosen (recommended), when the statements are printed, the hold or COD rating on the customer account will be removed automatically when payment is made. A report prints during the accounts receivable > Cash receipts processing > Cash receipts Update when the account has been paid to notify you that the hold / cod rating has been updated / removed.
If option [t] is chosen, then the HOLD/COD rating will float over the course of the month, since it would be possible to have the account be OK today, but overdue tomorrow.
- Check Holds
If the [s] option is chosen for the credit hold date field, then reply [y] to this field to have the HOLD/COD status checked and updated with Cash Receipts.
- Overdue Type
When the account is overdue, the account will be placed on HOLD or set to COD. This is a fundamental question that will affect all customers except those that have been set to ignore the overdue by setting the accounts receivable > File maintenance > customer maintenance customer record field for overdue control FLAG to [0] or [9]. When the customer is placed on HOLD, no sales activity is permitted except for Returns [r] and Payments on Account [$]. If the customer is set to COD however, the customer may still purchase product, but is not permitted to charge anything to their account.
- Allocate Invoice Number
- Next Invoice
Reserved for future use.
- Reserved Note Types
Customer notes are free-form notes that are date and time stamped during entry and then assigned to a particular type. A reserved note type is one that may not be changed or deleted until it has been removed from this field, although it is not necessary to have a reserved note type. In future releases of the software, reserved notes will be accessible with hot/function keys from inside various processes (example: invoicing / cash receipts etc.)
To begin using notes, determine the types of notes that may be helpful in working with customers, even if that means starting with a single type. As an example, a note type called NSF may be useful for office staff. Then, use the menu option accounts Receivable > file maintenance > customer notes parameter maintenance to add (example) a type [n] with a description of nsf. The singe character note type may be alphabetic or numeric. Once the note type is created, add it here to set it as a reserved type.
Payment Terms Maintenance
- ACCOUNTS RECEIVABLE…>1. DATA MAINTENANCE…>3. PAYMENT TERMS
You may offer different payment terms to certain customers; they can be set up here and entered to each individual customer record. The customer’s terms will print on both Invoices and Statements, however this is an informational field only, as all ageing in the system is done from the invoice date. No due dates are calculated.
Statement Text Maintenance
- SYSTEM UTILITIES…> 3. SYSTEM SETUP…> 4. SALES DESK…> 1. ACCOUNTS RECEIVABLE…> 5. DEFAULT STATEMENT TEXT
Any message entered to the GST, PST or FREIGHT fields on this screen will print with the associated dollar amount on the customer statement. The amounts are extracted for use during the sales desk control > sales desk month end procedures > extract taxes for ar statements process. Messages added for the taxes and prompt pay fields have no associated dollar values.
Any statement message can be altered during the accounts receivable > ar month end > Statements > Statement run (or blank paper statement) create option.
Salesman Maintenance
- ACCOUNTS RECEIVALBE…>1. DATA MAINTENANCE…> 4.SALESMAN
This option provides a means for tracking salesman sales figures. The salesman ID can be either numeric or alphanumeric. The daily figures will be updated to this record with each end of day process. The monthly figures are updated during accounts receivable > ar month end > sales summary monthly clear and the yearly figures are updated during the sales summary yearly clear.
VIP Customer Maintenance
- ACCOUNTS RECEIVABLE…> 1. DATA MAINTENANCE…> 5. VIP MASTER
A VIP customer is at once, the same and different from a cash or walk-in customer. VIP customers do not charge their purchases to an account; they are on a COD basis the same as any other cash customer. However, adding a repeat walk-in customer to a VIP list (database) allows you to track their purchases separately from cash sales and optionally set up special pricing.
Adding a new VIP customer is normally done through sales desk >invoicing by pressing [F11] at the customer number field to move over to the phone number field. The customer’s phone number may be found as a regular customer or an already existing VIP or in the AMS (Address Made Simple) database. If the customer is found in none of these places, then pressing [F11] again (in the phone number field) will allow you to enter in the VIP manually with this menu option. If a VIP customer already exists with the same phone number, the user is informed, but still allowed to add the second VIP. More details are offered in the Sales Desk User Guide.
Should you know prior to any sale being made that a particular customer is a VIP, then they may be added here. VIP records may also be ‘removed’ by changing the phone number to 000-000-0000.
VIP
- Last Name
- Given Name
The name must be entered entirely in CAPITAL letters.
- Address
- City
The city must be a valid city name and the correct spelling is important.
- Province
The provincial abbreviation must be one that is accepted by the federal government. (NU is the correct abbreviation for Nunavit).
- Postal
- Phone
- Work Number
- Cell Number
- Fax Number
Enter the personal information of the customer being added to the VIP database, exactly as you would wish to see it on an invoice or mailing label.
22.. Card Number
The card # field is available if you are using identifying cards for your VIPs. These are normally scanned cards, like Air Miles ®,
- PIN
Enter the personal identification number (PIN) for this VIP customer’s card.
- GST Lic #
- PST Lic #
Any character entered in either of these fields will cause the suppression of taxes at the time of sale, the same as with a regular accounts receivable customer.
- Contact
If there is another contact for this VIP, enter that name.
- Email Address
There are 40 spaces available for the entering of the VIP’s email address.
- Remarks
This is the same field as the regular customer record has. It will be displayed with the next sale on the billing screen.
- Industry
If this VIP is connected with one of the industry codes you have previously set-up, you may add them here. Sales dollars reported will include any sales made to this VIP customer.
- Direct Mail
If your business sends direct mail, a [y] here indicates that this customer will be included with the next mailing.
- Date Added
This date indicates the date that this customer was added to the VIP database. The default is for today’s date.
- Last Invoice
This is the date of the last sale made to this VIP customer.
- A/R Customer Number
The AR customer field is available if you have special pricing set up for an AR customer that you wish to also give to this specific VIP customer. Otherwise leave this field blank and pricing will be taken from the default pricing for the VIP customer number that has been set up in 9. SYSTEM UTILITIES…> 3. SYSTEM SETUP… > 4. SALES DESK… > 2. PARTS BILLING PARAMETERS (sCREEN1 : System defaults).
VIP Parameter Maintenance
- SYSTEM UTILITIES…>3. SYSTEM SETUP…>1. ACCOUNTS RECEIVABLE… > 2. VIP PARAMETERS
Since VIP customers are normally set up during invoicing, completion of the following fields will assist your users in setting up new VIP customers quickly.
- City
Enter your own city, as the majority of your VIP customers will likely come from the same area. The city must actually exist, and the correct spelling is important.
- Province
Enter your own province, in the format that is acceptable to the federal government.
- Area Code
Enter the area code.
- Next Customer
This field will be automatically updated with the addition of each new VIP customer and needs only be entered with the original setting up of this file.
- Prefix List
Develop a list of 5 prefixes to be used in the generation of new VIP customer numbers
- Force DIY Number
If this field is set to [y], then during sales desk > invoicing the use of the card will be mandatory.
- Validate Postal
Leave this field turned off [n] to allow US zip codes when setting up new VIP customers.
- 10 Digit Dialing
- Special Char in Name
- Allow A/R Create
- A/R Customer Template
- Current A/R Prefix
There are five prefixes available for use in generating new VIP customer numbers. Select the one that will be used as the default.
- Next A/R Customer
- A/R Prefix List
customer notes Parameters Maintenance
9. SYSTEM UTILITIES… > 3. SYSTEM SETUP… > 1. ACCOUNTS RECEIVABLE… > 3. NOTES PARAMETERS
The single character note type may be alphabetic or numeric and requires a description. Enter up to a total of 6 note types. As an example, a note type called NSF may be useful for office staff.
If this note is to be reserved, use the accounts receivable > file maintenance > 1. SYSTEM parameter field called resrvEd note types (FIELD 50). There is a limit of 3 reserved note types.
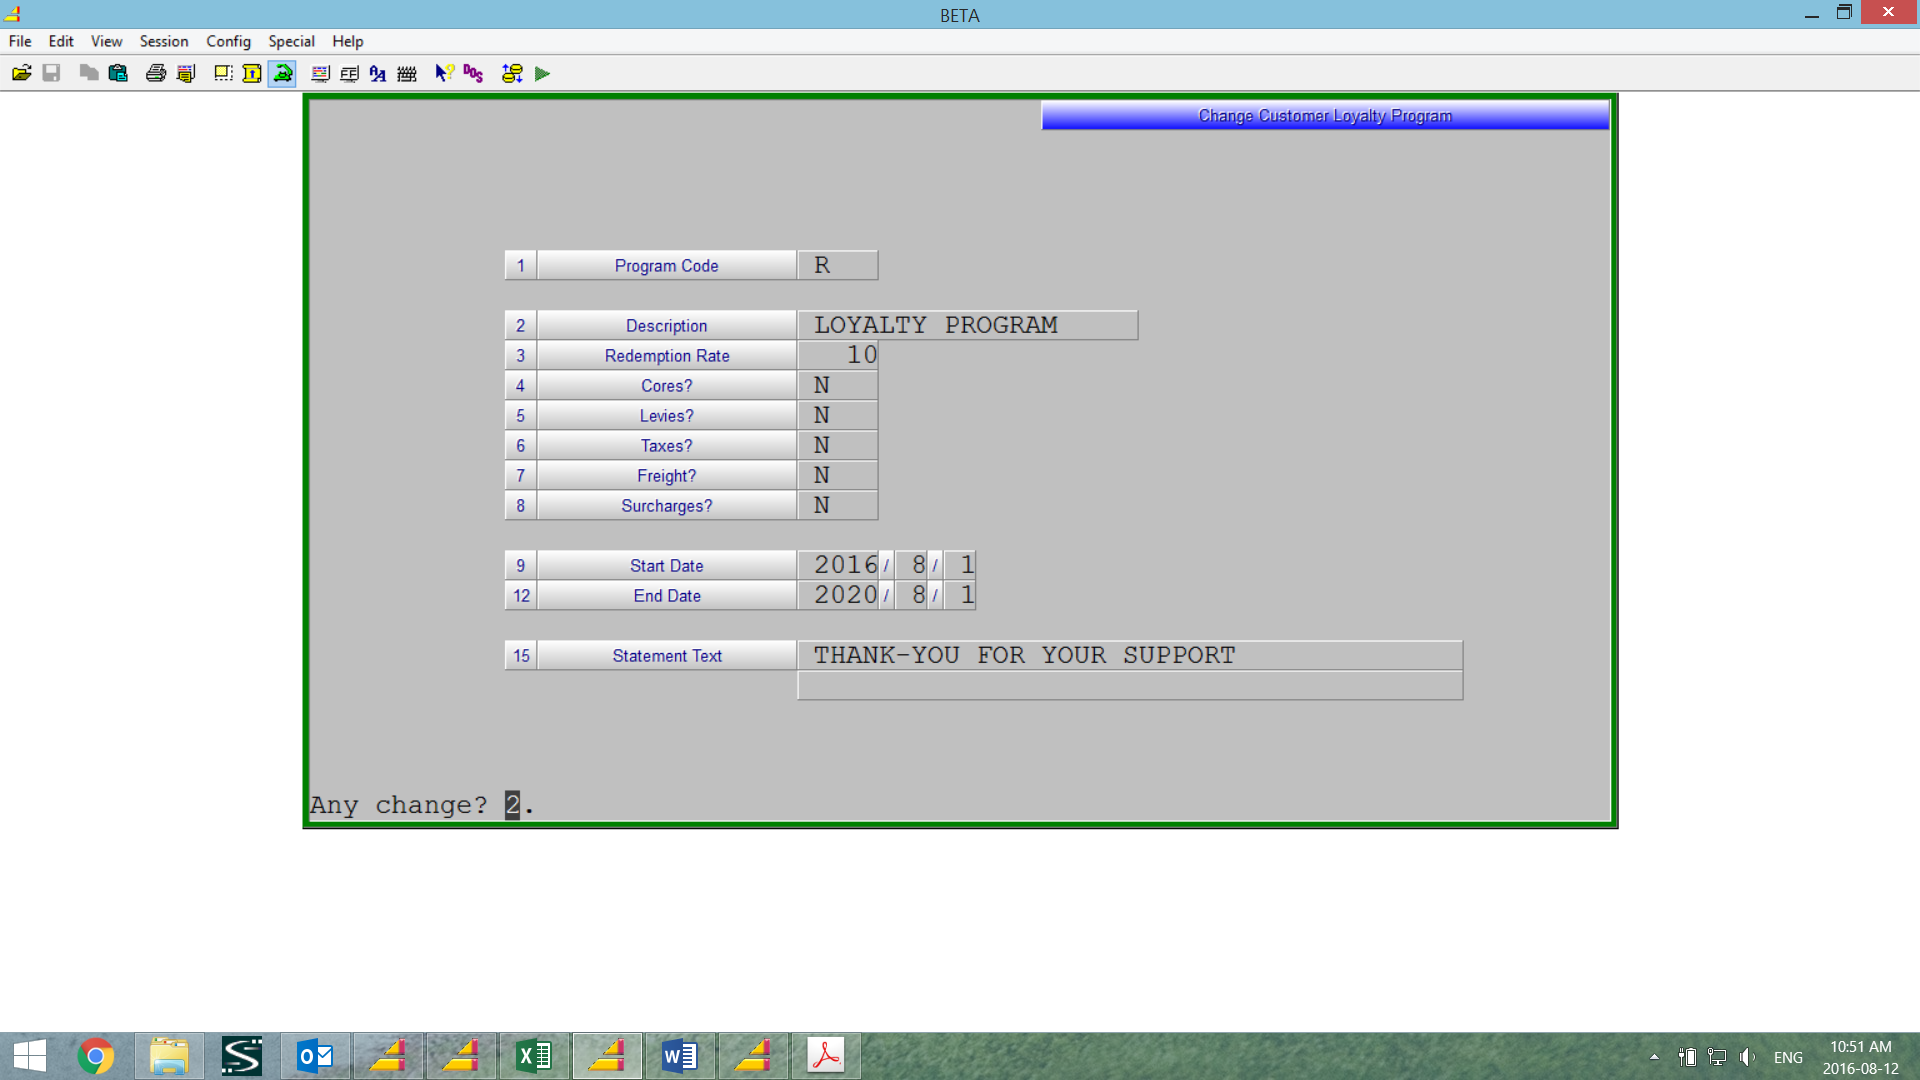
Loyalty Rewards Program
Loyalty Rewards
Definition
The new LOYALTY REWARDS program will allow you to offer and track point rewarded to customers for purchases made. This program can be for selected customers and products and the rewards value can be maintained by Category.
The new suite of programs is available through Sales Desk > Administration >
Loyalty Rewards
Loyalty Programs
- Assign a Program Code for customers to be included in the program
- Setup a Type Code which will be assigned to Customers included in the program such as “R”
- Add a Description for the program
- Default Redemption Rate for the program, points per dollar
- There is no automatic Redemption at this time
- Extra charges to be included in the value such as Taxes and Levies
- The initial default for this setting is “N”
- Default Statement Message

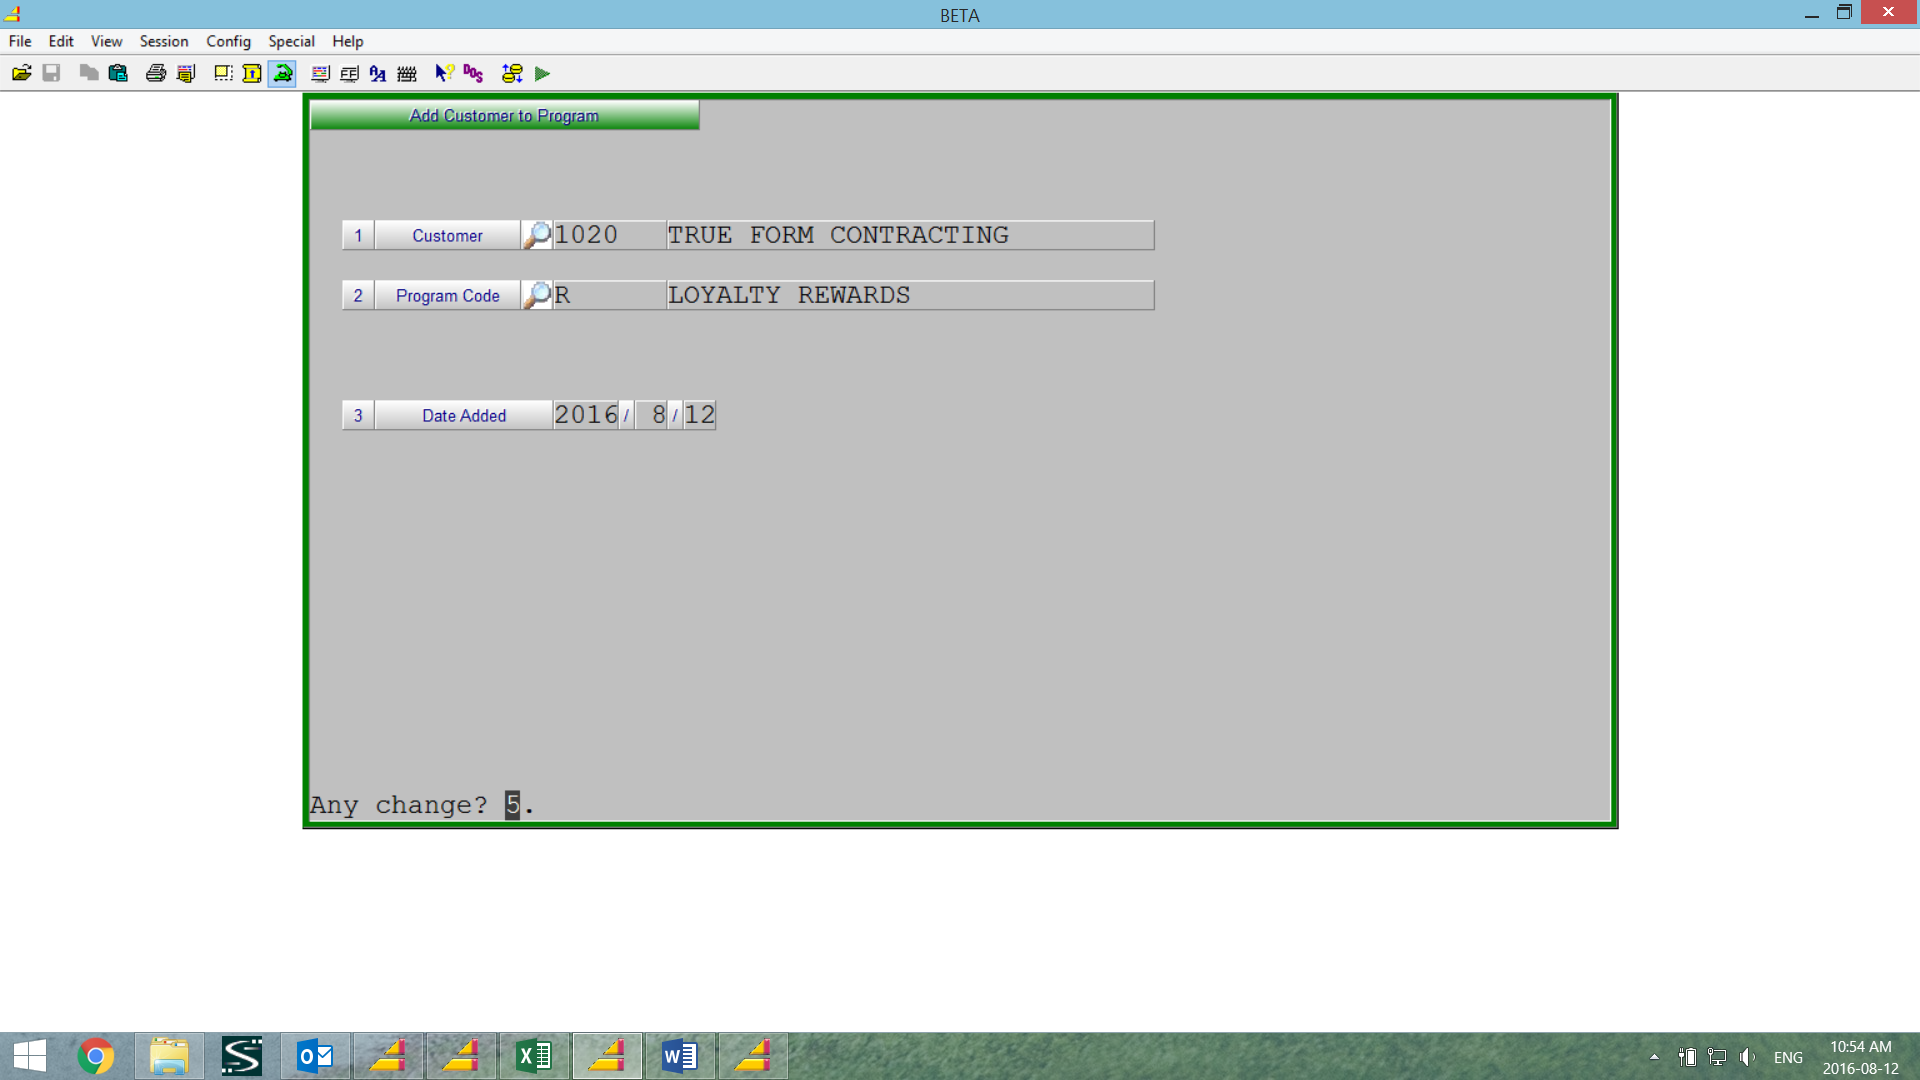
Loyalty Customers
- Add, Change or Delete Customers from a Loyalty Program
- You can assign a customer to multiple programs should you choose.

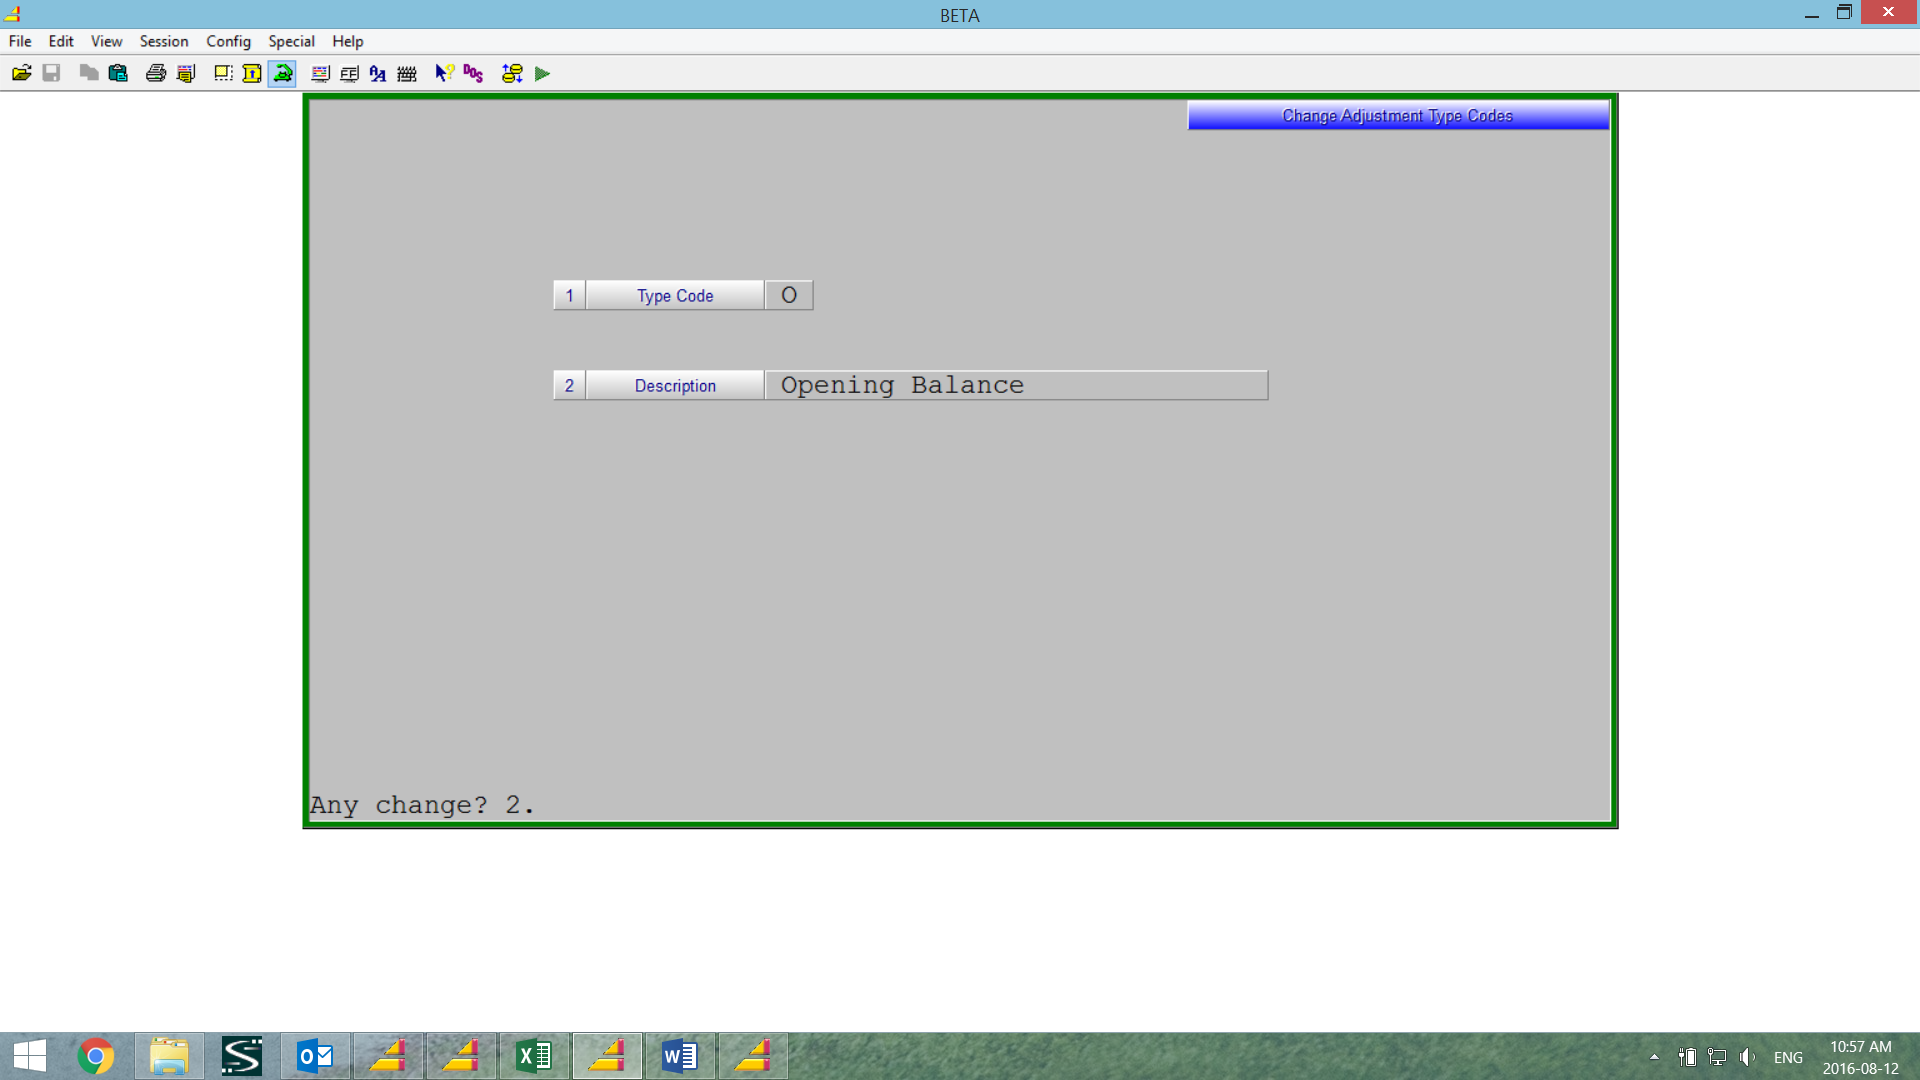
Loyalty Adjustment Codes
- Used to setup codes and descriptions of the various adjustment types required.
- Example RE = Redemption

- Example RE = Redemption
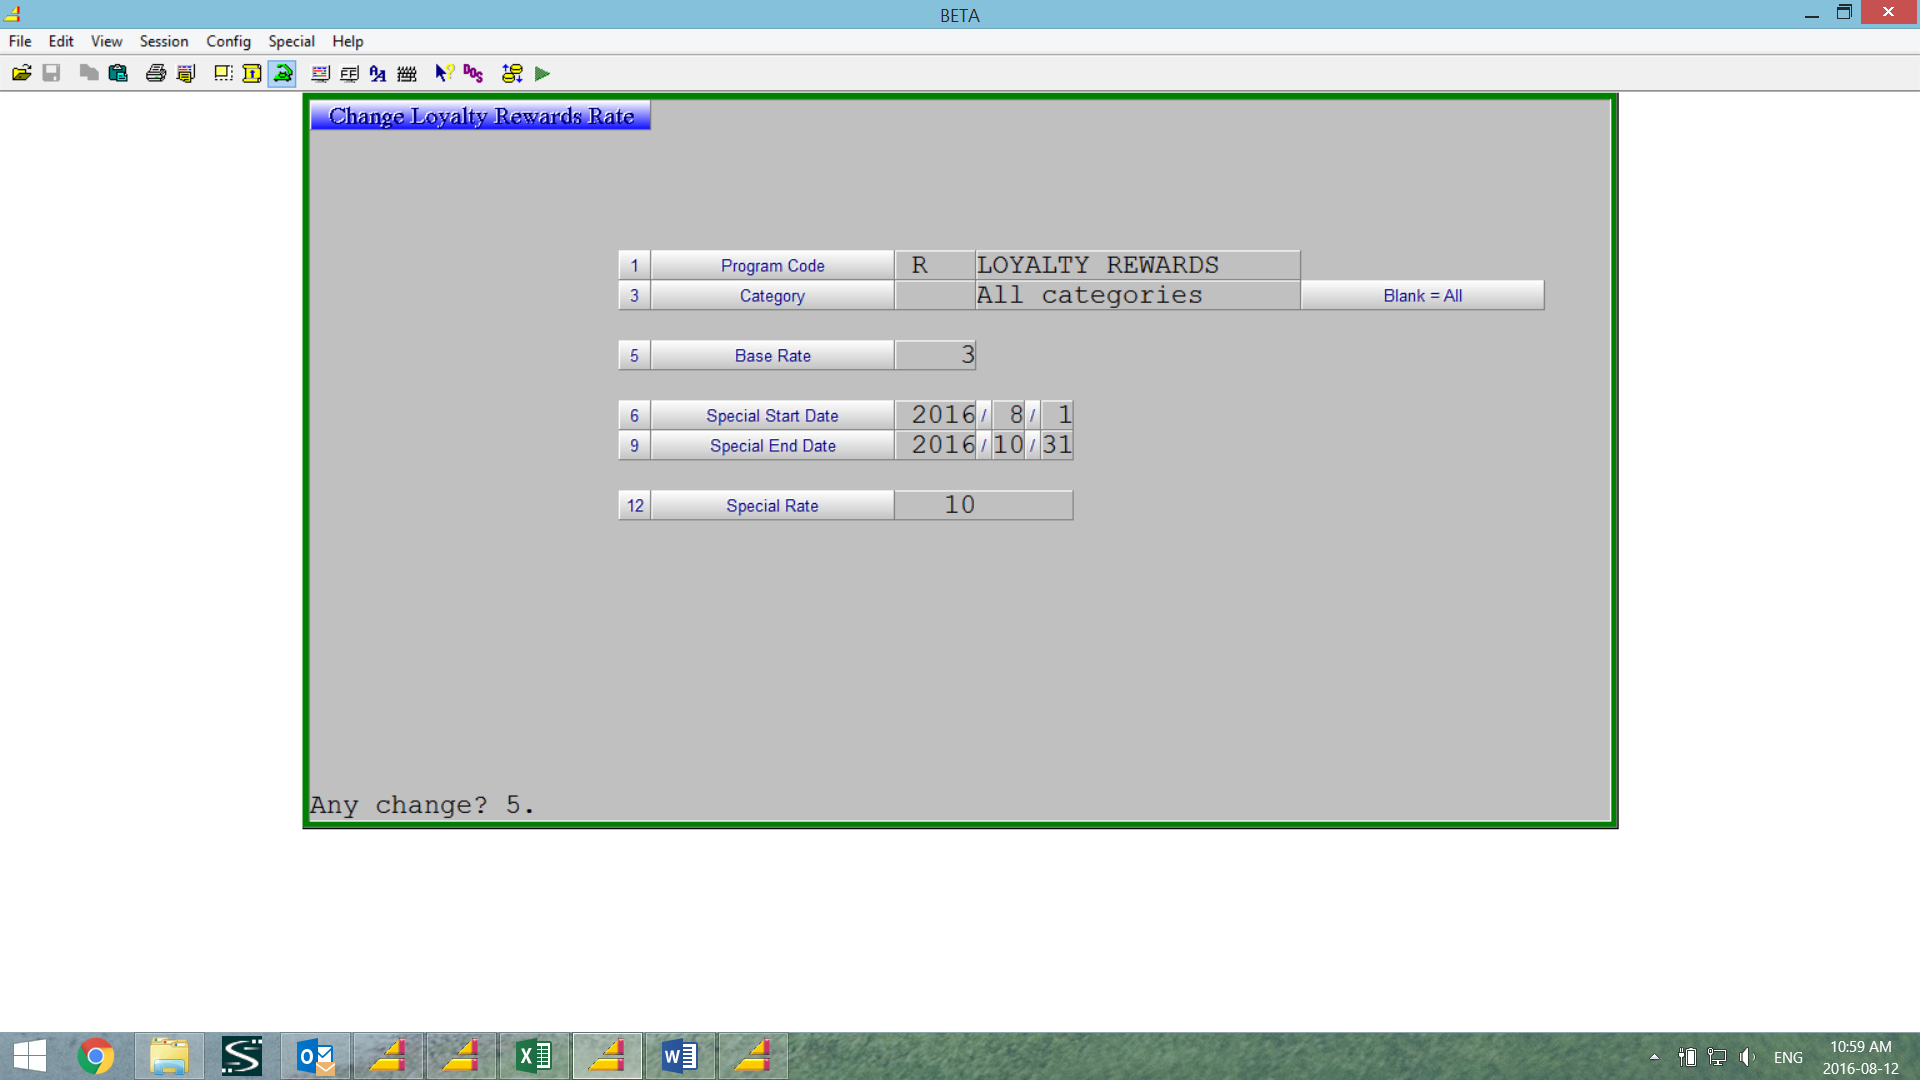
Loyalty Rates
- This is to assign the reward rates for various categories.
- Using an “All Category” entry could setup the default and then you could setup individual categories as exceptions.
- The Start and End Dates control the time that the Special Rate is in effect.
- The rate is the number of points earned per sales dollar.
- Only those extra charges set to Y for the program would be included in the sales total.
Loyalty Reward Adjustments
- To make adjustments to a customer total point not related to sales invoices
- Used to assign the initial start point and to adjust for point redemptions
Loyalty Rewards Inquiry
- View the current status of a customer’s Loyalty Rewards points and the activity
Loyalty Rewards Report
- A listing of the customer’s Loyalty Rewards point activity
Loyalty Rewards Statement
- Similar to a customers A/R statement showing their activity and balance.
- These Loyalty Reward statements can also be emailed to the customer.
Once the customers have been assigned to the program and the rates have been setup the point information can be built from invoice history from a start date if desired.
Invoicing
- When an invoice is generated for a customer included in the program their Loyalty Rewards will be updated when the invoice is completed and the current Loyalty Reward total can be printed on the invoice.
Move ROA Payment from one Customer to Another
(Note – this procedure has multiple steps so it is recommended that you do it only when you can run it from beginning to end uninterrupted.)
Accounts Receivable… à4. Transaction Processing… à1. Transaction Input à1. Add Transactions
- Enter the customer number that has the payment posted to it, and shouldn’t
- Enter 0 as the type (you are making a ‘fake’ invoice)
- Enter an invoice number
- Enter the same date that the payment was done
- Enter a reference if you wish
- Enter the amount of the payment – no sign, just the amount.
- Accept the entry with F1
- Enter your branch number (press ENTER will default) and an account number
- Enter the amount of the payment, no sign, just the amount.
- Accept the entry with F1
- Enter the customer number that should have the payment posted to it, but doesn’t
- Enter 0 as the type (you are making a ‘fake’ invoice)
- Enter an invoice number
- Enter the same date that the payment was done
- Enter a reference if you wish
- Enter the amount of the payment (WITH a sign – you MUST do this)
- Accept the entry with F1
- Enter your branch number (press ENTER will default) and the same account number you used in the steps above
- Enter the amount of the payment, (WITH a sign – you MUST do this)
- Update the entries to the customer accounts using the following process.
- Accounts Receivable… à 4. Transaction Processing… à 3. Transaction Update
If the customer account is a Balance Forward account, then you are done.
See following page for Open Item Account Completion Procedure
Setting Up Invoice Copies
COUNTERPOINT™ Provides a feature that allows you to set up the capture of a customers invoices for reprinting on Plain Paper at Month end. If there are customers set up with this feature, at the end of the statement run you will be asked to put plain paper on the printer and all invoices created during the statement period will be reprinted on Plain paper. This feature is turned on using the following procedure.
Bring up the customer A/R record in change mode using the following menu path
- Accounts Receivable…->1. Data Maintenance…->1.Customers
This will bring up the following screen.

The field that controls this feature is Field 56. As the prompt shows - entering a 1 in this field will cause the system to capture an image of all invoices done during the statement period for reprinting on plain paper after the completion of the statement printouts.
by entering a 2 in this field you can also cause the printer to produce 2 copies of EVERY invoice generated for this customer whenever they make a purchase.
If you wish to set up the multiple copies at time of purchase you must also set one of the fields in 36 to “M”.
Once set up WITH A “1” in Field 56 this customers invoices will be captured from this point forward for Month end plain paper reprinting.
Statements
If you have pre-printed statement forms, please use the statement run create option. If your statements are going to be printed on regular paper, please use the blank statement create option.
Statement Run – Create
1. ACCOUNTS RECEIVABLE > 5. MONTH END PROCESSING >4. CREATE STATEMENTS >1. STATEMENT RUN-CREATE
This option is for statements printing on special forms.
The statements must be created prior before the first end of day process for the new month, otherwise new charges will appear on the statements as future
- Starting Customer
- Ending Customer
The statements will be based on the starting and ending customer range entered here, and the Statement flag from the customer record in data file maintenance > Customer Maintenance. If the response to that flag was [N], then no statement will be created in this step.
- Statement Message
Enter any message that you wish to appear on all statements. If a default message was entered in accounts receivable > data maintenance > statement text maintenance then pressing [enter] here will default to that message.
- Show Prompt Pay
Use [y] if you are allowing prompt pay discounts and wish to notify the customer of the amount of the discount available to them.
- Prompt Pay Message
If you wish to show the value of any prompt pay discount on the statement, reply Y and then enter in the text that you want to appear on the statement next to the discount amount. If a default message was entered in accounts receivable > data maintenance > statement text maintenance then pressing [enter] here will default to that message.
- GST Message
If you wish to show the value of any GST associated with the charges on the statement, reply [Y] and then enter in the text that you want to appear on the statement next to the amount. If a default message was entered in accounts receivable > data maintenance > statement text maintenance then pressing [enter] here will default to that message.
- PST Message
If you wish to show the value of any PST associated with the charges on the statement, reply [Y] and then enter in the text that you want to appear on the statement next to the amount. If a default message was entered in accounts receivable > data maintenance > statement text maintenance then pressing [enter] here will default to that message.
- Freight Message
If you wish to show the value of any freight associated with the charges on the statement, reply [Y] and then enter in the text that you want to appear on the statement next to the amount. If a default message was entered in accounts receivable > data maintenance > statement text maintenance then pressing [enter] here will default to that message.
- Taxes Message
These fields will default to the values you previously entered in Accounts Receivable > File Maintenance > Statement Text Maintenance. You may change them here for this statement run.
- Only Overdues
You can further define the range of customers to include on this statement run. If you select this option, then only customers with overdue accounts will have a statement created for printing.
- Show Zeros
If you wish to print statements even for customers where the balance of the account is zero, then select this option. Customers with no activity and a zero balance are not included, only those with activity in the period.
- Show Credits
If you wish to print statements for customers where the balance of the account is negative, then select this option.
- Sequence
The statements can be created to print in customer number [n] or customer name [a] order.
Y(es) or N(o) to send electronic data for all customers having contact information set up customer master file EDI info.
- PRINT PAPER COPY ALSO
Offers the option to print hard copy Y(es) or N(o) for those getting their statement electronically. Customers not set up with EDI information will print hard copies.
- SHOW FUTURES
This option is to allow you to complete your accounts receivable month end after the first of the month and only print invoices from the previous month on the statement.
Statement Run – Align
1. ACCOUNTS RECEIVABLE > 5. MONTH END PROCESSING > 4. CREATE STATEMENTS > 2. STATEMENT RUN – ALIGN
Place your statement forms in the printer, and then use this option to test your alignment. Continue until the form is correctly aligned and then [Q]uit this function.
Statement Run – Print
1. ACCOUNTS RECEIVABLE > 5. MONTH END PROCESSING > 4. CREATE STATEMENTS > 3. STATEMENT RUN – PRINT
Before running this option, make sure that the alignment has been done. The statements will print according to the parameters you have set up in the Statement Run - Create (or blank paper statement create) option and when the statements have finished printing, the Statements Menu will re-display.
Blank Paper Statements – Create
1. ACCOUNTS RECEIVABLE > 5. MONTH END PROCESSING > 4. CREATE STATEMENTS > 4. BLANK PAPER - CREATE
If you have decided to use plain paper instead of pre-printed forms for your statements, then use this option in place of Accounts Receivable > AR Month End > Statements > Statement Run – Create, then continue with the steps for aligning and printing. The blank paper format is identical to the one that creates statement for pre-printed form, only this option will also print your company name and address, along with column headings.
The statements must be created prior before the first end of day process for the new month, otherwise new charges will appear on the statements as future
- starting customer
- ending customer
The statements will be based on the starting and ending customer range entered here, and the Statement flag from the customer record in data file maintenance > Customer Maintenance. If the response to that flag was [N], then no statement will be created in this step.
- Statement message
Enter any message that you wish to appear on all statements. If a default message was entered in accounts receivable > data maintenance > statement text maintenance then pressing [enter] here will default to that message.
- Show prompt pay
Use [y] if you are allowing prompt pay discounts and wish to notify the customer of the amount of the discount available to them.
- Prompt pay mess
If you wish to show the value of any prompt pay discount on the statement, reply Y and then enter in the text that you want to appear on the statement next to the discount amount. If a default message was entered in accounts receivable > data maintenance > statement text maintenance then pressing [enter] here will default to that message.
- GST message
If you wish to show the value of any GST associated with the charges on the statement, reply [Y] and then enter in the text that you want to appear on the statement next to the amount. If a default message was entered in accounts receivable > data maintenance > statement text maintenance then pressing [enter] here will default to that message.
- PST message
If you wish to show the value of any PST associated with the charges on the statement, reply [Y] and then enter in the text that you want to appear on the statement next to the amount. If a default message was entered in accounts receivable > data maintenance > statement text maintenance then pressing [enter] here will default to that message.
- Freight message
If you wish to show the value of any freight associated with the charges on the statement, reply [Y] and then enter in the text that you want to appear on the statement next to the amount. If a default message was entered in accounts receivable > data maintenance > statement text maintenance then pressing [enter] here will default to that message.
- Taxes message
These fields will default to the values you previously entered in Accounts Receivable > File Maintenance > Statement Text Maintenance. You may change them here for this statement run.
- Only overdues
You can further define the range of customers to include on this statement run. If you select this option, then only customers with overdue accounts will have a statement created for printing.
- Show zeros
If you wish to print statements even for customers where the balance of the account is zero, then select this option. Customers with no activity and a zero balance are not included, only those with activity in the period.
- Show credits
If you wish to print statements for customers where the balance of the account is negative, then select this option.
- SEQUENCE
The statements can be created to print in customer number [n] or customer name [a] order.
- SEND VIA FAX/EMAIL
Y(es) or N(o) to send electronic data for all customers having contact information set up customer master file EDI info.
- PRINT PAPER COPY ALSO
Offers the option to print hard copy Y(es) or N(o) for those getting their statement electronically. Customers not set up with EDI information will print hard copies.
- SHOW FUTURES
This option is to allow you to complete your accounts receivable month end after the first of the month and only print invoices from the previous month on the statement.
Transaction Processing
Transaction Input
- ACCOUNTS RECEIVABLE > 4. TRANSACTION PROCESSING > 1. TRANSACTION INPUT
Transaction process is used primarily to record charges or credits which do not affect inventory. These are normally service charges, rebates, PST adjustment and the recording of NSF payments. Any charge or credit to a customer that involves either the reduction or return of inventory should be completed through the appropriate billing module.
Sales reports will not reflect any charge or credit made through transaction processing to a customer.
Customer
Enter in the already existing customer number. If you don’t know what it is, you can use the Search function by pressing [TAB]. Then enter in either the entire customer name or a portion of the customer name followed by the []. Then select the line number of the customer you desire to return it to the customer number field.
Transaction Type
Enter the appropriate code for which type of transaction you wish to process for this customer, [0] invoice, [1] service charge, [2] credit memo.
Invoice Number
If you are entering an invoice or credit note not connected to an existing invoice, then enter in a unique number (there are no duplicates allowed). If you are entering a service charge [1], or a credit note [2] against an existing invoice/credit memo, then enter in the originating document/invoice number.
- Date
Today’s date is always the default, but you can over-ride this date if you need to. Remember that every entry after the first one will default the date to what was entered on the previous record.
- Reference
If there is a reference from the customer regarding this transaction, then enter it here.
- Amount
Enter in the amount of the transaction. Remember that the system already knows which sign (+ or -) the transaction should be dependant upon what type you selected. If you selected type [0] for invoices, you can make it a negative by typing in the amount with a [-]. If you are reversing a service charge using type [1], or issuing a credit to the customer using type [2], then the amount is not preceded by the [-] since the type already indicates that this is a reduction to the customer’s balance.
- GL Distributions
Enter in the account number(s) you wish to distribute the transaction to. You can have multiple lines of distribution. You can not complete this section and exit until the total of the distribution is equal to the amount from above. Tab to search functionality is available at the branch/account fields.
Enter in a full or partial name followed by the for the account search. If searching from the branch field, all accounts, regardless of location are displayed. If searching from the account field, only those accounts associated with the previously entered branch number will be displayed.
Transaction Edit List
- ACCOUNTS RECEIVABLE > 4. TRANSACTION PROCESSING > 2. TRANSACTION EDIT LIST
This (optional) program will create and print a Transaction Edit list of all transactions entered so that you can verify your entries before updating. A GL Summary Edit list will also print, which totals the amounts that will be posted to the General Ledger during the Update process.
When you press [Return] to begin, the date and times that the process completes each step will be displayed.
Transaction Update
1. ACCOUNTS RECEIVABLE > 4. TRANSACTION PROCESSING > 3. TRANSACTION UPDATE
The start of any Update program begins with an extra screen display to alert you to the fact that the Update has been selected. If you do not wish to continue, press [F2] to exit this screen and reply [N] to the next prompt. If you do wish to continue, then press [ENTER] to get to the next step:
As with the Transaction Edit, once you have replied [Y] that you want to start the update, the date and times of each step will be displayed upon completion of that step. You will receive a Transaction Journal and a GL Journal when all the steps are complete. If the update fails to complete properly, please note any error message on the screen and contact the Support Department at AMS. You will not be able to do another update until the problem is resolved.
APPLY Dating Terms
- ACCOUNTS RECEIVABLE > 4. TRANSACTION PROCESSING > 4. APPLY DATING TERMS
Enter in the already existing customer and invoice number with leading zeros if applicable. If a match is found, then the rest of the information for date, reference and amount will be displayed. You are asked to confirm that this is the correct invoice.
Use this screen to take the existing invoice and either spread the payment out over a period of time (called split terms or dated-out) or to advance the due date for the invoice as a whole. A ‘new’ invoice number will be assigned to each split using the originating invoice followed by -1, -2, -3 etc. The date to be entered for each split is the date that the payment is due and the amount of that payment needs to be entered as well. As soon as the amounts of each split total the originating invoice amount (when the ‘to allocate’ figure is 0.00), the system will automatically complete. Press [F1] to accept what you have done or enter in the line number to change the values.
Internally, the system will write a Credit Memo to the original invoice and create entries on the customer account for each of these split (dated out) invoices. A print out will be generated automatically identifying the original invoice and the new invoices.
If some of your invoices have been entered with dates for a future month, then they will not be picked up by the accounts receivable > ar month end > Balance Forward update process until the appropriate Month End.