How-To Guides
- Configure Vendors in Catalogue
- Non Application (Industrial) Catalogue Setup
- Autoecat Pricecheck API
- Uploading Stock Orders
- Sponsor Site Options
- Steps to activate a user
- Detailed Listing of Dealer Options
- Set up a standing order
- Looking Up Product by Application
- Navigating the Product Listings
Configure Vendors in Catalogue
Overview
There are many levels of configuration that can be maintained in autoecat for your application vendors. This document will try to outline the very basic down to the more detailed options you have to tailor your catalogue suppliers.
autoecat utilizes the same vendor codes as your Counterpoint inventory system, so the only work you need to do in autoecat is activate the vendors and tailor the product types to display as you wish. No need to assign category or line codes.
Maintaining Your Catalogue Display
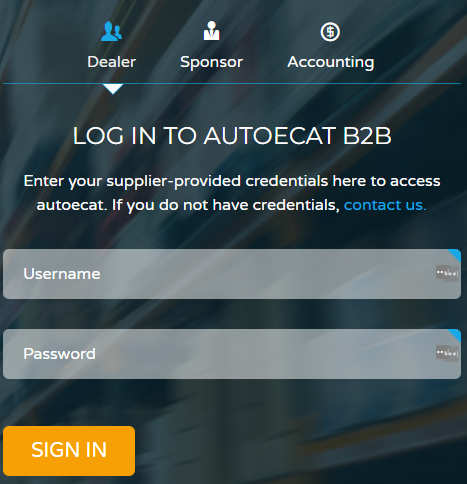
In order to modify any catalogue vendors and the catalogue display, you need to log into autoecat with your sponsor login provided by AMS. You use these credentials under the dealer login option
Once in the catalogue, navigate to Utilities > Catalogue Preferences
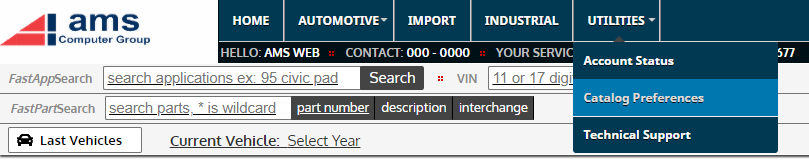
If this option isn't available, check with AMS to confirm the catalogue preferences have been enabled for your account.
Adding a new vendor
Before any work can be done to further tailor a product line, the product line must be initially turned on. To do this, select an application where you would find product for the vendor in question

You will then be presented with a full listing of all suppliers who can be found under that application heading.
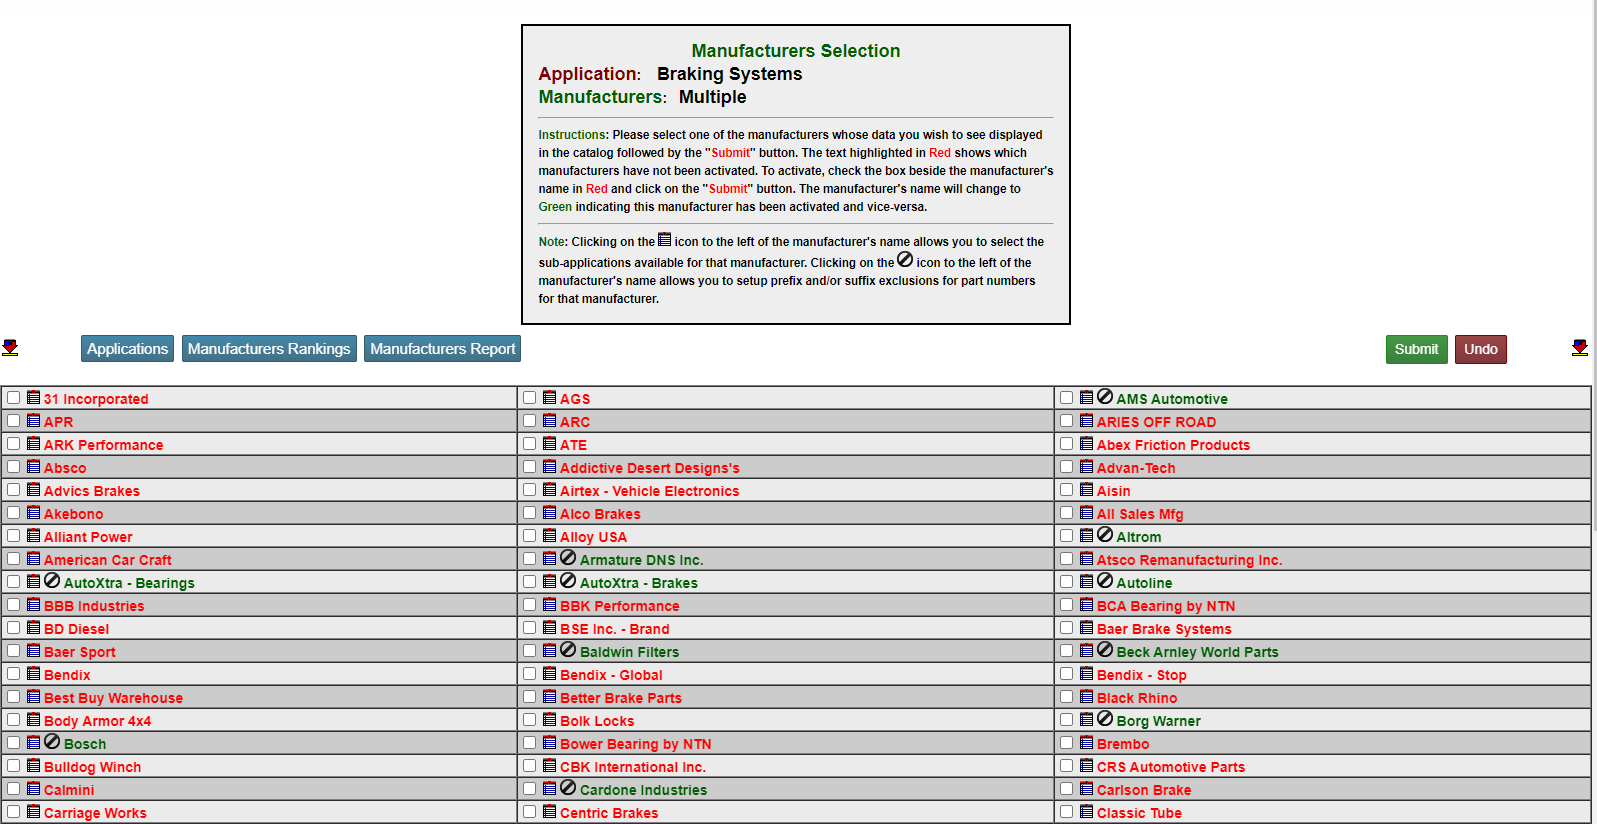
To activate a vendor, select one of the manufacturers whose data you wish to see displayed in the catalog followed by the "Submit" button. The text highlighted in Red shows which manufacturers have not been activated. To activate, check the box beside the manufacturer's name in Red and click on the "Submit" button. The manufacturer's name will change to Green indicating this manufacturer has been activated and vice-versa.
Activating a vendor like this will enable it throughout the entire catalogue
Activating / Deactivating Products by Product Type
In many cases, you may not stock all product made by a certain vendor. To turn off specific product types, you will need to click the
 icon next to the vendor's name. This will present you with a listing of the available product types under the heading you originally selected.
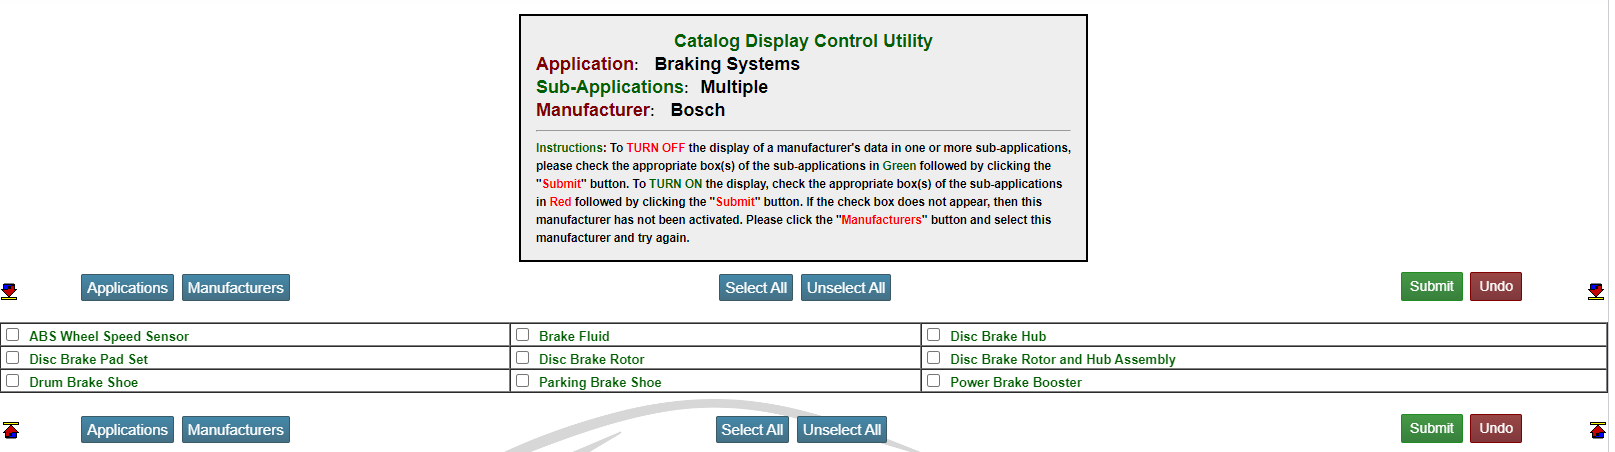
To TURN OFF the display of a manufacturer's data in one or more sub-applications, please check the appropriate box(s) of the sub-applications in Green followed by clicking the "Submit" button. To TURN ON the display, check the appropriate box(s) of the sub-applications in Red followed by clicking the "Submit" button. If the check box does not appear, then this manufacturer has not been activated. Please click the "Manufacturers" button and select this manufacturer and try again.
Deactivating Product by Prefix / Suffix
Optionally, you can further tailor what products show by deactivating products by their prefix or suffix. To do this, click the  icon next to the active line you wish to work with
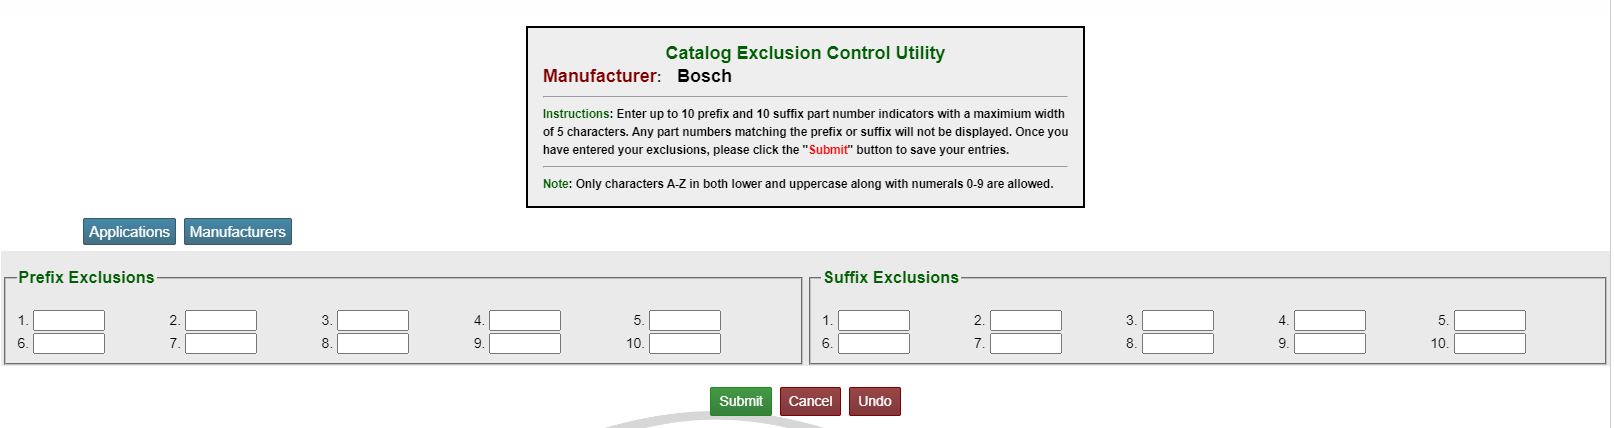
Enter up to 10 prefix and 10 suffix part number indicators with a maximum width of 5 characters. Any part numbers matching the prefix or suffix will not be displayed. Once you have entered your exclusions, please click the "Submit" button to save your entries.
Ranking Manufacturers
The catalogue defaults to sorting products by vendor name and, depending on customer settings, position.
Additionally, you can rank the order in which the manufacturers show. This enables you to make sure your priority lines show to your customers first.
In the manufacturers selection screen is a button labeled Manufacturers Rankings. Manufacturers can be ranked by the product subsystem, so clicking this will bring you to a screen to select the subsystem you wish to rank.
Once you select a system, you are presented with the manufacturer ranking screen
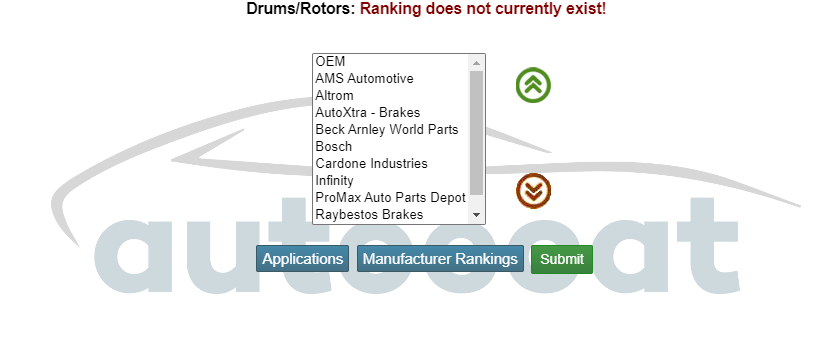
To rank the manufacturers, select the manufacturers in the order you wish the data to be displayed within the catalog followed by the "Submit" button. The list box shows the manufacturers available for the application and sub-application. Use the "up"or "down" arrows to move a highlighted selected manufacturer into the desired ranking position.
If a manufacturer fails to show up on the selection list, then that manufacturer has not not been activated
If you subscribe to the MOTOR OEM database, the OEM vendor will always show at the top in the ranking screen
Additional Considerations
- For manufacturers whose products span many product headings (i.e. braking systems, steering, tuneup), you will need to review the vendor under each of those headings and disable any of the product types you do not stock.
- For example, if you activate Bosch under braking systems, the vendor becomes active under Fuel Systems as well. if you do not stock the Bosch fuel line, you will need to go into the fuel systems section, click the
 icon and disable any of the fuel products you do not wish to show.
- For example, if you activate Bosch under braking systems, the vendor becomes active under Fuel Systems as well. if you do not stock the Bosch fuel line, you will need to go into the fuel systems section, click the
- In order for pricing to properly show, you will need to ensure that the Catalogue Vendor is set on the categories in your Counterpoint system
- Depending on the vendor their product may show up under the standard automotive, heavy duty, powersport or performance catalogues.
- If a vendor is not listed, please contact your autoecat support team and we will do everything we can to procure the data on your behalf

Non Application (Industrial) Catalogue Setup
This document outlines the steps to complete the initial setup for the new non-application specific catalogue provided in the latest version of autoecat.com. This document will also describe the steps required for ongoing maintenance of the non-application catalogue.
Initial Setup
Step 1. Open the spreadsheets provided by AMS
- The document named xlsx is a listing of all product currently in your stocking inventory.
- The document named xlsx is a listing of all available product codes used in the non-application catalogue.
Step 2. Remove all unnecessary categories from bindcsv.xlsx
- In order to reduce the amount of work you will need to do, remove all categories that you know do not contain non-application product.
Step 3. Match the Class & Subclass codes to your inventory
- Using the two spreadsheets, match up the product classification codes to your inventory.
- Place the Class code value from the xlsx spreadsheet into the class field of bindcsv.xlsx
- Place the Subclass code value from the xlsx spreadsheet into the subclass field of bindcsv.xlsx
- Enter in any additional comment/description info into the extended description field of xlsx.
Step 4. Check the Catalogue Vendor in your category file.
- Check to make sure your non-application categories have a catalogue vendor in the Catalogue Vendor
- Many new vendors have been added for use in the non-application catalogue
- If you can’t find a code, let us know.
Step 5. Email the completed spreadsheet to jimp@amscomp.com in order to have the updated classification codes uploaded into your system.
Continued Maintenance
Continued maintenance of the classification codes can be done through the product master maintenance screen in either (A)dd or (C)hange mode.
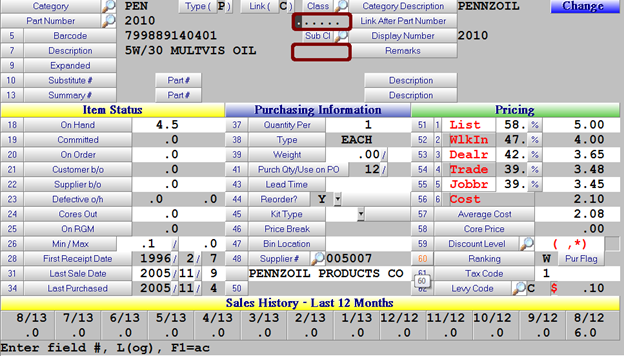
- The two highlighted fields will allow you to add/change the Class & Subclass for a given item.
- Each field has a search function tied to it. You can access it by clicking on the icon or pressing the Tab
- Any new or changed part classifications will take overnight to be updated online.
- Continue to ensure that a valid vendor is entered in the Catalogue Vendor field of your non-app categories
Autoecat Pricecheck API
1. Revision History
|
Version |
Date |
Author |
Update |
|
1.0.0 |
06/01/2016 |
Jim Potter |
- API release |
2. General Overview
The autoecat.com stockcheck API allows third-party warehouses to reply with stock availability when autoecat.com Jobber and installer users browse application parts.
2.1 Basic autoecat.com stock check web service functionality
At this time, the autoecat.com web service for third parties utilizes only a stock / price check capability. This provides our users with the information they need in order to make a decision on where to purchase the product. Further capabilities have been explored, but has not been seen as a required function by the autoecat.com user base.
3. Transaction API
3.1 Overview
In order for third-party systems to utilize the integrated features of JDISPATCH, they must utilize the JDISPATCH Transaction API, which allows third-party systems to create dispatch requests, and accept back subsequent delivery confirmations and signatures. The two transaction types utilized are a dispatch transaction and a delivery transaction
3.2 Basic autoecat.com API transaction architecture
At this time, the autoecat.com pricecheck API is only handling the process of requesting stock and pricing of an item. Ordering has been left in the hands of the Jobber to make a decision on where to source a part from.
- Quotes: This is the process of requesting stock and price from a supplier for a given item
3.3 Document Structure
The information passed within an autoecat.com API document can be sent via XM. All necessary information within an autoecat.com API document is contained within an element tag defined by the type of document being sent. Empty elements are allowed within an autoecat.com API document and will be ignored upon document validation on the autoecat.com server.
AMS has done their best to select semantic element names to avoid confusion when translating documents. Also, all tag names use Camel Case, indicating that the first letter of each word will be capitalized, and all subsequent letters are lower case.
3.4 XML Schema
Each of the autoecat.com document layouts are described in an XML schema document, or, template. If you are unfamiliar with a schema document, the W3C site provides more information on this topic here: http://www.w3.org/standards/xml/schema. Detailed schemas are listed in Appendix B.
3.5 Document Sections
Each document contains 3 basic elements, a root which will be named by the transaction type, either a <RequestForQuote> or a <Quote>, and then contain a <Header> element and a <Lines> element.
3.6 Header
The header of each document contains identifying information that validates the request and the user sending the request. The required information will not change, regardless of the document type being used. The following attributes will exist on each request document, and need to be included in the response. However, the tags may be left empty if no suitable value is available. Tags that can be left empty will be marked as 'Optional' below
|
Attribute |
Required |
Description |
|
Language |
Required |
Language of the response |
|
Currency |
Required |
Currency of the selling price |
|
DimensionalUOM |
Required |
General Unit Of Measure to be used in any dimensional values |
|
WeightUOM |
Required |
General Unit Of Measure to be used in any weight values
|
|
DocumentDateTime |
Required |
Full Datestamp of the request |
|
DocumentIds |
Required |
Unique identifiers of the document being sent |
|
TransportationTermCode |
Optional |
Transportation terms applicable to the quote (Not currently used) |
|
FreightTerms |
Optional |
Terms of freight on a quote request (Not currently used) |
|
AdditionalCharges |
Optional |
Contains any additional charges that may be included in a quote |
|
BillToParty |
Required |
Account information of the requestor |
|
HostParty |
Required |
|
3.7 Document Types
|
Document |
Description |
|
RequestForQuote |
Document to request price and availability |
|
Quote |
Response to a RequestFromQuote |
3.8 Lines
The <Lines> element will contain the pertinent part detail information for the request, and additional values in the response. By design, the autoecat.com RequestForQuote document will only contain a single item per request.
Request Values
|
Attribute |
Required |
Description |
|
LineNumber |
Required |
Line number of the item in the request (will always be 1) |
|
CustomerItemID |
Required |
Part number |
|
ManufacturerCode |
Required |
Code to describe the manufacturer of the requested part |
|
OrderQuantity |
Required |
Quantity Requestes
|
Response Values
|
Attribute |
Required |
Description |
|
LineNumber |
Required |
Line number of the item in the request (will always be 1) |
|
CustomerItemID |
Required |
Part number as defined by the buyer |
|
SupplierItemID |
Required |
Part Number as defined by the supplier |
|
ManufacturerCode |
Required |
Code to describe the manufacturer of the requested part |
|
ManufacturerName |
Required |
Name of the part manufacturer |
|
Description |
Required |
Product Description |
|
ItemStatusChange |
Required |
Status of the item. Information on available values is in Appendix B |
|
PriceType |
Required |
Type code of the price being passed. Information on these codes is in Appendix C |
|
Price |
Required |
Price value of the price being passed |
Full XML document examples with nested values and layout can be found in Appendix A.
4. Transaction Overviews
This section will give a general outline of each of the unique transaction types. For detailed XML examples, please refer to Appendix A.
4.1 Request Transaction Type Overviews
RequestForQuote: The RequestForQuote transaction is the initial request for stock and pricing of an item. At this time, this is the only document type passed via this API
4.2 Response Transaction Type Overviews
Quote: The Quote document is the standard response to a RequestForQuote and is the only response document accepted by this API at this time
4.3 Notable Field Limits
CustomerID – Alpha/Numeric, Limit 6 characters.
5. Appendix A
5.1 XML Response Transaction Examples
RequestForQuote
<RequestForQuote>
	<Header>
		<Language>en</Language>
		<Currency>CAD</Currency>
		<DimensionalUOM>IN</DimensionalUOM>
		<WeightUOM>LB</WeightUOM>
		<DocumentDateTime>2020-01-14T14:45:57+00:00</DocumentDateTime>
		<DocumentIds>
			<CustomerDocumentId>7317B260-EC0B-4A83-AFD3-303160F40C66</CustomerDocumentId>
		</DocumentIds>
		<TransportationTermCode>
			<issuingAgency></issuingAgency>
		</TransportationTermCode>
		<FreightTerms>
			<FreightTerm>
				<CommonCarrier freightTermCode=""/>
				<ShippingMethod freightTermCode=""/>
				<TransportationMethod freightTermCode=""/>
			</FreightTerm>
		</FreightTerms>
		<AdditionalCharges>
			<AdditionalCharge>
				<Description>ADDITIONAL CHARGE</Description>
				<Total>0.00</Total>
			</AdditionalCharge>
		</AdditionalCharges>
		<BillToParty>
			<PartyId>815638</PartyId>
			<Name></Name>
			<AddressLine></AddressLine>
			<City></City>
			<StateOrProvince></StateOrProvince>
			<PostalCode></PostalCode>
			<Country></Country>
		</BillToParty>
		<HostParty>
			<PartyId>001</PartyId>
		</HostParty>
	</Header>
	<Lines>
		<Line>
			<LineNumber>1</LineNumber>
			<OrderItem>
				<CustomerItemId>101467</CustomerItemId>
				<ManufacturerCode>PRO</ManufacturerCode>
			</OrderItem>
			<OrderQuantity uom="EA">1</OrderQuantity>
		</Line>
	</Lines>
</RequestForQuote>
5.2 XML Response Transaction Examples
Quote
<Quote>
	<Header>
		<Language>en</Language>
		<Currency>CAD</Currency>
		<DimensionalUOM>IN</DimensionalUOM>
		<WeightUOM>LB</WeightUOM>
		<DocumentDateTime>2021-01-11T07:52:17-07:00</DocumentDateTime>
		<DocumentIds>
			<CustomerRFQDocumentId>C7F49D23-6B60-43D7-8626-F5C2685B4364</CustomerRFQDocumentId>
			<SupplierDocumentID>180DDF34-D4E5-42FA-AB37-EB7C98AE9A86</SupplierDocumentID>
		</DocumentIds>
		<BillToParty>
			<PartyId>815638</PartyId>
			<Name/>
			<AddressLine/>
			<City/>
			<StateOrProvince/>
			<PostalCode/>
			<Country/>
		</BillToParty>
		<HostParty>
			<PartyId>001</PartyId>
		</HostParty>
	</Header>
	<Lines>
		<Line>
			<LineNumber>1</LineNumber>
			<OrderItem>
				<CustomerItemId>211467</CustomerItemId>
				<SupplierItemId>211467</SupplierItemId>
				<ManufacturerCode>PRO</ManufacturerCode>
				<ManufacturerName>PROMAX PADS</ManufacturerName>
				<Description>PM CERAMIC PADS WHW</Description>
			</OrderItem>
			<OrderQuantity>1</OrderQuantity>
			<ItemStatusChanges>
				<ItemStatusChange>
					<To>OK</To>
					<Description>Success</Description>
				</ItemStatusChange>
			</ItemStatusChanges>
			<Prices>
				<Pricing>
					<PriceType>NET</PriceType>
					<Price>53.64</Price>
				</Pricing>
				<Pricing>
					<PriceType>LST</PriceType>
					<Price>53.64</Price>
				</Pricing>
				<Pricing>
					<PriceType>COR</PriceType>
					<Price>0.00</Price>
				</Pricing>
			</Prices>
			<AvailQuantity>3</AvailQuantity>
		</Line>
	</Lines>
</Quote>
6. Appendix B
6.1 Item Status Codes
The status codes below are used to report the status of the items sent in a <Quote> doument
|
Status Code |
Description |
|
OK |
Success |
|
INVALID |
Invalid Part. Not Found |
|
ALT |
Alternate Part |
7. Appendix C
7.1 Price Codes
|
Code |
Description |
|
NET |
Customer Net Selling Price |
|
LST |
List / Retail Price |
Uploading Stock Orders
One of the latest features for autoecat.com is the ability to upload stock orders into the scratch pad to submit to cart. This requires only that you have the ability to export a purchase order from your system into a .csv file.
Creating a .csv
- Open your order in MS excel and remove all columns except for the part number and order quantity

- Save the file to your PC as a comma delimited .csv file
Uploading to autoecat.com
- Log into autoecat.com with your regular credentials and click on the "Stock Order" button
- From within the stock order screen, click the 'upload items' button

-
Follow the instructions in the upload window, selecting the .csv file you saved earlier.

- Click the 'Upload File' button to upload the file into the autoecat scratch pad
- Once the file is loaded, review your order to ensure all items were properly priced. In any cases where there are duplicate numbers on your sponsor's system, you will need to identify which brand of product you wish to purchase.

- Once you have identified proper brands for any duplicates, click the 'Stock Check' button to price these items.
- You will be automatically redirected to the shopping cart to begin the checkout process.
- Click 'Submit Order' to continue the checkout process

- In the order submit screen, enter in a PO number, your ship via information and any additional notes you would like assigned to the order

- At the bottom of the page, click the "Send P.O." button to submit the order to your supplier.
- You will be provided a reference number once the order has been processed, and your order will be available for review in the 'Order Review' on autoecat.com. If your supplier is using JDispatch, you will also be able to track the status of your order from first receipt to delivery/pickup.
Sponsor Site Options
Name: The sponsors name.
PO Reference (AMS Only): Deprecated
Web Address: The website to take users to when clicking on the sponsors logo, and/or the Home link in the menu bar.
Web Image (AMS Only): A link to where autoecat can find a logo for the sponsor, to be displayed in the top right of the screen, to the left of the menu bar. Max size is 150px X 70px
Home Link: This sets the Home link in the menu to take the users to the customers website. If set to No, they are returned to the autoecat login screen
Default Order Branch: This is the order branch that will be added to any new customers entered into autoecat.
Part Search: Deprecated
Technical Support Email: The email that emails get sent to when users click the Technical Support link under the Utilities menu.
Alternate Sponsor: This allows multiple sponsors to use one set of catalogue preferences. Whatever sponsor is entered here will be the sponsor providing catalogue display preferences.
Electronic Catalogue (AMS Only): Allows you to suppress the automotive catalogue.
View Links: Deprecated
Show Catalogue Parts: When activated, this suppresses the display of any parts that are not priced in the catalogue.
Show Stocked on hand: Allows you to turn on/off the display of on hands for items that are stocked
Show Out Of Stocked on hand: Allows you to turn on/off the display of on hands for items that are out of stock
Show Special on hand: Allows you to turn on/off the display of on hands for items that are on special
Show Contract on hand: Allows you to turn on/off the display of on hands for items that are contract items
Inventory Stocked Message: This is a description that will show for all in-stock items
Inventory Out Of Stock Message: This is a description that will show for all out-of-stock items
Contract Pricing Message: This is a description that will show for all contract items
Jobber IP Address: This is the ip address to be used to identify the webserver for all F6 internal catalogue users.
Use Background Image (AMS Only): This allows you to use a customer specific image for the background of the catalogue. The image must be named BSPONSOR.gif on both alpha and the webserver.
Buying Groups: This option defines what buying group the sponsor belongs to, and is used in conjunction with the warehouse lookup options.
Search TradeX warehouses: This option allows the setup of inter sponsor ordering. Ie. AMS customer to AMS customer bia autoecat.
Catalog Comment Color: deprecated
User Comment Color: deprecated
Substitute Title Color: Changes the color that the substitute shows up in
Branch Code: This shows up in the header bar as ‘your servicing branch’
Steps to activate a user
- Open a web browser and navigate to autoecat.com
- Click on the sponsor login logo
- Log in with your admin credentials
- In the first screen, you are presented with a number of options. Dealer Preferences will allow you to maintain any users currently set up for remote ordering, and Jobber Preferences will list any users not yet activated for remote ordering, but that are set up in your A/R system in Counterpoint. Click Jobber Preferences to add a customer.
- Scroll through the listing, and click on the customer you wish to activate
- Set up the customer as desired. The required settings are:
- Order Branch set to the default order branch of the customer
- Counterman No set to your web counterman number
- Web access from Counterpoint set to NO
- Purchasing Allowed set to YES
The customer will now be able to order with these basic settings, and every user is different, but we have found the following settings to enhance the user’s experience.
- Search Only Inventory set to YES
- Multiples View set to YES
- Catalogue Compressed View set to NO
- Search Buying Group Warehouse set to YES
Detailed Listing of Dealer Options
Name: Name provided by the customer file on Counterpoint. This name can be changed as necessary.
Order Branch: This is the default order branch for the customer. Invalid branch numbers can cause zero-stock scenarios. (Default is set in website maintenance)
Counterman No: The counterman number that will be used when creating invoices sent by this customer. (Default is set in website maintenance)
PO Required: Forces a PO to be entered on all orders submitted.
On-hand Quantity: Option to show or suppress the display of the on-hand quantity.
Interchange Data: Option to show or suppress the display of the interchange data in the part detail screen as well as allow interchange searches via the FastPart search.
Account Status: Option to show or suppress the Account Status link under the utilities menu. When activated, this shows a snapshot of the customer’s current account status as well as shows the past 12 months statements. Also, you can limit who has access to this screen by setting the Password field.
Always ask Engine Version: This option makes it so that the user is always asked which engine they would like to select, even when it doesn’t have any effect on the parts that are shown.
Part search default: The option selected here will be the default search type used in the FastPart search. Whenever they enter a part and hit the enter key, this search type will be used.
Price Level 1, 2, 3: Select 2 of these price levels to be shown, along with the customer’s net price. The price levels correspond to prices 1, 2, & 3 in counterpoint, and you can change the displayed headings by entering something in the text fields next to the Y/N options. Note, that only 2 of the 3 can be selected.
Autoecat first page: This allows you to change the default landing page for autoecat users. The page selected here will be the first page they see when logging in.
Contact Phone: This phone number will show in the top menu bar, next to Contact.
Create Comments: This allows the user to create specific comments on either parts or applications within the catalogue. They can be set to create either public (seen by all of a sponsors customers) or private (seen only by the autoecat user who creates them) or both types.
Replenishment Cycle: This sets the replenishment cycle used in the stocking list, found under the stock order screen.
Buyers Guide: This option allows you to suppress the display of the buyer’s guide for part numbers.
Preferences (AMS Only): Allows the user access to the catalogue preferences.
Change Password (AMS Only): Allows the user to change their autoecat password.
View All Data: This option presents the user with a View All Data button when doing interchange lookups when no parts matching your preferred lines show up.
Part Search: Option to allow the suppression of the FastPart bar.
Single Vendor: This option overrides a user’s preferences and function the catalogue in such a way as the vendor entered is the only vendor in the catalogue.
Billing Type (AMS Only): Not Applicable
Change Catalogue Comments: Deprecated
Multiples View: This option either turns on or off, the full-screen multiples display that allows users to select multiple subgroups at once.
Catalogue Compressed View: This option collapses all subgroup headings when looking up product. Each subgroup can then be clicked on to expand to see part numbers.
Transaction: This is the Counterpoint transaction type that will be created when this user submits orders.
Quotes Allowed: This allows the user to gain access to the ability to save shopping carts as quotations
Branch Detail: This option will suppress the display of the branch drop-down menu showing on-hands.
Web access from Counterpoint: This option determines whether the customer has been set to order remotely. If this option is set to No, the shopping cart screen will have a Save Query To Invoice button vs. a Submit Order button.
Part Search Quick Return: This option will return the user to the part search screen, with parts, when adding an item to the cart. If set to N, they will be placed back at their home screen.
Search Only Inventory: When set to Yes, this option hides all non-stocked items when application parts are first shown. To access non-stocked items, the user must click the product group heading.
Purchasing Allowed: This option activates the shopping cart.
Branch Inventory View: This sets the on-hand quantity that is shown. Default & Branch both show your default branch, Corporate will show all branches in one total
Sort Parts By Position: This option will allow you to sort parts by position, and then by ranking, and then by name. If set to No, parts are sorted by ranking and then name.
Contact Email: This option is for future use.
View Comments: This option selects which type of user comments this user can view. This is to be used in conjunction with the Create User Comments option. (Default is none)
View All Interchanges: This option allows a user to see all interchange results, by default.
Labor Guide (AMS Only): This option is for future use.
Stock Check: Deprecated
Special Orders: This option will activate a free-form text line on Purchase orders that will show up as comment lines in counterpoint.
Gap Analysis (AMS Only): Not Applicable
Super User (AMS Only): Not Applicable
Expiry Date (AMS Only): Not Applicable
Search Buying Group Warehouse: This option allows the user to do warehouse lookups for approved warehouses.
Trading Partner: This activates TradeX, which is a feature that allows autoecat sponsors to search one another’s inventory when they do not have the product in stock.
Set up a standing order
- Log into autoecat.com using your autoecat.com credentials
- Add product to the autoecat scratchpad
- Anywhere you click the icon, the item(s) will be added to your scratchpad
- Alternatively, you can click the large STOCK ORDER button at the top of any screen within autoecat to launch the scratch pad and manually enter items.
- Save your selected items to a standing order
- By clicking the large STOCK ORDER button from any screen within autoecat, you will be brought into your scratchpad.
- Once in the scratchpad, simply check the items you wish to save (or add) to your standing order and click the Save To Standing Order
- A small pop up window will allow you to name your new order (or select an existing order to replace/append to). Once you click Submit in this pop-up, your order will be saved.
- Add your standing orders to your cart
- By clicking the large STOCK ORDER button from any screen within autoecat, you will be brought into your scratchpad.
- Clicking on the Standing Orders button will launch a small pop-up that shows your current standing orders.
- Clicking the icon next to the order will show a listing of the parts on the order.
- Check the items you wish to add to your cart (or check the box in the Part Number heading to add them all)
- Click the Add Standing Order Items To Cart.
- Maintain your standing orders.
- Once you are in the standing orders screen, you can delete entire orders by clicking the icon
- You may also delete specific items from an order by checking the item and clicking the Remove Items from Standing Order.
Looking Up Product by Application
Year / Make / Model Lookup
One of the most common ways to look up parts is via a traditional Year/Make/Model application lookup.
Within autoecat, the main landing page starts you off in this process by presenting a listing of available vehicle make year options. You can make selections through the Year/Make/Model process by using your mouse to scroll and click the option, or simply begin typing as the cursor begins in the field above your current selection criteria.
Selecting a year will then present you with the available makes for that year, and selecting a make will present you with a listing of the available models.
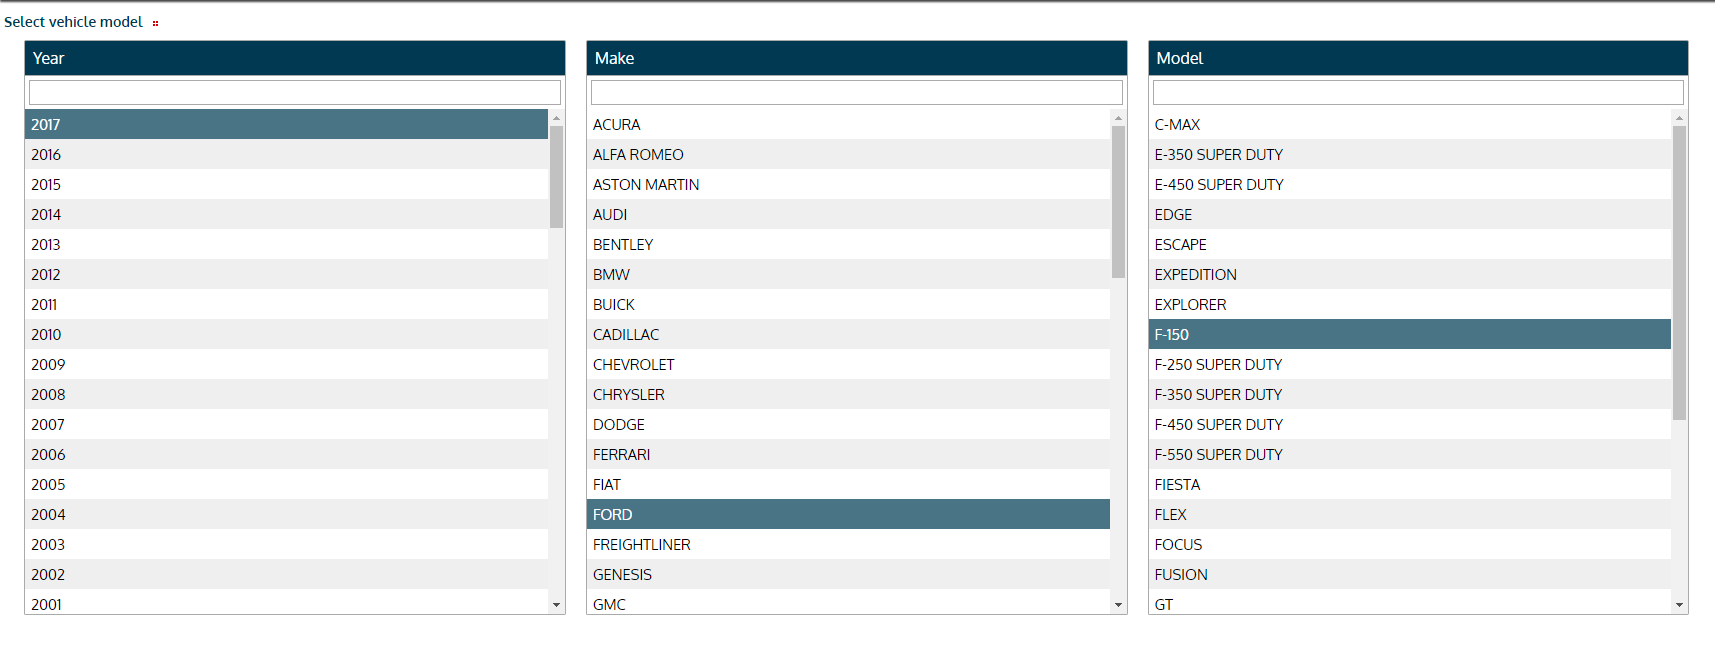
As you progress through the selection, the boxes will stay visible so that you may go back and make corrections if needed.
As you move through the selection box, your breadcrumb bar will also show you your selection and provide a quick way to go back to modifying your vehicle selection if necessary

Each of the Year/Make/Model are active links that will take you back to the corresponding selection page.
Looking up by VIN
If you have a VIN from the vehicle, you can enter it into our VIN decoder and have autoecat determine the correct Year/Make/Model

Filling the VIN code in will take you the product type screen with the proper vehicle information selected
Using the FastApp Search
Another option to look up products is via our FastApp search. This allows you to simply type in the information you need, and autoecat determines the vehicle and/or product type.

The above example will take you directly to the engine selection for Shocks/Struts on a 2007 Ford Fusion, with no other clicking or selections required.
Selecting a Product Type
Once you have selected a Year/Make/Model, you will most likely be presented with our 'Multiple Search Screen'. This screen allows you to pick the product types you are looking for.
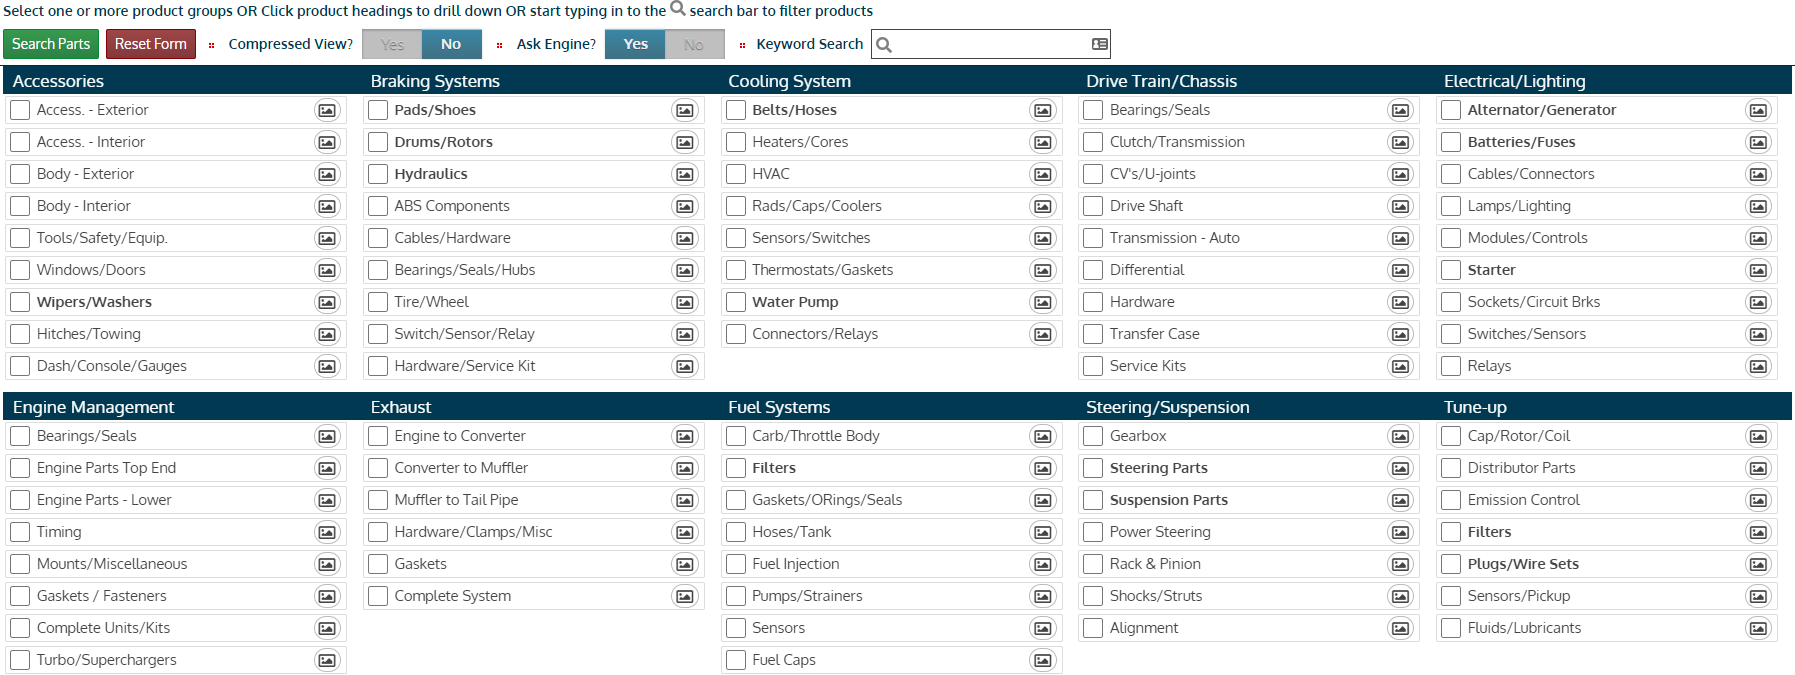
There are a number of options within this screen to select product.
- You can begin typing (the cursor is automatically set to the 'Keyword Search' field) and potential matches will be presented to you
- When using the keyword search, you can check multiple checkboxes to select multiple products, or click on the product description to select just that product type.
- You can select an entire group of products by ticking the box next to the main group descriptions, and then click the 'Search Parts' button
- You can Click the name of a product group to select a specific product type beneath the group.
- Similar to the product search, you may tick the box next to the description and build a list of multiple products, or you may click the description to select that specific type.
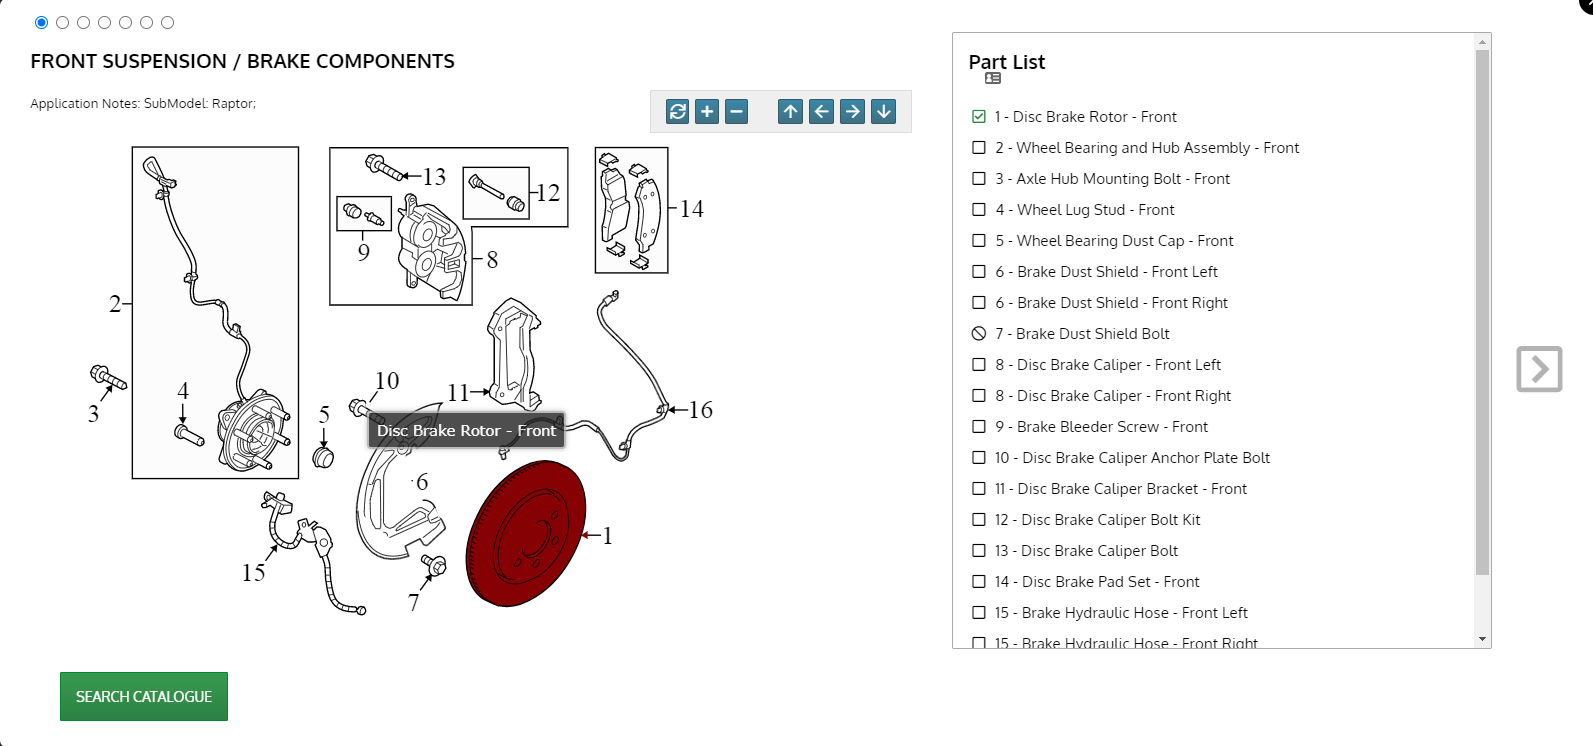
- If your sponsor has subscribed you to our Vector Image Database, you can click on the image icon to the right of each group description and select product via image.
- This will present an interactive image where you can click on the product image to select that product type

- This will present an interactive image where you can click on the product image to select that product type
- All of the bolded descriptions are the most frequently searched groups/product types
- The 'Compressed View' option will suppress all part listings on the next screen and show you expandable product type headings only
- The 'Select Engine' option will force the selection of the Engine. Usually, autoecat will only present this if it makes a difference in the products that show.
Selecting an Engine
Once the base vehicle and product type information is selected, you may be asked to validate the engine size of the vehicle you are looking up.

You will be presented with possible engine fitments for your vehicle selection and can pick any one of them by hovering over it and clicking
Navigating the Product Listings
Overview
Once you have selected a vehicle, you are presented with the listing of parts that match your search criteria.

This screen is filled with a number of features to help you purchase products.
Breadcrumb Bar

- Navigate to a listing of previously selected and scanned (via the autoecat VinScan app) vehicles.
- One click access to change the current vehicle or product selection - Each of the Vehicle / Product description titles is a link back to that selection screen.
- Fluid Specifications (Subscription required). Clicking the
 icon will show you the specifications and capacities for a number of different fluids, tire specifications, and recommended service intervals for the vehicle selected. These include
 - OEM Listings. Another add-on module may present you with the
 icon. Clicking this will reveal OEM application listings in the listing page. These are true OE listings from the manufacturers.
 - Vehicle Options. Clicking the
 icon will pop up a vehicle option selection window. These are vehicle attributes found in the listings on screen that have a bearing on the product fitment. For example, you can filter down to only applications fitting a 4 wheel drive vehicle. These options only show if the vehicle attributes are listed and make a difference in fitment.


Product Header Options
Within the product header itself are a number of options related to that product type and the listings within it
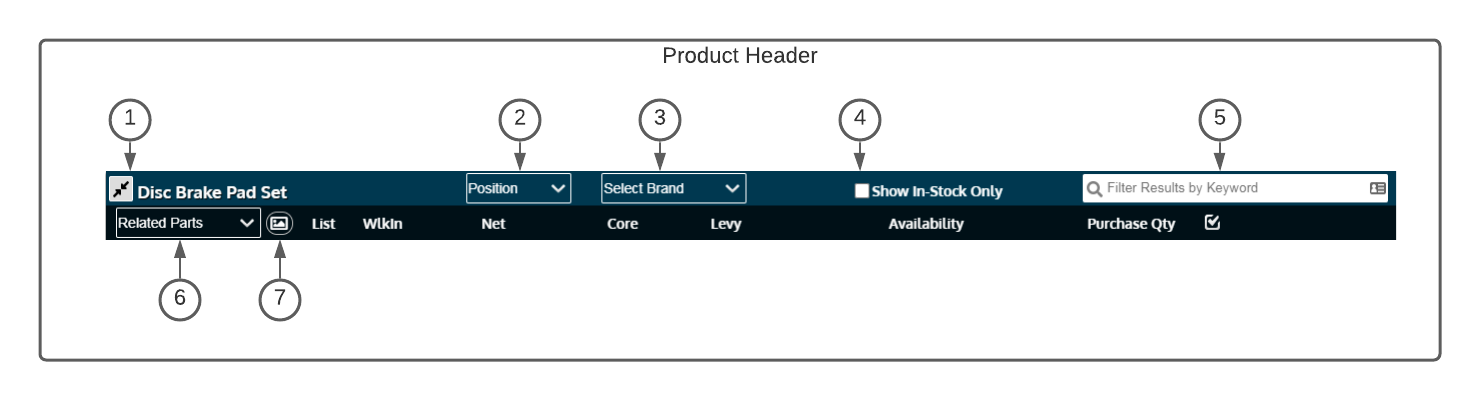
- If shown, clicking the
 icon will expand the part listings to include non-stocked items.
 - The Position dropdown will show when the product has multiple positions on the vehicle. Selecting any option in this dropdown will filter the selected product type to just those positions.
- When multiple brands are available, the brand dropdown will allow you to filter for a specific brand.
- Clicking the 'Show In-Stock Only' checkbox will hide any listings without stock
- Entering any text into the searchbox to the right will filter to only show listings matching that search criteria. This search is limited only to the product type whose header you are searching within
- The 'Related Parts' drop-down will show products that are related by job and/or proximity to the part you are listing
- The Icon next to the related parts will show you an interactive vector image of the product you are searching, plus other products in close proximity on the vehicle. This is a premium and licensed module.

The Product Listing
The product listing is the actual listing of a specific part. Within this listing on screen, there are a number of features you will find
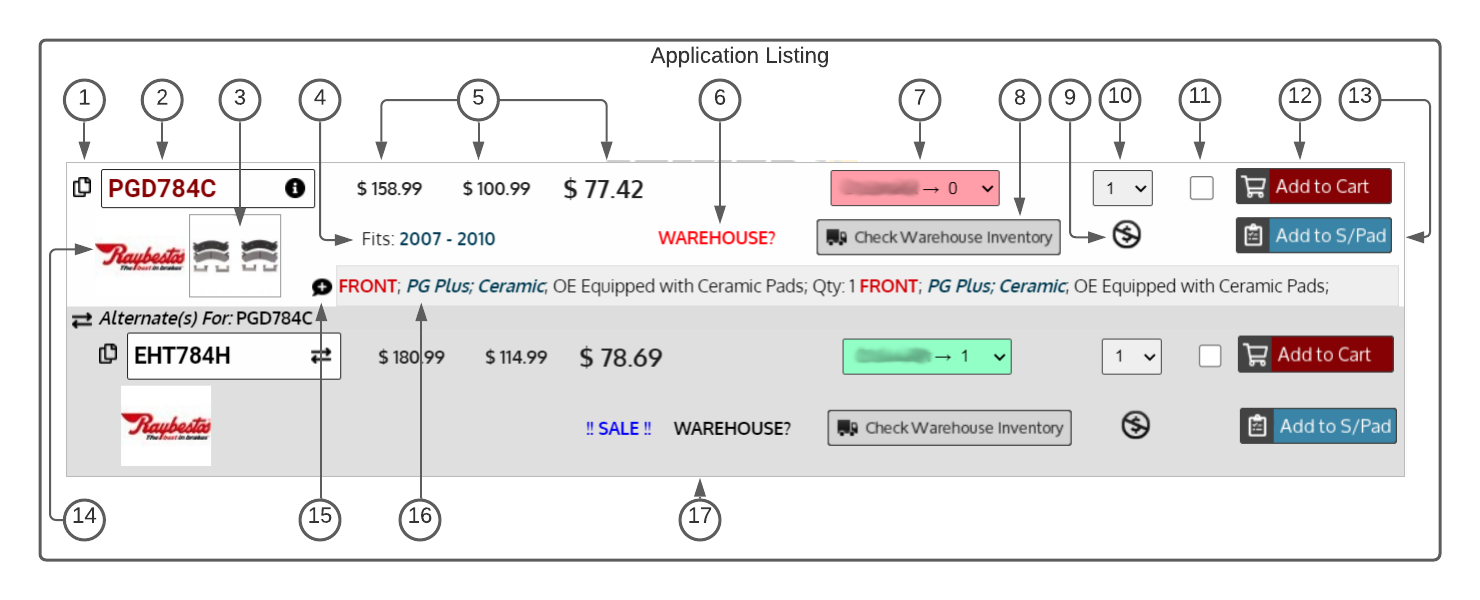
- Copy Part. Clicking the copy icon will copy this part number to your PC clipboard. You can then quickly paste the part into your shop system, invoice, etc.
- Part Number Info. Clicking on the box containing the part number will present you with the detailed part info screen. This screen contains info such as
- Buyers Guide
- Interchange Parts
- Marketing Information
- Detailed product description
- Specification Documents
- Installation Instructions
- Product Bulletins
- 360 degree images with zoom and rotate
- Part Image. Clicking on the product image will present you with a full resolution image of the product. Optionally, the product image may indicate if there is a 360 degree image available in the product info screen
- Year Fitment. This comment indicates what year range of this vehicle the part in question fits.
- Prices. The product listing will show your net price and two other configurable prices.
- Product Status. This description indicates the inventory status of the item, or if it is on sale.
- Availability. This dropdown box shows the onhand availability of the product at all branches for the sponsor being used. This drop-down is also colour-coded for easy readability
- Green - Available in servicing branch
- Yellow - Not available in servicing branch, but available in another branch
- Red - Not available in any of the branches
- Warehouse Lookup. Clicking this will pop up a window which will search all available warehouses for stock of this item
- Lost Sale. Clicking this icon will register a lost sale for this item
- Purchase Quantity. This will be the quantity added to the cart when clicking the add to cart button
- Will also add this quantity to the scratch pad if you click the Add to S/Pad button
- Add multiple items to cart. This checkbox is used along with the
 button in the header. You can check this box next to multiple items and use the in the header to add them all to the cart at once
 - Add to cart button. Add selected item to the shopping cart
- Add to S/Pad button. Add the selected item to your scratchpad
- Vendor Logo. This indicates what brand the product is. Clicking the logo will take you to that vendor's catalogue.
- Add comment. This allows you to add custom comments to an application and/or part. Comments optionally can be made public to all users
- Substitute listing. Items flagged as substitutes in a sponsor's system will show with a darker grey background. These parts can be substituted for the original